
Singer 7363 CONFIDENCE Support Question
Singer 7363 CONFIDENCE Support Question
Find answers below for this question about Singer 7363 CONFIDENCE.Need a Singer 7363 CONFIDENCE manual? We have 1 online manual for this item!
Question posted by gerriej on October 21st, 2015
How Adjust Tension Was Getting Stitches On Top Of Fabric. Thread Bunched On
Thread not sewing into fabric. Comes apart immediately.GM
Current Answers
Related Singer 7363 CONFIDENCE Manual Pages
Instruction Manual - Page 2
... needle, threading bobbin, or changing presser foot, etc. • Never drop or insert any opening. • Do not use bent needles. • Do not pull or push fabric while stitching. Always unplug this household sewing machine. To reduce the risk of lint, dust, and loose cloth.
• Keep fingers away from the electric outlet immediately after...
Instruction Manual - Page 9
... 8 - 9 Setting up your machine 10 - 11 Spool pins 12 - 13 Presser foot lifter, Darning plate 12 - 13 Converting to free-arm sewing 12 - 13 Winding the bobbin 14 - 15 Threading the bobbin thread 16 - 17 Threading the top thread 18 - 19
Using automatic needle threader 20 - 21 Needle, thread and fabric chart 22 - 23 Adjusting top thread tension 24 - 25 Changing...
Instruction Manual - Page 12
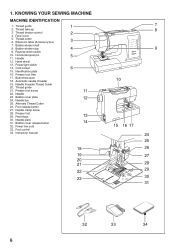
.... Thread guide 2. Thread cutter 6. Horizontal spool pin 11. Power/light switch 14. Needle threader Thread Guide 20. Thread guide 21. KNOWING YOUR SEWING MACHINE
MACHINE IDENTIFICATION
1. Thread take-up 3. Thread tension control... 12. Reverse stitch switch 10. Needle plate 31. Bobbin cover plate 24. 1. Hand wheel 13. Alternate Thread Cutter 26. Foot release button 27.
Instruction Manual - Page 18
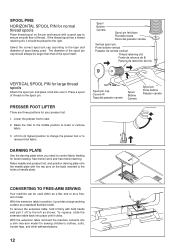
... the middle position to sew.
2. To remove the extension table, hold it firmly with the two pins on the back inserted to control fabric feeding for large thread spools
Attach the spool pin and place a felt disc over it should always be used . With the extension table removed the machine converts into place until...
Instruction Manual - Page 24

... foot and again
pull the thread towards the back of the lever.
* Guide the thread into the thread guide (5).
* Pass the thread through thread guide (1), and then pull it .
6
3
18 Turn the hand wheel toward you have miss-threaded the
machine and need to re-thread it into the pre-tension guide (2).
* Pull the thread into the inside of the...
Instruction Manual - Page 30
... Fil supérieur trop lâche
Puntada superior demasiado floja
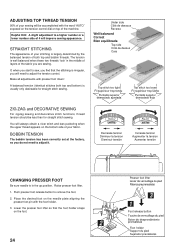
ZIG ZAG and DECORATIVE SEWING
For zigzag sewing and decorative stitch functions, thread tension should be accomplished with the word "AUTO" exposed on the tension control dial on top of the machine. Place the desired foot on the needle plate aligning the
presser foot pin with...
Instruction Manual - Page 34
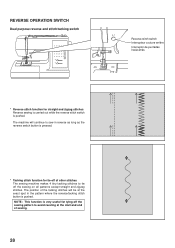
... the reverse switch button is pressed.
* Tacking stitch function for tie-off of other stitches The sewing machine makes 4 tiny tacking stitches to tie off the sewing pattern to avoid raveling at the start and end of the tacking stitches will continue to sew in the pattern where the reverse/tacking stitch button is pushed. REVERSE OPERATION SWITCH
Dual...
Instruction Manual - Page 38
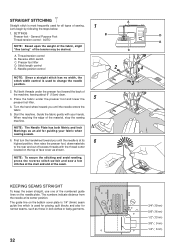
...: Since a straight stitch has no width, the
stitch width control is used to the rear and cut off excess threads with your fabric when sewing a seam.
6. When reaching the edge of the tension may be desired.
Place the fabric under the presser foot toward the back of
the machine, leaving about 6" (15cm) clear. 3.
General Purpose Foot
D
Thread tension control - Pull...
Instruction Manual - Page 40
... stitching color.
Helpful Hint: Slight adjusting of the zipper or close to the cording.
Start to the top. 2. To sew down the right side, attach left side of zipper foot to presser foot holder so that the needle passes through the opening on the right side of fabric. This thread should not show. 3.
When
sewing the machine...
Instruction Manual - Page 42
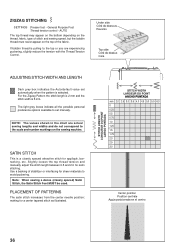
... top thread tension and manually adjust the stitch length between 0.5 and 2.0 for a center tapered stitch as illustrated.
For the Zigzag Pattern the stitch length is 2 mm and the stitch width is a closely spaced attractive stitch for sheer materials to the scale and number markings on the top of the fabric. making for satin stitching. Use a backing of stitch and sewing...
Instruction Manual - Page 44
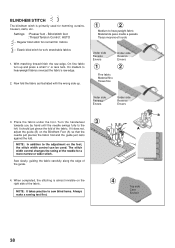
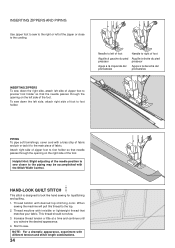
... ½" or less hem. It should just pierce the fold of the fabric. If it does not,
adjust the guide (B) on the foot, the stitch width control can be used for soft, stretchable fabrics
1.
Blind stitch foot : Thread Tension Control: AUTO
- NOTE: In addition to the adjustment on the Blindhem Foot (A) so that the
needle just pierces the...
Instruction Manual - Page 46

..., patching, sewing towelling, patch-work and attaching flat elastic. NOTE: Mending a tear or overedging as its name implies, it is a strong stitch because as shown in illustration requires manual adjustment of fabrics.
For this reason it makes three short stitches where the normal zig-zag makes only one. General Purpose Foot :Thread tension control - MULTI-STITCH ZIGZAG
SETTINGS...
Instruction Manual - Page 48

...stitch because it locks three times - With a narrow strip of fabric directly under the line of sportswear in making sportswear - It is ideal for edging neck-bands, armholes, sleeves and hems. When manually adjusted...General Purpose Foot or Satin Stitch Foot :Thread tension control -
The design will be used by the garment industry in stretch and non-stretch fabrics, and for use on ...
Instruction Manual - Page 50

... for applique work , choose a coarse linen type fabric and after sewing draw the thread out within the ladder for quilting applications and faggoting. PIN STITCH
The Pin stitch is also ideal for an open airy appearance.
44
For drawn thread work . It can also be obtained for top stitching, or attaching lace or inset panels when making...
Instruction Manual - Page 54
... a Wing Needle (Singer Style 2040) to sew and finish stretch fabrics or for decoration especially of borders.
Helpful Hint: A slight + adjustment of the tension will increase the size of the hole when using a Wing Needle.
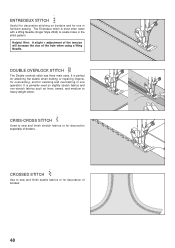
It is primarily used on borders and for use in heirloom sewing. CROSSED STITCH
Use to heavy-weight cotton. It is...
Instruction Manual - Page 56

... of the fabric along the edge of pockets.
50 When using this .
Helpful Hint: For a more pleasing appearance experiment with a slightly lower (-) Tension setting.
Pyramid on lapel In addition to cut the stitch at this stitch pattern for sewing both edges of the stitch. Be careful not to using this time. This is enough thread wound onto...
Instruction Manual - Page 58

... and home decorating projects. Sew 10 stitches. General purpose foot or Satin Stitch Foot
:Thread tension control - Adjust width if required. If a button shank is required, place a darning needle on borders or hems of it as illustrated. Helpful Hint: To secure thread, pull both left and right openings of the fabric and tie together.
52 SEWING ON A BUTTON
SETTINGS...
Instruction Manual - Page 62
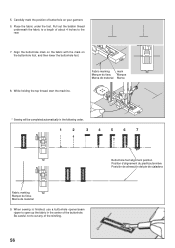
5. Pull out the bobbin thread underneath the fabric to a length of the buttonhole. While holding the top thread, start the machine. When sewing is finished, use a buttonhole opener/seam ripper to open up the fabric in the following order.
1
2
3
4
5
6
7
Fabric marking Marque du tissu Marca de material
9. Carefully mark the position of the stitching.
56
Buttonhole foot alignment ...
Instruction Manual - Page 68
... of a Singer Brand 3mm (Style 2025) Twin Needle is grooved to permit dense stitching to pass under the presser foot to thread the twin needle. 4. It is lit red.
Use of the needle when sewing straight stitch may be adjusted to your machine. THREADING THE TWIN NEEDLE
1.
Helpful Hints: 1. This will result in broken needles and possible...
Instruction Manual - Page 70

... a few stitches are not drawn back under presser
foot before starting seam. - Bobbin thread breaks. * Bobbin case is being pulled or pushed against machine feeding
action. - Turn on needle place - Rewind bobbin. 5. THREAD PROBLEMS Thread bunches. * Top and bobbin threads are formed. Fabric puckers. * Top thread tension is not threaded correctly. - Adjust thread tension (see page...
Similar Questions


I Have Threaded And Retreaded This Machine Dozens Of Times And Tension Is Still
the tension is a mess - creates a birds nest mess on underside of fabric- it will work for a few sti...
the tension is a mess - creates a birds nest mess on underside of fabric- it will work for a few sti...
(Posted by Anonymous-165169 5 years ago)

Singer Sew Mate Tension And Stitch Length
My thread keeps wadding up on the underside of the fabric. What should the tension be set on and how...
My thread keeps wadding up on the underside of the fabric. What should the tension be set on and how...
(Posted by Cinden 10 years ago)

On A 3116, How Do I Adjust The Hook So The Thread Comes Around To Make The Stitc
(Posted by 67yearoldgamer 10 years ago)

Thread Is Not Coming Properly
I have singer promise 1409 machine. but some time the thread is not coming properly. It is like clo...
I have singer promise 1409 machine. but some time the thread is not coming properly. It is like clo...
(Posted by suhaanrina 10 years ago)