Singer 5532 Heavy Duty Support and Manuals
Get Help and Manuals for this Singer item
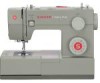
View All Support Options Below
Free Singer 5532 Heavy Duty manuals!
Problems with Singer 5532 Heavy Duty?
Ask a Question
Free Singer 5532 Heavy Duty manuals!
Problems with Singer 5532 Heavy Duty?
Ask a Question
Most Recent Singer 5532 Heavy Duty Questions

I Can't Seem To Get The Feed Dogs Working On My Heavy Duty Singer 5532.
I haven't made any adjustments on my machine since the last time I used it, but now it won't feed th...
I haven't made any adjustments on my machine since the last time I used it, but now it won't feed th...
(Posted by polarbowler 5 years ago)

How To Oil
I have a 5532 Heavy Duty singer would like to oil this Help
I have a 5532 Heavy Duty singer would like to oil this Help
(Posted by deekayjay655 9 years ago)

My Machine Is A 5532. What Needles Should I Use? Can't Find Manual.
(Posted by alishakely 9 years ago)

Stuck In Reverse. How Do I Fix
(Posted by patriciafreeman2003 9 years ago)
Could You Please Show Me A Video On House To Set-up My Machine To Do Stippling?
(Posted by sfsfibro 9 years ago)
Popular Singer 5532 Heavy Duty Manual Pages
Instruction Manual - Page 2

... in order to the nearest authorized dealer or service center for their safety. 21. Return the appliance to avoid a hazard. 20. Do not use the proper needle plate. SAVE THESE INSTRUCTIONS
This sewing machine is not intended for household use bent needles. 8. Do not allow to be replaced by the manufacturer or its intended use...
Instruction Manual - Page 6

... ...36 Sew 1-step Buttonholes ...38 Left and Right Side Balance for Buttonhole ...40 Sewing on Buttons ...42
General Information Installing the Removable Extension Table ...44 Attaching the Presser Foot Shank ...46 Needle/ Fabric/ Thread Chart ...48 How To Drop Feed Dog ...51
Maintenance and Troubleshooting Inserting & Changing Needle ...53 Changing the Bulb ...55 Troubleshooting Guide...57
Instruction Manual - Page 15

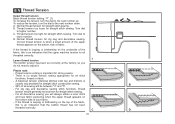
...presser foot lifter. EN Two Step Presser Foot Lifter
When sewing several layers or thick fabrics, the presser foot can be...Presser Foot Pressure
The presser foot pressure of the machine has been pre-set and requires no particular readjustment according to the type ... for heavy fabric, tighten by turning the screw counter clockwise, and for easy positioning of fabric (light-or-heavy weight)....
Instruction Manual - Page 23

... by not doing so several sewing problems could result.
- Now pass the thread behind the horizontal thread guide, and then behind the thin wire needle clamp guide (7) and then down right ... to left through pre-tension spring as this movement pass thread from spool through the upper thread guide (3) and pulling thread through the slotted eye of thread under the presser foot to be threaded...
Instruction Manual - Page 25

...18 The threader automtically swings to top.
1
-
EN Automatic Needle Threader
- Raise the needle to straight stitch.
- Set machine to its highest position.
- Pass thread under thread guide (C), from you when it back up to right.
- Pull the thread through the needle eye. Thread upper tension of ... it away from left to the thin wire in front of machine up to off ("O")!
Instruction Manual - Page 29
... loose for zig zag and decorative sewing. C. D. Correct thread tension is an indication that the upper machine tension is
usually only desirable for all decorative sewing you
do not need to adjust it. Proper tension setting is no single tension setting appropriate for straight stitch construction sewing. - 90% of all sewing will always obtain a nicer stitch
and...
Instruction Manual - Page 31

... JK
S1
ABCDE FGH I JK
a. Stitches in the top of the stitch as desired for setting the stitch width & the stitch length dials can be turned in gray. Instructions for the project. To obtain the other patterns, turn the stitch length dial to "S1" or...dial (c) to Choose Your Pattern
The diagram on this page display the stitch patterns available on the machine. Reverse sewing lever b.
Instruction Manual - Page 35

... 6mm. Standard zigzag stitches are usually achieved at "3" or below. (2)
Dense zig-zag stitches are called satin stitches. (2)
1
Function of stitch length dial for sewing a seam is set the stitch length all the way to 6. When the dial is between 2 and 3. - EN Stitch Width Dial & Stitch Length Dial
Function of stitch width...
Instruction Manual - Page 37

EN Sewing Straight Stitch
To begin sewing, set the machine for straight stitch. (1)
Set the stitch length to start sewing. (3)
1
2
3
30 Place the fabric under the presser foot with the fabric edge lined up with the desired seam guide line on the needle plate. (2)
Lower the presser foot lifter, and then step on the foot controller to between 2 and 3.
Instruction Manual - Page 41

... and red colors on the pattern selector dial. Ric Rac (2) Set the pattern selector dial to " ". Adjust the stitch width dial to "1".
Set the stitch width dial to between "3" and "6". M
1 M
2 34 Set the stitch length dial to stretch and hardwearing seams. The machine sews two stitches forward and one stitch backwards. Then, turn the pattern...
Instruction Manual - Page 43
...longer stitch length setting. Sew a test first to make blind hem sewing even easier, use a blind hem
foot, available from your SINGER® retailer. ... stitch is used for part number)
36
Blind hems, however, are
appropriate for heavier weight fabrics. Set the stitch width dial..., skirts, etc. Note:
2
To make sure the machine settings are normally sewn
with
the top edge of the hem ...
Instruction Manual - Page 45

... the order (D). 8. Lower the presser foot and start the machine. 7. Using tailor's chalk, mark the position of the buttonhole on the fabric with the mark on stretch fabric, hook heavy thread or
cord under & to the project. While lightly holding the upper thread, start sewing.
*Set the stitch width to " ". a
b
A
PUSH
B
C
Making a Buttonhole on...
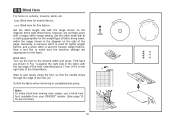
Instruction Manual - Page 49

... to the distance between the holes of the button and sew. Slowly sew on the button with 4 holes, sew through the front two holes first, push the work forward and then sew through the back two holes.
3
4
42
Set the machine for straight
a
2
ba b
stitch again, then sew a few securing stitches to check that the needle goes...
Instruction Manual - Page 55
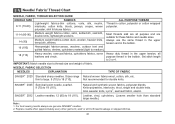
..., some Heavy duty thread in the bobbin. Leather, vinyl, upholstery. (Leaves smaller hole than standard large needle.)
Note : 1. NEEDLE, FABRIC SELECTION
NEEDLES
EXPLANATION
TYPE OF FABRIC
SINGER® 2020 Standard sharp needles.
purpose thread in cotton, polyester or cotton wrapped interlocks, cotton knits, tricots, jerseys, crepes, woven polyester. For best sewing results always...
Instruction Manual - Page 60

The flat side of the shaft should be in perfect condition. (2)
Problems can occur with: A. Needles must be towards the back.
Damaged points C. Blunt needles
Replace your needle after inserting the new needle. (1)
B.
Insert the needle as illustrated as it is showing signs of sewing for better quality stitching.
2
53
D A
B C
B
A
C
C/D.Insert the needle as...
Singer 5532 Heavy Duty Reviews
We have not received any reviews for Singer yet.