
XL-HP505 Operation Manual
Page 1
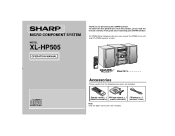
Accessories Please confirm that the following accessories are included. Remote control 1 AM loop antenna 1 FM antenna 1 (RRMCG0408AWSA) (QANTL0005AWZZ) (92LFANT1746A) Note: Only the above accessories are included. To obtain the best performance from this product, please read this SHARP product. XL-HP505 Micro Component System consisting of XL-HP505 (main unit) and CP-HP505 (speaker system). It will guide you for purchasing this manual carefully. MICRO COMPONENT SYSTEM MODEL XL-HP505 OPERATION MANUAL Thank you in operating your SHARP product.
Accessories Please confirm that the following accessories are included. Remote control 1 AM loop antenna 1 FM antenna 1 (RRMCG0408AWSA) (QANTL0005AWZZ) (92LFANT1746A) Note: Only the above accessories are included. To obtain the best performance from this product, please read this SHARP product. XL-HP505 Micro Component System consisting of XL-HP505 (main unit) and CP-HP505 (speaker system). It will guide you for purchasing this manual carefully. MICRO COMPONENT SYSTEM MODEL XL-HP505 OPERATION MANUAL Thank you in operating your SHARP product.
XL-HP505 Operation Manual
Page 5
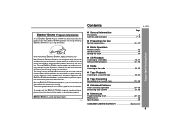
...174; Program Information As an ENERGY STAR® Partner, SHARP has determined that en- Many Electrical /Electronic Products use...27 - 30 Enhancing your electric bills and use energy both when they are off. Basic Operation Remote control 13 General control 14 Setting the clock 15 ! Radio Listening to eliminating more than $1 billion a year in... fuels and the related carbon dioxide pollution that contributes to 75 percent. registered mark. 0209 Contents XL-HP505 Important Instruction ! Tape Recording Recording on energy consumed by up to global warming. lent to the...
...174; Program Information As an ENERGY STAR® Partner, SHARP has determined that en- Many Electrical /Electronic Products use...27 - 30 Enhancing your electric bills and use energy both when they are off. Basic Operation Remote control 13 General control 14 Setting the clock 15 ! Radio Listening to eliminating more than $1 billion a year in... fuels and the related carbon dioxide pollution that contributes to 75 percent. registered mark. 0209 Contents XL-HP505 Important Instruction ! Tape Recording Recording on energy consumed by up to global warming. lent to the...

XL-HP505 Operation Manual
Page 9
...CD Pause Button 17 22. CD Play or Repeat Button 16, 19 23. Tape Button 23 12. Tuner (Band) Button 21 24 11. Remote Control Transmitter 13 2. Volume Up and Down Buttons 14 10 5. Video/Auxiliary Button 31 4 13. Tape Stop Button 24 20. Tape Forward Play ... Record Pause Button 25, 26 Buttons with " " mark in the illustration or highlighted in bold on the list can be operated on the remote control only. 9 XL-HP505 General Information ! Disc Direct Search Buttons 18 2 16 21 6. CD Track Up or Fast Forward, Tape Fast Wind, Tuner Preset Up, Time...
...CD Pause Button 17 22. CD Play or Repeat Button 16, 19 23. Tape Button 23 12. Tuner (Band) Button 21 24 11. Remote Control Transmitter 13 2. Volume Up and Down Buttons 14 10 5. Video/Auxiliary Button 31 4 13. Tape Stop Button 24 20. Tape Forward Play ... Record Pause Button 25, 26 Buttons with " " mark in the illustration or highlighted in bold on the list can be operated on the remote control only. 9 XL-HP505 General Information ! Disc Direct Search Buttons 18 2 16 21 6. CD Track Up or Fast Forward, Tape Fast Wind, Tuner Preset Up, Time...
XL-HP505 Operation Manual
Page 13
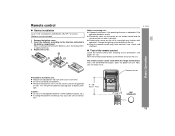
... be used within the range shown below: Press the ON/STAND-BY button. Change the lighting or the direction of the remote control Check the remote control after checking all old batteries with operation. XL-HP505 Remote sensor Basic Operation Precautions for long periods of time. Battery installation Use 2 "AA" size batteries (UM/SUM-3, R6, HP-7 or...
... be used within the range shown below: Press the ON/STAND-BY button. Change the lighting or the direction of the remote control Check the remote control after checking all old batteries with operation. XL-HP505 Remote sensor Basic Operation Precautions for long periods of time. Battery installation Use 2 "AA" size batteries (UM/SUM-3, R6, HP-7 or...
XL-HP505 Operation Manual
Page 14
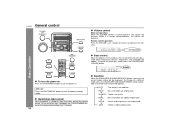
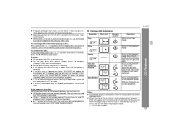
... the extra bass mode, press the X-BASS/DEMO (X-BASS) button. CLASSIC Treble is turned counterclockwise, the volume will be displayed. Remote control operation: Press the VOLUME (+ or -) button to turn on/off the light, hold down the CLEAR/DIMMER button on , light illuminates...control is first turned on . ! Basic Operation ! ROCK Bass and treble are emphasized. To turn the power on , the unit will enter the extra bass mode which emphasizes the bass frequencies, and "X-BASS" will increase. Bass control When the power is turned clockwise, the volume will appear. XL-HP505 General control...
... the extra bass mode, press the X-BASS/DEMO (X-BASS) button. CLASSIC Treble is turned counterclockwise, the volume will be displayed. Remote control operation: Press the VOLUME (+ or -) button to turn on/off the light, hold down the CLEAR/DIMMER button on , light illuminates...control is first turned on . ! Basic Operation ! ROCK Bass and treble are emphasized. To turn the power on , the unit will enter the extra bass mode which emphasizes the bass frequencies, and "X-BASS" will increase. Bass control When the power is turned clockwise, the volume will appear. XL-HP505 General control...
XL-HP505 Operation Manual
Page 15
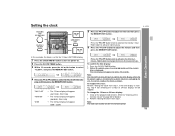
Setting the clock XL-HP505 5 Press the or button to advance the time by 1 minute. Hold it down to advance continuously. 6 Press the or button to advance the time by 1 ...-hour display will appear. (AM 12:00 - To readjust the clock: Perform "Setting the clock" from step 1. If the time display is set with the remote control. 15 To change the time in 5-minute intervals. To confirm the time display: 1 Press the CLOCK/TIMER button. 2 Within 10 seconds, press the or button...
Setting the clock XL-HP505 5 Press the or button to advance the time by 1 minute. Hold it down to advance continuously. 6 Press the or button to advance the time by 1 ...-hour display will appear. (AM 12:00 - To readjust the clock: Perform "Setting the clock" from step 1. If the time display is set with the remote control. 15 To change the time in 5-minute intervals. To confirm the time display: 1 Press the CLOCK/TIMER button. 2 Within 10 seconds, press the or button...
XL-HP505 Operation Manual
Page 17
... Press in the stop mode. " CD button (main unit and remote control): The unit turns on the fifth disc is reached during fast reverse, the unit will enter the playback mode. ( : Last track number) CD Playback XL-HP505 17 Release the button to the next tray with special shapes (heart-...unit turns on function: When you press any of the last function starts (CD/TAPE/TUNER/VIDEO). ! Various CD functions Function Play Main unit Remote control Operation Press in the playback or stop mode. When the beginning of the 1 - 5 buttons for 3 seconds and the unit will skip....
... Press in the stop mode. " CD button (main unit and remote control): The unit turns on the fifth disc is reached during fast reverse, the unit will enter the playback mode. ( : Last track number) CD Playback XL-HP505 17 Release the button to the next tray with special shapes (heart-...unit turns on function: When you press any of the last function starts (CD/TAPE/TUNER/VIDEO). ! Various CD functions Function Play Main unit Remote control Operation Press in the playback or stop mode. When the beginning of the 1 - 5 buttons for 3 seconds and the unit will skip....
XL-HP505 Operation Manual
Page 18
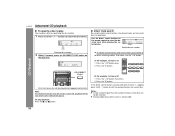
XL-HP505 Advanced CD playback ! To specify a disc to play You can play , direct search is not possible. 18 Direct track search By using the direct search ... the button of the 1 - 5 buttons to start and the disc indicator will be played. Notes: " A track number higher than the number of tracks on the remote control to number 9. CD Playback Only the chosen disc will go out. If the direct search buttons are pressed while the disc is pressed, playback will...
XL-HP505 Advanced CD playback ! To specify a disc to play You can play , direct search is not possible. 18 Direct track search By using the direct search ... the button of the 1 - 5 buttons to start and the disc indicator will be played. Notes: " A track number higher than the number of tracks on the remote control to number 9. CD Playback Only the chosen disc will go out. If the direct search buttons are pressed while the disc is pressed, playback will...

XL-HP505 Operation Manual
Page 19
... of the 1 - 5 buttons. 2 Within 5 seconds, press the CD DIRECT PLAY button. 3 Press the RANDOM button on the remote control. Notes: " If you press the button during random play continuously. 19 On the other hand, the button does not allow you can... move to 5 discs: Press the RANDOM button on the remote control. Otherwise, the disc(s) will be located. To random play , be played in the "Programmed play : Press the / button ...press the (CD ) button. To repeat all tracks on up to the previous track. XL-HP505 !
... of the 1 - 5 buttons. 2 Within 5 seconds, press the CD DIRECT PLAY button. 3 Press the RANDOM button on the remote control. Notes: " If you press the button during random play continuously. 19 On the other hand, the button does not allow you can... move to 5 discs: Press the RANDOM button on the remote control. Otherwise, the disc(s) will be located. To random play , be played in the "Programmed play : Press the / button ...press the (CD ) button. To repeat all tracks on up to the previous track. XL-HP505 !
XL-HP505 Operation Manual
Page 20
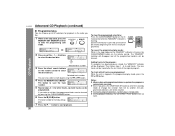
Each time the button is automatically canceled. XL-HP505 Advanced CD Playback (continued) ! To cancel the programmed play , the CD DIRECT PLAY buttons will not work. 20 If you press the ON/STAND-BY ... program: If a program has been previously stored, the "MEMORY" indicator will be displayed. To clear the programmed selections: Press the CLEAR/DIMMER button on the remote control to save mode. 2 Press one track will not be cleared, beginning with the last track programmed. Adding tracks to start playback. Programmed play mode, press...
Each time the button is automatically canceled. XL-HP505 Advanced CD Playback (continued) ! To cancel the programmed play , the CD DIRECT PLAY buttons will not work. 20 If you press the ON/STAND-BY ... program: If a program has been previously stored, the "MEMORY" indicator will be displayed. To clear the programmed selections: Press the CLEAR/DIMMER button on the remote control to save mode. 2 Press one track will not be cleared, beginning with the last track programmed. Adding tracks to start playback. Programmed play mode, press...
XL-HP505 Operation Manual
Page 21
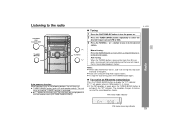
Listening to display the "ST" indicator. XL-HP505 Radio Auto power on . Manual tuning: Press the TUNING button as many times as required to tune in to the desired station. Tuning 1 Press the ... station. Notes: " When radio interference occurs, auto scan tuning may stop the auto tuning, press the TUNING button again. ! " TUNER (BAND) button (main unit and remote control): The unit turns on . 2 Press the TUNER (BAND) button repeatedly to select the desired frequency band (FM or AM). 3 Press the TUNING ( or ) button to...
Listening to display the "ST" indicator. XL-HP505 Radio Auto power on . Manual tuning: Press the TUNING button as many times as required to tune in to the desired station. Tuning 1 Press the ... station. Notes: " When radio interference occurs, auto scan tuning may stop the auto tuning, press the TUNING button again. ! " TUNER (BAND) button (main unit and remote control): The unit turns on . 2 Press the TUNER (BAND) button repeatedly to select the desired frequency band (FM or AM). 3 Press the TUNING ( or ) button to...
XL-HP505 Operation Manual
Page 23
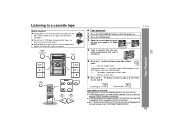
...a cassette into the cassette compartment, tighten the slack with side A facing you press any of the last function starts (CD/TAPE/TUNER/VIDEO). 23 XL-HP505 Tape Playback 5 Press the sides. sette compartment with a pen or a pencil. ! To listen to a cassette tape Before playback: " For playback...button to listen to choose one side or both ... button to side A, or the but- When playback starts from side A. " TAPE button on the remote control: The unit turns on and side A playback starts (regardless of both sides ( ), start from side B, side A will not be played. ... ...
...a cassette into the cassette compartment, tighten the slack with side A facing you press any of the last function starts (CD/TAPE/TUNER/VIDEO). 23 XL-HP505 Tape Playback 5 Press the sides. sette compartment with a pen or a pencil. ! To listen to a cassette tape Before playback: " For playback...button to listen to choose one side or both ... button to side A, or the but- When playback starts from side A. " TAPE button on the remote control: The unit turns on and side A playback starts (regardless of both sides ( ), start from side B, side A will not be played. ... ...
XL-HP505 Operation Manual
Page 24
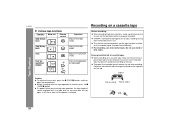
...in the stop mode. Recording on a cassette tape, make a preliminary test to ensure that the erase- " The volume and sound controls can be adjusted with no effect on the tape without the tab. Erase-prevention tab of cassette tapes: " When recording on a ... button. Side B playback Press in the playback or stop mode. XL-HP505 ! Cassettes have removable tabs that prevent accidental recording or erasing. Various tape functions Function Main unit Side A playback Remote control Operation Press in the playback mode. " SHARP is restored. Tab for side B Tab for damage or loss of...
...in the stop mode. Recording on a cassette tape, make a preliminary test to ensure that the erase- " The volume and sound controls can be adjusted with no effect on the tape without the tab. Erase-prevention tab of cassette tapes: " When recording on a ... button. Side B playback Press in the playback or stop mode. XL-HP505 ! Cassettes have removable tabs that prevent accidental recording or erasing. Various tape functions Function Main unit Side A playback Remote control Operation Press in the playback mode. " SHARP is restored. Tab for side B Tab for damage or loss of...

XL-HP505 Operation Manual
Page 29
... the timer setting: 1 In the timer stand-by mode after displaying the settings in the timer standby mode. Reusing the timer: Using the same setting; XL-HP505 Advanced Features 12When the preset time is reached, playback or recording will continue until it is canceled by mode. 13When the timer end time is... recording". To reuse the same setting, perform the following procedure without turning the power on or off. Note: The timer can be set with the remote control. 29
... the timer setting: 1 In the timer stand-by mode after displaying the settings in the timer standby mode. Reusing the timer: Using the same setting; XL-HP505 Advanced Features 12When the preset time is reached, playback or recording will continue until it is canceled by mode. 13When the timer end time is... recording". To reuse the same setting, perform the following procedure without turning the power on or off. Note: The timer can be set with the remote control. 29

XL-HP505 Operation Manual
Page 31
...VCR, DVD, etc. 1 Use a connection cord to turn the power on. 3 Press the VIDEO/AUX button. 4 Play the connected equipment. Advanced Features XL-HP505 Auto power on and the "VIDEO" function is not included. Adjust the volume using video equipment, connect the audio output to this unit and the... the VCR, DVD, etc. Listening to the VIDEO/AUX IN jacks. The recom- VCR, DVD, etc. When using the VOLUME control. 31 " VIDEO/AUX button (main unit and remote control): The unit turns on function: When you press any of the last function starts (CD/TAPE/TUNER/VIDEO). ! To record on...
...VCR, DVD, etc. 1 Use a connection cord to turn the power on. 3 Press the VIDEO/AUX button. 4 Play the connected equipment. Advanced Features XL-HP505 Auto power on and the "VIDEO" function is not included. Adjust the volume using video equipment, connect the audio output to this unit and the... the VCR, DVD, etc. Listening to the VIDEO/AUX IN jacks. The recom- VCR, DVD, etc. When using the VOLUME control. 31 " VIDEO/AUX button (main unit and remote control): The unit turns on function: When you press any of the last function starts (CD/TAPE/TUNER/VIDEO). ! To record on...
XL-HP505 Operation Manual
Page 33
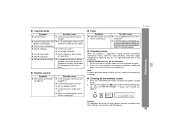
... press the PRESET button until "CLEAR AL" appears. " Cannot remove the tape. " Is the distance or angle incor- " Does the remote control sensor receive strong light? Move the antenna away from the AC power cord if it . ! " Sound skipping. Possible cause " Is the... interference (mechanical shock, excessive static electricity, abnormal supply voltage due to enter the power stand-by resetting it 's located nearby. ! XL-HP505 References ! Clearing all data stored in ? " If a power failure occurs during playback, the heads remain engaged with the tape. Note...
... press the PRESET button until "CLEAR AL" appears. " Cannot remove the tape. " Is the distance or angle incor- " Does the remote control sensor receive strong light? Move the antenna away from the AC power cord if it . ! " Sound skipping. Possible cause " Is the... interference (mechanical shock, excessive static electricity, abnormal supply voltage due to enter the power stand-by resetting it 's located nearby. ! XL-HP505 References ! Clearing all data stored in ? " If a power failure occurs during playback, the heads remain engaged with the tape. Note...
XL-HP505 Operation Manual
Page 34
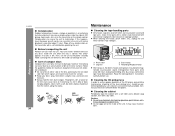
... parts with a cotton swab moistened with discs left inside the unit when the tray is left. It may cause condensation inside of dirt on the remote control. tions. " Keep your CD collection and player. Contact your local CD software dealer for maximum enjoyment from your discs away from the center, along the... on either side of the laser pickup lens) should be performed periodically. Before transporting the unit Remove all CDs from which contains high voltages. References XL-HP505 34 !
... parts with a cotton swab moistened with discs left inside the unit when the tray is left. It may cause condensation inside of dirt on the remote control. tions. " Keep your CD collection and player. Contact your local CD software dealer for maximum enjoyment from your discs away from the center, along the... on either side of the laser pickup lens) should be performed periodically. Before transporting the unit Remove all CDs from which contains high voltages. References XL-HP505 34 !


