
XL-ES5 | XL-ES50 Operation Manual
Page 3
... equipped with an attachment plug having one way. and the like. 8 Accessories - The product may cause the product and cart combination to the operating instructions. 12 Grounding or Polarization - Alternate Warnings - If replacement of the grounding-type plug. 13 Power-Cord Protection - IMPORTANT SAFETY INSTRUCTIONS 1 Read Instructions - uct manufacturer as a ... only one blade wider than the other). The product is operated. 2 Retain Instructions - Unplug this product from the product. 14 Protective Attachment Plug - Important Instruction XL-ES5 XL-ES50 3
... equipped with an attachment plug having one way. and the like. 8 Accessories - The product may cause the product and cart combination to the operating instructions. 12 Grounding or Polarization - Alternate Warnings - If replacement of the grounding-type plug. 13 Power-Cord Protection - IMPORTANT SAFETY INSTRUCTIONS 1 Read Instructions - uct manufacturer as a ... only one blade wider than the other). The product is operated. 2 Retain Instructions - Unplug this product from the product. 14 Protective Attachment Plug - Important Instruction XL-ES5 XL-ES50 3
XL-ES5 | XL-ES50 Operation Manual
Page 5
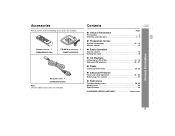
...Only the above accessories are included. Contents Page „ General Information Precautions 6 Controls and indicators 7 - 9 „ Preparation for Use System connections 10 - 12 Remote control 13 „ Basic Operation General control 14 Setting the clock 15 „ CD Playback Listening to a CD (CDs 16 - 18 Advanced CD playback... your system 27 „ References Troubleshooting chart 28, 29 Maintenance 29 Specifications 30 CONSUMER LIMITED WARRANTY Back cover General Information XL-ES5 XL-ES50 5 Accessories Please confirm that the following accessories are included.
...Only the above accessories are included. Contents Page „ General Information Precautions 6 Controls and indicators 7 - 9 „ Preparation for Use System connections 10 - 12 Remote control 13 „ Basic Operation General control 14 Setting the clock 15 „ CD Playback Listening to a CD (CDs 16 - 18 Advanced CD playback... your system 27 „ References Troubleshooting chart 28, 29 Maintenance 29 Specifications 30 CONSUMER LIMITED WARRANTY Back cover General Information XL-ES5 XL-ES50 5 Accessories Please confirm that the following accessories are included.
XL-ES5 | XL-ES50 Operation Manual
Page 7
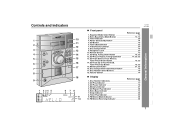
...Video/Auxiliary Button 27 8. Remote Sensor 13 11. CD Stop, Tuning Down Button 18, 22 12. CD Track Down or Fast Reverse, Tuner Preset Down Button 18, 23 14. Extra Bass Indicator...19 18. Volume Control 14 „ Display Reference page 1. Sleep Indicator 26 8. Extra Bass/Demo Mode Button 12, 14 3. Controls and indicators 1 2 3 4 5 6 7 8 9 1 234 5 10 11 12 13 14 15 16 17 18 6 78 9 10 „ Front panel Reference page 1. CD Button 16 ...Memory Indicator 21 5. CD Repeat Play Indicator 20 6. FM Stereo Receiving Indicator 22 General Information XL-ES5 XL-ES50 7
...Video/Auxiliary Button 27 8. Remote Sensor 13 11. CD Stop, Tuning Down Button 18, 22 12. CD Track Down or Fast Reverse, Tuner Preset Down Button 18, 23 14. Extra Bass Indicator...19 18. Volume Control 14 „ Display Reference page 1. Sleep Indicator 26 8. Extra Bass/Demo Mode Button 12, 14 3. Controls and indicators 1 2 3 4 5 6 7 8 9 1 234 5 10 11 12 13 14 15 16 17 18 6 78 9 10 „ Front panel Reference page 1. CD Button 16 ...Memory Indicator 21 5. CD Repeat Play Indicator 20 6. FM Stereo Receiving Indicator 22 General Information XL-ES5 XL-ES50 7

XL-ES5 | XL-ES50 Operation Manual
Page 8
Video/Auxiliary (Audio Signal) Input Jacks 27 5. Sub Duct Pipe 2 2. XL-ES5 XL-ES50 Controls and indicators (continued) 1 3 4 2 5 „ Rear panel Reference page 1. FM/AM Loop Antenna Jack 11 4. Cooling Fan 12 General Information 1 2 1 8 „ Front speaker 1. Woofer 3. Bass Reflex Duct 3 4. Speaker Wire 3 Note: The speaker grilles are not removable. AC Power Input Jack 12 2. Speaker Wire 4 „ Subwoofer 1. Subwoofer 3. Super Tweeter 2. Speaker Terminals 11 3.
Video/Auxiliary (Audio Signal) Input Jacks 27 5. Sub Duct Pipe 2 2. XL-ES5 XL-ES50 Controls and indicators (continued) 1 3 4 2 5 „ Rear panel Reference page 1. FM/AM Loop Antenna Jack 11 4. Cooling Fan 12 General Information 1 2 1 8 „ Front speaker 1. Woofer 3. Bass Reflex Duct 3 4. Speaker Wire 3 Note: The speaker grilles are not removable. AC Power Input Jack 12 2. Speaker Wire 4 „ Subwoofer 1. Subwoofer 3. Super Tweeter 2. Speaker Terminals 11 3.
XL-ES5 | XL-ES50 Operation Manual
Page 9
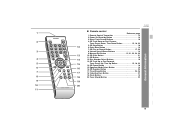
... Button 21 11. CD Random Button 20 7 17. Clock Button 15 18 20. Direct Track Search Buttons 19 2 4. CD Stop Button 18 12 6. Disc Number Select Buttons 19 13. CD Track Down or Fast Reverse, Tuner Preset Down, Time Down Button 15, 18, 23 5. Volume Up...14 9. Timer/Sleep Button 24, 26 17 18. CD Button 16 4 14 12. Video/Auxiliary Button 27 8 19. Remote Control Transmitter 13 2. CD Pause Button 18 6 16 15. Equalizer Mode Select Button 14 16. XL-ES5 XL-ES50 General Information „ Remote control 1 Reference page 1. Power On/Stand-by...
... Button 21 11. CD Random Button 20 7 17. Clock Button 15 18 20. Direct Track Search Buttons 19 2 4. CD Stop Button 18 12 6. Disc Number Select Buttons 19 13. CD Track Down or Fast Reverse, Tuner Preset Down, Time Down Button 15, 18, 23 5. Volume Up...14 9. Timer/Sleep Button 24, 26 17 18. CD Button 16 4 14 12. Video/Auxiliary Button 27 8 19. Remote Control Transmitter 13 2. CD Pause Button 18 6 16 15. Equalizer Mode Select Button 14 16. XL-ES5 XL-ES50 General Information „ Remote control 1 Reference page 1. Power On/Stand-by...

XL-ES5 | XL-ES50 Operation Manual
Page 10
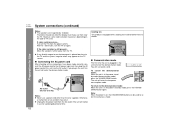
Subwoofer FM/AM loop antenna connection (see page 11) FM antenna Front speaker (right) AM loop antenna Front speaker (left) Preparation for Use Speaker connection (see page 11) 10 AC outlet (AC 120 V, 60 Hz) Connecting the AC power cord (see page 12) XL-ES5 XL-ES50 System connections Make sure to unplug the AC power cord before any connections.
Subwoofer FM/AM loop antenna connection (see page 11) FM antenna Front speaker (right) AM loop antenna Front speaker (left) Preparation for Use Speaker connection (see page 11) 10 AC outlet (AC 120 V, 60 Hz) Connecting the AC power cord (see page 12) XL-ES5 XL-ES50 System connections Make sure to unplug the AC power cord before any connections.
XL-ES5 | XL-ES50 Operation Manual
Page 12
... an accident may appear on , the X-BASS/DEMO button can be in use for a prolonged period of TV used to select the extra bass mode. 12 XL-ES5 XL-ES50 System connections (continued) Preparation for better heat radiation. „ Demonstration mode The first time the unit is in , the unit will enter the low...
... an accident may appear on , the X-BASS/DEMO button can be in use for a prolonged period of TV used to select the extra bass mode. 12 XL-ES5 XL-ES50 System connections (continued) Preparation for better heat radiation. „ Demonstration mode The first time the unit is in , the unit will enter the low...

XL-ES5 | XL-ES50 Operation Manual
Page 13
... not use : z Replace all the connections (see pages 10 - 12). z Periodically clean the transmitter on the remote control and the sensor on the unit to the direction indicated in the battery compartment. Point the remote control directly at the same time. XL-ES5 XL-ES50 Preparation for Use Precautions for long periods of time...
... not use : z Replace all the connections (see pages 10 - 12). z Periodically clean the transmitter on the remote control and the sensor on the unit to the direction indicated in the battery compartment. Point the remote control directly at the same time. XL-ES5 XL-ES50 Preparation for Use Precautions for long periods of time...

XL-ES5 | XL-ES50 Operation Manual
Page 15
...2 Perform "Setting the clock" from step 1. To confirm the time display: Press the CLOCK button. Note: The "CLOCK" or time will appear. (AM 12:00 - To change the 12-hour or 24-hour display: 1 Clear all the programmed contents. [Refer to "Clearing all the memory (reset)" on page 29 for the... clock 3 Within 30 seconds, press the PRESET ( or ) button to advance the time by 1 hour. XL-ES5 XL-ES50 Press the PRESET ( or ) button once to advance continuously. The time display will appear for selecting the 12-hour or 24-hour display) will appear. (0:00 - 23:59) Press the PRESET ( or ) button...
...2 Perform "Setting the clock" from step 1. To confirm the time display: Press the CLOCK button. Note: The "CLOCK" or time will appear. (AM 12:00 - To change the 12-hour or 24-hour display: 1 Clear all the programmed contents. [Refer to "Clearing all the memory (reset)" on page 29 for the... clock 3 Within 30 seconds, press the PRESET ( or ) button to advance the time by 1 hour. XL-ES5 XL-ES50 Press the PRESET ( or ) button once to advance continuously. The time display will appear for selecting the 12-hour or 24-hour display) will appear. (0:00 - 23:59) Press the PRESET ( or ) button...
XL-ES5 | XL-ES50 Operation Manual
Page 16
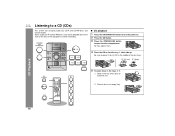
... the unit. 2. Slide in tiers. 4 Place the CD on . 2 Press the CD button. 3 Press the OPEN/CLOSE button to the state of the disc trays. 5" (12 cm) 3" (8 cm) CD Playback 5 To place discs in an empty tray. 16 All trays open the disc compartment. Be sure to place 3" (8 cm) CD in... playback 1 Press the ON/STAND-BY button to a CD (CDs) This system can also play audio CD, CD-R and CD-RW discs, but cannot record. XL-ES5 XL-ES50 Listening to turn the power on the disc tray 1, label side up. Place a disc in the trays 2 - 5 1.
... the unit. 2. Slide in tiers. 4 Place the CD on . 2 Press the CD button. 3 Press the OPEN/CLOSE button to the state of the disc trays. 5" (12 cm) 3" (8 cm) CD Playback 5 To place discs in an empty tray. 16 All trays open the disc compartment. Be sure to place 3" (8 cm) CD in... playback 1 Press the ON/STAND-BY button to a CD (CDs) This system can also play audio CD, CD-R and CD-RW discs, but cannot record. XL-ES5 XL-ES50 Listening to turn the power on the disc tray 1, label side up. Place a disc in the trays 2 - 5 1.