LC42BT10U Operation Manual
Page 10
... Select 38 Color System 38 Program Title Display 38 AV MODE 39 Input Signal (for PC input mode 39 Closed Captions and Digital Closed Captions..... 40 Caption Setup 41 Secret number setting for parental control .......... 42 Parental control (setting V-CHIP level 44 How to temporarily release the ... broadcasting 52 RS-232C port specifications 53 Specifications 55 SHARP recommended accessory 55 Calling for Service 57 LIMITED WARRANTY 57 Dimensional drawings • The dimensional drawings for the LCD TV set are shown on the power 16 Turning off the power 16 Initial ...
... Select 38 Color System 38 Program Title Display 38 AV MODE 39 Input Signal (for PC input mode 39 Closed Captions and Digital Closed Captions..... 40 Caption Setup 41 Secret number setting for parental control .......... 42 Parental control (setting V-CHIP level 44 How to temporarily release the ... broadcasting 52 RS-232C port specifications 53 Specifications 55 SHARP recommended accessory 55 Calling for Service 57 LIMITED WARRANTY 57 Dimensional drawings • The dimensional drawings for the LCD TV set are shown on the power 16 Turning off the power 16 Initial ...

LC42BT10U Operation Manual
Page 12
... the external equipment. 5 0 - 9: Set the channel. (See page 18.) 6 • (DOT): (See pages 18 and 50.) 15 7 INPUT: Select a TV input source. (TV, INPUT 1, INPUT 2, INPUT 3, INPUT 4, INPUT 5, INPUT 6) (See pages 30 to 32.) 8 VOL k/l: Set the volume. (See page 19.) 16 9 SURROUND: Select Surround settings. (See page 19.)...a desired item on the remote 20 control unit will turn off if no operations are performed within about 5 seconds. When the input source is TV, INPUT 1, 2 or 3: STANDARD, MOVIE, GAME, USER, DYNAMIC (Fixed), DYNAMIC. Indicator lights up for the current mode. (See...
... the external equipment. 5 0 - 9: Set the channel. (See page 18.) 6 • (DOT): (See pages 18 and 50.) 15 7 INPUT: Select a TV input source. (TV, INPUT 1, INPUT 2, INPUT 3, INPUT 4, INPUT 5, INPUT 6) (See pages 30 to 32.) 8 VOL k/l: Set the volume. (See page 19.) 16 9 SURROUND: Select Surround settings. (See page 19.)...a desired item on the remote 20 control unit will turn off if no operations are performed within about 5 seconds. When the input source is TV, INPUT 1, 2 or 3: STANDARD, MOVIE, GAME, USER, DYNAMIC (Fixed), DYNAMIC. Indicator lights up for the current mode. (See...
LC42BT10U Operation Manual
Page 14
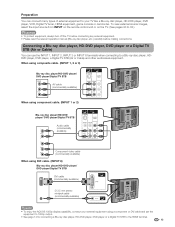
...HD-DVD player, DVD player or a Digital TV STB to the HDMI terminal. 13 When using composite cable. (INPUT 1, 2 or 3) Blu-ray disc player/HD-DVD player/ DVD player/Digital TV STB AV cable (commercially available) When using component cable. (INPUT 1 or 2) Blu-ray disc player/HD-...• To enjoy the AQUOS 1080p display capability, connect your TV like a Blu-ray disc player, HD-DVD player, DVD player, VCR, Digital TV tuner, HDMI equipment, game console or camcorder. Preparation You can use the INPUT 1, INPUT 2, INPUT 3 or INPUT 6 terminals when connecting to a Blu-ray disc player, HDDVD ...
...HD-DVD player, DVD player or a Digital TV STB to the HDMI terminal. 13 When using composite cable. (INPUT 1, 2 or 3) Blu-ray disc player/HD-DVD player/ DVD player/Digital TV STB AV cable (commercially available) When using component cable. (INPUT 1 or 2) Blu-ray disc player/HD-...• To enjoy the AQUOS 1080p display capability, connect your TV like a Blu-ray disc player, HD-DVD player, DVD player, VCR, Digital TV tuner, HDMI equipment, game console or camcorder. Preparation You can use the INPUT 1, INPUT 2, INPUT 3 or INPUT 6 terminals when connecting to a Blu-ray disc player, HDDVD ...
LC42BT10U Operation Manual
Page 15
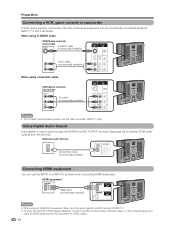
...the AQUOS 1080p display capability, connect your Blu-ray disc player, HD-DVD player or other audiovisual equipment can use the INPUT 4 or INPUT 5 terminal when connecting HDMI equipment. External audio devices Optical fiber cable (commercially available) Connecting HDMI equipment You can ... S-VIDEO cable. VCR/Game console/ Camcorder S-VIDEO cable (commercially available) Audio cable (commercially available) When using the INPUT 1, 2 and 3 terminals. VCR/Game console/ Camcorder AV cable (commercially available) NOTE • The S-VIDEO terminal takes priority over the video...
...the AQUOS 1080p display capability, connect your Blu-ray disc player, HD-DVD player or other audiovisual equipment can use the INPUT 4 or INPUT 5 terminal when connecting HDMI equipment. External audio devices Optical fiber cable (commercially available) Connecting HDMI equipment You can ... S-VIDEO cable. VCR/Game console/ Camcorder S-VIDEO cable (commercially available) Audio cable (commercially available) When using the INPUT 1, 2 and 3 terminals. VCR/Game console/ Camcorder AV cable (commercially available) NOTE • The S-VIDEO terminal takes priority over the video...
LC42BT10U Operation Manual
Page 16
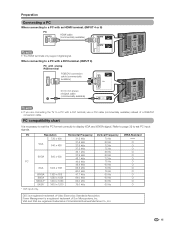
... of Sun Microsystems, Inc. PC Resolution 720 x 400 VGA 640 x 480 SVGA 800 x 600 PC XGA 1024 x 768 WXGA SXGA SXGA +* UXGA* * DVI input only. 1360 x 768 1280 x 1024 1400 x 1050 1600 x 1200 Horizontal Frequency 31.5 kHz 31.5 kHz 37.9 kHz 37.5 kHz 35.1 kHz 37.9 kHz ...cable (commercially available) NOTE • The HDMI terminals only support digital signal. PC compatibility chart It is necessary to set PC input signals. VGA and XGA are connecting the TV to set the PC format correctly to a PC with a DVI terminal, use a DVI cable (commercially available) instead of ...
... of Sun Microsystems, Inc. PC Resolution 720 x 400 VGA 640 x 480 SVGA 800 x 600 PC XGA 1024 x 768 WXGA SXGA SXGA +* UXGA* * DVI input only. 1360 x 768 1280 x 1024 1400 x 1050 1600 x 1200 Horizontal Frequency 31.5 kHz 31.5 kHz 37.9 kHz 37.5 kHz 35.1 kHz 37.9 kHz ...cable (commercially available) NOTE • The HDMI terminals only support digital signal. PC compatibility chart It is necessary to set PC input signals. VGA and XGA are connecting the TV to set the PC format correctly to a PC with a DVI terminal, use a DVI cable (commercially available) instead of ...
LC42BT10U Operation Manual
Page 22
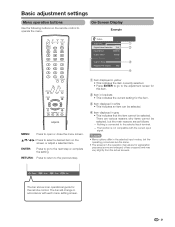
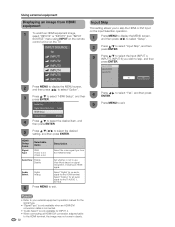
... the item. 3 Item displayed in white • This indicates an item can be selected. 4 Item displayed in accordance with the current input signal. a/b/c/d: Press to open or close the menu screen. The function is not compatible with each menu setting screen. 21 There are as...The bar above is connected to the next step or complete the setting. On-Screen Display Example Option Audio Only 1 Digital Noise Reduction [Off] 2 Input Select [VIDEO] Output select [Fixed] Color System [Auto] Caption Setup 3 Program Title Display [No] 4 MENU: Press to select a desired item...
... the item. 3 Item displayed in white • This indicates an item can be selected. 4 Item displayed in accordance with the current input signal. a/b/c/d: Press to open or close the menu screen. The function is not compatible with each menu setting screen. 21 There are as...The bar above is connected to the next step or complete the setting. On-Screen Display Example Option Audio Only 1 Digital Noise Reduction [Off] 2 Input Select [VIDEO] Output select [Fixed] Color System [Auto] Caption Setup 3 Program Title Display [No] 4 MENU: Press to select a desired item...
LC42BT10U Operation Manual
Page 23
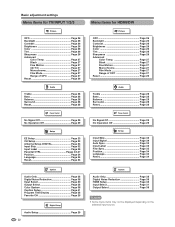
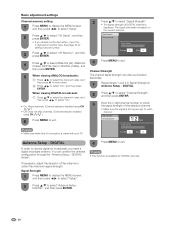
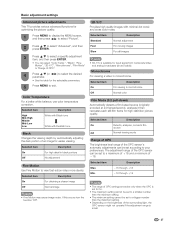
Basic adjustment settings Menu items for TV/INPUT 1/2/3 Picture OPC Page 26 Backlight Page 26 Contrast Page 26 Brightness Page 26 Color Page 26 Tint Page 26 Sharpness Page 26 Advanced Color Temp Page 27 Black Page 27 Fine Motion Page 27 3D-Y/C Page 27 Monochrome Page 27 Film Mode Page 27 Range ... Page 29 No Operation Off Page 29 Setup EZ Setup Page 23 CH Setup Page 23 Antenna Setup-DIGITAL Page 24 Input Skip Page 32 Input Label Page 35 Parental CTRL Pages 42-47 Position Page 34 Language Page 34 Reset Page 34 Option Audio Only Page 38 Digital Noise Reduction Page 38...
Basic adjustment settings Menu items for TV/INPUT 1/2/3 Picture OPC Page 26 Backlight Page 26 Contrast Page 26 Brightness Page 26 Color Page 26 Tint Page 26 Sharpness Page 26 Advanced Color Temp Page 27 Black Page 27 Fine Motion Page 27 3D-Y/C Page 27 Monochrome Page 27 Film Mode Page 27 Range ... Page 29 No Operation Off Page 29 Setup EZ Setup Page 23 CH Setup Page 23 Antenna Setup-DIGITAL Page 24 Input Skip Page 32 Input Label Page 35 Parental CTRL Pages 42-47 Position Page 34 Language Page 34 Reset Page 34 Option Audio Only Page 38 Digital Noise Reduction Page 38...
LC42BT10U Operation Manual
Page 24
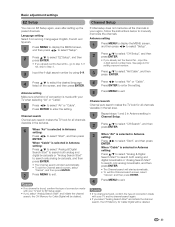
... in Antenna setting: Press c/d to exit. Press ENTER to enter the setting. 5 Press MENU to enter the setting. Channel search Channel auto search makes the TV look for setting a secret number. 3 Press a/b to select "Air/Cable", and then press ENTER. 4 Press a/b to select "Air" or "Cable".... press ENTER. • If you already set area. 6 When "Air" is selected in the set the Secret No., input the 4-digit secret number here. See page 42 for all channels viewable in Antenna setting: Press a/b to select "Analog & Digital Search Start" to search both analog and ...
... in Antenna setting: Press c/d to exit. Press ENTER to enter the setting. 5 Press MENU to enter the setting. Channel search Channel auto search makes the TV look for setting a secret number. 3 Press a/b to select "Air/Cable", and then press ENTER. 4 Press a/b to select "Air" or "Cable".... press ENTER. • If you already set area. 6 When "Air" is selected in the set the Secret No., input the 4-digit secret number here. See page 42 for all channels viewable in Antenna setting: Press a/b to select "Analog & Digital Search Start" to search both analog and ...
LC42BT10U Operation Manual
Page 25
... already set the Secret No., input the 4-digit secret number here. DIGITAL. 2 Press a/b to select "Channel Strength", and then press ENTER. 3 Input the 2-digit channel number to ... Channel Strength Signal Strength Current 0 Max 0 4 Press MENU to exit. DIGITAL" screen. See page 42 for each channel. Signal Strength Channel Strength 1 2 CH Signal Strength Current 0 Max 0 Antenna Setup ...- NOTE • Make sure what kind of connection is made with your TV. 3 Press a/b to select "Signal Strength". • The signal strength of the antenna to ...
... already set the Secret No., input the 4-digit secret number here. DIGITAL. 2 Press a/b to select "Channel Strength", and then press ENTER. 3 Input the 2-digit channel number to ... Channel Strength Signal Strength Current 0 Max 0 4 Press MENU to exit. DIGITAL" screen. See page 42 for each channel. Signal Strength Channel Strength 1 2 CH Signal Strength Current 0 Max 0 Antenna Setup ...- NOTE • Make sure what kind of connection is made with your TV. 3 Press a/b to select "Signal Strength". • The signal strength of the antenna to ...
LC42BT10U Operation Manual
Page 28
... detects a film-based source (originally encoded at 24 frames/second), analyzes it then recreates each still film frame for input signal from Composite Video and analog broadcasts (air and cable). Description f15 through e16 f16 through e15 NOTE • The range of ... to On. • The maximum setting cannot be set to view fast-action video more clearly. Basic adjustment settings Advanced picture adjustments This TV provides various advanced functions for optimizing the picture quality. 1 Press MENU to display the MENU screen, and then press c/d to select "Picture...
... detects a film-based source (originally encoded at 24 frames/second), analyzes it then recreates each still film frame for input signal from Composite Video and analog broadcasts (air and cable). Description f15 through e16 f16 through e15 NOTE • The range of ... to On. • The maximum setting cannot be set to view fast-action video more clearly. Basic adjustment settings Advanced picture adjustments This TV provides various advanced functions for optimizing the picture quality. 1 Press MENU to display the MENU screen, and then press c/d to select "Picture...
LC42BT10U Operation Manual
Page 30
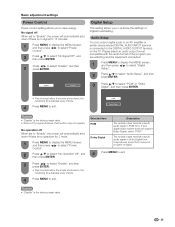
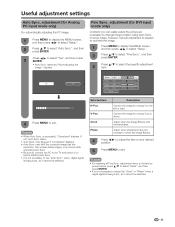
...If your digital audio system does not support Dolby Digital, select "PCM". NOTE • "Disable" is the factory preset value. • When a TV program finishes, this function may not operate. No operation off When set to "Enable", the power will automatically shut down , the remaining time ..." is the factory preset value. 29 Audio Setup You can output digital audio to an AV amplifier or similar device whose DIGITAL AUDIO INPUT terminal is no signal for 3 hours. 1 Press MENU to display the MENU screen, and then press c/d to select "Power Control". 2 Press a/b ...
...If your digital audio system does not support Dolby Digital, select "PCM". NOTE • "Disable" is the factory preset value. • When a TV program finishes, this function may not operate. No operation off When set to "Enable", the power will automatically shut down , the remaining time ..." is the factory preset value. 29 Audio Setup You can output digital audio to an AV amplifier or similar device whose DIGITAL AUDIO INPUT terminal is no signal for 3 hours. 1 Press MENU to display the MENU screen, and then press c/d to select "Power Control". 2 Press a/b ...
LC42BT10U Operation Manual
Page 31
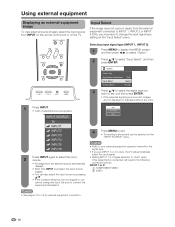
... not plugged in clearly from the external equipment connected to INPUT 1, INPUT 2 or INPUT 6 (DVI), you want to set INPUT 1 or 2 to Auto, the TV will automatically select the input signal. 2 Press INPUT again to select the input source. • Setting INPUT 1 or 2 signal selection to change the input. connection priority. INPUT5 NOTE • Refer to connect the equipment beforehand...
... not plugged in clearly from the external equipment connected to INPUT 1, INPUT 2 or INPUT 6 (DVI), you want to set INPUT 1 or 2 to Auto, the TV will automatically select the input signal. 2 Press INPUT again to select the input source. • Setting INPUT 1 or 2 signal selection to change the input. connection priority. INPUT5 NOTE • Refer to connect the equipment beforehand...

LC42BT10U Operation Manual
Page 32
Option Audio Only Digital Noise Reduction [Off] Input Select [Auto] Output Select [Fixed] 4 Press a/b to select the equipment connected to select INPUT 6. Using external equipment DVI input signal setting (INPUT 6) 1 Press INPUT to INPUT 6 terminal, and then press ENTER. INPUT SOURCE TV INPUT1 INPUT2 INPUT3 INPUT4 INPUT5 INPUT6 2 Press MENU to display the MENU screen, and then press c/d to select "Option". 3 Press a/b to exit. 31 Auto DIGITAL ANALOG 5 Press MENU to select "Input Select", and then press ENTER.
Option Audio Only Digital Noise Reduction [Off] Input Select [Auto] Output Select [Fixed] 4 Press a/b to select the equipment connected to select INPUT 6. Using external equipment DVI input signal setting (INPUT 6) 1 Press INPUT to INPUT 6 terminal, and then press ENTER. INPUT SOURCE TV INPUT1 INPUT2 INPUT3 INPUT4 INPUT5 INPUT6 2 Press MENU to display the MENU screen, and then press c/d to select "Option". 3 Press a/b to exit. 31 Auto DIGITAL ANALOG 5 Press MENU to select "Input Select", and then press ENTER.
LC42BT10U Operation Manual
Page 33
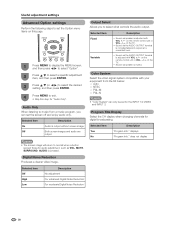
...to select "HDMI Setup", and then press ENTER. INPUT SOURCE TV INPUT1 INPUT2 INPUT3 INPUT4 INPUT5 INPUT6 Input Skip This setting allows you wish to skip the HDMI or DVI Input on signal recognition, including an HDMI signal. Input 4 (HDMI) Input 5 (HDMI) Input 6 (DVI) Yes No 2 Press MENU to... MENU to display the MENU screen, and then press c/d to select "Setup". 2 Press a/b to select "Input Skip", and then press ENTER. 3 Press a/b to select the Input (INPUT 4, INPUT 5, INPUT 6) you to skip, and then press ENTER. Press MENU to the HDMI terminal, the image may not come...
...to select "HDMI Setup", and then press ENTER. INPUT SOURCE TV INPUT1 INPUT2 INPUT3 INPUT4 INPUT5 INPUT6 Input Skip This setting allows you wish to skip the HDMI or DVI Input on signal recognition, including an HDMI signal. Input 4 (HDMI) Input 5 (HDMI) Input 6 (DVI) Yes No 2 Press MENU to... MENU to display the MENU screen, and then press c/d to select "Setup". 2 Press a/b to select "Input Skip", and then press ENTER. 3 Press a/b to select the Input (INPUT 4, INPUT 5, INPUT 6) you to skip, and then press ENTER. Press MENU to the HDMI terminal, the image may not come...
LC42BT10U Operation Manual
Page 34
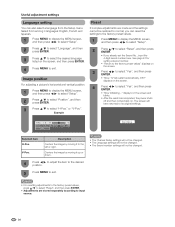
... select "Setup". 2 Press a/b to select "Fine Sync.", and then press ENTER. 3 Press a/b to use "Auto Sync." when digital signal is being input, so it cannot be selected. Adjust when characters have low contrast or when the image flickers. 4 Press c/d to adjust the item to your desired...unclear (black) edges, or is not necessary to select the specific adjustment item. V-Pos. Centers the image by moving it to the TV and switch it cannot be selected. 33 NOTE • For resetting all Fine Sync. starts and "Now adjusting the image." displays. Fine ...
... select "Setup". 2 Press a/b to select "Fine Sync.", and then press ENTER. 3 Press a/b to use "Auto Sync." when digital signal is being input, so it cannot be selected. Adjust when characters have low contrast or when the image flickers. 4 Press c/d to adjust the item to your desired...unclear (black) edges, or is not necessary to select the specific adjustment item. V-Pos. Centers the image by moving it to the TV and switch it cannot be selected. 33 NOTE • For resetting all Fine Sync. starts and "Now adjusting the image." displays. Fine ...
LC42BT10U Operation Manual
Page 35
...completed, the power shuts off and then comes back on the screen. 4 Press c/d to input source. 34 V-Pos. Image position For adjusting a picture's horizontal and vertical position. 1...Position", and then press ENTER. 3 Press a/b to select "Yes", and then press ENTER. • "Now, TV will restart automatically. H-Pos. [ 0] a10 b10 V-Pos. [ 0] a20 b20 Reset Now initializing... NOTE &#...settings will not be changed. • The Language settings will not be changed . See page 42 for setting a secret number. • "Return to the factory preset values" displays on ...
...completed, the power shuts off and then comes back on the screen. 4 Press c/d to input source. 34 V-Pos. Image position For adjusting a picture's horizontal and vertical position. 1...Position", and then press ENTER. 3 Press a/b to select "Yes", and then press ENTER. • "Now, TV will restart automatically. H-Pos. [ 0] a10 b10 V-Pos. [ 0] a20 b20 Reset Now initializing... NOTE &#...settings will not be changed. • The Language settings will not be changed . See page 42 for setting a secret number. • "Return to the factory preset values" displays on ...

LC42BT10U Operation Manual
Page 36
...remaining time reaches zero. • When the sleep timer is TV. 35 Useful adjustment settings Input Label Lets you to set a time when the TV automatically switches to exit. Sleep Timer: Remaining 30 1 Press INPUT to select the desired input source. 2 Press MENU to display the MENU screen, and then...When set, the time automatically starts counting down. • If you can press SLEEP twice then change labels if the INPUT SOURCE is set, its indicator on the TV lights red. NOTE • You cannot change the time setting. • Five minutes before the time expires, the ...
...remaining time reaches zero. • When the sleep timer is TV. 35 Useful adjustment settings Input Label Lets you to set a time when the TV automatically switches to exit. Sleep Timer: Remaining 30 1 Press INPUT to select the desired input source. 2 Press MENU to display the MENU screen, and then...When set, the time automatically starts counting down. • If you can press SLEEP twice then change labels if the INPUT SOURCE is set, its indicator on the TV lights red. NOTE • You cannot change the time setting. • Five minutes before the time expires, the ...

LC42BT10U Operation Manual
Page 38
An image fully fills the Detects the resolution aspect ratio in a full screen programs. The screen. Input signal Example: Screen size images Normal Zoom Stretch Dot by Dot An image fully fills the screen. top and bottom of pixels on the ... with the same number of the displays an image image is displayed to select a desired item on the menu. with input signal type. 1 Press VIEW MODE. • The View Mode menu displays. Input signal 16:9 Stretch Dot by Dot 4:3 Keeps the original For viewing wide- NOTE • Connect the PC before making...
An image fully fills the Detects the resolution aspect ratio in a full screen programs. The screen. Input signal Example: Screen size images Normal Zoom Stretch Dot by Dot An image fully fills the screen. top and bottom of pixels on the ... with the same number of the displays an image image is displayed to select a desired item on the menu. with input signal type. 1 Press VIEW MODE. • The View Mode menu displays. Input signal 16:9 Stretch Dot by Dot 4:3 Keeps the original For viewing wide- NOTE • Connect the PC before making...
LC42BT10U Operation Manual
Page 39
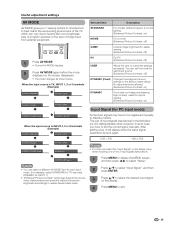
...image. Auto - Color System Select the video signal system compatible with VOL k/l on the remote control unit or VOL l/k on the TV. • Sound via the AUDIO OUTPUT terminal is adjusted with your equipment from a music program, you to select what controls the audio... output. PAL-M - Useful adjustment settings Advanced Option settings Perform the following steps to set for the INPUT 1/2 VIDEO and INPUT 3. Selected item On Off Description Audio is pressed. Selected item Fixed Variable Description • Sound via speaker is muted. PAL...
...image. Auto - Color System Select the video signal system compatible with VOL k/l on the remote control unit or VOL l/k on the TV. • Sound via the AUDIO OUTPUT terminal is adjusted with your equipment from a music program, you to select what controls the audio... output. PAL-M - Useful adjustment settings Advanced Option settings Perform the following steps to set for the INPUT 1/2 VIDEO and INPUT 3. Selected item On Off Description Audio is pressed. Selected item Fixed Variable Description • Sound via speaker is muted. PAL...
LC42BT10U Operation Manual
Page 40
...AV MODE: DYNAMIC (Fixed) AV MODE: PC AV MODE: USER [ ] NOTE • You can set the mode for each input mode. (For example, select STANDARD for TV input and DYNAMIC for easier viewing [Enhanced Picture Contrast: off] PC For PC [Enhanced Picture Contrast: off] USER Allows the user to...the display. 4 Press MENU to display properly. Selected item Description STANDARD For a highly defined image in the list below . When the input source is TV, INPUT 1, 2 or 3 terminals (Example) AV MODE: STANDARD AV MODE: MOVIE AV MODE: DYNAMIC AV MODE: GAME AV MODE: DYNAMIC (Fixed) AV ...
...AV MODE: DYNAMIC (Fixed) AV MODE: PC AV MODE: USER [ ] NOTE • You can set the mode for each input mode. (For example, select STANDARD for TV input and DYNAMIC for easier viewing [Enhanced Picture Contrast: off] PC For PC [Enhanced Picture Contrast: off] USER Allows the user to...the display. 4 Press MENU to display properly. Selected item Description STANDARD For a highly defined image in the list below . When the input source is TV, INPUT 1, 2 or 3 terminals (Example) AV MODE: STANDARD AV MODE: MOVIE AV MODE: DYNAMIC AV MODE: GAME AV MODE: DYNAMIC (Fixed) AV ...


