Operation Manual
Page 9
... purposes and may vary slightly from the actual operations. • The examples used throughout this operation manual are for LC-70C8470U/LC-60C8470U 44-46 Viewing 3D Images 47-48 Configuring the TV Settings to Enhance 3D Image Viewing 48-50... model. 7 Contents IMPORTANT INFORMATION 1-2 DEAR SHARP CUSTOMER 3 IMPORTANT SAFETY INSTRUCTIONS 3-6 Accessories 8 Supplied Accessories 8 Optional Accessories 8 QUICK REFERENCE Attaching the Stand 9 QUICK INSTALLATION TIPS 10 Experiencing HD Images 10 Using the Remote Control Unit 10 Preparation Antennas 11 Installing Batteries in ...
... purposes and may vary slightly from the actual operations. • The examples used throughout this operation manual are for LC-70C8470U/LC-60C8470U 44-46 Viewing 3D Images 47-48 Configuring the TV Settings to Enhance 3D Image Viewing 48-50... model. 7 Contents IMPORTANT INFORMATION 1-2 DEAR SHARP CUSTOMER 3 IMPORTANT SAFETY INSTRUCTIONS 3-6 Accessories 8 Supplied Accessories 8 Optional Accessories 8 QUICK REFERENCE Attaching the Stand 9 QUICK INSTALLATION TIPS 10 Experiencing HD Images 10 Using the Remote Control Unit 10 Preparation Antennas 11 Installing Batteries in ...
Operation Manual
Page 10
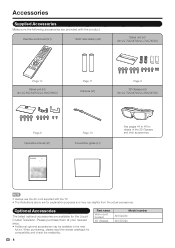
... explanation purposes and may be available in the near future. Remote control unit (x1) "AAA" size battery (x2) Stand unit (x1) (for LC-70C8470U/LC-70C7450U) Page 10 Stand unit (x1) (for LC-60C8470U/LC-60C7450U) Page 11 Cable tie (x1) Page 9 3D Glasses (x2) (for LC-70C8470U/LC-60C8470U) Page 9 Operation manual (x1) Page 10 Connection guide (x1...
... explanation purposes and may be available in the near future. Remote control unit (x1) "AAA" size battery (x2) Stand unit (x1) (for LC-70C8470U/LC-70C7450U) Page 10 Stand unit (x1) (for LC-60C8470U/LC-60C7450U) Page 11 Cable tie (x1) Page 9 3D Glasses (x2) (for LC-70C8470U/LC-60C8470U) Page 9 Operation manual (x1) Page 10 Connection guide (x1...
Operation Manual
Page 12
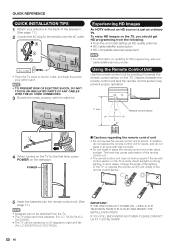
... sensor may not work properly if the remote control sensor on the TV for the television into the remote control unit. (See page 11.) • Speakers cannot be detached from the TV. • The TV angle cannot be adjusted. (For LC-70C8470U/LC- 70C7450U) • The TV can be rotated up to 20 ...area with the cable tie. IF YOU STILL ENCOUNTER NO POWER, PLEASE CONTACT US AT 1-800-BE-SHARP. 10 Using the Remote Control Unit Use the remote control unit by pointing it towards the remote control sensor on the television. Experiencing HD Images An HDTV without an HD source is under direct ...
... sensor may not work properly if the remote control sensor on the TV for the television into the remote control unit. (See page 11.) • Speakers cannot be detached from the TV. • The TV angle cannot be adjusted. (For LC-70C8470U/LC- 70C7450U) • The TV can be rotated up to 20 ...area with the cable tie. IF YOU STILL ENCOUNTER NO POWER, PLEASE CONTACT US AT 1-800-BE-SHARP. 10 Using the Remote Control Unit Use the remote control unit by pointing it towards the remote control sensor on the television. Experiencing HD Images An HDTV without an HD source is under direct ...
Operation Manual
Page 13
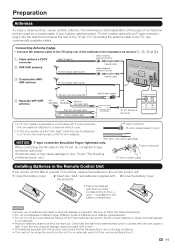
...round) 300-ohm twin-lead cable (flat) NOTICE F-type connector should be attached to operate TV functions, replace the batteries in the remote control unit. 1 Open the battery cover. 2 Insert two "AAA" size batteries (supplied with this product may cause damage to your outdoor ...to the (e) and (f) indications in the battery compartment. Different types of batteries have a shorter life expectancy due to the TV using the remote control unit for a coaxial cable. When connecting the RF cable to a 75-ohm terminal through a 300/75-ohm adapter. Preparation Antennas To...
...round) 300-ohm twin-lead cable (flat) NOTICE F-type connector should be attached to operate TV functions, replace the batteries in the remote control unit. 1 Open the battery cover. 2 Insert two "AAA" size batteries (supplied with this product may cause damage to your outdoor ...to the (e) and (f) indications in the battery compartment. Different types of batteries have a shorter life expectancy due to the TV using the remote control unit for a coaxial cable. When connecting the RF cable to a 75-ohm terminal through a 300/75-ohm adapter. Preparation Antennas To...
Operation Manual
Page 14
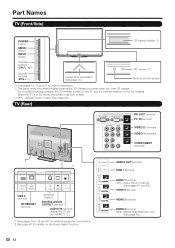
... (Front/Side) *1 POWER button MENU button INPUT button 3D infrared emitter *2 Channel buttons (CHU/V) Volume buttons (VOLk/l) Center Icon illumination (See page 35.) OPC sensor *3 Remote control sensor *1 See pages 14, 19 and 27 for details on the 3D Glasses.
... (Front/Side) *1 POWER button MENU button INPUT button 3D infrared emitter *2 Channel buttons (CHU/V) Volume buttons (VOLk/l) Center Icon illumination (See page 35.) OPC sensor *3 Remote control sensor *1 See pages 14, 19 and 27 for details on the 3D Glasses.
Operation Manual
Page 15
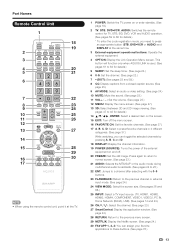
...) and DISPLAY at the TV. 1 POWER: Switch the TV power on or enter standby. (See page 19.) 2 TV, STB, DVD•VCR, AUDIO: Switches the remote control for TV, STB, BD, DVD, VCR and AUDIO operation. (See pages 59 to 60 for details.) 14 a/b/c/d, ENTER: Select a desired item on and off... favorite channels in 4 different categories. (See page 37.) While watching, you can assign your favorite applications to these buttons. (See page 76.) 13 Part Names Remote Control Unit 1 18 19 2 3 4 20 5 21 6 7 22 8 23 9 24 10 25 11 26 12 13 27 14 15 28 29 16 30 17 • When...
...) and DISPLAY at the TV. 1 POWER: Switch the TV power on or enter standby. (See page 19.) 2 TV, STB, DVD•VCR, AUDIO: Switches the remote control for TV, STB, BD, DVD, VCR and AUDIO operation. (See pages 59 to 60 for details.) 14 a/b/c/d, ENTER: Select a desired item on and off... favorite channels in 4 different categories. (See page 37.) While watching, you can assign your favorite applications to these buttons. (See page 76.) 13 Part Names Remote Control Unit 1 18 19 2 3 4 20 5 21 6 7 22 8 23 9 24 10 25 11 26 12 13 27 14 15 28 29 16 30 17 • When...
Operation Manual
Page 16
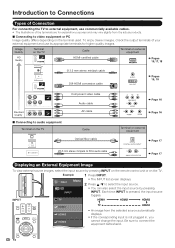
.... • The INPUT list screen displays. 2 Press a/b to select the input source. • You can also select the input source by pressing INPUT on the remote control unit or on the terminal used. INPUT TV HDMI1 HDMI2 HDMI3 HDMI1 HDMI2 HDMI3 TV HDMI4 • An image from the actual products. ■...
.... • The INPUT list screen displays. 2 Press a/b to select the input source. • You can also select the input source by pressing INPUT on the remote control unit or on the terminal used. INPUT TV HDMI1 HDMI2 HDMI3 HDMI1 HDMI2 HDMI3 TV HDMI4 • An image from the actual products. ■...
Operation Manual
Page 17
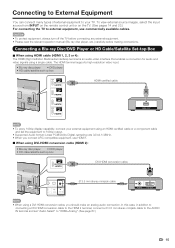
... many types of external equipment to "HDMI+Analog". (See page 67.) 15 To view external source images, select the input source from INPUT on the remote control unit or on the TV. (See pages 14 and 23.) For connecting the TV to 1080p output. • Supported Audio format: Linear PCM/Dolby...
... many types of external equipment to "HDMI+Analog". (See page 67.) 15 To view external source images, select the input source from INPUT on the remote control unit or on the TV. (See pages 14 and 23.) For connecting the TV to 1080p output. • Supported Audio format: Linear PCM/Dolby...
Operation Manual
Page 21
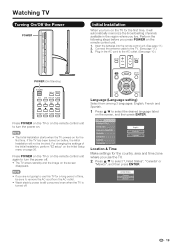
... unit. (See page 11.) 2. If the TV has been turned on before you press POWER on the remote control unit. 1. Language Location & Time TV Location Antenna & Cable/STB Air/Cable CH Search Network Completed English Français Español Location & Time ... broadcasting channels available in the AC cord to the AC outlet. (See page 10.) POWER (On/Standby) Press POWER on the TV or on the remote control unit to select "United States", "Canada" or "Mexico", and then press ENTER. Connect the antenna cable to select the desired language listed on the...
... unit. (See page 11.) 2. If the TV has been turned on before you press POWER on the remote control unit. 1. Language Location & Time TV Location Antenna & Cable/STB Air/Cable CH Search Network Completed English Français Español Location & Time ... broadcasting channels available in the AC cord to the AC outlet. (See page 10.) POWER (On/Standby) Press POWER on the TV or on the remote control unit to select "United States", "Canada" or "Mexico", and then press ENTER. Connect the antenna cable to select the desired language listed on the...
Operation Manual
Page 22
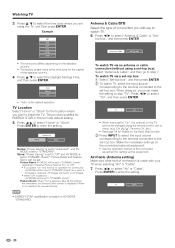
Antenna & Cable Set-top box • The time zone differs depending on the TV cannot be changed using the remote control unit or menu. (e.g. Store: "Power Saving" is set to "Off" and AV MODE is set to "STANDARD". Feature Demo: When "On" is selected, after ...
Antenna & Cable Set-top box • The time zone differs depending on the TV cannot be changed using the remote control unit or menu. (e.g. Store: "Power Saving" is set to "Off" and AV MODE is set to "STANDARD". Feature Demo: When "On" is selected, after ...
Operation Manual
Page 25
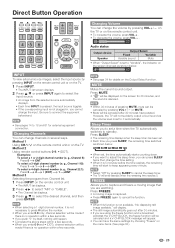
... the TV automatically switches to standby. Examples: To select a 1 or 2-digit channel number (e. MUTE Mutes the current sound output. Method 2 Using remote control buttons 0-9, • (DOT). To select a 4-digit channel number (e. However, the TV will be canceled and a V-CHIP BLOCK message will...number (e. g., Channel 5): Press 5 ENT. Direct Button Operation INPUT To view external source images, select the input source by pressing INPUT on the remote control unit or on the TV. 1 Press INPUT. • The INPUT list screen displays. 2 Press a/b or press INPUT again to select...
... the TV automatically switches to standby. Examples: To select a 1 or 2-digit channel number (e. MUTE Mutes the current sound output. Method 2 Using remote control buttons 0-9, • (DOT). To select a 4-digit channel number (e. However, the TV will be canceled and a V-CHIP BLOCK message will...number (e. g., Channel 5): Press 5 ENT. Direct Button Operation INPUT To view external source images, select the input source by pressing INPUT on the remote control unit or on the TV. 1 Press INPUT. • The INPUT list screen displays. 2 Press a/b or press INPUT again to select...

Operation Manual
Page 29
...The operations for some are enlarged, others cropped) and may vary slightly from the actual screens. • The order of the items on the remote control as follows: -Nothing is connected to exit. 1 Guide display • This indicates the buttons that the item cannot be selected, but ...on the screen. Using the control panel of the main unit You can be selected. 5 Item displayed in accordance with LC Font technology, which was developed by SHARP Corporation for button operations. 3 Press MENU to the selected input terminal. -The function is embedded with the alignment of ...
...The operations for some are enlarged, others cropped) and may vary slightly from the actual screens. • The order of the items on the remote control as follows: -Nothing is connected to exit. 1 Guide display • This indicates the buttons that the item cannot be selected, but ...on the screen. Using the control panel of the main unit You can be selected. 5 Item displayed in accordance with LC Font technology, which was developed by SHARP Corporation for button operations. 3 Press MENU to the selected input terminal. -The function is embedded with the alignment of ...
Operation Manual
Page 31
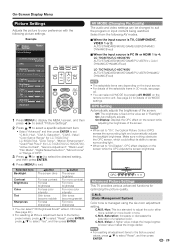
...is PC IN or HDMI 1 to 4: LC-70C8470U/LC-60C8470U AUTO/STANDARD/MOVIE/GAME/PC/USER/x.v.Color/ DYNAMIC/DYNAMIC(Fixed) LC-70C7450U/LC-60C7450U AUTO/STANDARD/MOVIE/GAME/PC/USER/DYNAMIC/ DYNAMIC(Fixed) • The selectable items vary depending on the remote control unit. C.M.S. (Color Management System) ... b5] a16 b16 3D Brightness Boost [Middle] Contrast [b30] 0 b40 Brightness [ 0] a30 b30 Color [ b2] a30 b30 Tint [ 0] a30 b30 Sharpness [ b2] a10 b10 Advanced 1 Press MENU to display the MENU screen, and then press c/d to select "Picture Settings". 2 Press a/b to select a ...
...is PC IN or HDMI 1 to 4: LC-70C8470U/LC-60C8470U AUTO/STANDARD/MOVIE/GAME/PC/USER/x.v.Color/ DYNAMIC/DYNAMIC(Fixed) LC-70C7450U/LC-60C7450U AUTO/STANDARD/MOVIE/GAME/PC/USER/DYNAMIC/ DYNAMIC(Fixed) • The selectable items vary depending on the remote control unit. C.M.S. (Color Management System) ... b5] a16 b16 3D Brightness Boost [Middle] Contrast [b30] 0 b40 Brightness [ 0] a30 b30 Color [ b2] a30 b30 Tint [ 0] a30 b30 Sharpness [ b2] a10 b10 Advanced 1 Press MENU to display the MENU screen, and then press c/d to select "Picture Settings". 2 Press a/b to select a ...

Operation Manual
Page 35
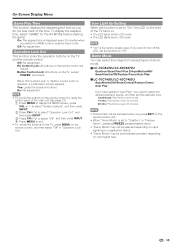
... window can change the audio when multiple audio is selected. 33 Select "Change CC" on the menu to the DIGITAL AUDIO OUTPUT terminal on the remote control unit. PCM: Set to "PCM" when connecting to an audio system that supports Dolby Digital. The same audio (main, sub, or main/sub)...View Option functions can be displayed by selecting "APPS" on the MENU screen. • You can display the application window by pressing SmartCentral on the remote control unit. (See page 24.) • You can output digital audio to an AV amplifier or similar device whose DIGITAL AUDIO INPUT terminal...
... window can change the audio when multiple audio is selected. 33 Select "Change CC" on the menu to the DIGITAL AUDIO OUTPUT terminal on the remote control unit. PCM: Set to "PCM" when connecting to an audio system that supports Dolby Digital. The same audio (main, sub, or main/sub)...View Option functions can be displayed by selecting "APPS" on the MENU screen. • You can display the application window by pressing SmartCentral on the remote control unit. (See page 24.) • You can output digital audio to an AV amplifier or similar device whose DIGITAL AUDIO INPUT terminal...

Operation Manual
Page 36
Output Select Allows you set the input terminal displayed when using INPUT on the remote control unit or on the View Mode or the signal type. Color System Select the video signal system compatible with serifs. Yes: A transition effect is ... you to input source. • "Position" does not work . Type 3: Monospaced without serifs. Sound via the AUDIO OUT terminal is adjusted with VOLk/l on the remote control unit or on signal recognition, including an HDMI signal. No: "Program Info." Auto View: Enable: To use transition effects when changing channels. Disable: No...
Output Select Allows you set the input terminal displayed when using INPUT on the remote control unit or on the View Mode or the signal type. Color System Select the video signal system compatible with serifs. Yes: A transition effect is ... you to input source. • "Position" does not work . Type 3: Monospaced without serifs. Sound via the AUDIO OUT terminal is adjusted with VOLk/l on the remote control unit or on signal recognition, including an HDMI signal. No: "Program Info." Auto View: Enable: To use transition effects when changing channels. Disable: No...
Operation Manual
Page 37
... time, select "GAME" for the AV MODE before starting the game. Yes: Locks the operation buttons. RC Control Lock: All buttons on the remote control, and then select "Off" in 3D mode. • "On" is selected, a confirmation screen appears. Icon Light Up Setting...8226; This function will be canceled when you do not lose track of demo mode. ■ LC-70C8470U/LC-60C8470U Quattron/Quad Pixel Plus 2/AquoMotion480/ SmartCentral/3D/Feature Demo/Auto Play ■ LC-70C7450U/LC-60C7450U AquoMotion240/SmartCentral/Feature Demo/ Auto Play If you have selected "Auto Play", you need to ...
... time, select "GAME" for the AV MODE before starting the game. Yes: Locks the operation buttons. RC Control Lock: All buttons on the remote control, and then select "Off" in 3D mode. • "On" is selected, a confirmation screen appears. Icon Light Up Setting...8226; This function will be canceled when you do not lose track of demo mode. ■ LC-70C8470U/LC-60C8470U Quattron/Quad Pixel Plus 2/AquoMotion480/ SmartCentral/3D/Feature Demo/Auto Play ■ LC-70C7450U/LC-60C7450U AquoMotion240/SmartCentral/Feature Demo/ Auto Play If you have selected "Auto Play", you need to ...
Operation Manual
Page 39
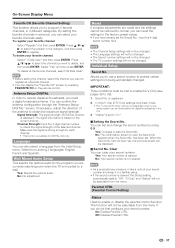
.... By setting the favorite channels in the U.S. 3. No: No adjustment. Reset If complex adjustments are currently watching even when the TV is based on the remote control. When the Secret No. This function will only be selectable when a new rating system can confirm the antenna configuration through...
.... By setting the favorite channels in the U.S. 3. No: No adjustment. Reset If complex adjustments are currently watching even when the TV is based on the remote control. When the Secret No. This function will only be selectable when a new rating system can confirm the antenna configuration through...
Operation Manual
Page 43
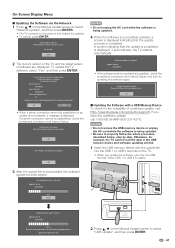
...64257;le into the USB 1 or USB 2 terminal on the TV. • When you have any questions, please call 1-800-BE-SHARP (800-237-4277). If a server connection cannot be established or an update is not available, a message is downloaded, the software update ...the software is successfully updated, a screen is displayed indicating that the update is completed is disabled during update process. Update Version XXXXXXXX 50% Remote control operation is displayed. 4 seconds later, the TV restarts automatically. Connecting to complete update. Failed to Internet.. or 2 Press a/b on...
...64257;le into the USB 1 or USB 2 terminal on the TV. • When you have any questions, please call 1-800-BE-SHARP (800-237-4277). If a server connection cannot be established or an update is not available, a message is downloaded, the software update ...the software is successfully updated, a screen is displayed indicating that the update is completed is disabled during update process. Update Version XXXXXXXX 50% Remote control operation is displayed. 4 seconds later, the TV restarts automatically. Connecting to complete update. Failed to Internet.. or 2 Press a/b on...
Operation Manual
Page 44
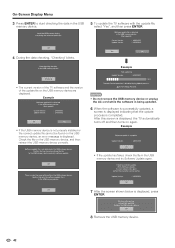
...;rm that the update process is displayed indicating that you have transferred the file to complete update. Example Now updating Update Version : UXXXXXX2 30% Remote Control operation is complete. After this screen is displayed. Current Version Update Version : UXXXXXX1 : UXXXXXX2 Yes No Now checking the data in the USB memory...
...;rm that the update process is displayed indicating that you have transferred the file to complete update. Example Now updating Update Version : UXXXXXX2 30% Remote Control operation is complete. After this screen is displayed. Current Version Update Version : UXXXXXX1 : UXXXXXX2 Yes No Now checking the data in the USB memory...
Operation Manual
Page 50
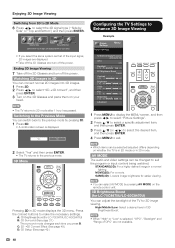
... Switching to the Previous Mode You can be selected/adjusted differs depending on the remote control unit. 3D Brightness Boost (for 3D image viewing. STANDARD(3D): For a...Middle] Contrast [b30] 0 b40 Brightness [ 0] a30 b30 Color [ b2] a30 b30 Tint [ 0] a30 b30 Sharpness [ b2] a10 b10 Advanced • The TV returns to 2D mode after 1 hour has passed. High/Middle/Low...Boost. • When "High" or "Low" is displayed. GAME(3D): Lowers image brightness for LC-70C8470U/LC-60C8470U) B: 3D Surround (See page 31.) The surround mode changes each other. • If you...
... Switching to the Previous Mode You can be selected/adjusted differs depending on the remote control unit. 3D Brightness Boost (for 3D image viewing. STANDARD(3D): For a...Middle] Contrast [b30] 0 b40 Brightness [ 0] a30 b30 Color [ b2] a30 b30 Tint [ 0] a30 b30 Sharpness [ b2] a10 b10 Advanced • The TV returns to 2D mode after 1 hour has passed. High/Middle/Low...Boost. • When "High" or "Low" is displayed. GAME(3D): Lowers image brightness for LC-70C8470U/LC-60C8470U) B: 3D Surround (See page 31.) The surround mode changes each other. • If you...


