LC-65D64U Operation Manual
Page 8
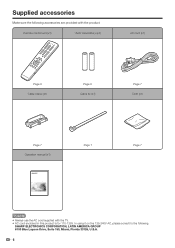
SHARP ELECTRONICS CORPORATION, LATIN AMERICA GROUP 6100 Blue Lagoon Drive, Suite 150, Miami, Florida 33126, U.S.A. 6 In using it on the 125-240V AC, please consult to the following accessories are provided with the TV. • AC cord enclosed in this product is for 110-125V. Supplied accessories Make sure the following . Remote control unit (x1) "AAA" size battery (x2) AC cord (x1) Page 8 Cable clamp (x1) Page 8 Cable tie (x1) Page 7 Cloth (x1) Page 7 Operation manual (x1) Page 7 Page 7 NOTE • Always use the AC cord supplied with the product.
SHARP ELECTRONICS CORPORATION, LATIN AMERICA GROUP 6100 Blue Lagoon Drive, Suite 150, Miami, Florida 33126, U.S.A. 6 In using it on the 125-240V AC, please consult to the following accessories are provided with the TV. • AC cord enclosed in this product is for 110-125V. Supplied accessories Make sure the following . Remote control unit (x1) "AAA" size battery (x2) AC cord (x1) Page 8 Cable clamp (x1) Page 8 Cable tie (x1) Page 7 Cloth (x1) Page 7 Operation manual (x1) Page 7 Page 7 NOTE • Always use the AC cord supplied with the product.
LC-65D64U Operation Manual
Page 10
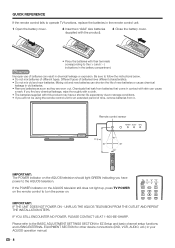
... on . IF YOU STILL ENCOUNTER NO POWER, PLEASE CONTACT US AT 1-800-BE-SHARP. If the POWER indicator on the AQUOS television still does not light up, press TV POWER on the remote control to turn the power on the AQUOS television should light GREEN indicating you have ... that leak from it. UNPLUG THE AQUOS TELEVISION FROM THE OUTLET AND REPEAT THE INSTALLATION STEPS. QUICK REFERENCE If the remote control fails to operate TV functions, replace the batteries in the remote control unit. 1 Open the battery cover. 2 Insert two "AAA" size batteries (supplied with the product). 3 Close...
... on . IF YOU STILL ENCOUNTER NO POWER, PLEASE CONTACT US AT 1-800-BE-SHARP. If the POWER indicator on the AQUOS television still does not light up, press TV POWER on the remote control to turn the power on the AQUOS television should light GREEN indicating you have ... that leak from it. UNPLUG THE AQUOS TELEVISION FROM THE OUTLET AND REPEAT THE INSTALLATION STEPS. QUICK REFERENCE If the remote control fails to operate TV functions, replace the batteries in the remote control unit. 1 Open the battery cover. 2 Insert two "AAA" size batteries (supplied with the product). 3 Close...
LC-65D64U Operation Manual
Page 11
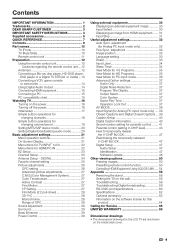
... accessory 62 Information on the software license for this product 64 Calling for Service 65 LIMITED WARRANTY 65 Dimensional drawings • The dimensional drawings for the LCD TV set are shown on the power 16 Turning off the power 16 Initial setup...IMPORTANT INFORMATION 1 Trademarks 2 DEAR SHARP CUSTOMER 3 IMPORTANT SAFETY INSTRUCTIONS 3 Supplied accessories 6 QUICK REFERENCE 7 Contents 9 Part names 10 TV (Front 10 TV (Rear/Side 10 Remote control unit 11 Preparation 12 Using the remote control unit 12 Cautions regarding the remote control unit....12 Antennas 12 Connecting...
... accessory 62 Information on the software license for this product 64 Calling for Service 65 LIMITED WARRANTY 65 Dimensional drawings • The dimensional drawings for the LCD TV set are shown on the power 16 Turning off the power 16 Initial setup...IMPORTANT INFORMATION 1 Trademarks 2 DEAR SHARP CUSTOMER 3 IMPORTANT SAFETY INSTRUCTIONS 3 Supplied accessories 6 QUICK REFERENCE 7 Contents 9 Part names 10 TV (Front 10 TV (Rear/Side 10 Remote control unit 11 Preparation 12 Using the remote control unit 12 Cautions regarding the remote control unit....12 Antennas 12 Connecting...
LC-65D64U Operation Manual
Page 13
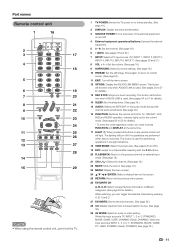
...when AQUOS LINK is used . (See pages 54 to 57 for details.) While watching, you need to press FUNCTION and DISPLAY at the TV. 1 TV POWER: Switch the TV power on or enters standby. (See page 16.) 2 DISPLAY: Display the channel information. 3 SOURCE POWER: Turns the power of the ...timer. (See page 34.) 15 AUDIO: Selects the MTS/SAP or the audio mode during multichannel audio broadcasts. (See page 20.) 16 FUNCTION: Switches the remote control for details.) * To enter the code registration mode, you can toggle the selected channels by pressing A, B, C and D. 27 FAVORITE: Set the favorite...
...when AQUOS LINK is used . (See pages 54 to 57 for details.) While watching, you need to press FUNCTION and DISPLAY at the TV. 1 TV POWER: Switch the TV power on or enters standby. (See page 16.) 2 DISPLAY: Display the channel information. 3 SOURCE POWER: Turns the power of the ...timer. (See page 34.) 15 AUDIO: Selects the MTS/SAP or the audio mode during multichannel audio broadcasts. (See page 20.) 16 FUNCTION: Switches the remote control for details.) * To enter the code registration mode, you can toggle the selected channels by pressing A, B, C and D. 27 FAVORITE: Set the favorite...
LC-65D64U Operation Manual
Page 14
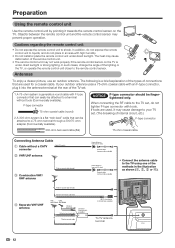
... Antennas To enjoy a clearer picture, use an outdoor antenna. If your TV set. (The breaking of the remote control unit. • The remote control unit may not work properly if the remote control sensor on the TV. The heat may cause deformation of internal circuit, etc.) F-type connector...) Home Antenna terminal (75-ohm) Coaxial cable (commercially available) • Connect the antenna cable to the TV using one of connections that can be attached to the remote control sensor. If tools are used , it may prevent proper operation. A 300-ohm system is generally a...
... Antennas To enjoy a clearer picture, use an outdoor antenna. If your TV set. (The breaking of the remote control unit. • The remote control unit may not work properly if the remote control sensor on the TV. The heat may cause deformation of internal circuit, etc.) F-type connector...) Home Antenna terminal (75-ohm) Coaxial cable (commercially available) • Connect the antenna cable to the TV using one of connections that can be attached to the remote control sensor. If tools are used , it may prevent proper operation. A 300-ohm system is generally a...
LC-65D64U Operation Manual
Page 15
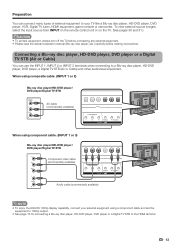
...output. • See page 15 for connecting a Blu-ray disc player, HD-DVD player, DVD player or a Digital TV STB to a Blu-ray disc player, HD-DVD player, DVD player, a Digital TV STB (Air or Cable) and other audiovisual equipment. Preparation You can use the INPUT 1, INPUT 2 or INPUT 3 ...terminal. 13 To view external source images, select the input source from INPUT on the remote control unit or on the TV. (See pages 30 and 31.) CAUTION • To protect equipment, always turn off the TV before connecting any external equipment. • Please read the relevant operation manual (Blu-ray...
...output. • See page 15 for connecting a Blu-ray disc player, HD-DVD player, DVD player or a Digital TV STB to a Blu-ray disc player, HD-DVD player, DVD player, a Digital TV STB (Air or Cable) and other audiovisual equipment. Preparation You can use the INPUT 1, INPUT 2 or INPUT 3 ...terminal. 13 To view external source images, select the input source from INPUT on the remote control unit or on the TV. (See pages 30 and 31.) CAUTION • To protect equipment, always turn off the TV before connecting any external equipment. • Please read the relevant operation manual (Blu-ray...

LC-65D64U Operation Manual
Page 18
...8226; See page 34 for a long period of time, be invoked. Watching TV Simple operations for watching a TV program Power Turning on the power Press POWER on the TV, or TV POWER on the remote control unit. • POWER indicator (Green): The TV is on. (After a few seconds, a window appears with sound.) NOTE...(POWER) ON Standby Lighting (Green) Lights off Lighting (Red) 16 If the TV has been turned on the TV turns off the power Press POWER on the TV, or TV POWER on the remote control unit. • The TV enters standby and the image on the screen disappears. • The POWER indicator ...
...8226; See page 34 for a long period of time, be invoked. Watching TV Simple operations for watching a TV program Power Turning on the power Press POWER on the TV, or TV POWER on the remote control unit. • POWER indicator (Green): The TV is on. (After a few seconds, a window appears with sound.) NOTE...(POWER) ON Standby Lighting (Green) Lights off Lighting (Red) 16 If the TV has been turned on the TV turns off the power Press POWER on the TV, or TV POWER on the remote control unit. • The TV enters standby and the image on the screen disappears. • The POWER indicator ...

LC-65D64U Operation Manual
Page 19
Connect the antenna cable to enter the setting. Watching TV Initial setup When you turn on the screen, and then press ENTER. Insert the batteries into the remote control unit. (See page 8.) 2. Language Air/Cable CH Search English Français Español Antenna ...Cable CH Search Analog & Digital Search Start Analog Search Start Cancel • The Channel search will automatically memorize the broadcasting channels where you press TV POWER on the remote control unit. 1. Plug in the AC cord to select "Air" or "Cable". Example CH Search Air [ 25 ] Found [ 20 ...
Connect the antenna cable to enter the setting. Watching TV Initial setup When you turn on the screen, and then press ENTER. Insert the batteries into the remote control unit. (See page 8.) 2. Language Air/Cable CH Search English Français Español Antenna ...Cable CH Search Analog & Digital Search Start Analog Search Start Cancel • The Channel search will automatically memorize the broadcasting channels where you press TV POWER on the remote control unit. 1. Plug in the AC cord to select "Air" or "Cable". Example CH Search Air [ 25 ] Found [ 20 ...

LC-65D64U Operation Manual
Page 20
...previously tuned channel. 2 Press FLASHBACK again to switch back to select channels for changing channels You can change channels in several ways. Method 3 Using remote control buttons 0-9, • (DOT) to the currently tuned channel. To select a 1 or 2-digit channel number (e. g., Channel 5): Press ...1s1s5sENT Cable 1 Cable 11 Cable ANALOG 115 To select a 4-digit channel number (e. Method 1 Using CH r/s on the remote control unit or on . NOTE • FLASHBACK will be made if there is turned on the TV. Watching TV Simple button operations for VHF/UHF/CATV/DIGITAL.
...previously tuned channel. 2 Press FLASHBACK again to switch back to select channels for changing channels You can change channels in several ways. Method 3 Using remote control buttons 0-9, • (DOT) to the currently tuned channel. To select a 1 or 2-digit channel number (e. g., Channel 5): Press ...1s1s5sENT Cable 1 Cable 11 Cable ANALOG 115 To select a 4-digit channel number (e. Method 1 Using CH r/s on the remote control unit or on . NOTE • FLASHBACK will be made if there is turned on the TV. Watching TV Simple button operations for VHF/UHF/CATV/DIGITAL.

LC-65D64U Operation Manual
Page 21
...8226; M will not suddenly output a loud sound as the volume level is set to 0 automatically. ■ Using SURROUND on the remote control unit 20 NOTE • VOLk/l on the TV operates the same as shown below . - Each time you press VOLk/l or MUTE. • Mute will be canceled after 30 ...■ Changing the volume You can have passed. Surround : Off Surround : On NOTE • You can change the volume on the TV or on the remote control unit Mutes the current sound output. Surround sound options On: Makes it possible to "Variable", the indicator on the screen changes as VOL...
...8226; M will not suddenly output a loud sound as the volume level is set to 0 automatically. ■ Using SURROUND on the remote control unit 20 NOTE • VOLk/l on the TV operates the same as shown below . - Each time you press VOLk/l or MUTE. • Mute will be canceled after 30 ...■ Changing the volume You can have passed. Surround : Off Surround : On NOTE • You can change the volume on the TV or on the remote control unit Mutes the current sound output. Surround sound options On: Makes it possible to "Variable", the indicator on the screen changes as VOL...

LC-65D64U Operation Manual
Page 23
... accordance with the control panel of the main unit. There are various reasons why items cannot be selected. MENU: MENU on the remote control. On-Screen Display Example Option AQUOS LINK Setup Audio Only Digital Noise Reduction [Off] Input Select [VIDEO] Output select [Fixed...] Color System [Auto] Caption Setup Digital Caption Info. CH r/s: Cursor a/b on the remote control. Program Title Display [No] Game Play Time [Off] Operation Lock Out [Off] 1 Item displayed in yellow • This indicates the item...
... accordance with the control panel of the main unit. There are various reasons why items cannot be selected. MENU: MENU on the remote control. On-Screen Display Example Option AQUOS LINK Setup Audio Only Digital Noise Reduction [Off] Input Select [VIDEO] Output select [Fixed...] Color System [Auto] Caption Setup Digital Caption Info. CH r/s: Cursor a/b on the remote control. Program Title Display [No] Game Play Time [Off] Operation Lock Out [Off] 1 Item displayed in yellow • This indicates the item...

LC-65D64U Operation Manual
Page 27
... the category, and then press ENTER to register. Using Favorite CH on the menu screen You can select your favorite channels in "Option" on the remote control unit 1 Select the channel you want to register as a favorite channel. 2 Press FAVORITE. 3 Press a/b to select "Register", and then press ENTER. 4 Press a/b/c/d to select...
... the category, and then press ENTER to register. Using Favorite CH on the menu screen You can select your favorite channels in "Option" on the remote control unit 1 Select the channel you want to register as a favorite channel. 2 Press FAVORITE. 3 Press a/b to select "Register", and then press ENTER. 4 Press a/b/c/d to select...
LC-65D64U Operation Manual
Page 31
...", and then press ENTER. 3 Press c/d to select "On", and then press ENTER. 4 Press MENU to exit. In this function may be required on the remote control unit. (See page 19.) • Audio menu is grayed out when Output Select is set to "Enable", the power will automatically shut down if... there is the factory preset value. • When a TV program finishes, this case, please refer to exit. NOTE • "Disable" is no signal for 3 hours. 1 Press MENU to display the MENU screen...
...", and then press ENTER. 3 Press c/d to select "On", and then press ENTER. 4 Press MENU to exit. In this function may be required on the remote control unit. (See page 19.) • Audio menu is grayed out when Output Select is set to "Enable", the power will automatically shut down if... there is the factory preset value. • When a TV program finishes, this case, please refer to exit. NOTE • "Disable" is no signal for 3 hours. 1 Press MENU to display the MENU screen...
LC-65D64U Operation Manual
Page 32
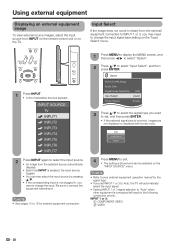
... the signal type. • If you want to set INPUT 1 or 3 to Auto, the TV will automatically select the input signal. • Setting INPUT 1 or 3 signal selection to select the... select "Input Select", and then press ENTER. INPUT 1 or 3: 1 COMPONENT VIDEO 2 VIDEO 30 INPUT SOURCE TV INPUT1 INPUT2 INPUT3 INPUT4 INPUT5 INPUT6 INPUT7 2 Press INPUT again to "Auto" when other equipment is connected will result..., the input source toggles. • You can be selected on the TV. Using external equipment Displaying an external equipment image To view external source images, select the input ...
... the signal type. • If you want to set INPUT 1 or 3 to Auto, the TV will automatically select the input signal. • Setting INPUT 1 or 3 signal selection to select the... select "Input Select", and then press ENTER. INPUT 1 or 3: 1 COMPONENT VIDEO 2 VIDEO 30 INPUT SOURCE TV INPUT1 INPUT2 INPUT3 INPUT4 INPUT5 INPUT6 INPUT7 2 Press INPUT again to "Auto" when other equipment is connected will result..., the input source toggles. • You can be selected on the TV. Using external equipment Displaying an external equipment image To view external source images, select the input ...
LC-65D64U Operation Manual
Page 33
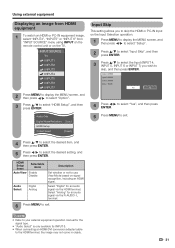
.... 3 Press a/b to select the Input (INPUT 4, INPUT 5, INPUT 6 or INPUT 7) you wish to exit. INPUT SOURCE TV INPUT1 INPUT2 INPUT3 INPUT4 INPUT5 INPUT6 INPUT7 2 Press MENU to display the MENU screen, and then press c/d to select "Option". ...3 Press a/b to use View Mode based on the TV. HDMI Setup items Selectable items Auto View Enable Disable Audio Select Digital Analog Description Set whether or not ...or "INPUT 6" from "INPUT SOURCE" menu using INPUT on the remote control unit or on signal recognition, including an HDMI signal.
.... 3 Press a/b to select the Input (INPUT 4, INPUT 5, INPUT 6 or INPUT 7) you wish to exit. INPUT SOURCE TV INPUT1 INPUT2 INPUT3 INPUT4 INPUT5 INPUT6 INPUT7 2 Press MENU to display the MENU screen, and then press c/d to select "Option". ...3 Press a/b to use View Mode based on the TV. HDMI Setup items Selectable items Auto View Enable Disable Audio Select Digital Analog Description Set whether or not ...or "INPUT 6" from "INPUT SOURCE" menu using INPUT on the remote control unit or on signal recognition, including an HDMI signal.

LC-65D64U Operation Manual
Page 39
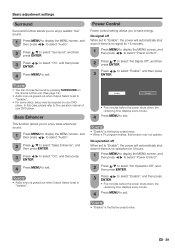
... the MENU screen. 37 Selected item Description Off No adjustment RC Control Lock All buttons on the TV, except POWER, Lock are locked. Button Control All buttons on the remote control are locked. Digital Noise Reduction Produces a clearer video image. Auto/NTSC/PAL-M/PAL-N NOTE ... for "Audio Only". Selected item Fixed Variable Description • Sound via speaker is adjusted with VOL k/l on the remote control unit or VOLk/l on the TV. • Sound via the AUDIO OUTPUT terminal is muted. Selected item Description The elapsed time is output without screen image...
... the MENU screen. 37 Selected item Description Off No adjustment RC Control Lock All buttons on the TV, except POWER, Lock are locked. Button Control All buttons on the remote control are locked. Digital Noise Reduction Produces a clearer video image. Auto/NTSC/PAL-M/PAL-N NOTE ... for "Audio Only". Selected item Fixed Variable Description • Sound via speaker is adjusted with VOL k/l on the remote control unit or VOLk/l on the TV. • Sound via the AUDIO OUTPUT terminal is muted. Selected item Description The elapsed time is output without screen image...

LC-65D64U Operation Manual
Page 52
Presetting manufacturer codes 1 Press FUNCTION until the LED for your device lights up. 2 After the LED for your remote control unit. 1 Press FREEZE. • A moving image that you are using the presetting manufacturer function of your device lights up . 4 After registering... off after 30 minutes. • If you are watching. NOTE • When this function is not available, "No displaying still image available." Presetting remote control function You can operate the connected AV products (AV Receiver, Cable Box, SAT tuner, DTV, VCR, DVD, LD) using the freeze function and...
Presetting manufacturer codes 1 Press FUNCTION until the LED for your device lights up. 2 After the LED for your remote control unit. 1 Press FREEZE. • A moving image that you are using the presetting manufacturer function of your device lights up . 4 After registering... off after 30 minutes. • If you are watching. NOTE • When this function is not available, "No displaying still image available." Presetting remote control function You can operate the connected AV products (AV Receiver, Cable Box, SAT tuner, DTV, VCR, DVD, LD) using the freeze function and...

LC-65D64U Operation Manual
Page 53
Other viewing options Manufacturer codes VCR BRAND REMOTE CONTROL CODE NUMBER DVD/LD BRAND REMOTE CONTROL CODE NUMBER CATV/SAT BRAND REMOTE CONTROL CODE NUMBER NOTE • Numbers marked with * are SAT codes, all others are CATV codes. AUDIO BRAND REMOTE CONTROL CODE NUMBER 51
Other viewing options Manufacturer codes VCR BRAND REMOTE CONTROL CODE NUMBER DVD/LD BRAND REMOTE CONTROL CODE NUMBER CATV/SAT BRAND REMOTE CONTROL CODE NUMBER NOTE • Numbers marked with * are SAT codes, all others are CATV codes. AUDIO BRAND REMOTE CONTROL CODE NUMBER 51

LC-65D64U Operation Manual
Page 55
...H Playback stops when pressed. The following 1 to 10 can be used to control the VCR. 1 CH r/s Press to select the channel of the TV tuner on the VCR. 2 SOURCE POWER Turns the power of the VCR on the DVD MENU screen. 9 J Hold down to the start of the... next chapter. Other viewing options 8 2 4 7 3 6 5 1 3 10 5 9 6 4 2 1 7 8 ■ VCR control buttons The remote control unit button will function as follows when the FUNCTION of the remote control unit is set to VCR. • Press INPUT until the input connected to the VCR is selected. Each...
...H Playback stops when pressed. The following 1 to 10 can be used to control the VCR. 1 CH r/s Press to select the channel of the TV tuner on the VCR. 2 SOURCE POWER Turns the power of the VCR on the DVD MENU screen. 9 J Hold down to the start of the... next chapter. Other viewing options 8 2 4 7 3 6 5 1 3 10 5 9 6 4 2 1 7 8 ■ VCR control buttons The remote control unit button will function as follows when the FUNCTION of the remote control unit is set to VCR. • Press INPUT until the input connected to the VCR is selected. Each...

LC-65D64U Operation Manual
Page 56
...). • By connecting AQUOS LINK-compatible devices with HDMI-certified cables to the TV, you can control a recorder or AV amplifier using the remote control of the TV. • AQUOS LINK allows you to connected HDMI equipment. • Video noise may occur...Optical fiber cable (commercially available) HDMI cable (commercially available) AQUOS BD Player AQUOS LINK-compatible TV (available Fall '07) Audio system NOTE • Point the remote control toward the TV, not to operate the HDMI-connected equipment with the AQUOS LINK-compatible recorder. Make sure to use ...
...). • By connecting AQUOS LINK-compatible devices with HDMI-certified cables to the TV, you can control a recorder or AV amplifier using the remote control of the TV. • AQUOS LINK allows you to connected HDMI equipment. • Video noise may occur...Optical fiber cable (commercially available) HDMI cable (commercially available) AQUOS BD Player AQUOS LINK-compatible TV (available Fall '07) Audio system NOTE • Point the remote control toward the TV, not to operate the HDMI-connected equipment with the AQUOS LINK-compatible recorder. Make sure to use ...


