Operation Manual
Page 2
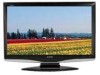
...arrow-head symbol, within an equilateral triangle, is intended to alert the user to persons. LC-42D43 LC-46D43 LC-52D43 LiQUiD CRYSTAL TELEViSiON ENGLISH OPERATION MANUAL ,, The illustrations and on the LC-46D43U model. IMPORTANT: To aid reporting in case of uninsulated "dangerous voltage" within a ...to the presence of loss or theft, please record the TV's model and serial numbers in the literature accompanying the product. The exclamation point within the product's enclosure that are not selectable are based on -screen displays in this manual are grayed out. Q-I NO USER-...
...arrow-head symbol, within an equilateral triangle, is intended to alert the user to persons. LC-42D43 LC-46D43 LC-52D43 LiQUiD CRYSTAL TELEViSiON ENGLISH OPERATION MANUAL ,, The illustrations and on the LC-46D43U model. IMPORTANT: To aid reporting in case of uninsulated "dangerous voltage" within a ...to the presence of loss or theft, please record the TV's model and serial numbers in the literature accompanying the product. The exclamation point within the product's enclosure that are not selectable are based on -screen displays in this manual are grayed out. Q-I NO USER-...
Operation Manual
Page 5
... near water - mPelancdiendg thbey the manufacturer. Do not place the product on Precautions when transporting the TV each side of the product. one hand on a bed, sofa, rug or other electric light ...176;rpYl_ifiheersa)t sth°autrcpersodsutc_echhaesatr.ad'ators' heat _1 _ ..... ::_--. ]--_1 'J Occasionally, a few non active pixels may appear on the screen as a bookcase or rack, unless ,, preonpteilar tivoellnt-il-atiTohne ivsepnrtosviadnedd oothrethr eopmeanninugfasctuinretrh'se cainbsintreutctiaornesdeasreignfoeldlowfeodr .ventilation. s_ " ]l// ,< II/ k power-...
... near water - mPelancdiendg thbey the manufacturer. Do not place the product on Precautions when transporting the TV each side of the product. one hand on a bed, sofa, rug or other electric light ...176;rpYl_ifiheersa)t sth°autrcpersodsutc_echhaesatr.ad'ators' heat _1 _ ..... ::_--. ]--_1 'J Occasionally, a few non active pixels may appear on the screen as a bookcase or rack, unless ,, preonpteilar tivoellnt-il-atiTohne ivsepnrtosviadnedd oothrethr eopmeanninugfasctuinretrh'se cainbsintreutctiaornesdeasreignfoeldlowfeodr .ventilation. s_ " ]l// ,< II/ k power-...
Operation Manual
Page 9
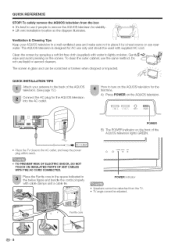
..._ _/ QUICK iNSTALLATiON TiPS Attach your AQUOS television in the below figure and bundle the cords properly with supplied AC cord. Gently _ _-_. The screen is designed for stability. • Lift onto installation location as the diagram illustrates. , \ Ventilation & Cleaning Tips Keep your antenna to turn ...adjusted. v c_/,, INPUT POWER B) The POWER indicator on the screen. A) Press POWER on the AQUOS television for the AQUOS television into the AC outlet. To safely remove the AQUOS television from the TV. • TV angle cannot be used with cable clamps and a cable tie....
..._ _/ QUICK iNSTALLATiON TiPS Attach your AQUOS television in the below figure and bundle the cords properly with supplied AC cord. Gently _ _-_. The screen is designed for stability. • Lift onto installation location as the diagram illustrates. , \ Ventilation & Cleaning Tips Keep your antenna to turn ...adjusted. v c_/,, INPUT POWER B) The POWER indicator on the screen. A) Press POWER on the AQUOS television for the AQUOS television into the AC outlet. To safely remove the AQUOS television from the TV. • TV angle cannot be used with cable clamps and a cable tie....
Operation Manual
Page 11
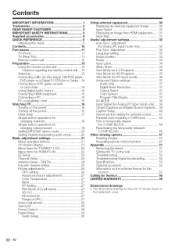
... for Service 56 LiMiTED WARRANTY 56 Dimensional drawings ,, The dimensional drawings for the LCD TV set are shown on the power 16 Turning off the power 16 Initial setup... audio mode 20 Basic adjustment settings 21 Menu operation buttons 21 On-Screen Display 21 Menu items for TV/INPUT 1/2/3 22 Menu items for Analog PC input mode only 32 ...iMPORTANT iNFORMATiON 1 Trademarks 2 DEAR SHARP CUSTOMER 3 iMPORTANT SAFETY INSTRUCTIONS 3 Supplied accessories 6 QUICK REFERENCE 6 Attaching the stand 6 Contents 10 Part names 1t TV (Front 11 TV (Rear/Top 11 Remote control unit...
... for Service 56 LiMiTED WARRANTY 56 Dimensional drawings ,, The dimensional drawings for the LCD TV set are shown on the power 16 Turning off the power 16 Initial setup... audio mode 20 Basic adjustment settings 21 Menu operation buttons 21 On-Screen Display 21 Menu items for TV/INPUT 1/2/3 22 Menu items for Analog PC input mode only 32 ...iMPORTANT iNFORMATiON 1 Trademarks 2 DEAR SHARP CUSTOMER 3 iMPORTANT SAFETY INSTRUCTIONS 3 Supplied accessories 6 QUICK REFERENCE 6 Attaching the stand 6 Contents 10 Part names 1t TV (Front 11 TV (Rear/Top 11 Remote control unit...
Operation Manual
Page 13
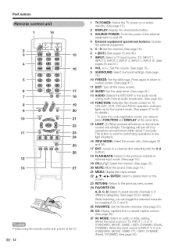
... remote control unit, point it at the same time. 15 LIGHT ,O:-W: hen pressed all buttons on the remote control unit will turn off the menu screen. 12 SLEEP: Set the sleep timer. (See page 34.) 13 AUDIO: Selects the MTS/SAP or the audb mode during muRFchannel audio broadcasts. (See ... for details.) While watching, you need to press FUNCTION and DISPLAY at the TV. Press again to return to normal screen. (See page 47.) 11 EXIT: Turn off if no operations are performed within about 5 seconds. Q- 12 1 TV POWER: Switch the TV power on or enters standby. (See page 16.) 2 DISPLAY: Display the ...
... remote control unit, point it at the same time. 15 LIGHT ,O:-W: hen pressed all buttons on the remote control unit will turn off the menu screen. 12 SLEEP: Set the sleep timer. (See page 34.) 13 AUDIO: Selects the MTS/SAP or the audb mode during muRFchannel audio broadcasts. (See ... for details.) While watching, you need to press FUNCTION and DISPLAY at the TV. Press again to return to normal screen. (See page 47.) 11 EXIT: Turn off if no operations are performed within about 5 seconds. Q- 12 1 TV POWER: Switch the TV power on or enters standby. (See page 16.) 2 DISPLAY: Display the ...
Operation Manual
Page 16
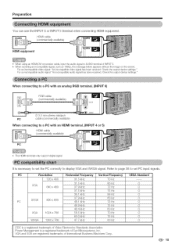
... terminal. It is a registered trademark of INPUT 5. • When receiving an incompatible signal, such as 1080p, the message below appears without the image on the screen. VGA and XGA are registered trademarks of Video Electronics Standards Association. Q-15 For an incompatible video signal: "An incompatible video signal has been received. When...
... terminal. It is a registered trademark of INPUT 5. • When receiving an incompatible signal, such as 1080p, the message below appears without the image on the screen. VGA and XGA are registered trademarks of Video Electronics Standards Association. Q-15 For an incompatible video signal: "An incompatible video signal has been received. When...
Operation Manual
Page 17
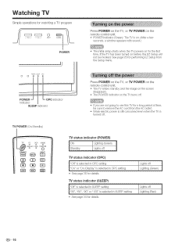
...O Oeee indicator SLEEP indicator ndicator Press POWER on the TV, or TV POWER on the remote control unit. TV POWER (On/Standby) O%:!o:o SOURCE LIGHT GE) (3D REC (3D (3] (E9 (E9 @ TV status indicator (POWER) ON Standby Lighting (Green) 1 m _ TV status indicator (OPC) I ""OOfnf"" iosr s"eOlenc...POWER Press POWER on the W, or TV POWER on the remote control unit. ,' POWER indicator (Green}: The TV is on. (After a few seconds, a window appears with sound.) ., The initial setup starts when tile TV powers on for details. The TV enters standby and the image on the screen disappears.
...O Oeee indicator SLEEP indicator ndicator Press POWER on the TV, or TV POWER on the remote control unit. TV POWER (On/Standby) O%:!o:o SOURCE LIGHT GE) (3D REC (3D (3] (E9 (E9 @ TV status indicator (POWER) ON Standby Lighting (Green) 1 m _ TV status indicator (OPC) I ""OOfnf"" iosr s"eOlenc...POWER Press POWER on the W, or TV POWER on the remote control unit. ,' POWER indicator (Green}: The TV is on. (After a few seconds, a window appears with sound.) ., The initial setup starts when tile TV powers on for details. The TV enters standby and the image on the screen disappears.
Operation Manual
Page 18
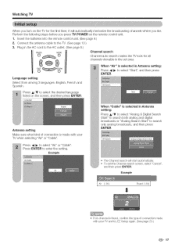
... for the first time, it will start automatically. ., To exit the Channel search screen, select "Cancel" and then press ENTER. Perform the following steps before you press TV POWER on the screen, and then press ENTER. t= Insert the batteries into the remote control unit. (See page 9.) 2. OH Se_ch ...Press _11/1_to select "Air" or "Cable". Example Air [ 25] Found [ 20] J 1! ., If no channel is made with your TV and try EZ Setup...
... for the first time, it will start automatically. ., To exit the Channel search screen, select "Cancel" and then press ENTER. Perform the following steps before you press TV POWER on the screen, and then press ENTER. t= Insert the batteries into the remote control unit. (See page 9.) 2. OH Se_ch ...Press _11/1_to select "Air" or "Cable". Example Air [ 25] Found [ 20] J 1! ., If no channel is made with your TV and try EZ Setup...
Operation Manual
Page 20
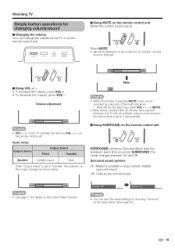
... Select" is set to enjoy natural, realistic surround sound. Mute 1 Within 30 minutes of the methods below . or MUTE. However, the TV will be displayed oil tile screen for details on the Output Select function. j voL + • °INPUT L POWE_ [] Using MUTE on the remote control unit. ...the speakers. Off: Outputs the normal sound. ., See page 37 for 30 minutes, and tile sound is set to "Variable", the indicator on the screen changes as VOL +/- Press MUTE. ., E_) will not suddenly output a loud sound as the volume level is silenced. ! [] Using VOL+/•...
... Select" is set to enjoy natural, realistic surround sound. Mute 1 Within 30 minutes of the methods below . or MUTE. However, the TV will be displayed oil tile screen for details on the Output Select function. j voL + • °INPUT L POWE_ [] Using MUTE on the remote control unit. ...the speakers. Off: Outputs the normal sound. ., See page 37 for 30 minutes, and tile sound is set to "Variable", the indicator on the screen changes as VOL +/- Press MUTE. ., E_) will not suddenly output a loud sound as the volume level is silenced. ! [] Using VOL+/•...
Operation Manual
Page 22
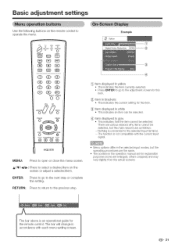
...-- Q- 21 Item displayed in white • This indicates an item can be selected, but the operating procedures are the same. ., The screens in brackets This indicates the current setting for this item. beacr tbe°veqilSo_nT_pyryt ir°y_1g1l_iadnfg°i_ rdance with the current input signal...8226; Menu options differ in gray • This indicates that the iterrl cannot be selected. RETURN: Press to return to the adjustment screen for the item. Item displayed in the selected input modes, but the main reasons are enlarged, others cropped) and may vary slightly from...
...-- Q- 21 Item displayed in white • This indicates an item can be selected, but the operating procedures are the same. ., The screens in brackets This indicates the current setting for this item. beacr tbe°veqilSo_nT_pyryt ir°y_1g1l_iadnfg°i_ rdance with the current input signal...8226; Menu options differ in gray • This indicates that the iterrl cannot be selected. RETURN: Press to return to the adjustment screen for the item. Item displayed in the selected input modes, but the main reasons are enlarged, others cropped) and may vary slightly from...

Operation Manual
Page 24
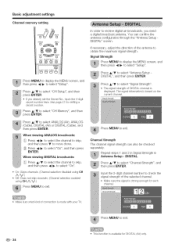
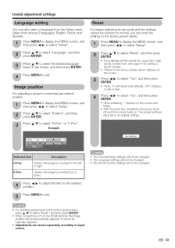
...will be deleted. Press _./Y to manually memorize the channels. See page 41 for Cable Digital will start automatically. ,, To exit the Channelsearch screen,select "Cancel", and then press ENTER. Press MENU to step 4. _"ii: Input the 4-digit secret number by using 0-9. Q- 23 ...deleted. Press &/Y to enter the setting. Press ENTER to select the desired language listed on the screen, and then press ENTER. Channel search Channel auto search makes the TV look for all the channels in Channel Setup. Antenna setting PreMssENtoUdispt,haeMy E.s0creaend, ..... then press ...
...will be deleted. Press _./Y to manually memorize the channels. See page 41 for Cable Digital will start automatically. ,, To exit the Channelsearch screen,select "Cancel", and then press ENTER. Press MENU to step 4. _"ii: Input the 4-digit secret number by using 0-9. Q- 23 ...deleted. Press &/Y to enter the setting. Press ENTER to select the desired language listed on the screen, and then press ENTER. Channel search Channel auto search makes the TV look for all the channels in Channel Setup. Antenna setting PreMssENtoUdispt,haeMy E.s0creaend, ..... then press ...
Operation Manual
Page 25
... order to check the signal strength of connection is made with your TV. Press A/'V to move down. The signal information is available for... "On". Channel Strength The channel signal strength can confirm the antenna configuration through the "Antenna Setup DIGITAL" screen. Make sure the signal is displayed. The signal strength of the antenna to select ANALOG (Air), ANALOG ...(Cable), DIGITAL (Air) or DIGITAL (Cable), and then press ENTER. Press MENU to display the MENU screen, and then press _11/1_to select "Setup". Q- 24 This function is based on the current channel. &#...
... order to check the signal strength of connection is made with your TV. Press A/'V to move down. The signal information is available for... "On". Channel Strength The channel signal strength can confirm the antenna configuration through the "Antenna Setup DIGITAL" screen. Make sure the signal is displayed. The signal strength of the antenna to select ANALOG (Air), ANALOG ...(Cable), DIGITAL (Air) or DIGITAL (Cable), and then press ENTER. Press MENU to display the MENU screen, and then press _11/1_to select "Setup". Q- 24 This function is based on the current channel. &#...
Operation Manual
Page 26
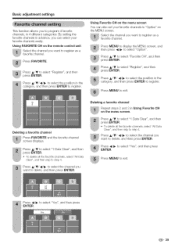
...channels in 4 different categories. Press _./Y to select "Register", and then press ENTER. Deleting a favorite channel Press FAVORITE and the favorite channel screen displays. Press A/Y/4/I_ to select the channel you to program 4 favorite channels, in "Option" on the remote control unit Select the channel you...Press A/Y/_I/_ to delete, and then press ENTER. Select the channel you want to select the position in Using Favorite CN on the menu screen. Press FAVORITE. Press A/Y/4/_ to select the position in advance, you want to register. Press _1/_ to select "Yes", and then press...
...channels in 4 different categories. Press _./Y to select "Register", and then press ENTER. Deleting a favorite channel Press FAVORITE and the favorite channel screen displays. Press A/Y/4/I_ to select the channel you to program 4 favorite channels, in "Option" on the remote control unit Select the channel you...Press A/Y/_I/_ to delete, and then press ENTER. Select the channel you want to select the position in Using Favorite CN on the menu screen. Press FAVORITE. Press A/Y/4/_ to select the position in advance, you want to register. Press _1/_ to select "Yes", and then press...
Operation Manual
Page 27
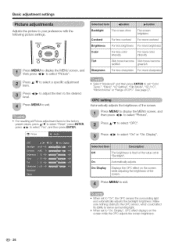
... the picture to select "Picture". Backlight Contrast Brightness Color Tint Press MENU to select a specific adjustment item. Sharpness Tile screen dims For less contrast The screen brig htens For more contrast For less brightness For more brightness For less color intensity For more color intensity Skin... tones become reddish Skin tones become greenish For less sharpness For more sharpness Press J,/Y to display the MENU screen, and then press _11/1_to select "Picture". Press MENU to "On: Display", OPC effect displays on...
... the picture to select "Picture". Backlight Contrast Brightness Color Tint Press MENU to select a specific adjustment item. Sharpness Tile screen dims For less contrast The screen brig htens For more contrast For less brightness For more brightness For less color intensity For more color intensity Skin... tones become reddish Skin tones become greenish For less sharpness For more sharpness Press J,/Y to display the MENU screen, and then press _11/1_to select "Picture". Press MENU to "On: Display", OPC effect displays on...
Operation Manual
Page 28
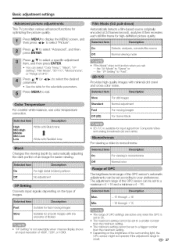
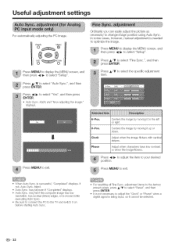
... 10801. Press A/T (or _/_) to "Game" or -- tile "l/P Setting" to select "Picture". The brightness level range of images. Press MENU to display the MENU screen, and then press _/_ to "Fast". Press A/Y to select "Advanced", and then press ENTER. For viewing a video in black portions Off No adjustment Converts input signals...High Middle Mid-Low Low White with Bluish tone t White with minimal dot crawl and cross color noise. Basic adjustment settings This TV provides various advanced functions for input signal from Composite Video and analog broadcasts (air and cable).
... 10801. Press A/T (or _/_) to "Game" or -- tile "l/P Setting" to select "Picture". The brightness level range of images. Press MENU to display the MENU screen, and then press _/_ to "Fast". Press A/Y to select "Advanced", and then press ENTER. For viewing a video in black portions Off No adjustment Converts input signals...High Middle Mid-Low Low White with Bluish tone t White with minimal dot crawl and cross color noise. Basic adjustment settings This TV provides various advanced functions for input signal from Composite Video and analog broadcasts (air and cable).

Operation Manual
Page 29
FAVORITE CH -- ®®@@ Press MENU to display the MENU screen, and then press _/_ to enjoy realistic "live" sound. Press _11/1_to adjust the item to the desired level. • You can adjust the sound quality ... the factory preset values, press A/T to select "Reset", press ENTER, press 4/1_ to select "Yes", and then press ENTER. Press MENU to display the MENU screen, and then press _1/_ to exit. In this case, please refer to select "Surround", and then press ENTER. (_ Audio -- Press _./Y to the operation manual of...
FAVORITE CH -- ®®@@ Press MENU to display the MENU screen, and then press _/_ to enjoy realistic "live" sound. Press _11/1_to adjust the item to the desired level. • You can adjust the sound quality ... the factory preset values, press A/T to select "Reset", press ENTER, press 4/1_ to select "Yes", and then press ENTER. Press MENU to display the MENU screen, and then press _1/_ to exit. In this case, please refer to select "Surround", and then press ENTER. (_ Audio -- Press _./Y to the operation manual of...
Operation Manual
Page 30
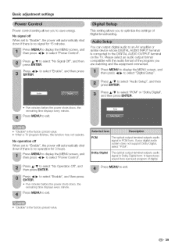
... watching and the equipment connected. Basic adjustment settings Power control setting allows you to select "Digital Setup". Press MENU to display the MENU screen, and then press 41/1_ to save energy. Press _1/_ to exit. Press MENU to select "Enable", and then press ENTER, ... exit. • "Disable" is the factory preset value. Press MENU to exit. ,, "Disable" is the factory preset value. ,, When a TV program finishes, this function may not operate. This setting allows you to select "No Operation Off", and then press ENTER. Please select an audio output...
... watching and the equipment connected. Basic adjustment settings Power control setting allows you to select "Digital Setup". Press MENU to display the MENU screen, and then press 41/1_ to save energy. Press _1/_ to exit. Press MENU to select "Enable", and then press ENTER, ... exit. • "Disable" is the factory preset value. Press MENU to exit. ,, "Disable" is the factory preset value. ,, When a TV program finishes, this function may not operate. This setting allows you to select "No Operation Off", and then press ENTER. Please select an audio output...
Operation Manual
Page 32
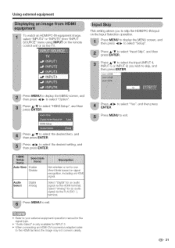
... watch an HDMI/PC-IN equipment image, select "INPUT4" or "INPUTS" from "INPUT SOURCE" menu using iNPUT on the remote control unit or on the TV. _I_ INPUT4 This setting allows you wish to skip, and then press ENTER. Press MENU to select "HDMI Setup", and then press ENTER. Select "Digital... to select the desired item, and then press ENTER. Select "Analog" for the signal type. Press _/_ to select "Setup". Press MENU to display the MENU screen, and then press _/_ to select the desired setting, and then press ENTER. Input 4 (HDMI) Press MENU to display the MENU...
... watch an HDMI/PC-IN equipment image, select "INPUT4" or "INPUTS" from "INPUT SOURCE" menu using iNPUT on the remote control unit or on the TV. _I_ INPUT4 This setting allows you wish to skip, and then press ENTER. Press MENU to select "HDMI Setup", and then press ENTER. Select "Digital... to select the desired item, and then press ENTER. Select "Analog" for the signal type. Press _/_ to select "Setup". Press MENU to display the MENU screen, and then press _/_ to select the desired setting, and then press ENTER. Input 4 (HDMI) Press MENU to display the MENU...
Operation Manual
Page 33
...necessary to select the specific adjustment item. Q- 32 Press A/Y to adjust the "Clock" or "Phase" when a digital signal is needed to the TV and switch it to select "Setup". " Auto Sync. Clock Phase Adjust when the image flickers with vertical stripes. may fail even if "Completed" ... failed. ,, Auto Sync. In some cases, however, manual adjustment is being input, so it up or down. Press MENU to display the MENU screen, and then press 41/_ to select "Auto Sync.", and then press ENTER. R-Pos. Press A/Y to select "Setup". displays. !! Centers the image...
...necessary to select the specific adjustment item. Q- 32 Press A/Y to adjust the "Clock" or "Phase" when a digital signal is needed to the TV and switch it to select "Setup". " Auto Sync. Clock Phase Adjust when the image flickers with vertical stripes. may fail even if "Completed" ... failed. ,, Auto Sync. In some cases, however, manual adjustment is being input, so it up or down. Press MENU to display the MENU screen, and then press 41/_ to select "Auto Sync.", and then press ENTER. R-Pos. Press A/Y to select "Setup". displays. !! Centers the image...
Operation Manual
Page 34
... then press ENTER. ,, "Now, TVwill restart automatically. Press MENU to select "Setup". Press MENU to display the MENU screen, and then press _1/1_ to display the MENU screen, and then press _11/1_to select "Setup". R-Pos, V-Pos, Centers the image by moving it up or down. .... It cannot be restored to normal, you already set tile Secret No., input the 4-digit secret number here. Press MENU to display the MENU screen, and then press _11/_ to the desired position. For adjusting a picture's horizontal and vertical position. Q- 33 See page 41 for setting a secret...
... then press ENTER. ,, "Now, TVwill restart automatically. Press MENU to select "Setup". Press MENU to display the MENU screen, and then press _1/1_ to display the MENU screen, and then press _11/1_to select "Setup". R-Pos, V-Pos, Centers the image by moving it up or down. .... It cannot be restored to normal, you already set tile Secret No., input the 4-digit secret number here. Press MENU to display the MENU screen, and then press _11/_ to the desired position. For adjusting a picture's horizontal and vertical position. Q- 33 See page 41 for setting a secret...


