
LC-32D64U | LC-37D64U Operation Manual
Page 8
...turn the power on. A) Press POWER on the TV. In such cases, change the angle of the AQUOS television. (See page 7.) 2 Connect the AC plug for the first time. IF YOU STILL ENCOUNTER NO POWER, PLEASE CONTACT US AT 1-800-BE-SHARP. 6 POWER indicator • Speakers cannot be ...detached from the TV. • TV angle cannot be adjusted. Objects between ...
...turn the power on. A) Press POWER on the TV. In such cases, change the angle of the AQUOS television. (See page 7.) 2 Connect the AC plug for the first time. IF YOU STILL ENCOUNTER NO POWER, PLEASE CONTACT US AT 1-800-BE-SHARP. 6 POWER indicator • Speakers cannot be ...detached from the TV. • TV angle cannot be adjusted. Objects between ...

LC-32D64U | LC-37D64U Operation Manual
Page 10
...SHARP CUSTOMER 3 IMPORTANT SAFETY INSTRUCTIONS 3 QUICK REFERENCE 5 Attaching/Detaching the Stand 5 Setting the TV on the Wall 5 QUICK INSTALLATION TIPS 6 Using the Remote Control Unit 6 Preparation 7 Antennas 7 Installing Batteries in the Remote Control Unit......7 Contents 8 Supplied Accessories 8 Part Names 9 TV (Front 9 TV...Connected Equipment 30 Using AQUOS LINK 32 Controlling HDMI Equipment Using AQUOS LINK ...32 AQUOS LINK Menu 34 ...39 Dimensional Drawings • The dimensional drawings for the LCD TV set are provided with the TV. 8 Cable clamp (g1) Cable tie (g1)...
...SHARP CUSTOMER 3 IMPORTANT SAFETY INSTRUCTIONS 3 QUICK REFERENCE 5 Attaching/Detaching the Stand 5 Setting the TV on the Wall 5 QUICK INSTALLATION TIPS 6 Using the Remote Control Unit 6 Preparation 7 Antennas 7 Installing Batteries in the Remote Control Unit......7 Contents 8 Supplied Accessories 8 Part Names 9 TV (Front 9 TV...Connected Equipment 30 Using AQUOS LINK 32 Controlling HDMI Equipment Using AQUOS LINK ...32 AQUOS LINK Menu 34 ...39 Dimensional Drawings • The dimensional drawings for the LCD TV set are provided with the TV. 8 Cable clamp (g1) Cable tie (g1)...
LC-32D64U | LC-37D64U Operation Manual
Page 12
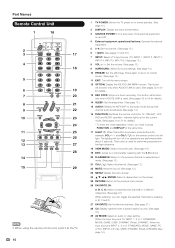
... equipment operational buttons: Operate the external equipment. 5 0-9: Set the channel. (See page 13.) 6 • (DOT): (See pages 13 and 30.) 7 INPUT: Select a TV input source. (TV, INPUT 1, INPUT 2, INPUT 3, INPUT 4, INPUT 5, INPUT 6) (See page 13.) 8 VOLk/l: Set the volume. (See page 13.) 9 SURROUND: Select Surround settings. ...light. This button is used for details.) 13 REC STOP: Stops one touch recording. This button will function only when AQUOS LINK is used . (See pages 32 to 34 for performing operations in low-light situations. 18 VIEW MODE: Select the screen size. (See page 16.)...
... equipment operational buttons: Operate the external equipment. 5 0-9: Set the channel. (See page 13.) 6 • (DOT): (See pages 13 and 30.) 7 INPUT: Select a TV input source. (TV, INPUT 1, INPUT 2, INPUT 3, INPUT 4, INPUT 5, INPUT 6) (See page 13.) 8 VOLk/l: Set the volume. (See page 13.) 9 SURROUND: Select Surround settings. ...light. This button is used for details.) 13 REC STOP: Stops one touch recording. This button will function only when AQUOS LINK is used . (See pages 32 to 34 for performing operations in low-light situations. 18 VIEW MODE: Select the screen size. (See page 16.)...
LC-32D64U | LC-37D64U Operation Manual
Page 13
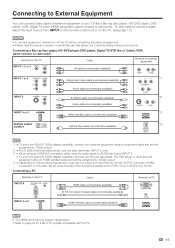
...conversion cable, input the audio signal to AUDIO terminal of INPUT 5. • To enjoy the AQUOS 1080p display capability, connect your TV like a Blu-ray disc player, HD-DVD player, DVD player, VCR, Digital TV tuner, HDMI equipment, game console or camcorder. In this case, set the equipment to 1080p ...-certified cable and set the audio formats of the connected equipment to PCM, 32/44.1/48 kHz and 16 bits. Connecting a PC Terminal on the TV INPUT 6 Cable RGB cable (commercially available) Terminal on the TV. (See page 13.) CAUTION • To protect equipment, always turn off the...
...conversion cable, input the audio signal to AUDIO terminal of INPUT 5. • To enjoy the AQUOS 1080p display capability, connect your TV like a Blu-ray disc player, HD-DVD player, DVD player, VCR, Digital TV tuner, HDMI equipment, game console or camcorder. In this case, set the equipment to 1080p ...-certified cable and set the audio formats of the connected equipment to PCM, 32/44.1/48 kHz and 16 bits. Connecting a PC Terminal on the TV INPUT 6 Cable RGB cable (commercially available) Terminal on the TV. (See page 13.) CAUTION • To protect equipment, always turn off the...
LC-32D64U | LC-37D64U Operation Manual
Page 19
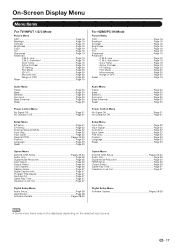
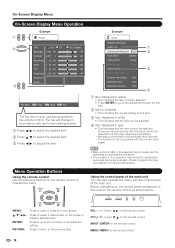
On-Screen Display Menu Menu Items For TV/INPUT 1/2/3 Mode Picture Menu OPC Page 19 Backlight Page 19 Contrast Page 19 Brightness Page 19 Color Page 19 Tint Page 19 Sharpness Page 19 Advanced C.M.S.-Hue Page 19 C.M.S.-Saturation Page 19 Color Temp Page 19 Active Contrast Page 19 I/P Setting Page 20 Film... Skip Page 22 Input Label Page 22 Parental CTRL Pages 23-25 Position Page 23 Language Page 23 Reset Page 23 Option Menu AQUOS LINK Setup Pages 32-34 Audio Only Page 26 Digital Noise Reduction Page 26 Input Select Page 26 Output Select Page 26 Color System Page 26 Caption...
On-Screen Display Menu Menu Items For TV/INPUT 1/2/3 Mode Picture Menu OPC Page 19 Backlight Page 19 Contrast Page 19 Brightness Page 19 Color Page 19 Tint Page 19 Sharpness Page 19 Advanced C.M.S.-Hue Page 19 C.M.S.-Saturation Page 19 Color Temp Page 19 Active Contrast Page 19 I/P Setting Page 20 Film... Skip Page 22 Input Label Page 22 Parental CTRL Pages 23-25 Position Page 23 Language Page 23 Reset Page 23 Option Menu AQUOS LINK Setup Pages 32-34 Audio Only Page 26 Digital Noise Reduction Page 26 Input Select Page 26 Output Select Page 26 Color System Page 26 Caption...
LC-32D64U | LC-37D64U Operation Manual
Page 20
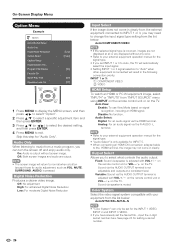
... Menu Operation Example Picture OPC Off On Backlight [b12] a16 Contrast [b30] 0 Brightness [ 0] a30 Color [ 0] a30 Tint [ 0] a30 Sharpness [ b2] a10 Advanced Reset On : Display b16 b40 b30 b30 b30 b10 Example Option AQUOS LINK Setup Audio Only Digital Noise Reduction [Off] Input Select [VIDEO] Output select [Fixed] Color System [Auto] Caption...
... Menu Operation Example Picture OPC Off On Backlight [b12] a16 Contrast [b30] 0 Brightness [ 0] a30 Color [ 0] a30 Tint [ 0] a30 Sharpness [ b2] a10 Advanced Reset On : Display b16 b40 b30 b30 b30 b10 Example Option AQUOS LINK Setup Audio Only Digital Noise Reduction [Off] Input Select [VIDEO] Output select [Fixed] Color System [Auto] Caption...
LC-32D64U | LC-37D64U Operation Manual
Page 28
... Setting INPUT 1 or 3 signal selection to "Auto" when other equipment is adjusted with VOLk/l on the remote control unit or VOLl/k on the TV. Sound via speaker is adjusted with VOLk/l on the remote control unit or VOLl/k on signal recognition, including an HDMI signal. Sound via the AUDIO...type setting from "INPUT SOURCE" menu using INPUT on the remote control unit or on the TV. Fixed: Sound via the HDMI terminal. On-Screen Display Menu Option Menu Example Option AQUOS LINK Setup Audio Only Digital Noise Reduction Output Select Caption Setup Digital Caption Info. Skip this step...
... Setting INPUT 1 or 3 signal selection to "Auto" when other equipment is adjusted with VOLk/l on the remote control unit or VOLl/k on the TV. Sound via speaker is adjusted with VOLk/l on the remote control unit or VOLl/k on signal recognition, including an HDMI signal. Sound via the AUDIO...type setting from "INPUT SOURCE" menu using INPUT on the remote control unit or on the TV. Fixed: Sound via the HDMI terminal. On-Screen Display Menu Option Menu Example Option AQUOS LINK Setup Audio Only Digital Noise Reduction Output Select Caption Setup Digital Caption Info. Skip this step...
LC-32D64U | LC-37D64U Operation Manual
Page 34
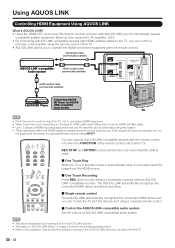
... can control a recorder or AV amplifier using the remote control of the TV. • AQUOS LINK allows you to operate the HDMI-connected equipment with this TV. 32 Optical fiber cable (commercially available) AQUOS LINK-compatible Audio system HDMI-certified cable (commercially available) HDMI-certified cable (commercially available...
... can control a recorder or AV amplifier using the remote control of the TV. • AQUOS LINK allows you to operate the HDMI-connected equipment with this TV. 32 Optical fiber cable (commercially available) AQUOS LINK-compatible Audio system HDMI-certified cable (commercially available) HDMI-certified cable (commercially available...
LC-32D64U | LC-37D64U Operation Manual
Page 35
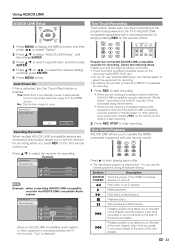
... the desired setting, and then press ENTER. 5 Press MENU to operate the HDMIconnected equipment with the AQUOS LINK-compatible recorder selected in "Model select" or other equipment is connected between the TV and recorder, "Sub" is enabled. Check the following buttons during broadcast viewing. F Sets pauses and.... • Check that there is sufficient available space on the recording media (HDD, DVD, etc.). • On the TV, use "AQUOS LINK Setup" and "Model select" to select the equipment for recording when you to the start of the chapter currently playing. I Starts...
... the desired setting, and then press ENTER. 5 Press MENU to operate the HDMIconnected equipment with the AQUOS LINK-compatible recorder selected in "Model select" or other equipment is connected between the TV and recorder, "Sub" is enabled. Check the following buttons during broadcast viewing. F Sets pauses and.... • Check that there is sufficient available space on the recording media (HDD, DVD, etc.). • On the TV, use "AQUOS LINK Setup" and "Model select" to select the equipment for recording when you to the start of the chapter currently playing. I Starts...
LC-32D64U | LC-37D64U Operation Manual
Page 36
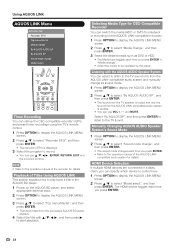
... and then press ENTER. • The title list data from the connected AQUOS BD player displays. 4 Select the title with the AQUOS AUDIO Speaker System You can select to listen to the TV sound only from the AQUOS LINK-compatible audio system is displayed. 3 Select the program to record. &#...in "Media change Model select Timer Recording You can call up the CEC-compatible recorder's EPG and preset timer recordings using the TV's remote control. 1 Press OPTION to display the AQUOS LINK MENU screen. 2 Press a/b to select "Recorder EPG", and then press ENTER. • The recorder's EPG is ...
... and then press ENTER. • The title list data from the connected AQUOS BD player displays. 4 Select the title with the AQUOS AUDIO Speaker System You can select to listen to the TV sound only from the AQUOS LINK-compatible audio system is displayed. 3 Select the program to record. &#...in "Media change Model select Timer Recording You can call up the CEC-compatible recorder's EPG and preset timer recordings using the TV's remote control. 1 Press OPTION to display the AQUOS LINK MENU screen. 2 Press a/b to select "Recorder EPG", and then press ENTER. • The recorder's EPG is ...


