Operation Manual
Page 1
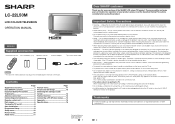
...off 8 Auto Installation 8 Programme Setup 8 Setup menu 10 Picture menu 10 Audio menu 11 Page Feature menu 11 Picture and still image 13 Switching the analogue audio format 13 Teletext function 13 Connecting a PC (Picture menu).......14 Appendix 15 Specifications 16 Printed in...to clean it, as a fixed point of the SHARP LCD colour TV product. Unplug the AC cord from the cart. • Ventilation - Use a soft damp cloth to follow the manufacturer's instructions. LC-22L50M LCD COLOUR TELEVISION OPERATION MANUAL ENGLISH Supplied accessories Remote control unit ...
...off 8 Auto Installation 8 Programme Setup 8 Setup menu 10 Picture menu 10 Audio menu 11 Page Feature menu 11 Picture and still image 13 Switching the analogue audio format 13 Teletext function 13 Connecting a PC (Picture menu).......14 Appendix 15 Specifications 16 Printed in...to clean it, as a fixed point of the SHARP LCD colour TV product. Unplug the AC cord from the cart. • Ventilation - Use a soft damp cloth to follow the manufacturer's instructions. LC-22L50M LCD COLOUR TELEVISION OPERATION MANUAL ENGLISH Supplied accessories Remote control unit ...
Operation Manual
Page 3
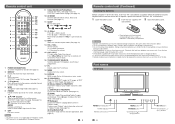
.... TELETEXT* mode: Set the page. (See page 13.) 4 A (Flashback) Press A to return to the previous selected channel or external input mode. 5 WIDE Change the wide image mode. (See page 12.) 6 FREEZE Freeze a motion picture on the screen. (See page 13.) 7 a/b/c/d (Cursor) Select a desired item on and...the first time, insert two "AA" size batteries (supplied). NOTE 17 PC Directly select the PC terminal. 18 MENU Display the menu screen. 19 RETURN MENU mode: Return to the previous menu screen. 20 m (TELETEXT*) Select the TELETEXT* mode. (all TV image, all TEXT image, TV/TEXT image) ...
.... TELETEXT* mode: Set the page. (See page 13.) 4 A (Flashback) Press A to return to the previous selected channel or external input mode. 5 WIDE Change the wide image mode. (See page 12.) 6 FREEZE Freeze a motion picture on the screen. (See page 13.) 7 a/b/c/d (Cursor) Select a desired item on and...the first time, insert two "AA" size batteries (supplied). NOTE 17 PC Directly select the PC terminal. 18 MENU Display the menu screen. 19 RETURN MENU mode: Return to the previous menu screen. 20 m (TELETEXT*) Select the TELETEXT* mode. (all TV image, all TEXT image, TV/TEXT image) ...
Operation Manual
Page 4
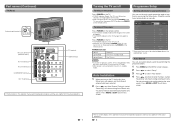
.... • The POWER indicator on the remote control. Auto Installation 1 When you turn the power ON/OFF by performing the procedure below. 1 Press MENU and the MENU screen displays. 2 Press c/d to select "Setup". 3 Press a/b to remove the AC cord from the actual operations. 7 8 "Searching" will shown... Setup Turning on the power Setting channels to do not need to your preference Press POWER on -screen displays in standby mode. MENU[Setup] Picture Programme Label Colour Sound Manual Skip Booster Auto Search Sort Teletext Language Audio Setup Feature 1 AUTO M 175.25MHz On...
.... • The POWER indicator on the remote control. Auto Installation 1 When you turn the power ON/OFF by performing the procedure below. 1 Press MENU and the MENU screen displays. 2 Press c/d to select "Setup". 3 Press a/b to remove the AC cord from the actual operations. 7 8 "Searching" will shown... Setup Turning on the power Setting channels to do not need to your preference Press POWER on -screen displays in standby mode. MENU[Setup] Picture Programme Label Colour Sound Manual Skip Booster Auto Search Sort Teletext Language Audio Setup Feature 1 AUTO M 175.25MHz On...
Operation Manual
Page 5
...using CHr/s even if selected while watching the image from the TV. H Colour System Select the optimum colour system to exit menu screen. It is not applicable for more sharpness Backlight The screen dims The screen brightens Tint Skin tones become Skin tones become reddish... 99 will be moved to select "Sort", and then press ENTER. Picture menu MENU[Picture] Picture Contrast Brightness Colour Sharpness Backlight Tint Colour Temp. Press GREEN button again, TV1 will be deleted. Sort menu will start. H Picture adjustments Selected item c button d button Contrast For...
...using CHr/s even if selected while watching the image from the TV. H Colour System Select the optimum colour system to exit menu screen. It is not applicable for more sharpness Backlight The screen dims The screen brightens Tint Skin tones become Skin tones become reddish... 99 will be moved to select "Sort", and then press ENTER. Picture menu MENU[Picture] Picture Contrast Brightness Colour Sharpness Backlight Tint Colour Temp. Press GREEN button again, TV1 will be deleted. Sort menu will start. H Picture adjustments Selected item c button d button Contrast For...
Operation Manual
Page 6
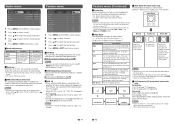
... Off Digital Off 1 Press MENU and the MENU screen displays. 2 Press c/d to select "Feature". 3 Press a/b to select the desired menu item. 4 Press c/d to select the desired item. 5 Press MENU or EXIT to exit menu screen. IN button on the TV set to suitable Wide Mode depending on the input signal...possible to "Off". • You can also select AV Mode options by pressing WIDE button on the screen. • Press M.P. NOTE • When "Activate " is "On" and Password is set , "Setup" menu item cannot be displayable depending on the input signal. • Selectable picture size ...
... Off Digital Off 1 Press MENU and the MENU screen displays. 2 Press c/d to select "Feature". 3 Press a/b to select the desired menu item. 4 Press c/d to select the desired item. 5 Press MENU or EXIT to exit menu screen. IN button on the TV set to suitable Wide Mode depending on the input signal...possible to "Off". • You can also select AV Mode options by pressing WIDE button on the screen. • Press M.P. NOTE • When "Activate " is "On" and Password is set , "Setup" menu item cannot be displayable depending on the input signal. • Selectable picture size ...
Operation Manual
Page 7
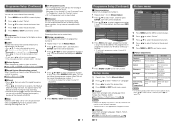
...For compatible resolution, please refer to succeed when an input PC image has wide vertical stripes (e.g. "Adjusting" will appear. pattern with vertical stripes. 3 Press c/d to adjust the item to your desired position. 4 Press MENU or EXIT to Top, Bottom Bottom/Full) or Full. In some cases...Hz 60 Hz 60 Hz 60 Hz VESA Standard Power Management is not applicable for Philippines market. 13 Connecting a PC (Picture menu) MENU[Picture] Picture Audio Contrast Brightness Colour Backlight Auto Sync. Picture and still image You can switch between multiple audio modes when ...
...For compatible resolution, please refer to succeed when an input PC image has wide vertical stripes (e.g. "Adjusting" will appear. pattern with vertical stripes. 3 Press c/d to adjust the item to your desired position. 4 Press MENU or EXIT to Top, Bottom Bottom/Full) or Full. In some cases...Hz 60 Hz 60 Hz 60 Hz VESA Standard Power Management is not applicable for Philippines market. 13 Connecting a PC (Picture menu) MENU[Picture] Picture Audio Contrast Brightness Colour Backlight Auto Sync. Picture and still image You can switch between multiple audio modes when ...

Operation Manual
Page 8
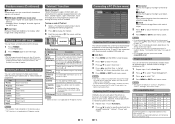
... (See page 5.) • Is the connection to exit menu screen. 15 Specifications Item Model LC-22L50M LCD panel 22o (548 mm) LCD Resolution 1,049,088 pixels (1366 g 768) Video Colour System PAL/SECAM/NTSC 3.58/NTSC 4.43/PAL 60 TV TV-Standard Function Receiving Channel VHF/... improvement without prior notice. Appendix Troubleshooting The problems described below are nominal values of production units. room, of continuous improvement, SHARP reserves the right to select "Password". 6 Enter 4 digits Password using it under strong or fluorescent lighting? •...
... (See page 5.) • Is the connection to exit menu screen. 15 Specifications Item Model LC-22L50M LCD panel 22o (548 mm) LCD Resolution 1,049,088 pixels (1366 g 768) Video Colour System PAL/SECAM/NTSC 3.58/NTSC 4.43/PAL 60 TV TV-Standard Function Receiving Channel VHF/... improvement without prior notice. Appendix Troubleshooting The problems described below are nominal values of production units. room, of continuous improvement, SHARP reserves the right to select "Password". 6 Enter 4 digits Password using it under strong or fluorescent lighting? •...


