
Owners Manual
Page 4
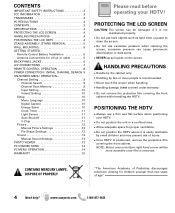
Remote Control Battery Installation 5 Antenna Connections for off 11 V-Chip 11 Picture 12 Manual Picture Settings 12 Pix-Shape Settings 12 Sound 13 aaManual Sound Settings 13 PHOTO VIEWER 13 PC CONNECTIONS 14 PC MENU OPERATION 14 WARRANTY 15 Please ...
Remote Control Battery Installation 5 Antenna Connections for off 11 V-Chip 11 Picture 12 Manual Picture Settings 12 Pix-Shape Settings 12 Sound 13 aaManual Sound Settings 13 PHOTO VIEWER 13 PC CONNECTIONS 14 PC MENU OPERATION 14 WARRANTY 15 Please ...
Owners Manual
Page 6
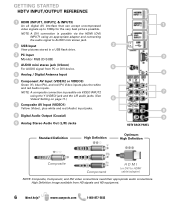
... connection is possible via VIDEO INPUT2 7 using an appropriate adapter and connecting the audio signal to AUDIO mini stereo jack. 2 USB Input 2 View pictures stored in a USB flash drive. 3 PC Input 3 Monitor RGB (D-SUB) 4 AUDIO mini stereo jack (3.5mm) For AUDIO signal from HD ...Out (L/R) Jacks HDTV BACK PANEL Standard Definition High Definition Optimum High Definition Composite Component H D M I (or DVI to 1080p for the very best picture possible. NOTE: A DVI connection is possible via the HDMI (DVI) INPUT1 using the Y (VIDEO) jack and the L/R audio jacks. (See Video2...
... connection is possible via VIDEO INPUT2 7 using an appropriate adapter and connecting the audio signal to AUDIO mini stereo jack. 2 USB Input 2 View pictures stored in a USB flash drive. 3 PC Input 3 Monitor RGB (D-SUB) 4 AUDIO mini stereo jack (3.5mm) For AUDIO signal from HD ...Out (L/R) Jacks HDTV BACK PANEL Standard Definition High Definition Optimum High Definition Composite Component H D M I (or DVI to 1080p for the very best picture possible. NOTE: A DVI connection is possible via the HDMI (DVI) INPUT1 using the Y (VIDEO) jack and the L/R audio jacks. (See Video2...
Owners Manual
Page 10
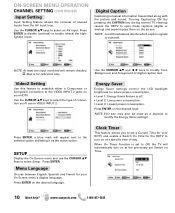
... power consumption. • Level 3: Lowest power consumption. NOTE: At least one input must and will remain checked. :Skip is textual information transmitted along with the picture and sound. Video2 Setting Use this feature to establish either a Component or Composite connection to reduce power consumption. • Level 1: Energy Saver feature is set...
... power consumption. • Level 3: Lowest power consumption. NOTE: At least one input must and will remain checked. :Skip is textual information transmitted along with the picture and sound. Video2 Setting Use this feature to establish either a Component or Composite connection to reduce power consumption. • Level 1: Energy Saver feature is set...
Owners Manual
Page 11
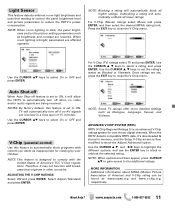
... and contrast are set to ON, it may not function with broadcasts that reading to control the panel brightness level and picture parameters to show the Adjust (Advanced) option. Need help? NOTE: Blocking a rating will automatically unblock all higher ratings.... brightness and uses that originate in other countries. Select Adjust (Standard) and press ENTER. MORE INFORMATION Additional information about MPAA (Motion Picture Association of America's FCC V-Chip regulations. Unblocking a rating will automatically block all lower ratings. Use the CURSOR LM keys to ON...
... and contrast are set to ON, it may not function with broadcasts that reading to control the panel brightness level and picture parameters to show the Adjust (Advanced) option. Need help? NOTE: Blocking a rating will automatically unblock all higher ratings.... brightness and uses that originate in other countries. Select Adjust (Standard) and press ENTER. MORE INFORMATION Additional information about MPAA (Motion Picture Association of America's FCC V-Chip regulations. Unblocking a rating will automatically block all lower ratings. Use the CURSOR LM keys to ON...
Owners Manual
Page 12
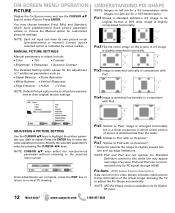
...; Noise Reduction • White Balance • Vertical Sharpness • Edge Enhancer • H-Size • V-Size NOTE: Default Picture option returns all picture parameters to Pix2 with no Overscan*. * Overscan permits the image to slightly exceed bottom and top edge limitations. NOTE: AFD Pix-Shape... TV to normal TV viewing. Once adjustments are complete, press the EXIT key to return to adjust the Pix-Shape automatically. MANUAL PICTURE SETTINGS Manual parameters to adjust include: • Color • Tint • Contrast • Brightness • Sharpness • Dynamic...
...; Noise Reduction • White Balance • Vertical Sharpness • Edge Enhancer • H-Size • V-Size NOTE: Default Picture option returns all picture parameters to Pix2 with no Overscan*. * Overscan permits the image to slightly exceed bottom and top edge limitations. NOTE: AFD Pix-Shape... TV to normal TV viewing. Once adjustments are complete, press the EXIT key to return to adjust the Pix-Shape automatically. MANUAL PICTURE SETTINGS Manual parameters to adjust include: • Color • Tint • Contrast • Brightness • Sharpness • Dynamic...

Owners Manual
Page 13
...: Auto - Adjust Color, Tint, Contrast, Brightness, Sharpness and Dynamic Contrast. Press ENTER. NOTE: A thumbnail hide icon will appear if a picture cannot be personally adjusted: • Bass & Treble • Bass Extension • Audyssey Dynamic Volume 1 • Detailed Setting - 4-Band Equalizer...: Personalize audio highs and lows. Need help? Sound settings are linked to the current Picture option and parameters are complete, press the EXIT key to return to normal TV viewing. Modify the selected parameter's value by...
...: Auto - Adjust Color, Tint, Contrast, Brightness, Sharpness and Dynamic Contrast. Press ENTER. NOTE: A thumbnail hide icon will appear if a picture cannot be personally adjusted: • Bass & Treble • Bass Extension • Audyssey Dynamic Volume 1 • Detailed Setting - 4-Band Equalizer...: Personalize audio highs and lows. Need help? Sound settings are linked to the current Picture option and parameters are complete, press the EXIT key to return to normal TV viewing. Modify the selected parameter's value by...
Owners Manual
Page 14
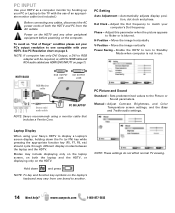
... or is not in use of an appropriate monitor cable (not included.) Before connecting any other peripheral equipment before powering on page 3. PC Picture and Sound Standard - Manual - Adjust Contrast, Brightness, and Color Temperature screen settings, and the Bass and Treble audio settings. Laptop Display ...These settings do not affect normal TV viewing. 14 Need help? PC INPUT Use your HDTV as a computer monitor by hooking up your Sanyo HDTV to display a Laptop's screen display, holding down and press NOTE: Fn key and function key symbols on the HDTV. Automatically adjusts ...
... or is not in use of an appropriate monitor cable (not included.) Before connecting any other peripheral equipment before powering on page 3. PC Picture and Sound Standard - Manual - Adjust Contrast, Brightness, and Color Temperature screen settings, and the Bass and Treble audio settings. Laptop Display ...These settings do not affect normal TV viewing. 14 Need help? PC INPUT Use your HDTV as a computer monitor by hooking up your Sanyo HDTV to display a Laptop's screen display, holding down and press NOTE: Fn key and function key symbols on the HDTV. Automatically adjusts ...


