
Owners Manual (w/ GXEA remote)
Page 4
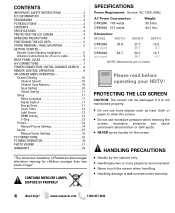
PROTECTING THE LCD SCREEN CAUTION: The screen can cause permanent discoloration or dark spots. • NEVER spray liquids on the screen. Dimensions: MODEL WIDTH HEIGHT DEPTH DP42840 w/o stand 39.8 27.7 25.7 12.0 4.7 DP46840 w/o stand 43.7 30.7 28.1 12.7 4.7 NOTE: Dimensions are in inches Please read before operating your HDTV! HANDLING PRECAUTIONS • Handle by the cabinet only...
PROTECTING THE LCD SCREEN CAUTION: The screen can cause permanent discoloration or dark spots. • NEVER spray liquids on the screen. Dimensions: MODEL WIDTH HEIGHT DEPTH DP42840 w/o stand 39.8 27.7 25.7 12.0 4.7 DP46840 w/o stand 43.7 30.7 28.1 12.7 4.7 NOTE: Dimensions are in inches Please read before operating your HDTV! HANDLING PRECAUTIONS • Handle by the cabinet only...
Owners Manual (w/ GXEA remote)
Page 5
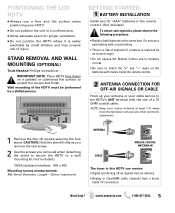
...injury. NOTE: Keep your indoor antenna at the same time. www.sanyoctv.com 1-800-877-5032 5 POSITIONING THE LCD HDTV • Always use a firm and flat surface when positioning your HDTV. • Do not position the unit in a confined area. • Allow adequate space for proper ventilation. &#...8226; Do not position the HDTV where it is replaced by an incorrect type. • Do not expose the Remote Control unit to moisture or heat. • Be sure to protect the screen and finish. Need help? GETTING STARTED BATTERY INSTALLATION Install two ...
...injury. NOTE: Keep your indoor antenna at the same time. www.sanyoctv.com 1-800-877-5032 5 POSITIONING THE LCD HDTV • Always use a firm and flat surface when positioning your HDTV. • Do not position the unit in a confined area. • Allow adequate space for proper ventilation. &#...8226; Do not position the HDTV where it is replaced by an incorrect type. • Do not expose the Remote Control unit to moisture or heat. • Be sure to protect the screen and finish. Need help? GETTING STARTED BATTERY INSTALLATION Install two ...
Owners Manual (w/ GXEA remote)
Page 8
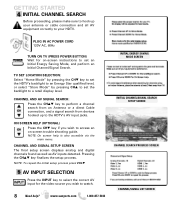
... hooked up your antenna or cable connection and all AV equipment correctly to the HDTV's AV input jacks. GETTING STARTED INITIAL CHANNEL SEARCH Before proceeding, please make sure to hook up to your HDTV. NOTE: On screen help ? NOTE: To repeat the initial setup process press VOLM AV INPUT SELECTION... Press the INPUT key to select the correct AV input for on screen trouble shooting guide. Pressing the CHLM key finalizes the setup...
... hooked up your antenna or cable connection and all AV equipment correctly to the HDTV's AV input jacks. GETTING STARTED INITIAL CHANNEL SEARCH Before proceeding, please make sure to hook up to your HDTV. NOTE: On screen help ? NOTE: To repeat the initial setup process press VOLM AV INPUT SELECTION... Press the INPUT key to select the correct AV input for on screen trouble shooting guide. Pressing the CHLM key finalizes the setup...
Owners Manual (w/ GXEA remote)
Page 9
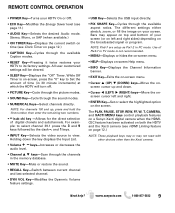
...The PLAY, PAUSE, STOP, REW, FF, W, T, CAMERA, and XACTI MENU keys control playback features on a Sanyo Xacti digital camera when the HDMICEC feature has been activated on both the HDTV and the Xacti camera (see page 11.) • AUDIO Key-Selects the desired Audio mode. While Off Timer is... and right sides) depending on page 12.) • CAPTION Key-Cycles through the available Caption modes. • RESET Key-Pressing it twice restores your screen. For example: to select channel 39.1 press the 3 and 9 keys followed by the dash -, and 1 keys. • INPUT Key-Selects the...
...The PLAY, PAUSE, STOP, REW, FF, W, T, CAMERA, and XACTI MENU keys control playback features on a Sanyo Xacti digital camera when the HDMICEC feature has been activated on both the HDTV and the Xacti camera (see page 11.) • AUDIO Key-Selects the desired Audio mode. While Off Timer is... and right sides) depending on page 12.) • CAPTION Key-Cycles through the available Caption modes. • RESET Key-Pressing it twice restores your screen. For example: to select channel 39.1 press the 3 and 9 keys followed by the dash -, and 1 keys. • INPUT Key-Selects the...
Owners Manual (w/ GXEA remote)
Page 10
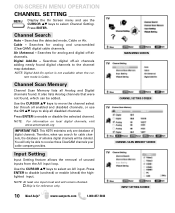
...or disable the selected channel. NOTE: At least one database of digital channels. www.sanyoctv.com 1-800-877-5032 MAIN MENU SCREEN CHANNEL SETTING SCREEN CHANNEL SCAN MEMORY SCREEN INPUT SETTING SCREEN Searches for cable channels, the database of unused inputs from the AV input loop. NOTE: Digital Add-On option is not ... of antenna digital channels will remain checked. :Skip is Cable. NOTE: For information on local digital channels, visit www.antennaweb.org IMPORTANT FACT: This HDTV maintains only one input must and will be deleted. Searches the detected mode, Cable or Air.
...or disable the selected channel. NOTE: At least one database of digital channels. www.sanyoctv.com 1-800-877-5032 MAIN MENU SCREEN CHANNEL SETTING SCREEN CHANNEL SCAN MEMORY SCREEN INPUT SETTING SCREEN Searches for cable channels, the database of unused inputs from the AV input loop. NOTE: Digital Add-On option is not ... of antenna digital channels will remain checked. :Skip is Cable. NOTE: For information on local digital channels, visit www.antennaweb.org IMPORTANT FACT: This HDTV maintains only one input must and will be deleted. Searches the detected mode, Cable or Air.
Owners Manual (w/ GXEA remote)
Page 11
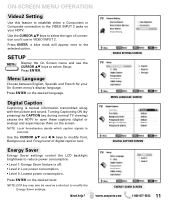
... Foreground of connection you'll use the CURSOR LM keys to select Setup. VIDEO2 SETTING SCREEN MENU LANGUAGE SCREEN DIGITAL CAPTION SCREEN Energy Saver Energy Saver settings control the LCD backlight brightness to reduce power consumption. • Level 1: Energy Saver feature is textual ...information transmitted along with the picture and sound. Menu Language Choose between English, Spanish and French for your HDTV. Press ENTER on the screen. Use the...
... Foreground of connection you'll use the CURSOR LM keys to select Setup. VIDEO2 SETTING SCREEN MENU LANGUAGE SCREEN DIGITAL CAPTION SCREEN Energy Saver Energy Saver settings control the LCD backlight brightness to reduce power consumption. • Level 1: Energy Saver feature is textual ...information transmitted along with the picture and sound. Menu Language Choose between English, Spanish and French for your HDTV. Press ENTER on the screen. Use the...
Owners Manual (w/ GXEA remote)
Page 12
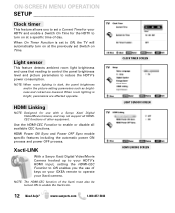
... are affected opposite. Xacti-LINK With a Sanyo Xacti Digital Video/Movie Camera hooked up to turn on at a specific time of other equipment. www.sanyoctv.com 1-800-877-5032 CLOCK TIMER SCREEN LIGHT SENSOR SCREEN HDMI LINKING SCREEN When room lighting is set a Current Time for your HDTV and enable a Switch On Time for use...
... are affected opposite. Xacti-LINK With a Sanyo Xacti Digital Video/Movie Camera hooked up to turn on at a specific time of other equipment. www.sanyoctv.com 1-800-877-5032 CLOCK TIMER SCREEN LIGHT SENSOR SCREEN HDMI LINKING SCREEN When room lighting is set a Current Time for your HDTV and enable a Switch On Time for use...
Owners Manual (w/ GXEA remote)
Page 13
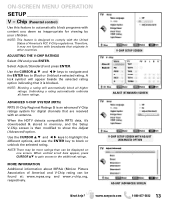
... children. ADVANCED V-CHIP SYSTEM (RRT5) RRT5 (V-Chip Regional Ratings 5) is blocked. When the HDTV detects compatible RRT5 data, it may be more ratings than can be displayed on one screen. When vertical scroll bars appear, press CURSOR LM to gain access to Block or Unblock a ...this feature to automatically block programs with content you deem as inappropriate for digital channels that originate in memory, and the Setup V-Chip screen is designed to comply with an antenna. Select Adjust (Standard) and press ENTER. Unblocking a rating automatically unblocks all higher ratings. NOTE...
... children. ADVANCED V-CHIP SYSTEM (RRT5) RRT5 (V-Chip Regional Ratings 5) is blocked. When the HDTV detects compatible RRT5 data, it may be more ratings than can be displayed on one screen. When vertical scroll bars appear, press CURSOR LM to gain access to Block or Unblock a ...this feature to automatically block programs with content you deem as inappropriate for digital channels that originate in memory, and the Setup V-Chip screen is designed to comply with an antenna. Select Adjust (Standard) and press ENTER. Unblocking a rating automatically unblocks all higher ratings. NOTE...
Owners Manual (w/ GXEA remote)
Page 14
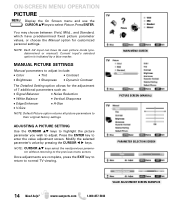
Once adjustments are complete, press the EXIT key to return to enter the value adjustment screen. Press ENTER. Press the ENTER key to normal TV viewing. NOTE: CURSOR LM keys select the next/previous parameter without ... NOTE: Default Picture option returns all picture parameters to the previous menu screen. ON-SCREEN MENU OPERATION PICTURE Display the On Screen menu and use the CURSOR LM keys to adjust. MAIN MENU SCREEN PICTURE SCREEN (MANUAL) PARAMETER SELECTION SCREEN VALUE ADJUSTMENT SCREEN EXAMPLES 14 Need help? Modify the selected parameter's value by a blue...
Once adjustments are complete, press the EXIT key to return to enter the value adjustment screen. Press ENTER. Press the ENTER key to normal TV viewing. NOTE: CURSOR LM keys select the next/previous parameter without ... NOTE: Default Picture option returns all picture parameters to the previous menu screen. ON-SCREEN MENU OPERATION PICTURE Display the On Screen menu and use the CURSOR LM keys to adjust. MAIN MENU SCREEN PICTURE SCREEN (MANUAL) PARAMETER SELECTION SCREEN VALUE ADJUSTMENT SCREEN EXAMPLES 14 Need help? Modify the selected parameter's value by a blue...
Owners Manual (w/ GXEA remote)
Page 15
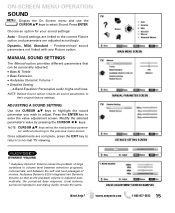
...Modify the selected parameter's value by pressing the CURSOR keys. VALUE ADJUSTMENT SCREEN EXAMPLES www.sanyoctv.com 1-800-877-5032 15 Dynamic, Mild, Standard - MAIN MENU SCREEN MANUAL PARAMETER SCREEN DETAILED SETTING SCREEN 1 Audyssey Dynamic Volume solves the problem of large variations in volume ...accordingly. ADJUSTING A SOUND SETTING Use the CURSOR LM keys to highlight the sound parameter you wish to the previous menu screen. NOTE: Default Sound option returns all sound parameters to normal TV viewing. MANUAL SOUND SETTINGS The Manual option provides different ...
...Modify the selected parameter's value by pressing the CURSOR keys. VALUE ADJUSTMENT SCREEN EXAMPLES www.sanyoctv.com 1-800-877-5032 15 Dynamic, Mild, Standard - MAIN MENU SCREEN MANUAL PARAMETER SCREEN DETAILED SETTING SCREEN 1 Audyssey Dynamic Volume solves the problem of large variations in volume ...accordingly. ADJUSTING A SOUND SETTING Use the CURSOR LM keys to highlight the sound parameter you wish to the previous menu screen. NOTE: Default Sound option returns all sound parameters to normal TV viewing. MANUAL SOUND SETTINGS The Manual option provides different ...
Owners Manual (w/ GXEA remote)
Page 16
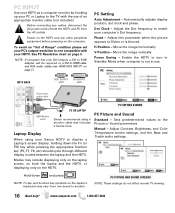
... when computer is blurred. Sets predetermined values to match your computer's Dot frequency. HDTV BACK RGB OUTPUT JACK DVI OUTPUT JACK Stereo mini audio cable PC OR LAPTOP RGB Monitor cable Sanyo recommends using your Sanyo HDTV to display a Laptop's screen display, holding down and press NOTE: Fn key and function key symbols on the...
... when computer is blurred. Sets predetermined values to match your computer's Dot frequency. HDTV BACK RGB OUTPUT JACK DVI OUTPUT JACK Stereo mini audio cable PC OR LAPTOP RGB Monitor cable Sanyo recommends using your Sanyo HDTV to display a Laptop's screen display, holding down and press NOTE: Fn key and function key symbols on the...
Owners Manual (w/ GXEA remote)
Page 17
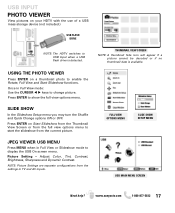
... thumbnail data is detected. www.sanyoctv.com 1-800-877-5032 17 FULL VIEW OPTIONS MENU SLIDE SHOW SETUP MENU USB MAIN MENU SCREEN Need help? Press ENTER on Start Slideshow from the Thumbnail View Screen or from the full view options menu to change picture. Adjust Color, Tint, Contrast, ...on a thumbnail photo to USB Input when a USB flash drive is available. Once in Full View or Slideshow mode to show the full view options menu. USB INPUT PHOTO VIEWER View pictures on your HDTV with the use of a USB mass storage device (not included.) USB FLASH DRIVE NOTE...
... thumbnail data is detected. www.sanyoctv.com 1-800-877-5032 17 FULL VIEW OPTIONS MENU SLIDE SHOW SETUP MENU USB MAIN MENU SCREEN Need help? Press ENTER on Start Slideshow from the Thumbnail View Screen or from the full view options menu to change picture. Adjust Color, Tint, Contrast, ...on a thumbnail photo to USB Input when a USB flash drive is available. Once in Full View or Slideshow mode to show the full view options menu. USB INPUT PHOTO VIEWER View pictures on your HDTV with the use of a USB mass storage device (not included.) USB FLASH DRIVE NOTE...


