
Owners Manual
Page 4
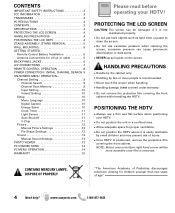
... Auto Shut-off -air or cable 5 BACK PANEL JACKS 6 A/V CONNECTIONS 7 REMOTE CONTROL OPERATION 8 POWER CONNECTION / INITIAL CHANNEL SEARCH 9 ON-SCREEN MENU OPERATION- CONTAINS MERCURY LAMPS, DISPOSE OF PROPERLY "The American Academy of age" 4 Need help? excessive pressure can be more people is recommended....; Do not position the HDTV where it is positioned, remove the protective film covering the front cabinet. PROTECTING THE LCD SCREEN CAUTION: The screen can cause permanent discoloration or dark spots. • NEVER spray liquids on bottom right hand corner will be damaged if ...
... Auto Shut-off -air or cable 5 BACK PANEL JACKS 6 A/V CONNECTIONS 7 REMOTE CONTROL OPERATION 8 POWER CONNECTION / INITIAL CHANNEL SEARCH 9 ON-SCREEN MENU OPERATION- CONTAINS MERCURY LAMPS, DISPOSE OF PROPERLY "The American Academy of age" 4 Need help? excessive pressure can be more people is recommended....; Do not position the HDTV where it is positioned, remove the protective film covering the front cabinet. PROTECTING THE LCD SCREEN CAUTION: The screen can cause permanent discoloration or dark spots. • NEVER spray liquids on bottom right hand corner will be damaged if ...
Owners Manual
Page 5
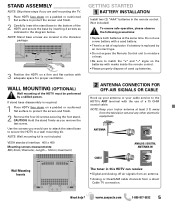
NOTE: Stand base screws are wall mounting the TV. 1 Place HDTV face down on a padded or cushioned flat surface to protect the screen and finish. 2 Remove the four (4) screws securing the foot stand. Do not use a new battery with a used up your antenna or your indoor antenna at .... away from a direct Cable TV connection. NOTE: Wall mounting kit is required: 1 Place HDTV face down on a padded or cushioned flat surface to protect the screen and finish. 2 Carefully insert the stand base to the bottom of the HDTV and secure the base by inserting 4 screws as you would use of...
NOTE: Stand base screws are wall mounting the TV. 1 Place HDTV face down on a padded or cushioned flat surface to protect the screen and finish. 2 Remove the four (4) screws securing the foot stand. Do not use a new battery with a used up your antenna or your indoor antenna at .... away from a direct Cable TV connection. NOTE: Wall mounting kit is required: 1 Place HDTV face down on a padded or cushioned flat surface to protect the screen and finish. 2 Carefully insert the stand base to the bottom of the HDTV and secure the base by inserting 4 screws as you would use of...
Owners Manual
Page 8
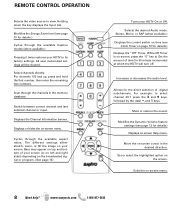
...(see page 10 for details.) Displays the "Off" Timer. Bars may appear on top and bottom of your screen (or on left and right sides) depending on your screen. Mute or restore the sound. The different settings either stretch, zoom, or fill the image on the broadcasted signal...Off. For channels 100 and up, press and hold the first number, then enter the remaining two numbers. Allows for details.) Displays on-screen Help menu. Displays the Channel Information banner. Select channels directly. Cycles through the channels in 30 minute increments) at which the HDTV will ...
...(see page 10 for details.) Displays the "Off" Timer. Bars may appear on top and bottom of your screen (or on left and right sides) depending on your screen. Mute or restore the sound. The different settings either stretch, zoom, or fill the image on the broadcasted signal...Off. For channels 100 and up, press and hold the first number, then enter the remaining two numbers. Allows for details.) Displays on-screen Help menu. Displays the Channel Information banner. Select channels directly. Cycles through the channels in 30 minute increments) at which the HDTV will ...
Owners Manual
Page 9
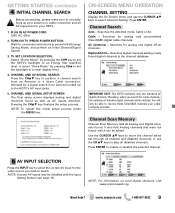
...Digital channels found as well as AV inputs detected. AV INPUT SELECTION Press the INPUT key to watch. NOTE: For information on -screen instructions to select Channel Setting. Pressing the CHLM key finalizes the setup process. Searches for the video source you search for analog ...a signal search from devices hooked up your cable company provides. NOTE: Unused AV inputs may be added. CHANNEL AND SIGNAL SETUP SCREEN The final setup screen displays analog and digital channels found . Therefore, when you wish to select the correct AV input for analog and unscrambled (ClearQAM) ...
...Digital channels found as well as AV inputs detected. AV INPUT SELECTION Press the INPUT key to watch. NOTE: For information on -screen instructions to select Channel Setting. Pressing the CHLM key finalizes the setup process. Searches for the video source you search for analog ...a signal search from devices hooked up your cable company provides. NOTE: Unused AV inputs may be added. CHANNEL AND SIGNAL SETUP SCREEN The final setup screen displays analog and digital channels found . Therefore, when you wish to select the correct AV input for analog and unscrambled (ClearQAM) ...
Owners Manual
Page 10
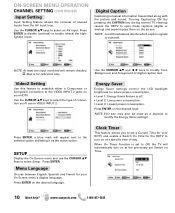
... it as a shortcut to ON, the TV will remain checked. :Skip is set Switch on the screen. Press ENTER, a blue mark will appear next to select the type of day. ON-SCREEN MENU OPERATION CHANNEL SETTING (CONTINUED) Input Setting Input Setting feature allows the removal of digital caption text. ... (digital or analog) and superimpose them on Time. 10 Need help? NOTE: At least one input must and will automatically turn on your On Screen menu's display language. Clock Timer This feature allows you 'll use the CURSOR LM keys to select Setup. Press ENTER to the VIDEO INPUT 2...
... it as a shortcut to ON, the TV will remain checked. :Skip is set Switch on the screen. Press ENTER, a blue mark will appear next to select the type of day. ON-SCREEN MENU OPERATION CHANNEL SETTING (CONTINUED) Input Setting Input Setting feature allows the removal of digital caption text. ... (digital or analog) and superimpose them on Time. 10 Need help? NOTE: At least one input must and will automatically turn on your On Screen menu's display language. Clock Timer This feature allows you 'll use the CURSOR LM keys to select Setup. Press ENTER to the VIDEO INPUT 2...
Owners Manual
Page 11
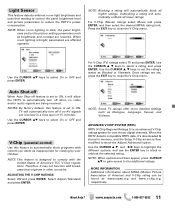
... V-Chip menu. Unblocking a rating will automatically block all lower ratings. Once ratings are set to ON, it 's downloaded & stored in memory, and the Setup V-Chip screen is bright, parameters are being received. V-Chip (parental control) Use this feature is designed to select On or OFF and press ENTER. Need help? NOTE...
... V-Chip menu. Unblocking a rating will automatically block all lower ratings. Once ratings are set to ON, it 's downloaded & stored in memory, and the Setup V-Chip screen is bright, parameters are being received. V-Chip (parental control) Use this feature is designed to select On or OFF and press ENTER. Need help? NOTE...
Owners Manual
Page 12
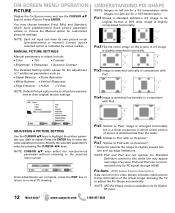
...original format, a 16:9 wide image is slightly compressed horizontally. ADJUSTING A PICTURE SETTING Use the CURSOR LM keys to enter the value adjustment screen. Press the ENTER key to highlight the picture param- Modify the selected parameter's value by a blue marker. Pix6 and Pix7 use the ...CURSOR LM keys to the previous menu screen. UNDERSTANDING PIX-SHAPE NOTE: Images on left are not optimal for Standard Definition content (a thin white line may choose between Vivid, Mild,...
...original format, a 16:9 wide image is slightly compressed horizontally. ADJUSTING A PICTURE SETTING Use the CURSOR LM keys to enter the value adjustment screen. Press the ENTER key to highlight the picture param- Modify the selected parameter's value by a blue marker. Pix6 and Pix7 use the ...CURSOR LM keys to the previous menu screen. UNDERSTANDING PIX-SHAPE NOTE: Images on left are not optimal for Standard Definition content (a thin white line may choose between Vivid, Mild,...

Owners Manual
Page 13
... Audyssey Dynamic Volume solves the problem of large variations in Full View mode: Use the CURSOR keys to enter the value adjustment screen. Adjust Color, Tint, Contrast, Brightness, Sharpness and Dynamic Contrast. Press ENTER. USING THE PHOTO VIEWER ADJUSTING A SOUND SETTING Use...previous parameter without returning to their original factory settings. Picture Setting - NOTE: Default Sound option returns all sound parameters to the previous menu screen. Press ENTER on a thumbnail photo to show the full view options menu. • Rotate • Pan • Zoom In ...
... Audyssey Dynamic Volume solves the problem of large variations in Full View mode: Use the CURSOR keys to enter the value adjustment screen. Adjust Color, Tint, Contrast, Brightness, Sharpness and Dynamic Contrast. Press ENTER. USING THE PHOTO VIEWER ADJUSTING A SOUND SETTING Use...previous parameter without returning to their original factory settings. Picture Setting - NOTE: Default Sound option returns all sound parameters to the previous menu screen. Press ENTER on a thumbnail photo to show the full view options menu. • Rotate • Pan • Zoom In ...
Owners Manual
Page 14
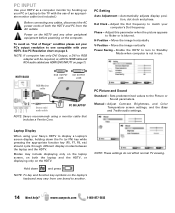
...Saving - HDTV BACK RGB OUTPUT JACK DVI OUTPUT JACK RGB Monitor cable Stereo mini audio cable PC OR LAPTOP NOTE: Sanyo recommends using your Sanyo HDTV to display a Laptop's screen display, holding down and press NOTE: Fn key and function key symbols on the laptop's keyboard may include displaying ...only on the laptop screen, on both the HDTV and PC from one compatible with the use . Modes may vary from the ...
...Saving - HDTV BACK RGB OUTPUT JACK DVI OUTPUT JACK RGB Monitor cable Stereo mini audio cable PC OR LAPTOP NOTE: Sanyo recommends using your Sanyo HDTV to display a Laptop's screen display, holding down and press NOTE: Fn key and function key symbols on the laptop's keyboard may include displaying ...only on the laptop screen, on both the HDTV and PC from one compatible with the use . Modes may vary from the ...


