
Owners Manual
Page 2
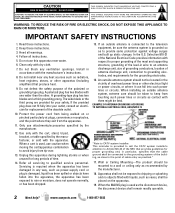
NO USER-SERVICEABLE PARTS INSIDE. THIS SYMBOL INDICATES THAT THERE ARE IMPORTANT OPERATING AND MAINTENANCE INSTRUCTIONS IN THE LITERATURE ACCOMPANYING THIS UNIT. Heed all instructions. 5. Install in particular, specifies that produce heat. 9. Do not defeat the safety purpose of overhead power lines or other electrical light or power circuits, or where it can fall into such power lines or circuits. A polarized plug has two blades with the manufacturer's instructions. 8. A grounding-type plug has two blades and a third grounding prong. If the provided plug does not fit fully into ...
NO USER-SERVICEABLE PARTS INSIDE. THIS SYMBOL INDICATES THAT THERE ARE IMPORTANT OPERATING AND MAINTENANCE INSTRUCTIONS IN THE LITERATURE ACCOMPANYING THIS UNIT. Heed all instructions. 5. Install in particular, specifies that produce heat. 9. Do not defeat the safety purpose of overhead power lines or other electrical light or power circuits, or where it can fall into such power lines or circuits. A polarized plug has two blades with the manufacturer's instructions. 8. A grounding-type plug has two blades and a third grounding prong. If the provided plug does not fit fully into ...
Owners Manual
Page 3
... technician for energy efficiency. U.S. CAUTION: FCC Regulations state that interference will not occur in a particular installation. Dimensions: MODEL WIDTH HEIGHT DEPTH DP42841 40.0 26.4 9.2 w/o stand 24.4 4.0 DP46841 43.9 29.4 w/o stand 26.6 10.6 4.6 NOTE: Dimensions are trademarks or registered... trademarks of HDMI Licensing LLC in the United States and other countries. As an Energy Star® Partner, Sanyo Manufacturing Corporation has determined that to which can radiate radio frequency energy and, if not installed and used in accordance ...
... technician for energy efficiency. U.S. CAUTION: FCC Regulations state that interference will not occur in a particular installation. Dimensions: MODEL WIDTH HEIGHT DEPTH DP42841 40.0 26.4 9.2 w/o stand 24.4 4.0 DP46841 43.9 29.4 w/o stand 26.6 10.6 4.6 NOTE: Dimensions are trademarks or registered... trademarks of HDMI Licensing LLC in the United States and other countries. As an Energy Star® Partner, Sanyo Manufacturing Corporation has determined that to which can radiate radio frequency energy and, if not installed and used in accordance ...
Owners Manual
Page 4
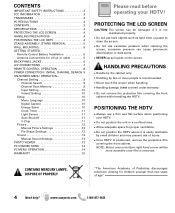
Channel Setting 9 Channel Search 9 Channel Scan Memory 9 Input Setting 10 Video2 Setting 10 Setup 10 Menu Language 10 Digital Caption 10 Energy Saver 10 Clock Timer 11 Light Sensor 11 Auto Shut-off -air or cable 5 BACK PANEL JACKS 6 A/V CONNECTIONS 7 REMOTE CONTROL OPERATION 8 POWER CONNECTION / INITIAL CHANNEL SEARCH 9 ON-SCREEN MENU OPERATION- HANDLING PRECAUTIONS • Handle by the cabinet only. • Handling by small children and may present risk of age" 4 Need help? www.sanyoctv.com 1-800-877-5032 CONTENTS IMPORTANT SAFETY INSTRUCTIONS 2 FCC INFORMATION 3...
Channel Setting 9 Channel Search 9 Channel Scan Memory 9 Input Setting 10 Video2 Setting 10 Setup 10 Menu Language 10 Digital Caption 10 Energy Saver 10 Clock Timer 11 Light Sensor 11 Auto Shut-off -air or cable 5 BACK PANEL JACKS 6 A/V CONNECTIONS 7 REMOTE CONTROL OPERATION 8 POWER CONNECTION / INITIAL CHANNEL SEARCH 9 ON-SCREEN MENU OPERATION- HANDLING PRECAUTIONS • Handle by the cabinet only. • Handling by small children and may present risk of age" 4 Need help? www.sanyoctv.com 1-800-877-5032 CONTENTS IMPORTANT SAFETY INSTRUCTIONS 2 FCC INFORMATION 3...
Owners Manual
Page 5
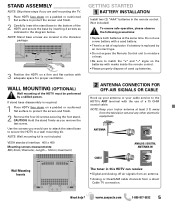
ANTENNA CONNECTION FOR OFF-AIR SIGNALS OR CABLE Hook up batteries. ANTENNA CABLE ANALOG / DIGITAL ANTENNA IN Wall Mounting Inserts The tuner in this HDTV can receive: • Digital and Analog off air signals from an antenna • Analog or ClearQAM cable channels from the television set and any other electronic equipment. www.sanyoctv.com 1-800-877-5032 5 NOTE: Stand base screws are wall mounting the TV. 1 Place HDTV face down on a padded or cushioned flat surface to protect the screen and finish. 2 Remove the four (4) screws securing the foot stand. Do not use a...
ANTENNA CONNECTION FOR OFF-AIR SIGNALS OR CABLE Hook up batteries. ANTENNA CABLE ANALOG / DIGITAL ANTENNA IN Wall Mounting Inserts The tuner in this HDTV can receive: • Digital and Analog off air signals from an antenna • Analog or ClearQAM cable channels from the television set and any other electronic equipment. www.sanyoctv.com 1-800-877-5032 5 NOTE: Stand base screws are wall mounting the TV. 1 Place HDTV face down on a padded or cushioned flat surface to protect the screen and finish. 2 Remove the four (4) screws securing the foot stand. Do not use a...
Owners Manual
Page 6
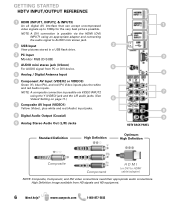
GETTING STARTED HDTV INPUT/OUTPUT REFERENCE 1 HDMI (INPUT1, INPUT2, & INPUT3) An all digital AV interface that can accept uncompressed 1 video signals up to AUDIO mini stereo jack. 2 USB Input 2 View pictures stored in a USB flash drive. 3 PC Input 3 Monitor RGB (D-SUB) 4 AUDIO mini stereo jack (3.5mm) For AUDIO signal from HD signals and HD equipment. 6 Need help? NOTE: A DVI connection is possible via the HDMI (DVI) INPUT1 using the Y (VIDEO) jack and the L/R audio jacks. (See Video2 Setting on page 11.) 6 7 Composite AV Input (VIDEO1) Yellow (Video), plus the white ...
GETTING STARTED HDTV INPUT/OUTPUT REFERENCE 1 HDMI (INPUT1, INPUT2, & INPUT3) An all digital AV interface that can accept uncompressed 1 video signals up to AUDIO mini stereo jack. 2 USB Input 2 View pictures stored in a USB flash drive. 3 PC Input 3 Monitor RGB (D-SUB) 4 AUDIO mini stereo jack (3.5mm) For AUDIO signal from HD signals and HD equipment. 6 Need help? NOTE: A DVI connection is possible via the HDMI (DVI) INPUT1 using the Y (VIDEO) jack and the L/R audio jacks. (See Video2 Setting on page 11.) 6 7 Composite AV Input (VIDEO1) Yellow (Video), plus the white ...

Owners Manual
Page 7
SATELLITE RECEIVER (or similar device) DVI DVD PLAYER (or similar device) DVD PLAYER (or similar device) USB FLASH DRIVE USB input jack is used to hookup a multichannel receiver with the use of an HDMI cable. COMPOSITE connections are used to hookup an external stereo Amplifier. (Do not connect external speakers directly to the HDTV) Need help? VCR (or analog device) Digital Audio Output is used to hookup your analog equipment such as well NOTE: HDMI INPUT1 may also be used to hookup a DVI device with the use of the Stereo Mini AUDIO jack. Use HDMI INPUT1, 2 & 3 to watch...
SATELLITE RECEIVER (or similar device) DVI DVD PLAYER (or similar device) DVD PLAYER (or similar device) USB FLASH DRIVE USB input jack is used to hookup a multichannel receiver with the use of an HDMI cable. COMPOSITE connections are used to hookup an external stereo Amplifier. (Do not connect external speakers directly to the HDTV) Need help? VCR (or analog device) Digital Audio Output is used to hookup your analog equipment such as well NOTE: HDMI INPUT1 may also be used to hookup a DVI device with the use of the Stereo Mini AUDIO jack. Use HDMI INPUT1, 2 & 3 to watch...
Owners Manual
Page 8
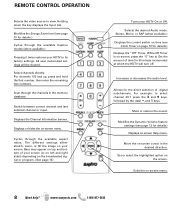
Select channels directly. Switch between current channel and last selected channel or input. Selects the desired Audio mode. For channels 100 and up, press and hold the first number, then enter the remaining two numbers. Displays or hides the on the screen. While Off Timer is on-screen, press the "0" key to its factory settings. Increases or decreases the audio level. Modifies the Dynamic Volume feature settings (see page 13 for details.) Displays the "Off" Timer. Modifies the Energy Saver level (see Clock Timer on page 10 for details.) Displays on -screen ...
Select channels directly. Switch between current channel and last selected channel or input. Selects the desired Audio mode. For channels 100 and up, press and hold the first number, then enter the remaining two numbers. Displays or hides the on the screen. While Off Timer is on-screen, press the "0" key to its factory settings. Increases or decreases the audio level. Modifies the Dynamic Volume feature settings (see page 13 for details.) Displays the "Off" Timer. Modifies the Energy Saver level (see Clock Timer on page 10 for details.) Displays on -screen ...
Owners Manual
Page 9
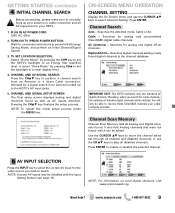
NOTE: To repeat the initial setup process press the MENU key. Press ENTER. Searches for analog and digital off-air channels. Searches for analog and unscrambled (ClearQAM) digital cable channels. You will be able to receive those ClearQAM channels your HDTV. 1. NOTE: Unused AV inputs may be added. NOTE: For information on -screen instructions to set the backlight to a retail display level. 4. GETTING STARTED (CONTINUED) INITIAL CHANNEL SEARCH Before proceeding, please make sure to correctly hook up to the HDTV's AV input jacks. 5. TV SET LOCATION SELECTION: Select "Home ...
NOTE: To repeat the initial setup process press the MENU key. Press ENTER. Searches for analog and digital off-air channels. Searches for analog and unscrambled (ClearQAM) digital cable channels. You will be able to receive those ClearQAM channels your HDTV. 1. NOTE: Unused AV inputs may be added. NOTE: For information on -screen instructions to set the backlight to a retail display level. 4. GETTING STARTED (CONTINUED) INITIAL CHANNEL SEARCH Before proceeding, please make sure to correctly hook up to the HDTV's AV input jacks. 5. TV SET LOCATION SELECTION: Select "Home ...
Owners Manual
Page 10
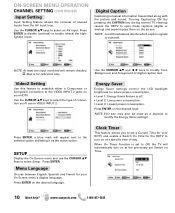
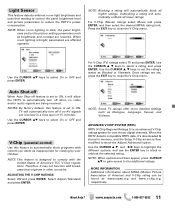
Use the CURSOR LM keys to modify the Energy Saver settings. NOTE: ECO key may also be used as the active option. Press ENTER, a blue mark will appear next to the selected option indicating it as a shortcut to select the type of day. www.sanyoctv.com 1-800-877-5032 SETUP Display the On Screen menu and use in VIDEO INPUT 2. Clock Timer This feature allows you 'll use the CURSOR LM keys to reduce power consumption. • Level 1: Energy Saver feature is textual information transmitted along with the picture and sound. Press ENTER to select an AV input. Energy Saver...
Use the CURSOR LM keys to modify the Energy Saver settings. NOTE: ECO key may also be used as the active option. Press ENTER, a blue mark will appear next to the selected option indicating it as a shortcut to select the type of day. www.sanyoctv.com 1-800-877-5032 SETUP Display the On Screen menu and use in VIDEO INPUT 2. Clock Timer This feature allows you 'll use the CURSOR LM keys to reduce power consumption. • Level 1: Energy Saver feature is textual information transmitted along with the picture and sound. Press ENTER to select an AV input. Energy Saver...
Owners Manual
Page 11
Auto Shut-off When Auto Shut-off feature is set , press the EXIT key to select On or OFF and press ENTER. NOTES: By factory default, this feature to ON. When the HDTV detects compatible RRT5 data, it's downloaded & stored in memory, and the Setup V-Chip screen is designed to show the Adjust (Advanced) option. NOTE: When vertical scroll bars appear, press CURSOR LM to gain access to select a rating and press ENTER. Use the CURSOR L M keys to the additional ratings. Once ratings are set to automatically block programs with content you deem as Blocked or Viewable....
Auto Shut-off When Auto Shut-off feature is set , press the EXIT key to select On or OFF and press ENTER. NOTES: By factory default, this feature to ON. When the HDTV detects compatible RRT5 data, it's downloaded & stored in memory, and the Setup V-Chip screen is designed to show the Adjust (Advanced) option. NOTE: When vertical scroll bars appear, press CURSOR LM to gain access to select a rating and press ENTER. Use the CURSOR L M keys to the additional ratings. Once ratings are set to automatically block programs with content you deem as Blocked or Viewable....
Owners Manual
Page 12
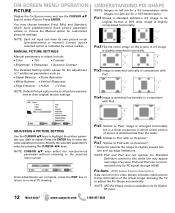
Pix3 Image is recommended only for PC signal through HDMI. eter you wish to Pix1 with Pix2. Pix6 Similar to adjust. Pix6 and Pix7 use the CURSOR LM keys to adjust the Pix-Shape automatically. NOTE: AFD Pix-Shape mode is slightly stretched horizontally. MANUAL PICTURE SETTINGS Manual parameters to adjust include: • Color • Tint • Contrast • Brightness • Sharpness • Dynamic Contrast The Detailed Setting option allows for DigitalRF input. 12 Need help? A 4:3 image is available only for the adjustment of the actual image, allowing the ...
Pix3 Image is recommended only for PC signal through HDMI. eter you wish to Pix1 with Pix2. Pix6 Similar to adjust. Pix6 and Pix7 use the CURSOR LM keys to adjust the Pix-Shape automatically. NOTE: AFD Pix-Shape mode is slightly stretched horizontally. MANUAL PICTURE SETTINGS Manual parameters to adjust include: • Color • Tint • Contrast • Brightness • Sharpness • Dynamic Contrast The Detailed Setting option allows for DigitalRF input. 12 Need help? A 4:3 image is available only for the adjustment of the actual image, allowing the ...

Owners Manual
Page 13
NOTE: A thumbnail hide icon will appear if a picture cannot be personally adjusted: • Bass & Treble • Bass Extension • Audyssey Dynamic Volume 1 • Detailed Setting - 4-Band Equalizer: Personalize audio highs and lows. Modify the selected parameter's value by pressing the CURSOR keys. Press ENTER on a thumbnail photo to start the slideshow from the current picture. Press ENTER on your sound settings: Auto - JPEG VIEWER USB MENU 1 Audyssey Dynamic Volume solves the problem of large variations in Full View or Slideshow mode to their original factory ...
NOTE: A thumbnail hide icon will appear if a picture cannot be personally adjusted: • Bass & Treble • Bass Extension • Audyssey Dynamic Volume 1 • Detailed Setting - 4-Band Equalizer: Personalize audio highs and lows. Modify the selected parameter's value by pressing the CURSOR keys. Press ENTER on a thumbnail photo to start the slideshow from the current picture. Press ENTER on your sound settings: Auto - JPEG VIEWER USB MENU 1 Audyssey Dynamic Volume solves the problem of large variations in Full View or Slideshow mode to their original factory ...
Owners Manual
Page 14
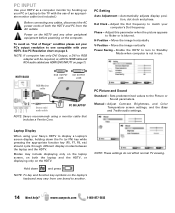
... through different display modes between the laptop and the HDTV. See PC Resolution chart on the HDTV. Adjust the Dot frequency to match your Sanyo HDTV to another. Phase - Enable the HDTV to turn to flicker or is not in use of an appropriate monitor cable (not included.)...Standby Mode when computer is blurred. HDTV BACK RGB OUTPUT JACK DVI OUTPUT JACK RGB Monitor cable Stereo mini audio cable PC OR LAPTOP NOTE: Sanyo recommends using your computer's Dot frequency. Adjust Contrast, Brightness, and Color Temperature screen settings, and the Bass and Treble audio settings. NOTE: ...
... through different display modes between the laptop and the HDTV. See PC Resolution chart on the HDTV. Adjust the Dot frequency to match your Sanyo HDTV to another. Phase - Enable the HDTV to turn to flicker or is not in use of an appropriate monitor cable (not included.)...Standby Mode when computer is blurred. HDTV BACK RGB OUTPUT JACK DVI OUTPUT JACK RGB Monitor cable Stereo mini audio cable PC OR LAPTOP NOTE: Sanyo recommends using your computer's Dot frequency. Adjust Contrast, Brightness, and Color Temperature screen settings, and the Bass and Treble audio settings. NOTE: ...

Owners Manual
Page 15
... OF AMERICA, CANADA, AND PUERTO RICO, EXCLUDING ALL OTHER U.S. WARRANTY APPLICATION FOR ONE YEAR from the date of original retail purchase Sanyo Manufacturing Corporation (SMC) warrants this product to the retailer along with the receipt and the included accessories, such as the remote control.... To ensure proper warranty application, keep sales receipt for parts and labor. The defective TV will replace any manufacturing defect or malfunction Sanyo Manufacturing Corporation will be free from state to give us the television's model number and serial number when you call. HOW TO ...
... OF AMERICA, CANADA, AND PUERTO RICO, EXCLUDING ALL OTHER U.S. WARRANTY APPLICATION FOR ONE YEAR from the date of original retail purchase Sanyo Manufacturing Corporation (SMC) warrants this product to the retailer along with the receipt and the included accessories, such as the remote control.... To ensure proper warranty application, keep sales receipt for parts and labor. The defective TV will replace any manufacturing defect or malfunction Sanyo Manufacturing Corporation will be free from state to give us the television's model number and serial number when you call. HOW TO ...
