
Owners Manual (w/ GXEA remote)
Page 4
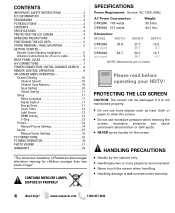
...LCD SCREEN 4 HANDLING PRECAUTIONS 4 POSITIONING THE LCD HDTV 5 STAND REMOVAL / WALL MOUNTING 5 GETTING STARTED- Dimensions: MODEL WIDTH HEIGHT DEPTH DP42840 w/o stand 39.8 27.7 25.7 12.0 4.7 DP46840 w/o stand 43.7 30.7 28.1 12.7 4.7 NOTE: Dimensions are in inches Please read before operating your HDTV! PROTECTING THE LCD... for off-air or cable 5 BACK PANEL JACKS 6 A/V CONNECTIONS 7 POWER CONNECTION / INITIAL CHANNEL SEARCH . . .8 REMOTE CONTROL OPERATION 9 ON-SCREEN MENU OPERATION- www.sanyoctv.com 1-800-877-5032 Channel Setting 10 Channel Search 10 Channel Scan ...
...LCD SCREEN 4 HANDLING PRECAUTIONS 4 POSITIONING THE LCD HDTV 5 STAND REMOVAL / WALL MOUNTING 5 GETTING STARTED- Dimensions: MODEL WIDTH HEIGHT DEPTH DP42840 w/o stand 39.8 27.7 25.7 12.0 4.7 DP46840 w/o stand 43.7 30.7 28.1 12.7 4.7 NOTE: Dimensions are in inches Please read before operating your HDTV! PROTECTING THE LCD... for off-air or cable 5 BACK PANEL JACKS 6 A/V CONNECTIONS 7 POWER CONNECTION / INITIAL CHANNEL SEARCH . . .8 REMOTE CONTROL OPERATION 9 ON-SCREEN MENU OPERATION- www.sanyoctv.com 1-800-877-5032 Channel Setting 10 Channel Search 10 Channel Scan ...
Owners Manual (w/ GXEA remote)
Page 5
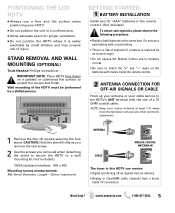
...at the same time. Do not use a new battery with the use a firm and flat surface when positioning your HDTV. • Do not position the unit in the remote control. (Not included) To ensure safe operation, please observe the following precautions: • Replace both batteries at least ...3 ft. away from a direct Cable TV connection. POSITIONING THE LCD HDTV • Always use of a 75 OHM coaxial cable. Wall mounting of the HDTV must be ...
...at the same time. Do not use a new battery with the use a firm and flat surface when positioning your HDTV. • Do not position the unit in the remote control. (Not included) To ensure safe operation, please observe the following precautions: • Replace both batteries at least ...3 ft. away from a direct Cable TV connection. POSITIONING THE LCD HDTV • Always use of a 75 OHM coaxial cable. Wall mounting of the HDTV must be ...
Owners Manual (w/ GXEA remote)
Page 9
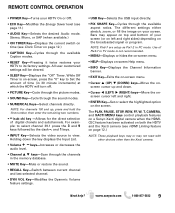
REMOTE CONTROL OPERATION • POWER Key-Turns your screen. All user customized settings will turn ...-Increases or decreases the audio level. • Channel L M keys-Scan through the channels in 30 minute increments) at which the HDTV will be cleared. • SLEEP Key-Displays the "Off" Timer. The PLAY, PAUSE, STOP, REW, FF, W, T, CAMERA..., and XACTI MENU keys control playback features on a Sanyo Xacti digital camera when the HDMICEC feature has been activated on both the HDTV and the Xacti camera (see HDMI Linking feature on page 12.) • CAPTION Key-Cycles...
REMOTE CONTROL OPERATION • POWER Key-Turns your screen. All user customized settings will turn ...-Increases or decreases the audio level. • Channel L M keys-Scan through the channels in 30 minute increments) at which the HDTV will be cleared. • SLEEP Key-Displays the "Off" Timer. The PLAY, PAUSE, STOP, REW, FF, W, T, CAMERA..., and XACTI MENU keys control playback features on a Sanyo Xacti digital camera when the HDMICEC feature has been activated on both the HDTV and the Xacti camera (see HDMI Linking feature on page 12.) • CAPTION Key-Cycles...
Owners Manual (w/ GXEA remote)
Page 12
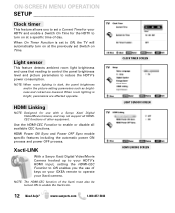
... automatically turn on Time. NOTE: The HDMI-CEC function of keys on at a specific time of day. Xacti-LINK With a Sanyo Xacti Digital Video/Movie Camera hooked up to your HDTV's HDMI input, setting the HDMI-CEC Function to ON enables you to set Switch on at the previously set a Current Time... SENSOR SCREEN HDMI LINKING SCREEN NOTE: When room lighting is bright, parameters are lowered. Use the HDMI-CEC Function to turn on your GXEA remote to operate your HDTV and enable a Switch On Time for use of the Xacti must also be turned ON to enable the Xacti-Link. 12 Need help...
... automatically turn on Time. NOTE: The HDMI-CEC function of keys on at a specific time of day. Xacti-LINK With a Sanyo Xacti Digital Video/Movie Camera hooked up to your HDTV's HDMI input, setting the HDMI-CEC Function to ON enables you to set Switch on at the previously set a Current Time... SENSOR SCREEN HDMI LINKING SCREEN NOTE: When room lighting is bright, parameters are lowered. Use the HDMI-CEC Function to turn on your GXEA remote to operate your HDTV and enable a Switch On Time for use of the Xacti must also be turned ON to enable the Xacti-Link. 12 Need help...

Owners Manual (w/ GXEA remote)
Page 18
...this TV to be prepared to state. (EFFECTIVE: March 1, 2007) Your Sanyo HDTV is registered at the retailer. ONE-YEAR LIMITED PARTS AND LABOR WARRANTY THIS LIMITED PARTS AND LABOR ... workmanship under normal use and conditions for the same model, or a replacement model of purchase, Sanyo Manufacturing Corporation warrants this product, please fill in material and workmanship under normal use and conditions. ...along with the receipt and the included accessories, such as the remote control. THE FOREGOING WARRANTY IS EXCLUSIVE AND IN LIEU OF ALL OTHER WARRANTIES OF MERCHANTABILITY OR FITNESS...
...this TV to be prepared to state. (EFFECTIVE: March 1, 2007) Your Sanyo HDTV is registered at the retailer. ONE-YEAR LIMITED PARTS AND LABOR WARRANTY THIS LIMITED PARTS AND LABOR ... workmanship under normal use and conditions for the same model, or a replacement model of purchase, Sanyo Manufacturing Corporation warrants this product, please fill in material and workmanship under normal use and conditions. ...along with the receipt and the included accessories, such as the remote control. THE FOREGOING WARRANTY IS EXCLUSIVE AND IN LIEU OF ALL OTHER WARRANTIES OF MERCHANTABILITY OR FITNESS...


