Owners Manual
Page 2
... ventilation openings. A grounding-type plug has two blades and a third grounding prong. Only use attachments/accessories specified by the manufacturer, or sold with the cart, stand, tripod, bracket, or table specified by the manufacturer. 12. Refer all instructions. 5. Clean only with the manufacturer's instructions. 8. Use only with the apparatus. Servicing is...
... ventilation openings. A grounding-type plug has two blades and a third grounding prong. Only use attachments/accessories specified by the manufacturer, or sold with the cart, stand, tripod, bracket, or table specified by the manufacturer. 12. Refer all instructions. 5. Clean only with the manufacturer's instructions. 8. Use only with the apparatus. Servicing is...
Owners Manual
Page 3
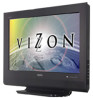
... 3 (Component: green, blue, red) . . Am I using the best quality connection? safety standards against risk of Sanyo Manufacturing Corporation. with DVI Output 7 COMPONENT JACKS CONNECTIONS HD DVD Player 8 DIGITAL AUDIO OUT CONNECTION Multichannel Receiver 8 ANALOG AV ...trademark of Dolby Laboratories. CONTENTS IMPORTANT SAFETY INSTRUCTIONS 2 CONTENT 3 SPECIFICATIONS 4 POSITIONING THE LCD DTV 4 PROTECTING THE LCD SCREEN 4 REMOVING THE DTV STAND (OPTIONAL 4 WALL MOUNTING (OPTIONAL 4 GETTING STARTED (REQUIRED INITIAL SETUP) . . . . . 5 Installing Batteries in the Remote Control 5 ...
... 3 (Component: green, blue, red) . . Am I using the best quality connection? safety standards against risk of Sanyo Manufacturing Corporation. with DVI Output 7 COMPONENT JACKS CONNECTIONS HD DVD Player 8 DIGITAL AUDIO OUT CONNECTION Multichannel Receiver 8 ANALOG AV ...trademark of Dolby Laboratories. CONTENTS IMPORTANT SAFETY INSTRUCTIONS 2 CONTENT 3 SPECIFICATIONS 4 POSITIONING THE LCD DTV 4 PROTECTING THE LCD SCREEN 4 REMOVING THE DTV STAND (OPTIONAL 4 WALL MOUNTING (OPTIONAL 4 GETTING STARTED (REQUIRED INITIAL SETUP) . . . . . 5 Installing Batteries in the Remote Control 5 ...
Owners Manual
Page 4
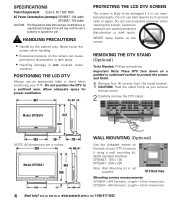
... DTV in inches. Do not use hard objects such as you remove the last screw. 2 Carefully remove the DTV stand. VESA standard interface: DP26647: 100 x 100 DP32647: 200 x 200 Note: Wall Mounting kit is not maintained properly. PROTECTING THE LCD DTV SCREEN The screen is likely...confined area. DTV Back View Mounting screws measurements: DP26647-M4 Diameter, Length-10mm (maximum). DP32647-M6 Diameter, Length-12mm (maximum). 4 Need help? POSITIONING THE LCD DTV Always use an appropriate table or stand when positioning your DTV to be damaged if it using a wall mounting kit. Do ...
... DTV in inches. Do not use hard objects such as you remove the last screw. 2 Carefully remove the DTV stand. VESA standard interface: DP26647: 100 x 100 DP32647: 200 x 200 Note: Wall Mounting kit is not maintained properly. PROTECTING THE LCD DTV SCREEN The screen is likely...confined area. DTV Back View Mounting screws measurements: DP26647-M4 Diameter, Length-10mm (maximum). DP32647-M6 Diameter, Length-12mm (maximum). 4 Need help? POSITIONING THE LCD DTV Always use an appropriate table or stand when positioning your DTV to be damaged if it using a wall mounting kit. Do ...


