User Manual
Page 5
... 36 V-Guide (Parental Control 37 To Block MPAA Movie or TV Programs 37 To Setup V-Guide Ratings 37 On-Screen View of Blocked TV program 38 To Temporarily Unblock MPAA Movie or TV Rating . . 38 To Unblock All MPAA Movie or All TV Rating 38 TV Ratings (Age and Content-Based) Symbol Explanation 39 MPAA...
... 36 V-Guide (Parental Control 37 To Block MPAA Movie or TV Programs 37 To Setup V-Guide Ratings 37 On-Screen View of Blocked TV program 38 To Temporarily Unblock MPAA Movie or TV Rating . . 38 To Unblock All MPAA Movie or All TV Rating 38 TV Ratings (Age and Content-Based) Symbol Explanation 39 MPAA...

User Manual
Page 6
... (Detachable) N Trilingual Menu Options (English, Spanish, or French) N Integrated Digital/Analog Tuner N Energy Saver Mode (Backlight) N Automatic Channel Search N 3-D Y/C Comb Filter N V-Chip for Movies and TV guidelines rating limits (parental control) N Closed-Captioning: Analog EIA-608B Digital EIA-708B N Audio Modes: Digital-Main and Sub Analog-Stereo, Mono, and SAP N Front...
... (Detachable) N Trilingual Menu Options (English, Spanish, or French) N Integrated Digital/Analog Tuner N Energy Saver Mode (Backlight) N Automatic Channel Search N 3-D Y/C Comb Filter N V-Chip for Movies and TV guidelines rating limits (parental control) N Closed-Captioning: Analog EIA-608B Digital EIA-708B N Audio Modes: Digital-Main and Sub Analog-Stereo, Mono, and SAP N Front...

User Manual
Page 11
... angle of your hand on a padded or cushioned surface to secure it using a wall mounting kit. (VESA standard interface 100 x 100.) DETACHING THE TV TILT STAND Tools Needed: Phillips screwdriver Important Note: Place DTV face down on the top and hold the stand firmly, then tilt the LCD screen..., Length-10mm (maximum). DTV BACK VIEW Note: Wall Mounting kit is not supplied. CAUTION: Do not position hand under the screen while tilting the TV forward. 11 CAUTION: Hold the stand firmly as you remove the last screw. 2 Carefully remove the DTV stand. OPTIONAL FEATURES WALL MOUNTING Use the ...
... angle of your hand on a padded or cushioned surface to secure it using a wall mounting kit. (VESA standard interface 100 x 100.) DETACHING THE TV TILT STAND Tools Needed: Phillips screwdriver Important Note: Place DTV face down on the top and hold the stand firmly, then tilt the LCD screen..., Length-10mm (maximum). DTV BACK VIEW Note: Wall Mounting kit is not supplied. CAUTION: Do not position hand under the screen while tilting the TV forward. 11 CAUTION: Hold the stand firmly as you remove the last screw. 2 Carefully remove the DTV stand. OPTIONAL FEATURES WALL MOUNTING Use the ...
User Manual
Page 19
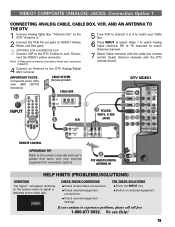
... the VIDEO1 yellow connector Note: S-Video jack connection overrides a Video jack connection (VIDEO1). 6 Press INPUT to select Video 1 to watch Analog Cable channels OR to TV channels to watch Antenna channels. 7 Select Cable channels with the cable box remote control.
... the VIDEO1 yellow connector Note: S-Video jack connection overrides a Video jack connection (VIDEO1). 6 Press INPUT to select Video 1 to watch Analog Cable channels OR to TV channels to watch Antenna channels. 7 Select Cable channels with the cable box remote control.
User Manual
Page 20
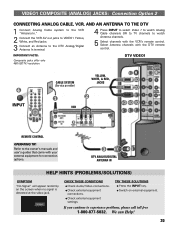
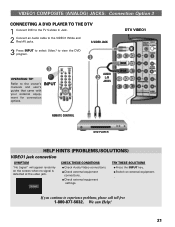
... FACTS: Composite jacks offer only 480i (SDTV ) resolution. CHECK THESE CONDITIONS G Check Audio / Video connections. If you continue to watch Analog Cable channels OR to TV channels to experience problems, please call toll free 1-800-877-5032. Select Antenna channels with your external equipment for connection options. „ DTV ANALOG/DIGITAL...
... FACTS: Composite jacks offer only 480i (SDTV ) resolution. CHECK THESE CONDITIONS G Check Audio / Video connections. If you continue to watch Analog Cable channels OR to TV channels to experience problems, please call toll free 1-800-877-5032. Select Antenna channels with your external equipment for connection options. „ DTV ANALOG/DIGITAL...
User Manual
Page 21
... external equipment. . TRY THESE SOLUTIONS G Press the INPUT key. VIDEO1 COMPOSITE (ANALOG) JACKS: Connection Option 3 CONNECTING A DVD PLAYER TO THE DTV 1 Connect DVD to the TV S-Video In Jack. 2 Connect an Audio cable to the VIDEO1 White and Red AV jacks.
... external equipment. . TRY THESE SOLUTIONS G Press the INPUT key. VIDEO1 COMPOSITE (ANALOG) JACKS: Connection Option 3 CONNECTING A DVD PLAYER TO THE DTV 1 Connect DVD to the TV S-Video In Jack. 2 Connect an Audio cable to the VIDEO1 White and Red AV jacks.

User Manual
Page 23
... AUDIO OUT (ANALOG) JACKS CONNECTING A STEREO AMPLIFIER TO THE DTV 1 Connect a Stereo Amplifier to the DTV. Note: Do not connect external speakers directly to the TV Audio Out jacks as shown. ment for connection options. We can Help! 23 TRY THESE SOLUTIONS G Switch on external equipment. BACK VIEW OF DTV OPERATING...
... AUDIO OUT (ANALOG) JACKS CONNECTING A STEREO AMPLIFIER TO THE DTV 1 Connect a Stereo Amplifier to the DTV. Note: Do not connect external speakers directly to the TV Audio Out jacks as shown. ment for connection options. We can Help! 23 TRY THESE SOLUTIONS G Switch on external equipment. BACK VIEW OF DTV OPERATING...
User Manual
Page 24
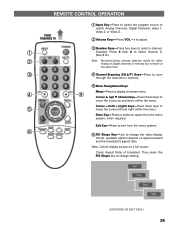
... LM) Keys-Press to scan through the channels in memory. Menu Navigational Keys: Menu-Press to select a channel. REMOTE CONTROL OPERATION POINT TOWARDS TV Œ Ž ‘ « Œ Input Key-Press to select the program source to watch: Analog Channels, Digital Channels, Video 1, Video 2, or...
... LM) Keys-Press to scan through the channels in memory. Menu Navigational Keys: Menu-Press to select a channel. REMOTE CONTROL OPERATION POINT TOWARDS TV Œ Ž ‘ « Œ Input Key-Press to select the program source to watch: Analog Channels, Digital Channels, Video 1, Video 2, or...
User Manual
Page 25
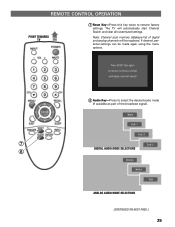
Note: Channel scan memory database list of the broadcast signal). ’ “ DIGITAL AUDIO MODE SELECTIONS ANALOG AUDIO MODE SELECTIONS (CONTINUED ON NEXT PAGE.) 25 If desired, personal settings can be replaced. REMOTE CONTROL OPERATION POINT TOWARDS TV « ’ Reset Key-Press this key twice to select the desired audio mode (if available as part of digital and analog channels will automatically start Channel Search and clear all customized settings. The TV will be made again using the menu options. “ Audio Key-Press to restore factory settings.
Note: Channel scan memory database list of the broadcast signal). ’ “ DIGITAL AUDIO MODE SELECTIONS ANALOG AUDIO MODE SELECTIONS (CONTINUED ON NEXT PAGE.) 25 If desired, personal settings can be replaced. REMOTE CONTROL OPERATION POINT TOWARDS TV « ’ Reset Key-Press this key twice to select the desired audio mode (if available as part of digital and analog channels will automatically start Channel Search and clear all customized settings. The TV will be made again using the menu options. “ Audio Key-Press to restore factory settings.
User Manual
Page 26
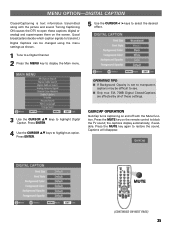
... the "0" key to select mode options: Digital CC1 ~ Digital CC6, or Analog CC1 ~ CC4, OFF, or QuikCap. (QuikCap switches captions on the TV screen. The Recall key cannot toggle between the last two channels selected. Press CAPTION to set in 30- minute increments up to mute the sound.... Note: The Sleep Timer cancels when the TV is text information transmitted along with the Mute function.) Digital Captions can be displayed on and off or if a power failure occurs. •...
... the "0" key to select mode options: Digital CC1 ~ Digital CC6, or Analog CC1 ~ CC4, OFF, or QuikCap. (QuikCap switches captions on the TV screen. The Recall key cannot toggle between the last two channels selected. Press CAPTION to set in 30- minute increments up to mute the sound.... Note: The Sleep Timer cancels when the TV is text information transmitted along with the Mute function.) Digital Captions can be displayed on and off or if a power failure occurs. •...
User Manual
Page 27
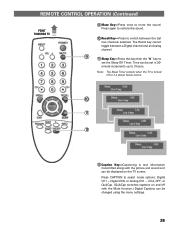
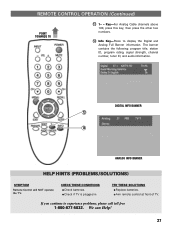
We can Help! 27 REMOTE CONTROL OPERATION (Continued) POINT TOWARDS TV « 13 1- - Key-For Analog Cable channels above 100, press this key, then press the other two numbers. 14 Info Key-Press to experience problems, .... DIGITAL INFO BANNER 13 14 ANALOG INFO BANNER HELP HINTS (PROBLEMS/SOLUTIONS) SYMPTOM Remote Control will NOT operate the T V. G Aim remote control at front of TV. The banner contains the following: program title, station ID, program rating, signal strength, channel number, tuner ID, and audio information. CHECK THESE CONDITIONS G Check batteries...
We can Help! 27 REMOTE CONTROL OPERATION (Continued) POINT TOWARDS TV « 13 1- - Key-For Analog Cable channels above 100, press this key, then press the other two numbers. 14 Info Key-Press to experience problems, .... DIGITAL INFO BANNER 13 14 ANALOG INFO BANNER HELP HINTS (PROBLEMS/SOLUTIONS) SYMPTOM Remote Control will NOT operate the T V. G Aim remote control at front of TV. The banner contains the following: program title, station ID, program rating, signal strength, channel number, tuner ID, and audio information. CHECK THESE CONDITIONS G Check batteries...
User Manual
Page 28
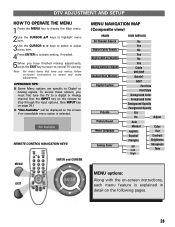
To access these options, you have sub menus, follow on-screen instructions to normal TV viewing. OPERATING TIPS: I Some Menu options are specific to step through the input options. (See INPUT key on page 24.) I "Not Available" will be displayed ... menu item. 3Use the CURSOR < > keys to select or adjust menu item. 4Press ENTER to activate setting, if needed. 5When you must first tune the TV to a digital or Analog channel Use the INPUT key on the remote to Digital or Analog signals. Add?
To access these options, you have sub menus, follow on-screen instructions to normal TV viewing. OPERATING TIPS: I Some Menu options are specific to step through the input options. (See INPUT key on page 24.) I "Not Available" will be displayed ... menu item. 3Use the CURSOR < > keys to select or adjust menu item. 4Press ENTER to activate setting, if needed. 5When you must first tune the TV to a digital or Analog channel Use the INPUT key on the remote to Digital or Analog signals. Add?
User Manual
Page 32
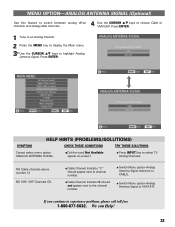
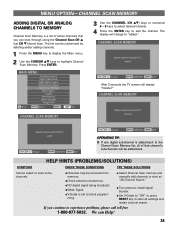
...; G Cable Channel Indicator C should appear next to channel number. G Press INPUT Key to choose Cable or VHF/ UHF. Use the CURSOR LM keys to select TV Analog Channels. G Switch Menu option-Analog Antenna Signal to CABLE. G Switch Menu option-Analog Antenna Signal selection to VHF/UHF. Press ENTER. 1 Tune to an...
...; G Cable Channel Indicator C should appear next to channel number. G Press INPUT Key to choose Cable or VHF/ UHF. Use the CURSOR LM keys to select TV Analog Channels. G Switch Menu option-Analog Antenna Signal to CABLE. G Switch Menu option-Analog Antenna Signal selection to VHF/UHF. Press ENTER. 1 Tune to an...
User Manual
Page 33
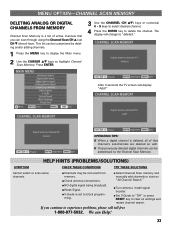
... back to the Channel Scan Memory. G Weak Signal. G Select Channel Scan memory and manually add channels or start an "All Channel Search." After 3 seconds the TV screen will change to delete the channel. G Set V-Guide to "Off" or press RESET key to experience problems, please call toll free 1-800-877-5032...
... back to the Channel Scan Memory. G Weak Signal. G Select Channel Scan memory and manually add channels or start an "All Channel Search." After 3 seconds the TV screen will change to delete the channel. G Set V-Guide to "Off" or press RESET key to experience problems, please call toll free 1-800-877-5032...
User Manual
Page 34
... (CH LM) keys or numerical 0 ~ 9 keys to select desired channel. 4 Press the ENTER key to block program- The display will display "Delete?" After 3 seconds the TV screen will change to highlight Channel Scan Memory. HELP HINTS (PROBLEMS/SOLUTIONS) SYMPTOM CHECK THESE CONDITIONS TRY THESE SOLUTIONS Cannot select or scan some channels...
... (CH LM) keys or numerical 0 ~ 9 keys to select desired channel. 4 Press the ENTER key to block program- The display will display "Delete?" After 3 seconds the TV screen will change to highlight Channel Scan Memory. HELP HINTS (PROBLEMS/SOLUTIONS) SYMPTOM CHECK THESE CONDITIONS TRY THESE SOLUTIONS Cannot select or scan some channels...
User Manual
Page 35
... ON causes the DTV to open these settings. 3 Use the CURSOR LM keys to highlight an option. Press the MUTE key again to block the TV sound; MUTE (CONTINUED ON NEXT PAGE) 35 OPERATING TIPS: I Only true EIA 708B Digital Closed-Captions are affected by all of these captions (digital or...
... ON causes the DTV to open these settings. 3 Use the CURSOR LM keys to highlight an option. Press the MUTE key again to block the TV sound; MUTE (CONTINUED ON NEXT PAGE) 35 OPERATING TIPS: I Only true EIA 708B Digital Closed-Captions are affected by all of these captions (digital or...
User Manual
Page 37
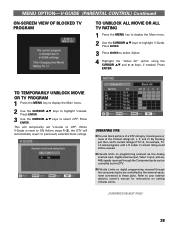
...violence), and D (suggestive dialog). 6 Press the ENTER key to interpret MPAA (Motion Picture Association of America) and TV Parental Guidelines rating codes. Press ENTER. (CONTINUED ON NEXT PAGE.) 37 This Sanyo television is blocked. 3 Use the CURSOR LM keys to view. Press ENTER. 5 Press CURSOR LM and < >... keys to select MOVIE, TV Rating, or Content Ratings. (A green square will appear beside the ...
...violence), and D (suggestive dialog). 6 Press the ENTER key to interpret MPAA (Motion Picture Association of America) and TV Parental Guidelines rating codes. Press ENTER. (CONTINUED ON NEXT PAGE.) 37 This Sanyo television is blocked. 3 Use the CURSOR LM keys to view. Press ENTER. 5 Press CURSOR LM and < >... keys to select MOVIE, TV Rating, or Content Ratings. (A green square will appear beside the ...
User Manual
Page 38
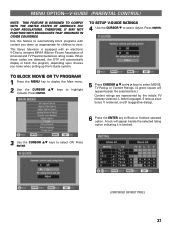
...jacks. I V-Guide Limits on digital programming received through the Component jacks can block portions of a DTV rating by choosing one or more of TV-14, for instructions on programming received via the Analog antenna input, Digital antenna input, Video 1 input, and any 480i signals received through ...the component jacks are controlled by this DTV. I You can be viewed. TO TEMPORARILY UNBLOCK MOVIE OR TV PROGRAM 1 Press the MENU key to display the Main menu. 2 Use the CURSOR LM keys to select OFF. Press ENTER. Refer to select ...
...jacks. I V-Guide Limits on digital programming received through the Component jacks can block portions of a DTV rating by choosing one or more of TV-14, for instructions on programming received via the Analog antenna input, Digital antenna input, Video 1 input, and any 480i signals received through ...the component jacks are controlled by this DTV. I You can be viewed. TO TEMPORARILY UNBLOCK MOVIE OR TV PROGRAM 1 Press the MENU key to display the Main menu. 2 Use the CURSOR LM keys to select OFF. Press ENTER. Refer to select ...
User Manual
Page 39
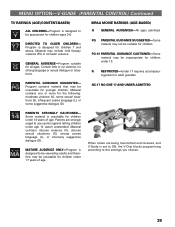
... programming according to be viewed by adults and therefore may be unsuitable for children under 17 years of age. MENU OPTION-V-GUIDE (PARENTAL CONTROL) Continued TV RATINGS (AGE/CONTENT-BASED) ALL CHILDREN-Program is designed to use caution against letting children under age 14 watch unattended. DIRECTED TO OLDER CHILDREN-
... programming according to be viewed by adults and therefore may be unsuitable for children under 17 years of age. MENU OPTION-V-GUIDE (PARENTAL CONTROL) Continued TV RATINGS (AGE/CONTENT-BASED) ALL CHILDREN-Program is designed to use caution against letting children under age 14 watch unattended. DIRECTED TO OLDER CHILDREN-
User Manual
Page 44
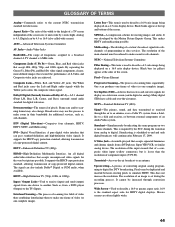
.... The resolution of the screen. Pixel-Picture Element Progressive Scanning-The process of programming or data services. SDTV-Standard-Definition TV (480i) Signal-The picture, sound, and data transmitted or received through conversion processes. ATSC-Advanced Television Systems Committee AV ...2009. By separating the Green (Y), Blue (Pb), and Red (Pr) video signal components, clearer, more channels. EDTV-Enhanced-Definition TV (480p) HDMI-High-Definition Multimedia Interface. This makes HDTV and multicasting possible. Many digital STBs have cable and over -the-air ...
.... The resolution of the screen. Pixel-Picture Element Progressive Scanning-The process of programming or data services. SDTV-Standard-Definition TV (480i) Signal-The picture, sound, and data transmitted or received through conversion processes. ATSC-Advanced Television Systems Committee AV ...2009. By separating the Green (Y), Blue (Pb), and Red (Pr) video signal components, clearer, more channels. EDTV-Enhanced-Definition TV (480p) HDMI-High-Definition Multimedia Interface. This makes HDTV and multicasting possible. Many digital STBs have cable and over -the-air ...


