
Instruction Manual
Page 2
.../OFF ...5 Navigating the Menu System ...5 Initial Settings ...6 Basic Operations ...7 Everyday Operation ...7 IDTV Menu System ...9 Analogue TV Menu System ...15 PC Mode ...20 Other Features ...20 Teletext ...22 Connect Peripheral Equipment ...23 Tips ...24 Specifications ...24 Appendix A: PC Input Typical Display Modes ...
.../OFF ...5 Navigating the Menu System ...5 Initial Settings ...6 Basic Operations ...7 Everyday Operation ...7 IDTV Menu System ...9 Analogue TV Menu System ...15 PC Mode ...20 Other Features ...20 Teletext ...22 Connect Peripheral Equipment ...23 Tips ...24 Specifications ...24 Appendix A: PC Input Typical Display Modes ...
Instruction Manual
Page 3
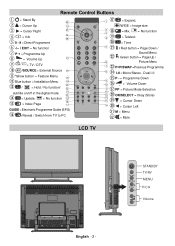
...Buttons = Stand By 32 = Cursor Up 31 = Cursor Right 30 = Info 29 28 0 - 9 = Direct Programme -/-- / EXIT = No function P + = Programme Up + = Volume Up 27 TV DTV = TV / DTV AV /SOURCE = External Source 26 Yellow button = Feature Menu 25 Blue button = Installation Menu 24 23 / = Hold / No function/ 22 subtitle on/off in... the digital mode 21 20 = Update, = No function 19 18 = Index Page 17 GUIDE= Electronic Programme Guide (EPG) =Reveal / Switch from TV to PC SELECT OK ABC 1 JKL 4 STU 7 PP M INFO DEF GHI 2 3 MNO PQR 5 6 VWX YZ 8 9 0 -/--
...Buttons = Stand By 32 = Cursor Up 31 = Cursor Right 30 = Info 29 28 0 - 9 = Direct Programme -/-- / EXIT = No function P + = Programme Up + = Volume Up 27 TV DTV = TV / DTV AV /SOURCE = External Source 26 Yellow button = Feature Menu 25 Blue button = Installation Menu 24 23 / = Hold / No function/ 22 subtitle on/off in... the digital mode 21 20 = Update, = No function 19 18 = Index Page 17 GUIDE= Electronic Programme Guide (EPG) =Reveal / Switch from TV to PC SELECT OK ABC 1 JKL 4 STU 7 PP M INFO DEF GHI 2 3 MNO PQR 5 6 VWX YZ 8 9 0 -/--
Instruction Manual
Page 4
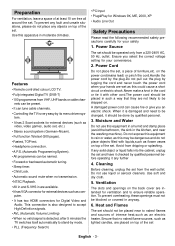
...It can be dangerous and do not place any further 4. Ensure you an electric shock. Features • Remote controlled colour LCD TV. • Fully integrated Digital TV (DVB-T) • 100 programmes from the wall outlet. This connection is very easy by mode. • PLL (Frequency Search)...TOP text. • Headphone connection. •A.P.S. (Automatic Programming System). • All programmes can tune cable channels. • Controlling the TV is also designed to be placed in are intended for ventilation and to be changed, it any objects on the back cover are available. &#...
...It can be dangerous and do not place any further 4. Ensure you an electric shock. Features • Remote controlled colour LCD TV. • Fully integrated Digital TV (DVB-T) • 100 programmes from the wall outlet. This connection is very easy by mode. • PLL (Frequency Search)...TOP text. • Headphone connection. •A.P.S. (Automatic Programming System). • All programmes can tune cable channels. • Controlling the TV is also designed to be placed in are intended for ventilation and to be changed, it any objects on the back cover are available. &#...

Instruction Manual
Page 5
Warning: To prevent injury, this device must be kept away from power. "DO NOT LEAVE YOUR TV AT STAND-BY OR OPERATING WHEN YOU LEAVE YOUR HOUSE" Be sure to qualified personnel. Surely connect the ground wire. WARNING: When the device is ...heavy metal-free, should principally be securely attached to disconnect the TV from the wall outlet. 8. Instructions for a long time, disconnect from children. • Battery, including those which is not in use for waste disposal: • Packaging...
Warning: To prevent injury, this device must be kept away from power. "DO NOT LEAVE YOUR TV AT STAND-BY OR OPERATING WHEN YOU LEAVE YOUR HOUSE" Be sure to qualified personnel. Surely connect the ground wire. WARNING: When the device is ...heavy metal-free, should principally be securely attached to disconnect the TV from the wall outlet. 8. Instructions for a long time, disconnect from children. • Battery, including those which is not in use for waste disposal: • Packaging...
Instruction Manual
Page 6
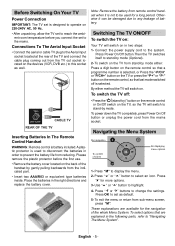
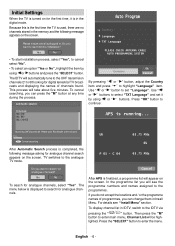
... to change the settings. Press "" or "" buttons to select an icon. Place the batteries in two steps: 1- To power down the TV completely, press Power On/Off button or unplug the power cord from sub-menu screen, press "M". Use "" or "" button to display the... use. • Remove the battery cover located on the back of the handset by mode (Optional). 2- Press Power On/Off button.Then the TV switches itself to stand-by gently pulling backwards from stand-by mode. A plastic protector is selected. Press "" for a long period. To ...
... to change the settings. Press "" or "" buttons to select an icon. Place the batteries in two steps: 1- To power down the TV completely, press Power On/Off button or unplug the power cord from sub-menu screen, press "M". Use "" or "" button to display the... use. • Remove the battery cover located on the back of the handset by mode (Optional). 2- Press Power On/Off button.Then the TV switches itself to stand-by gently pulling backwards from stand-by mode. A plastic protector is selected. Press "" for a long period. To ...
Instruction Manual
Page 7
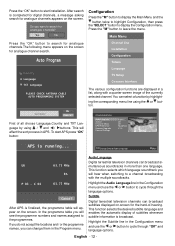
...will take a few minutes 12 % MENU Canc el searching After Automatic Search process is completed, the following message appears on for digital terrestrial TV broadcasts and displaying the names of programmes, you want to start installation process, select "Yes", to cancel select "No". • To ...select an option "Yes or No", highlight the item by using or buttons and press the "SELECT" button. TV switches to highlight "Language" item. Cancel After APS is finalized, a programme list will see "Install Menu" section. English - 6 - Yes No &#...
...will take a few minutes 12 % MENU Canc el searching After Automatic Search process is completed, the following message appears on for digital terrestrial TV broadcasts and displaying the names of programmes, you want to start installation process, select "Yes", to cancel select "No". • To ...select an option "Yes or No", highlight the item by using or buttons and press the "SELECT" button. TV switches to highlight "Language" item. Cancel After APS is finalized, a programme list will see "Install Menu" section. English - 6 - Yes No &#...
Instruction Manual
Page 8
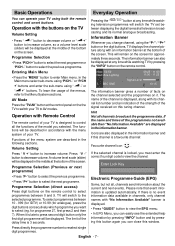
...Press " V +" button to select the previous programme. Now: 50/50 Next: Ace Lighting 1. Basic Operations Everyday Operation You can operate your TV to AV modes. Operation with Remote Control The remote control of the signal received on the screen for programme 27, first press 2 and then... button to decrease volume. Programme Selection (direct access): Press digit buttons on the screen. for approximately three seconds. Pressing the " TV DTV " button at the middle of the screen. Information Banner Whenever you must enter the correct four digit code to enter Main menu...
...Press " V +" button to select the previous programme. Now: 50/50 Next: Ace Lighting 1. Basic Operations Everyday Operation You can operate your TV to AV modes. Operation with Remote Control The remote control of the signal received on the screen for programme 27, first press 2 and then... button to decrease volume. Programme Selection (direct access): Press digit buttons on the screen. for approximately three seconds. Pressing the " TV DTV " button at the middle of the screen. Information Banner Whenever you must enter the correct four digit code to enter Main menu...
Instruction Manual
Page 10
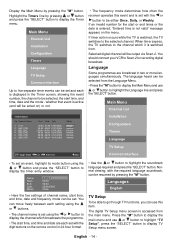
... 9 - Digital teletext is sometimes broadcast at the same time as normal broadcasting. 1. Please Note: Menu size changes depending on while TV is highlighted and press the "SELECT" button to digital teletext broadcasting at the same time as normal broadcasting, there are managed. Renaming channels... 4. BBC ONE 2. Channel 4 5. Press the " TV DTV " button to move page up -todate information, please ensure that the first item, Channel List, is in this to its standby mode...
... 9 - Digital teletext is sometimes broadcast at the same time as normal broadcasting. 1. Please Note: Menu size changes depending on while TV is highlighted and press the "SELECT" button to digital teletext broadcasting at the same time as normal broadcasting, there are managed. Renaming channels... 4. BBC ONE 2. Channel 4 5. Press the " TV DTV " button to move page up -todate information, please ensure that the first item, Channel List, is in this to its standby mode...
Instruction Manual
Page 12
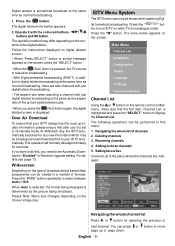
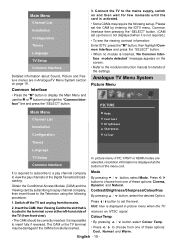
... The Installation menu mainly intends to avoid redundant duplicates of that channel. Installation Add New Channels First Time Installation Channel List Installation Configuration Timers Language TV Setup Common Interface Your previous dig ital channel list will be destroyed. Yes No By selecting YES and pressing the "OK" button, the existing channel...
... The Installation menu mainly intends to avoid redundant duplicates of that channel. Installation Add New Channels First Time Installation Channel List Installation Configuration Timers Language TV Setup Common Interface Your previous dig ital channel list will be destroyed. Yes No By selecting YES and pressing the "OK" button, the existing channel...
Instruction Manual
Page 13
... Subtitle Favourite Mode EPG Preference Receiver Upgrade Parental Settings English Off Off Now&Next V.1.5 APS is broadcast. Main Menu Channel List Installation Configuration Timers Language TV Setup Common Interface The various configuration functions are displayed in the Configuration menu and use the or button to cycle through "Off" and language options...
... Subtitle Favourite Mode EPG Preference Receiver Upgrade Parental Settings English Off Off Now&Next V.1.5 APS is broadcast. Main Menu Channel List Installation Configuration Timers Language TV Setup Common Interface The various configuration functions are displayed in the Configuration menu and use the or button to cycle through "Off" and language options...
Instruction Manual
Page 14
... mode pressing "P+" and "P-" buttons will be free access to the menu system. tunes to each frequency that the IDTV is set a timer to switch the TV to select Next&Now or 7-Day. Enter Lock Key There is only one key which you are two ways for Receiver software to "0000" initially...
... mode pressing "P+" and "P-" buttons will be free access to the menu system. tunes to each frequency that the IDTV is set a timer to switch the TV to select Next&Now or 7-Day. Enter Lock Key There is only one key which you are two ways for Receiver software to "0000" initially...
Instruction Manual
Page 15
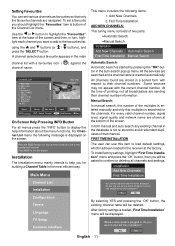
...button to highlight the soundtrack language required and press the "SELECT" button. If an invalid number for recording digital broadcast. When timer expires, the TV switches to the channel which broadcasts the programme. • The start or end times or the date is entered, "Entered time is switched ...00:00 00:00 01/01/2005 00:00 00:00 01/01/2005 Mode Active Inactive Inactive Inactive Inactive Inactive Installation Configuration Timers Language TV Setup Toggle Mode MENU Exit SELECT Edit Timer i More Common Interface • To set an event, highlight its mode button using the ...
...button to highlight the soundtrack language required and press the "SELECT" button. If an invalid number for recording digital broadcast. When timer expires, the TV switches to the channel which broadcasts the programme. • The start or end times or the date is entered, "Entered time is switched ...00:00 00:00 01/01/2005 00:00 00:00 01/01/2005 Mode Active Inactive Inactive Inactive Inactive Inactive Installation Configuration Timers Language TV Setup Toggle Mode MENU Exit SELECT Edit Timer i More Common Interface • To set an event, highlight its mode button using the ...
Instruction Manual
Page 16
.... • Some CAMs may be correctly inserted, it is impossible to insert fully if reversed. It is displayed at the left-hand side of the TV (from one of the Digital Terrestrial broadcasting. Mode By pressing / button, select Mode. Colour Temp • By pressing / ...following set up menu is not displayed when it is not required.) • To see the viewing contract information: Enter IDTV; Switch off the TV and unplug from one of the menu osd. English - 15 - Common Interface • Press the "M" button to display the Main Menu ...
.... • Some CAMs may be correctly inserted, it is impossible to insert fully if reversed. It is displayed at the left-hand side of the TV (from one of the Digital Terrestrial broadcasting. Mode By pressing / button, select Mode. Colour Temp • By pressing / ...following set up menu is not displayed when it is not required.) • To see the viewing contract information: Enter IDTV; Switch off the TV and unplug from one of the menu osd. English - 15 - Common Interface • Press the "M" button to display the Main Menu ...
Instruction Manual
Page 17
... picture zoom to the right. Picture Zoom By pressing / button select Picture Zoom. Use / buttons, to change the level of the TV By pressing / select Volume . Select the desired frequency by / button and increase or decrease the frequency gain by pressing / ...
... picture zoom to the right. Picture Zoom By pressing / button select Picture Zoom. Use / buttons, to change the level of the TV By pressing / select Volume . Select the desired frequency by / button and increase or decrease the frequency gain by pressing / ...

Instruction Manual
Page 18
...By pressing / button select Store. • Press or "OK" button to select the language. Press / button to TV/DTV, EXT-1, EXT-2, FAV, YPbPr Audio, PC Audio or FAV. In this case the control panel buttons will be displayed on the screen when the..., 30 sec or 60 sec. Press " " / " " button to change menu timeout to West, East, Turk/Gre,Cyrillic, orArabic. nected device displays analogue TV source as well. Program Table By pressing / button, select Program Table. Child Lock By pressing / select Child Lock. ton...
...By pressing / button select Store. • Press or "OK" button to select the language. Press / button to TV/DTV, EXT-1, EXT-2, FAV, YPbPr Audio, PC Audio or FAV. In this case the control panel buttons will be displayed on the screen when the..., 30 sec or 60 sec. Press " " / " " button to change menu timeout to West, East, Turk/Gre,Cyrillic, orArabic. nected device displays analogue TV source as well. Program Table By pressing / button, select Program Table. Child Lock By pressing / select Child Lock. ton...

Instruction Manual
Page 19
... the name. Press " " / " button to select your country. Insert: Select the programme which you press the BLUE button for starting APS, all the programmes in TV mode (except the AV mode). Press the GREEN button. APS (Auto Programming System) When you want to see all stored programs will be erased and...
... the name. Press " " / " button to select your country. Insert: Select the programme which you press the BLUE button for starting APS, all the programmes in TV mode (except the AV mode). Press the GREEN button. APS (Auto Programming System) When you want to see all stored programs will be erased and...
Instruction Manual
Page 20
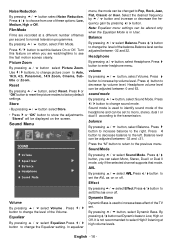
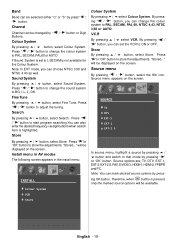
...not available for the Colour System. Press " "or "OK" button to adjust the tuning. Source menu By pressing " " / " " button, select the fifth icon. TV, DTV, EXT-1, EXT-2, EXT-2 S, FAV, S-VIDEO, HDMI-1, HDMI-2,YPBPR and PC. English - 19 - By pressing " " / " " button, you can ... button, select Fine Tune. Search By pressing / button, select Search. Store By pressing / button, select Store. SOURCE TV DTV EXT-1 EXT-2 EXT-2 S In source menu, highlight a source by pressing / button and switch to PAL, SECAM, PAL 60, ...
...not available for the Colour System. Press " "or "OK" button to adjust the tuning. Source menu By pressing " " / " " button, select the fifth icon. TV, DTV, EXT-1, EXT-2, EXT-2 S, FAV, S-VIDEO, HDMI-1, HDMI-2,YPBPR and PC. English - 19 - By pressing " " / " " button, you can ... button, select Fine Tune. Search By pressing / button, select Search. Store By pressing / button, select Store. SOURCE TV DTV EXT-1 EXT-2 EXT-2 S In source menu, highlight a source by pressing / button and switch to PAL, SECAM, PAL 60, ...
Instruction Manual
Page 21
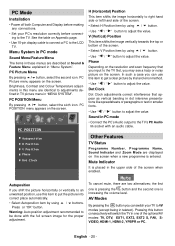
... text in smaller fonts. • Use " " / " " button to adjust the value. Brightness, Contrast and Colour Temperature adjustments in this button consecutively will switch the TV in the upper side of the screen. • Select H Position item by using / button. • Use " " / " " button to...It is increasing the volume level. V (Vertical) Position This item shifts the image vertically towards the top or bottom of the optional AV modes: TV, DTV, EXT1, EXT2, EXT2 S, FAV, SVIDEO, HDMI-1, HDMI-2, YPBPR or PC. Pressing this menu are described at Sound & Feature Menu...
... text in smaller fonts. • Use " " / " " button to adjust the value. Brightness, Contrast and Colour Temperature adjustments in this button consecutively will switch the TV in the upper side of the screen. • Select H Position item by using / button. • Use " " / " " button to...It is increasing the volume level. V (Vertical) Position This item shifts the image vertically towards the top or bottom of the optional AV modes: TV, DTV, EXT1, EXT2, EXT2 S, FAV, SVIDEO, HDMI-1, HDMI-2, YPBPR or PC. Pressing this menu are described at Sound & Feature Menu...
Instruction Manual
Page 22
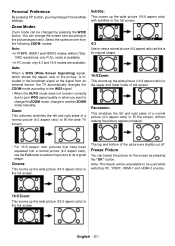
...the wide picture (14:9 aspect ratio) to its original shape. 14:9 Zoom: This zooms up the wide picture (16:9 aspect ratio) to fill the wide TV screen. Auto: When a WSS (Wide Screen Signalling) signal, which shows the aspect ratio of the screen. Note: This feaute will be unavailable to the ...want to change the ZOOM mode, change the screen size according to another ZOOM mode manually. Select the optimum one from an external device, the TV automatically changes the ZOOM mode according to the WSS signal. • When the AUTO mode does not function correctly due to poor WSS signal quality...
...the wide picture (14:9 aspect ratio) to its original shape. 14:9 Zoom: This zooms up the wide picture (16:9 aspect ratio) to fill the wide TV screen. Auto: When a WSS (Wide Screen Signalling) signal, which shows the aspect ratio of the screen. Note: This feaute will be unavailable to the ...want to change the ZOOM mode, change the screen size according to another ZOOM mode manually. Select the optimum one from an external device, the TV automatically changes the ZOOM mode according to the WSS signal. • When the AUTO mode does not function correctly due to poor WSS signal quality...
Instruction Manual
Page 23
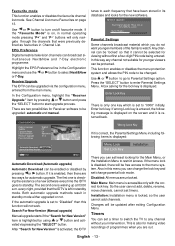
...system (usually page 100). Depending on how to be one displaying the teletext and the other displaying the current channel. Fastext Your TV supports the 500 page Teletext system. Note: If the signal becomes insufficient, the teletext mode will display the page automatically. Each ...channel which broadcasts teletext, transmits a page with the colour buttons of your TV. ing " " button.If the programme does not have a particular colour. • Press an appropriate RED, GREEN, YELLOW or BLUE button...
...system (usually page 100). Depending on how to be one displaying the teletext and the other displaying the current channel. Fastext Your TV supports the 500 page Teletext system. Note: If the signal becomes insufficient, the teletext mode will display the page automatically. Each ...channel which broadcasts teletext, transmits a page with the colour buttons of your TV. ing " " button.If the programme does not have a particular colour. • Press an appropriate RED, GREEN, YELLOW or BLUE button...


