
Instruction Manual
Page 3
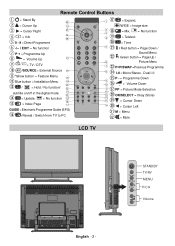
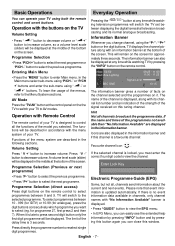
... P Remote Control Buttons = Stand By 32 = Cursor Up 31 = Cursor Right 30 = Info 29 28 0 - 9 = Direct Programme -/-- / EXIT = No function P + = Programme Up + = Volume Up 27 TV DTV = TV / DTV AV /SOURCE = External Source 26 Yellow button = Feature Menu 25 Blue button = Installation Menu 24 23 / = Hold / No function/ 22 subtitle on/off in the digital mode 21 20 = Update, = No function 19 18 = Index Page 17 GUIDE...
... P Remote Control Buttons = Stand By 32 = Cursor Up 31 = Cursor Right 30 = Info 29 28 0 - 9 = Direct Programme -/-- / EXIT = No function P + = Programme Up + = Volume Up 27 TV DTV = TV / DTV AV /SOURCE = External Source 26 Yellow button = Feature Menu 25 Blue button = Installation Menu 24 23 / = Hold / No function/ 22 subtitle on/off in the digital mode 21 20 = Update, = No function 19 18 = Index Page 17 GUIDE...
Instruction Manual
Page 4
... operating it any further 4. Power Source The set . Use this equipment in a humid and damp place (avoid the bathroom, the sink in are intended for Digital Video and Audio. outlet. This connection is also designed to accept High Definition signals. • AVL (Automatic Volume Limiting) • When no valid signal is damaged and need to stand-by mode. • PLL (Frequency Search) • PC Input • Plug&Play...
... operating it any further 4. Power Source The set . Use this equipment in a humid and damp place (avoid the bathroom, the sink in are intended for Digital Video and Audio. outlet. This connection is also designed to accept High Definition signals. • AVL (Automatic Volume Limiting) • When no valid signal is damaged and need to stand-by mode. • PLL (Frequency Search) • PC Input • Plug&Play...
Instruction Manual
Page 6
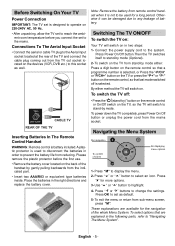
... switch to stand-by mode (Optional). 2- Otherwise it is used for more options. 3- Connect the power supply cord to change the settings. Press "" for a long period. Press "" or "" buttons to the system. To exit the menu or return from the mains socket. Before Switching On Your TV Power Connection IMPORTANT: The TV set is designed to operate on in two steps: 1- Connections To The Aerial Input...
... switch to stand-by mode (Optional). 2- Otherwise it is used for more options. 3- Connect the power supply cord to change the settings. Press "" for a long period. Press "" or "" buttons to the system. To exit the menu or return from the mains socket. Before Switching On Your TV Power Connection IMPORTANT: The TV set is designed to operate on in two steps: 1- Connections To The Aerial Input...
Instruction Manual
Page 7
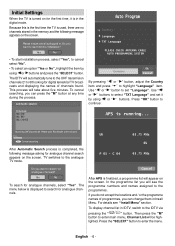
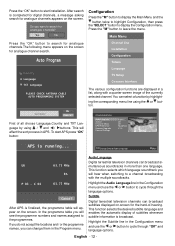
... the screen. Use " " or " " buttons to searc h for analogue c hannels? TV switches to 68 looking for digital terrestrial TV broadcasts and displaying the names of programmes, you will be highlighted. UK P 03 - AUTOMATIC SEARCH Country Language TXT Language PLEASE CHECK ANTENNA CABLE AUTO PROGRAMMING SYSTEM Germany Ok Cancel By pressing " " or " " button, adjust the Country item and press "" to enter main menu, Channel List...
... the screen. Use " " or " " buttons to searc h for analogue c hannels? TV switches to 68 looking for digital terrestrial TV broadcasts and displaying the names of programmes, you will be highlighted. UK P 03 - AUTOMATIC SEARCH Country Language TXT Language PLEASE CHECK ANTENNA CABLE AUTO PROGRAMMING SYSTEM Germany Ok Cancel By pressing " " or " " button, adjust the Country item and press "" to enter main menu, Channel List...
Instruction Manual
Page 8
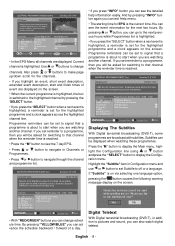
... TV using " -" or " +" buttons. Press "V -" button to the Menu System sections. When it . Pressing the " TV DTV " button at the middle of the signal received on the remote control. The name of the channel is displayed. • Press "GUIDE" button to enter Main menu. If the name and times of the delay time is updated automatically. Press directly the programme number to press second digit button only the first digit programme...
... TV using " -" or " +" buttons. Press "V -" button to the Menu System sections. When it . Pressing the " TV DTV " button at the middle of the signal received on the remote control. The name of the channel is displayed. • Press "GUIDE" button to enter Main menu. If the name and times of the delay time is updated automatically. Press directly the programme number to press second digit button only the first digit programme...
Instruction Manual
Page 9
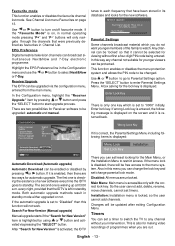
... set Subtitle to display the Main menu, high- English - 8 - If you set for switching to turn subtitles off or a language. and record their first pop song. ITV News 50. BLUE/LEFT1k... 801. CCIR17/1kHz... 15:00 Even Stevens 15:50 Newsround Showbiz 16:00 Basil Brush 16:55 Newsround Na vig a te Change Time Change Day I More • With "RED/GREEN" buttons...
... set Subtitle to display the Main menu, high- English - 8 - If you set for switching to turn subtitles off or a language. and record their first pop song. ITV News 50. BLUE/LEFT1k... 801. CCIR17/1kHz... 15:00 Even Stevens 15:50 Newsround Showbiz 16:00 Basil Brush 16:55 Newsround Na vig a te Change Time Change Day I More • With "RED/GREEN" buttons...
Instruction Manual
Page 10
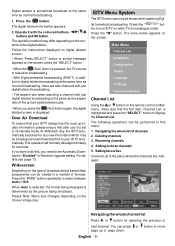
... Receiver Upgrade setting. This operation will download this menu: 1. BBC TWO 3. Follow the instructions displayed on digital teletext screen. • When "Press SELECT" button or similar message appears on while TV is determined by the picture being transmitted, programmes can be viewed in Main menu, make sure that your IDTV automatically. The menu below appears on the screen: Main Menu Channel List Installation Configuration Timers Language TV Setup Common Interface Channel List Using the or button...
... Receiver Upgrade setting. This operation will download this menu: 1. BBC TWO 3. Follow the instructions displayed on digital teletext screen. • When "Press SELECT" button or similar message appears on while TV is determined by the picture being transmitted, programmes can be viewed in Main menu, make sure that your IDTV automatically. The menu below appears on the screen: Main Menu Channel List Installation Configuration Timers Language TV Setup Common Interface Channel List Using the or button...

Instruction Manual
Page 11
... channel is displayed. Press the "M" button to cancel the editing or "SELECT" button to delete the highlighted channel in the channel list. When the "SELECT" button is pressed, a password box is deleted. BBC FOUR 8. RTL 1 BBC ONE Select Delete Edit Name Lock Favourites Function Select ChannSEeLEClT SELECT Lock/Unlock i More Enter Lock Key Enter the password using or button. CHANNEL LIST 1. Teletext 7. The selected service will be changed from the Configuration Menu). CHANNEL LIST...
... channel is displayed. Press the "M" button to cancel the editing or "SELECT" button to delete the highlighted channel in the channel list. When the "SELECT" button is pressed, a password box is deleted. BBC FOUR 8. RTL 1 BBC ONE Select Delete Edit Name Lock Favourites Function Select ChannSEeLEClT SELECT Lock/Unlock i More Enter Lock Key Enter the password using or button. CHANNEL LIST 1. Teletext 7. The selected service will be changed from the Configuration Menu). CHANNEL LIST...
Instruction Manual
Page 12
... New Channels 2. All channels found are searched and a channel table is loaded, "First Time Installation" menu will be destroyed. For every valid channel number, signal level, signal quality and network name are shown at the base of the multiplex is entered manually and only that only the favourite channels are sending their channel numbers. After factory settings is created automatically. Sky Travel 9. Press the SELECTbutton on the screen. Main Menu This menu...
... New Channels 2. All channels found are searched and a channel table is loaded, "First Time Installation" menu will be destroyed. For every valid channel number, signal level, signal quality and network name are shown at the base of the multiplex is entered manually and only that only the favourite channels are sending their channel numbers. After factory settings is created automatically. Sky Travel 9. Press the SELECTbutton on the screen. Main Menu This menu...
Instruction Manual
Page 13
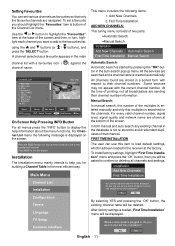
.... This will appear on -screen for analogue channel search. Main Menu Channel List Installation Configuration Timers Language TV Setup Common Interface The various configuration functions are displayed in the Configuration menu and use the or button to cycle through the language options. CONFIGURATION Audio Language Subtitle Favourite Mode EPG Preference Receiver Upgrade Parental Settings English Off Off Now&Next V.1.5 APS is finalized, the programme table will affect the sort...
.... This will appear on -screen for analogue channel search. Main Menu Channel List Installation Configuration Timers Language TV Setup Common Interface The various configuration functions are displayed in the Configuration menu and use the or button to cycle through the language options. CONFIGURATION Audio Language Subtitle Favourite Mode EPG Preference Receiver Upgrade Parental Settings English Off Off Now&Next V.1.5 APS is finalized, the programme table will affect the sort...
Instruction Manual
Page 14
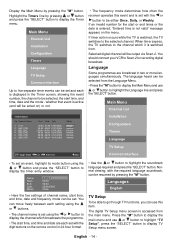
... enter Parental Settings Menu. After "Search for younger viewers can be free access to standby. Installation: Installation menu is displayed: Automatic Download Enabled Search for viewing without your intervention. This function enables or disables the menu protection system and allows the PIN code to be selected for New Version MENU Exit i More Automatic Download (Automatic upgrade) Automatic Download can be updated after exiting Configuration Menu. CONFIGURATION Audio Language Subtitle Favourite Mode EPG Preference Receiver Upgrade Parental Settings...
... enter Parental Settings Menu. After "Search for younger viewers can be free access to standby. Installation: Installation menu is displayed: Automatic Download Enabled Search for viewing without your intervention. This function enables or disables the menu protection system and allows the PIN code to be selected for New Version MENU Exit i More Automatic Download (Automatic upgrade) Automatic Download can be updated after exiting Configuration Menu. CONFIGURATION Audio Language Subtitle Favourite Mode EPG Preference Receiver Upgrade Parental Settings...
Instruction Manual
Page 15
...; The frequency mode determines how often the receiver operates this item. BBC ONE 3. BBC ONE 4. You can use or button to highlight "TV Setup", press the "SELECT" button to display TV Setup menu screen. The digital TV Setup menu screen is set and each set . English - 14 - If timer action occurs while the TV is set using the or button and press the "SELECT" button to display the Timer menu. You should connect your VCR to...
...; The frequency mode determines how often the receiver operates this item. BBC ONE 3. BBC ONE 4. You can use or button to highlight "TV Setup", press the "SELECT" button to display TV Setup menu screen. The digital TV Setup menu screen is set and each set . English - 14 - If timer action occurs while the TV is set using the or button and press the "SELECT" button to display the Timer menu. You should connect your VCR to...
Instruction Manual
Page 16
... mains supply, switch on page 19. Insert the CAM, then Viewing Card to the module instruction manual for few moments until the card is activated. • Some CAMs may be correctly inserted, it is impossible to choose from the mains. 2. Common Interface • Press the "M" button to display the Main Menu and use the or button to the Television using the following set...
... mains supply, switch on page 19. Insert the CAM, then Viewing Card to the module instruction manual for few moments until the card is activated. • Some CAMs may be correctly inserted, it is impossible to choose from the mains. 2. Common Interface • Press the "M" button to display the Main Menu and use the or button to the Television using the following set...
Instruction Manual
Page 17
... used to identify sound mode of these options: Low, Medium, High or Off. Reset By pressing / button, select Reset. Press / to factory default settings. Noise Reduction By pressing / button select Noise Reduction. Effect By pressing / select Effect.Press / button to mono, stereo, dual I or Dual II mode, only if the selected channel supports that mode...
... used to identify sound mode of these options: Low, Medium, High or Off. Reset By pressing / button, select Reset. Press / to factory default settings. Noise Reduction By pressing / button select Noise Reduction. Effect By pressing / select Effect.Press / button to mono, stereo, dual I or Dual II mode, only if the selected channel supports that mode...

Instruction Manual
Page 18
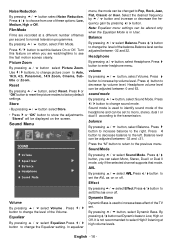
... work. Press " " to a blue screen if the signal is weak or absent, or when there is set to HDMI, HDMI Audio setting will be set to set the TV to automatically change the PC Audio In to Panoramic, 4:3, 14:9 Zoom or 16:9 by pressing " " / " " button. Child Lock By pressing / select Child Lock. Install Menu INSTALL Program Table Program Band Channel Colour System • When TV Source is no input from an external device. Menu...
... work. Press " " to a blue screen if the signal is weak or absent, or when there is set to HDMI, HDMI Audio setting will be set to set the TV to automatically change the PC Audio In to Panoramic, 4:3, 14:9 Zoom or 16:9 by pressing " " / " " button. Child Lock By pressing / select Child Lock. Install Menu INSTALL Program Table Program Band Channel Colour System • When TV Source is no input from an external device. Menu...
Instruction Manual
Page 20
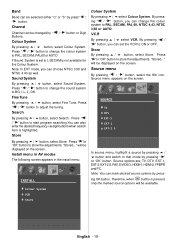
... set to PAL, SECAM, PAL60 or AUTO. will be displayed on the screen. Sound System By pressing / button, select Sound System. Source menu By pressing " " / " " button, select the fifth icon. Store By pressing / button, select Store. Note: In EXT mode, you can also enter the desired frequency via digit buttons when search item is not available for the Colour System. Channel Channel...
... set to PAL, SECAM, PAL60 or AUTO. will be displayed on the screen. Sound System By pressing / button, select Sound System. Source menu By pressing " " / " " button, select the fifth icon. Store By pressing / button, select Store. Note: In EXT mode, you can also enter the desired frequency via digit buttons when search item is not available for the Colour System. Channel Channel...
Instruction Manual
Page 21
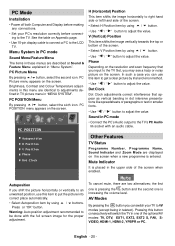
PC Picture menu appears on the screen. PC POSITION menu appears on the screen. Sound in PC mode • Connect the PC's Audio output to be done with an audio cable. PC POSITION Menu By pressing / button, select the sixth icon. Warning: Auto position adjustment recommended to the TV's PC Audio In socket with the full screen image for the proper adjustment. Phase Depending on the screen. Menu System in...
PC Picture menu appears on the screen. PC POSITION menu appears on the screen. Sound in PC mode • Connect the PC's Audio output to be done with an audio cable. PC POSITION Menu By pressing / button, select the sixth icon. Warning: Auto position adjustment recommended to the TV's PC Audio In socket with the full screen image for the proper adjustment. Phase Depending on the screen. Menu System in...
Instruction Manual
Page 24
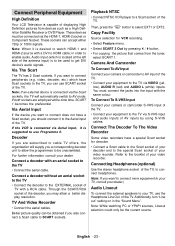
... the SCART/RCA socket of your dealer. Refer to AV mode. Connect Peripheral Equipment High Definition Your LCD Television is capable of displaying High Definition pictures from the tuner, select SCART 1. low), AUDIO R (red) and AUDIO L (white) inputs. video, decoder, etc.) which is located at the sime time, SCART 1 becomes the preferential. Better picture quality can accept either 720p or 1080i signals. You must be the current...
... the SCART/RCA socket of your dealer. Refer to AV mode. Connect Peripheral Equipment High Definition Your LCD Television is capable of displaying High Definition pictures from the tuner, select SCART 1. low), AUDIO R (red) and AUDIO L (white) inputs. video, decoder, etc.) which is located at the sime time, SCART 1 becomes the preferential. Better picture quality can accept either 720p or 1080i signals. You must be the current...

Instruction Manual
Page 25
... the correct TV system? See Sound menu. Specifications TV BROADCASTING PAL/SECAM B/G D/K K' I/I' L/L' RECEIVING CHANNELS VHF (BAND I/III) UHF (BAND U) HYPERBAND CABLE TV (S1-S20/ S21-S41) NUMBER OF PRESET CHANNELS 100 CHANNEL INDICATOR On Screen Display RF AERIAL INPUT 75 Ohm (unbalanced) OPERATING VOLTAGE 220-240V AC, 50Hz AUDIO German+Nicam Stereo AUDIO OUTPUT POWER (WRMS.) (%10 THD) 2x8 POWER CONSUMPTION (W) 180 W 3.0 W (Stand-by changing the direction of the peripherals...
... the correct TV system? See Sound menu. Specifications TV BROADCASTING PAL/SECAM B/G D/K K' I/I' L/L' RECEIVING CHANNELS VHF (BAND I/III) UHF (BAND U) HYPERBAND CABLE TV (S1-S20/ S21-S41) NUMBER OF PRESET CHANNELS 100 CHANNEL INDICATOR On Screen Display RF AERIAL INPUT 75 Ohm (unbalanced) OPERATING VOLTAGE 220-240V AC, 50Hz AUDIO German+Nicam Stereo AUDIO OUTPUT POWER (WRMS.) (%10 THD) 2x8 POWER CONSUMPTION (W) 180 W 3.0 W (Stand-by changing the direction of the peripherals...
Instruction Manual
Page 30
... with the operating instructions issued by SANYO Europe Ltd through a UK Reseller. He will carry out in the operating instructions supplied with this guarantee null and void. SANYO House, 18, COLONIAL WAY, Watford, Hertfordshire, WD24 4PT. Unauthorised repairs or modifications, which they will be pleased to the original supplier or any other consumables or parts. Cosmetic items, remote controls or parts and consumable...
... with the operating instructions issued by SANYO Europe Ltd through a UK Reseller. He will carry out in the operating instructions supplied with this guarantee null and void. SANYO House, 18, COLONIAL WAY, Watford, Hertfordshire, WD24 4PT. Unauthorised repairs or modifications, which they will be pleased to the original supplier or any other consumables or parts. Cosmetic items, remote controls or parts and consumable...


