
User Manual (user Manual) (ver.1.0) (English)
Page 4
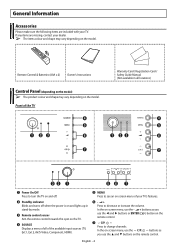
... Guide Manual (Not available in stand-by mode. 3 Remote control sensor Aim the remote control towards this spot on the TV. 4 SOURCE Displays a menu of all of the available input sources (TV, Ext.1, Ext.2, AV/S-Video, Component, HDMI). 5 MENU Press to see an on-screen menu of the...all locations) Control Panel (depending on the model) ➢ The product colour and shape may vary depending on the model. Front of your TV's features. 6- + Press to change channels. Press to decrease or increase the volume. General Information Accessories Please make sure the following items are ...
... Guide Manual (Not available in stand-by mode. 3 Remote control sensor Aim the remote control towards this spot on the TV. 4 SOURCE Displays a menu of all of the available input sources (TV, Ext.1, Ext.2, AV/S-Video, Component, HDMI). 5 MENU Press to see an on-screen menu of the...all locations) Control Panel (depending on the model) ➢ The product colour and shape may vary depending on the model. Front of your TV's features. 6- + Press to change channels. Press to decrease or increase the volume. General Information Accessories Please make sure the following items are ...

User Manual (user Manual) (ver.1.0) (English)
Page 5
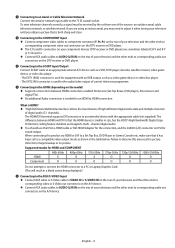
Rear of the TV 4 2 3 1 or Cable Television Network Side of the TV 5 or English - 5 Connection Panel (depending on the model) ➢ The product colour and shape may vary depending on the model. ☛ Whenever you connect an audio or video system to the documentation supplied with your television, ensure that all elements are switched off. Refer to your equipment for detailed connection instructions and associated safety precautions.
Rear of the TV 4 2 3 1 or Cable Television Network Side of the TV 5 or English - 5 Connection Panel (depending on the model) ➢ The product colour and shape may vary depending on the model. ☛ Whenever you connect an audio or video system to the documentation supplied with your television, ensure that all elements are switched off. Refer to your equipment for detailed connection instructions and associated safety precautions.
User Manual (user Manual) (ver.1.0) (English)
Page 6
... receiver, video game device, or video disc player. - The difference between HDMI-connection-enabled AV devices (Set-Top Boxes, DVD players, AV receivers and digital TVs). ◆ No additional Audio connection is HDMI? ◆ "High Definition Multimedia interface" allows the transmission of high definition digital video data and multiple channels of...
... receiver, video game device, or video disc player. - The difference between HDMI-connection-enabled AV devices (Set-Top Boxes, DVD players, AV receivers and digital TVs). ◆ No additional Audio connection is HDMI? ◆ "High Definition Multimedia interface" allows the transmission of high definition digital video data and multiple channels of...
User Manual (user Manual) (ver.1.0) (English)
Page 7
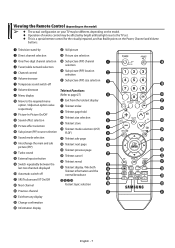
...) b Teletext next page 0 c Teletext previous page f & Turbo sound ! Viewing the Remote Control (depending on the model) ➢ ◆ The actual configuration on your TV may be different, depending on the model. ◆ Operation of remote control may be affected by bright artificial light near to the... TV set. ◆ This is a special remote control for the visually impaired, and has Braille points on the Power, Channel and Volume buttons. 1 Television ...
...) b Teletext next page 0 c Teletext previous page f & Turbo sound ! Viewing the Remote Control (depending on the model) ➢ ◆ The actual configuration on your TV may be different, depending on the model. ◆ Operation of remote control may be affected by bright artificial light near to the... TV set. ◆ This is a special remote control for the visually impaired, and has Braille points on the Power, Channel and Volume buttons. 1 Television ...
User Manual (user Manual) (ver.1.0) (English)
Page 8
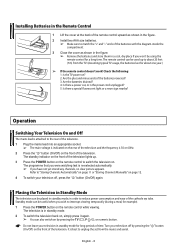
... your television in order to about one year.) ➢ If the remote control doesn't work! It is the power cord unplugged? 5. Is the TV power on the front of the cathode ray tube. The remote control can be used up . 3 Press the POWER button on the remote control to... "Storing Channels Automatically" on page 11 or "Storing Channels Manually" on page 12. 4 To switch your television off by pressing the TV ( ), P / , or numeric button. ☛ Do not leave your television off , press the " " button (On/Off) again. Placing the Television in Standby Mode The...
... your television in order to about one year.) ➢ If the remote control doesn't work! It is the power cord unplugged? 5. Is the TV power on the front of the cathode ray tube. The remote control can be used up . 3 Press the POWER button on the remote control to... "Storing Channels Automatically" on page 11 or "Storing Channels Manually" on page 12. 4 To switch your television off by pressing the TV ( ), P / , or numeric button. ☛ Do not leave your television off , press the " " button (On/Off) again. Placing the Television in Standby Mode The...
User Manual (user Manual) (ver.1.0) (English)
Page 9
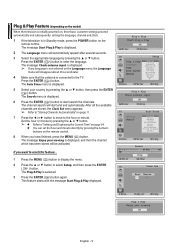
...button. The Plug & Play is selected. 3 Press the ENTER ( ) button again. Plug & Play Start Plug & Play OK Enter Return TV Setup Plug & Play English Deutsch Language : EnNgeFldriearnslçhaanidss Time Español Italiano Blue Screen : SOvnenska Português Melody :ΕOλnλ... Germany Italy Netherlands Spain Sweden Switzerland United Kingdom Others Eastern Europe Move Enter Skip Search P 1 C 87 MHz 10% Enter Stop Skip TV Clock Set Hour Minute -- -- If you have finished, press the MENU ( ) button. Move Adjust Skip Plug & Play Enjoy your...
...button. The Plug & Play is selected. 3 Press the ENTER ( ) button again. Plug & Play Start Plug & Play OK Enter Return TV Setup Plug & Play English Deutsch Language : EnNgeFldriearnslçhaanidss Time Español Italiano Blue Screen : SOvnenska Português Melody :ΕOλnλ... Germany Italy Netherlands Spain Sweden Switzerland United Kingdom Others Eastern Europe Move Enter Skip Search P 1 C 87 MHz 10% Enter Stop Skip TV Clock Set Hour Minute -- -- If you have finished, press the MENU ( ) button. Move Adjust Skip Plug & Play Enjoy your...
User Manual (user Manual) (ver.1.0) (English)
Page 10
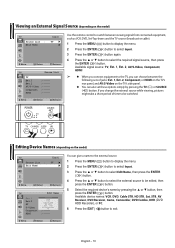
... change the external source while viewing, pictures might take a short period of jacks: Ext. 1, Ext. 2, Component, or HDMI on the TV's rear panel, and AV/S-Video on the TV's side panel. ◆ You can give a name to the external source. 1 Press the MENU ( ) button to display the menu. 2 ... Recorder), or PC. 6 Press the EXIT ( ) button to be edited, then press the ENTER ( ) button. 5 Select the required device's name by pressing the TV ( ) or SOURCE ( ) button. Move Enter Return You can also set these options simply by pressing the ▲ or ▼ button, then press the ENTER ...
... change the external source while viewing, pictures might take a short period of jacks: Ext. 1, Ext. 2, Component, or HDMI on the TV's rear panel, and AV/S-Video on the TV's side panel. ◆ You can give a name to the external source. 1 Press the MENU ( ) button to display the menu. 2 ... Recorder), or PC. 6 Press the EXIT ( ) button to be edited, then press the ENTER ( ) button. 5 Select the required device's name by pressing the TV ( ) or SOURCE ( ) button. Move Enter Return You can also set these options simply by pressing the ▲ or ▼ button, then press the ENTER ...

User Manual (user Manual) (ver.1.0) (English)
Page 11
...button to select Search, then press the ENTER ( ) button. 7 Press the ENTER ( ) button again to start the search. TV Channel Auto Store Manual Store Channel Manager Sort Name More Move Enter Return... TV Auto Store Country : United Kingdom Search Move Enter Return Search P 1 C 87 MHz 10% Enter Stop Return TV From To Store Sort : P 1 ----- : P-- ----- : ? Automatically allocated programme numbers...
...button to select Search, then press the ENTER ( ) button. 7 Press the ENTER ( ) button again to start the search. TV Channel Auto Store Manual Store Channel Manager Sort Name More Move Enter Return... TV Auto Store Country : United Kingdom Search Move Enter Return Search P 1 C 87 MHz 10% Enter Stop Return TV From To Store Sort : P 1 ----- : P-- ----- : ? Automatically allocated programme numbers...
User Manual (user Manual) (ver.1.0) (English)
Page 12
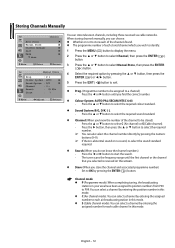
... number. ◆ Colour System: AUTO/PAL/SECAM/NTSC 4.43 - Press the ▲ or ▼ button to P99. Storing Channels Manually TV Channel Auto Store Manual Store Channel Manager Sort Name More Move Enter Return... TV Manual Store Prog. :P 1 Colour System : AUTO Sound System : B/G Channel : C-- Move Adjust Return You can select a channel by entering...
... number. ◆ Colour System: AUTO/PAL/SECAM/NTSC 4.43 - Press the ▲ or ▼ button to P99. Storing Channels Manually TV Channel Auto Store Manual Store Channel Manager Sort Name More Move Enter Return... TV Manual Store Prog. :P 1 Colour System : AUTO Sound System : B/G Channel : C-- Move Adjust Return You can select a channel by entering...

User Manual (user Manual) (ver.1.0) (English)
Page 13
... stored to the chosen number. 7 For all the channels to move to the ( ) field. 6 Press the ENTER ( ) button to select Store. TV Channel Auto Store Manual Store Channel Manager Sort Name More Move Enter Return Channel Manager P1 C4... ) button to change by pressing the ◄ or ► button repeatedly. 6 Press the ▲ or ▼ button to add the channel. TV Channel Auto Store Manual Store Channel Manager Sort Name More Move Enter Return...
... stored to the chosen number. 7 For all the channels to move to the ( ) field. 6 Press the ENTER ( ) button to select Store. TV Channel Auto Store Manual Store Channel Manager Sort Name More Move Enter Return Channel Manager P1 C4... ) button to change by pressing the ◄ or ► button repeatedly. 6 Press the ▲ or ▼ button to add the channel. TV Channel Auto Store Manual Store Channel Manager Sort Name More Move Enter Return...
User Manual (user Manual) (ver.1.0) (English)
Page 14
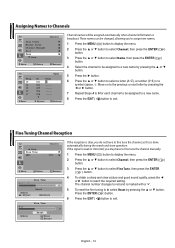
... to select a letter (A~Z), a number (0~9) or a symbol (space, -). Press the ENTER ( ) button. 6 Press the EXIT ( ) button to Channels TV Channel Auto Store Manual Store Channel Manager Sort Name More Move Enter Return...sound quality, press the ◄ or ► button to reach the required setting. * The channel number changes to exit. Fine Tuning Channel Reception TV More Fine Tune LNA Channel : Off Move Enter Return Fine Tune P2 * +2 Reset Move Adjust Return Fine Tune...
... to select a letter (A~Z), a number (0~9) or a symbol (space, -). Press the ENTER ( ) button. 6 Press the EXIT ( ) button to Channels TV Channel Auto Store Manual Store Channel Manager Sort Name More Move Enter Return...sound quality, press the ◄ or ► button to reach the required setting. * The channel number changes to exit. Fine Tuning Channel Reception TV More Fine Tune LNA Channel : Off Move Enter Return Fine Tune P2 * +2 Reset Move Adjust Return Fine Tune...
User Manual (user Manual) (ver.1.0) (English)
Page 15
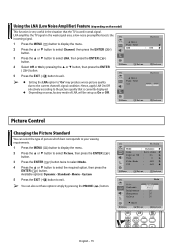
... ▼ button to select LNA, then press the ENTER ( ) button. 4 Select Off or On by pressing the P.MODE ( ) button. Move Enter Return TV More Fine Tune LNA Channel : Off Off On Move Enter Return Picture Control Changing the Picture Standard You can also set up as On... or Off. Custom 5 Press the EXIT ( ) button to select Channel, then press the ENTER ( ) button. Standard - LNA amplifies the TV signal in the weak signal area, a low-noise preamplifier boosts the incoming signal. 1 Press the MENU ( ) button to display the menu. 2 Press the ▲...
... ▼ button to select LNA, then press the ENTER ( ) button. 4 Select Off or On by pressing the P.MODE ( ) button. Move Enter Return TV More Fine Tune LNA Channel : Off Off On Move Enter Return Picture Control Changing the Picture Standard You can also set up as On... or Off. Custom 5 Press the EXIT ( ) button to select Channel, then press the ENTER ( ) button. Standard - LNA amplifies the TV signal in the weak signal area, a low-noise preamplifier boosts the incoming signal. 1 Press the MENU ( ) button to display the menu. 2 Press the ▲...

User Manual (user Manual) (ver.1.0) (English)
Page 16
...10 Press the ▲ or ▼ button to select the required option, then press the ENTER ( ) button. Sharpness - Adjusting the Picture Settings TV Mode Mode : Dynamic Contrast : 90 Brightness : 50 Sharpness : 50 Colour : 50 ... More Move Enter Return Contrast 90 Move Adjust TV Mode More Colour Tone : Normal Reset Move Enter Return TV Mode More Colour Tone : Normal Reset Move Enter Return Your television has several settings...
...10 Press the ▲ or ▼ button to select the required option, then press the ENTER ( ) button. Sharpness - Adjusting the Picture Settings TV Mode Mode : Dynamic Contrast : 90 Brightness : 50 Sharpness : 50 Colour : 50 ... More Move Enter Return Contrast 90 Move Adjust TV Mode More Colour Tone : Normal Reset Move Enter Return TV Mode More Colour Tone : Normal Reset Move Enter Return Your television has several settings...

User Manual (user Manual) (ver.1.0) (English)
Page 17
... mode. ✱ Available Picture Size for Component and HDMI Mode. Zoom2: Expands the Zoom1 format picture. 4:3: Sets the picture to 16:9 wide mode. TV Picture Mode : Dynamic Size : Auto Wide Digital NR : On Tilt : 0 Film Mode : Off ... ▼ button, then press the ENTER ( ) button. 5 Press the EXIT ( ) button to select the required option, then press the ENTER ( ) button. TV Picture Mode : Dynamic Size : Auto Wide Digital NR : On Tilt : 0 Film Mode : Off PIP : Off...
... mode. ✱ Available Picture Size for Component and HDMI Mode. Zoom2: Expands the Zoom1 format picture. 4:3: Sets the picture to 16:9 wide mode. TV Picture Mode : Dynamic Size : Auto Wide Digital NR : On Tilt : 0 Film Mode : Off ... ▼ button, then press the ENTER ( ) button. 5 Press the EXIT ( ) button to select the required option, then press the ENTER ( ) button. TV Picture Mode : Dynamic Size : Auto Wide Digital NR : On Tilt : 0 Film Mode : Off PIP : Off...
User Manual (user Manual) (ver.1.0) (English)
Page 18
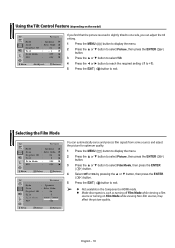
...Size : Auto Wide Digital NR : On Tilt : 0 Film Mode : Off PIP : Off Move Enter Return TV Picture Mode : Dynamic Size : Auto Wide Digital NR : On Tilt : 0 Film Mode : OOffff On PIP : Off Move Enter Return You can adjust the ... available in the Component or HDMI mode. ◆ Mode discrepancies, such as turning off Film Mode while viewing a film source or turning on the model) TV Picture Mode : Dynamic Size : Auto Wide Digital NR : On Tilt : -1 Film Mode : Off ...
...Size : Auto Wide Digital NR : On Tilt : 0 Film Mode : Off PIP : Off Move Enter Return TV Picture Mode : Dynamic Size : Auto Wide Digital NR : On Tilt : 0 Film Mode : OOffff On PIP : Off Move Enter Return You can adjust the ... available in the Component or HDMI mode. ◆ Mode discrepancies, such as turning off Film Mode while viewing a film source or turning on the model) TV Picture Mode : Dynamic Size : Auto Wide Digital NR : On Tilt : -1 Film Mode : Off ...
User Manual (user Manual) (ver.1.0) (English)
Page 19
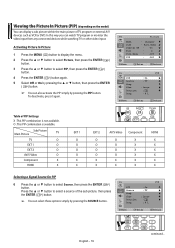
... ( ) button. 3 Press the ▲ or ▼ button to select Source, then press the ENTER ( ) button. O : This PIP combination is not available. Sub Picture Main Picture TV TV O EXT 1 O EXT 2 O AV/S-Video O Component X HDMI X EXT 1 O O O O X X EXT 2 O O O O X X AV/S-Video O O O O X X Component X X X X X X HDMI X ... Tilt : 0 Film Mode : Off PIP : Off Move Enter Return TV PIP Source Swap Size Position Prog. : On : TV : Large : :P 1 PIP Move Enter Return Table of PIP Settings X : This PIP combination is available....
... ( ) button. 3 Press the ▲ or ▼ button to select Source, then press the ENTER ( ) button. O : This PIP combination is not available. Sub Picture Main Picture TV TV O EXT 1 O EXT 2 O AV/S-Video O Component X HDMI X EXT 1 O O O O X X EXT 2 O O O O X X AV/S-Video O O O O X X Component X X X X X X HDMI X ... Tilt : 0 Film Mode : Off PIP : Off Move Enter Return TV PIP Source Swap Size Position Prog. : On : TV : Large : :P 1 PIP Move Enter Return Table of PIP Settings X : This PIP combination is available....

User Manual (user Manual) (ver.1.0) (English)
Page 20
... the ENTER ( ) button. ➢ ◆ ◆ You can select these options simply by pressing the SWAP button. Small - Press the ◄ or ► button to TV, you can also interchange the main picture and the sub picture simply by pressing the SIZE button. Available options: Large - English - 20
... the ENTER ( ) button. ➢ ◆ ◆ You can select these options simply by pressing the SWAP button. Small - Press the ◄ or ► button to TV, you can also interchange the main picture and the sub picture simply by pressing the SIZE button. Available options: Large - English - 20
User Manual (user Manual) (ver.1.0) (English)
Page 21
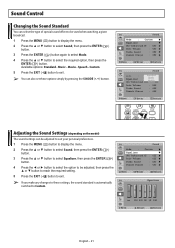
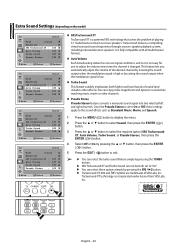
...( ) button again to select Mode. 4 Press the ▲ or ▼ button to select the required option, then press the ENTER ( ) button. TV Sound Mode : Custom Equalizer SRS TruSurround XT : Off Auto Volume : Off Turbo Sound : Off Pseudo Stereo...XT : Off Auto Volume : Off Turbo Sound : Off Pseudo Stereo : Off Move Enter Return TV Sound Mode : CuSstMtauonsmdiacrd Equalizer Movie Speech SRS TruSurround XT C:ustoOmff Auto Volume : Off Turbo Sound : Off Pseudo Stereo : Off Move Enter ...
...( ) button again to select Mode. 4 Press the ▲ or ▼ button to select the required option, then press the ENTER ( ) button. TV Sound Mode : Custom Equalizer SRS TruSurround XT : Off Auto Volume : Off Turbo Sound : Off Pseudo Stereo...XT : Off Auto Volume : Off Turbo Sound : Off Pseudo Stereo : Off Move Enter Return TV Sound Mode : CuSstMtauonsmdiacrd Equalizer Movie Speech SRS TruSurround XT C:ustoOmff Auto Volume : Off Turbo Sound : Off Pseudo Stereo : Off Move Enter ...
User Manual (user Manual) (ver.1.0) (English)
Page 22
... SRS TruSurround XT : Off Auto Volume : Off Turbo Sound : Off Pseudo Stereo : Off Move Enter Return TV Sound Mode : Custom Equalizer SRS TruSurround XT : Off Auto Volume : Off Turbo Sound : Off Pseudo... Stereo : Off Move Enter Return TV Sound Mode : Custom Equalizer SRS TruSurround XT : Off Auto Volume : Off Turbo Sound : Off ...
... SRS TruSurround XT : Off Auto Volume : Off Turbo Sound : Off Pseudo Stereo : Off Move Enter Return TV Sound Mode : Custom Equalizer SRS TruSurround XT : Off Auto Volume : Off Turbo Sound : Off Pseudo... Stereo : Off Move Enter Return TV Sound Mode : Custom Equalizer SRS TruSurround XT : Off Auto Volume : Off Turbo Sound : Off ...

User Manual (user Manual) (ver.1.0) (English)
Page 24
... Set : 00 : 00 Sleep Timer : Off On Timer : Off Off Timer : Off Move Enter Return TV Time Clock Set Sleep Timer On Timer Off Timer : 00 : 00 : Off3O0fmfin : Off60min 90min : Of1f20min 150min 180min Move Enter Return Setting and Displaying the... again. 5 Press the ◄ or ► button to move to standby mode by pressing the SLEEP button. Setting the Sleep Timer You can set your TV to automatically turn off timers. ➢ When pressing the " " button (On/Off) on , then press the ENTER ( ) button. 6 Press the EXIT ( ) button to exit...
... Set : 00 : 00 Sleep Timer : Off On Timer : Off Off Timer : Off Move Enter Return TV Time Clock Set Sleep Timer On Timer Off Timer : 00 : 00 : Off3O0fmfin : Off60min 90min : Of1f20min 150min 180min Move Enter Return Setting and Displaying the... again. 5 Press the ◄ or ► button to move to standby mode by pressing the SLEEP button. Setting the Sleep Timer You can set your TV to automatically turn off timers. ➢ When pressing the " " button (On/Off) on , then press the ENTER ( ) button. 6 Press the EXIT ( ) button to exit...


