
User Manual Ver.1.0 (English)
Page 5
... damaged. Avoid contact with other electronic devices in electric shock or camera malfunction or cause a fire. Do not use only Samsung-approved devices or accessories. You must plug the small end of data. Your camera emits radio frequency (RF) signals that may result in homes or...ports, connectors, and accessories. If the cable is operating properly before use a damaged charger, battery, or memory card. Consult the manufacturers of files or damage that the camera is reversed, it may damage the screen or external or internal components. If you force the connectors, improperly...
... damaged. Avoid contact with other electronic devices in electric shock or camera malfunction or cause a fire. Do not use only Samsung-approved devices or accessories. You must plug the small end of data. Your camera emits radio frequency (RF) signals that may result in homes or...ports, connectors, and accessories. If the cable is operating properly before use a damaged charger, battery, or memory card. Consult the manufacturers of files or damage that the camera is reversed, it may damage the screen or external or internal components. If you force the connectors, improperly...
User Manual Ver.1.0 (English)
Page 10
... ...15 Using the DIRECT LINK button 17 Inserting the battery and memory card 18 Charging the battery and turning on your camera 19 Charging the battery 19 Turning on your camera 19 Performing the initial setup 20 Learning icons ...22 Using the Home screen 23 Accessing the Home screen 23 Icons on... or menus 27 Setting the display and sound 29 Setting the display type 29 Setting the sound ...30 Capturing photos ...31 Zooming ...32 Reducing camera shake (OIS 34 Tips for getting a clearer photo 35 Extended functions ...37 Using Basic modes ...38 Using the Smart Auto mode 38 Using ...
... ...15 Using the DIRECT LINK button 17 Inserting the battery and memory card 18 Charging the battery and turning on your camera 19 Charging the battery 19 Turning on your camera 19 Performing the initial setup 20 Learning icons ...22 Using the Home screen 23 Accessing the Home screen 23 Icons on... or menus 27 Setting the display and sound 29 Setting the display type 29 Setting the sound ...30 Capturing photos ...31 Zooming ...32 Reducing camera shake (OIS 34 Tips for getting a clearer photo 35 Extended functions ...37 Using Basic modes ...38 Using the Smart Auto mode 38 Using ...

User Manual Ver.1.0 (English)
Page 13
Contents Settings ...105 Settings menu ...106 Accessing the settings menu 106 Sound ...107 Display ...107 Connectivity ...108 General ...109 Appendixes ...111 Error messages ...112 Camera maintenance 113 Cleaning your camera 113 Using or storing the camera 114 About memory cards 115 About the battery 118 Upgrading the firmware 122 Before contacting a service center 123 Camera specifications 126 Glossary ...130 Index ...135 12
Contents Settings ...105 Settings menu ...106 Accessing the settings menu 106 Sound ...107 Display ...107 Connectivity ...108 General ...109 Appendixes ...111 Error messages ...112 Camera maintenance 113 Cleaning your camera 113 Using or storing the camera 114 About memory cards 115 About the battery 118 Upgrading the firmware 122 Before contacting a service center 123 Camera specifications 126 Glossary ...130 Index ...135 12

User Manual Ver.1.0 (English)
Page 14
... 15 Using the DIRECT LINK button 17 Inserting the battery and memory card 18 Charging the battery and turning on your camera 19 Charging the battery 19 Turning on your camera 19 Performing the initial setup 20 Learning icons 22 Using the Home screen 23 Accessing the Home screen 23 Icons on the Home... options or menus 27 Setting the display and sound 29 Setting the display type 29 Setting the sound 30 Capturing photos 31 Zooming 32 Reducing camera shake (OIS 34 Tips for getting a clearer photo 35 Basic functions Learn about what is in the product box, the...
... 15 Using the DIRECT LINK button 17 Inserting the battery and memory card 18 Charging the battery and turning on your camera 19 Charging the battery 19 Turning on your camera 19 Performing the initial setup 20 Learning icons 22 Using the Home screen 23 Accessing the Home screen 23 Icons on the Home... options or menus 27 Setting the display and sound 29 Setting the display type 29 Setting the sound 30 Capturing photos 31 Zooming 32 Reducing camera shake (OIS 34 Tips for getting a clearer photo 35 Basic functions Learn about what is in the product box, the...

User Manual Ver.1.0 (English)
Page 15
Camera Rechargeable battery Quick Start Guide AC adapter/USB cable Strap Optional accessories Camera case A/V cable Battery charger Memory card/Memory card adapter • The illustrations may differ slightly from the items shipped with your product. • The items included in your product box. Unpacking The following items are included in the box may differ depending on the model. • You can purchase optional accessories at a retailer or a Samsung service center. Basic functions 14 Samsung is not responsible for any problems caused by using unauthorized accessories.
Camera Rechargeable battery Quick Start Guide AC adapter/USB cable Strap Optional accessories Camera case A/V cable Battery charger Memory card/Memory card adapter • The illustrations may differ slightly from the items shipped with your product. • The items included in your product box. Unpacking The following items are included in the box may differ depending on the model. • You can purchase optional accessories at a retailer or a Samsung service center. Basic functions 14 Samsung is not responsible for any problems caused by using unauthorized accessories.

User Manual Ver.1.0 (English)
Page 16
Camera layout Before you start, familiarize yourself with the internal antenna while using a wireless network. Shutter button Flash Power button Microphone AF-assist light/Timer lamp Tripod mount Battery chamber cover Insert a memory card and battery Basic functions 15 Speaker Internal antenna* * Avoid contact with your camera's parts and their functions. Lens Attaching the strap USB and A/V port Accepts USB cable and A/V cable
Camera layout Before you start, familiarize yourself with the internal antenna while using a wireless network. Shutter button Flash Power button Microphone AF-assist light/Timer lamp Tripod mount Battery chamber cover Insert a memory card and battery Basic functions 15 Speaker Internal antenna* * Avoid contact with your camera's parts and their functions. Lens Attaching the strap USB and A/V port Accepts USB cable and A/V cable
User Manual Ver.1.0 (English)
Page 19
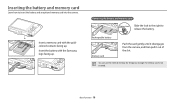
Inserting the battery and memory card Learn how to release the battery. Rechargeable battery Memory card Push the card gently until it disengages from the camera, and then pull it out of the slot. Basic functions 18 Insert a memory card with the Samsung logo facing up . Removing the battery and memory card Battery lock Slide the lock to the right to insert the battery and an optional memory card into the camera. You can use the internal memory for temporary storage if a memory card is not inserted. Insert the battery with the goldcolored contacts facing up .
Inserting the battery and memory card Learn how to release the battery. Rechargeable battery Memory card Push the card gently until it disengages from the camera, and then pull it out of the slot. Basic functions 18 Insert a memory card with the Samsung logo facing up . Removing the battery and memory card Battery lock Slide the lock to the right to insert the battery and an optional memory card into the camera. You can use the internal memory for temporary storage if a memory card is not inserted. Insert the battery with the goldcolored contacts facing up .

User Manual Ver.1.0 (English)
Page 23
...Current date Current time Available number of photos Memory card inserted • : Fully charged • : Partially charged • : Empty (Recharge) • : Charging (Connected with the charger) Aperture value Shutter speed Available recording time Auto focus frame Camera shake Zoom indicator Photo resolution when the ...Intelli zoom is on the screen change according to the mode you select or the options you set. Learning icons The icons the camera displays on Zoom ratio Basic ...
...Current date Current time Available number of photos Memory card inserted • : Fully charged • : Partially charged • : Empty (Recharge) • : Charging (Connected with the charger) Aperture value Shutter speed Available recording time Auto focus frame Camera shake Zoom indicator Photo resolution when the ...Intelli zoom is on the screen change according to the mode you select or the options you set. Learning icons The icons the camera displays on Zoom ratio Basic ...

User Manual Ver.1.0 (English)
Page 42
... AF): Use this function to shoot by the international standards organizations ISO-IEC and ITU-T. • If you use memory cards with slow write speeds, the camera may be corrupted or fail to 20 minutes in length. Extended functions 41 To record high-resolution videos, use... memory cards with faster write speeds. • If you activate the Image Stabilization function while recording a video, the camera may record the operating sound of the Image Stabilization function. • If...
... AF): Use this function to shoot by the international standards organizations ISO-IEC and ITU-T. • If you use memory cards with slow write speeds, the camera may be corrupted or fail to 20 minutes in length. Extended functions 41 To record high-resolution videos, use... memory cards with faster write speeds. • If you activate the Image Stabilization function while recording a video, the camera may record the operating sound of the Image Stabilization function. • If...

User Manual Ver.1.0 (English)
Page 66
Motion Capture: While you are pressing [Shutter], the camera continuously captures photos. • The maximum number of photos depends on the capacity of your memory card. In these cases, select one of 30 photos). Icon Description AEB: • Capture 3 consecutive photos, each with a ...different exposure: normal, underexposed, and overexposed. • It may take longer to save the photos depending on the memory card capacity and performance. Shooting options 65 Use a tripod for best results. 4 Align your subject in the frame, and then half-press [Shutter...
Motion Capture: While you are pressing [Shutter], the camera continuously captures photos. • The maximum number of photos depends on the capacity of your memory card. In these cases, select one of 30 photos). Icon Description AEB: • Capture 3 consecutive photos, each with a ...different exposure: normal, underexposed, and overexposed. • It may take longer to save the photos depending on the memory card capacity and performance. Shooting options 65 Use a tripod for best results. 4 Align your subject in the frame, and then half-press [Shutter...

User Manual Ver.1.0 (English)
Page 71
... through files. • Press and hold [ / ] to scroll through files quickly. • If you want to view files stored in the internal memory, remove your memory card. • You may not be able to edit or play back these files. • Photos or videos captured in portrait orientation do not rotate... automatically and are displayed in your camera. 1 Press [ ]. • The most recent file will be displayed. • If the camera is off, ...
... through files. • Press and hold [ / ] to scroll through files quickly. • If you want to view files stored in the internal memory, remove your memory card. • You may not be able to edit or play back these files. • Photos or videos captured in portrait orientation do not rotate... automatically and are displayed in your camera. 1 Press [ ]. • The most recent file will be displayed. • If the camera is off, ...

User Manual Ver.1.0 (English)
Page 85
... Computer → Removable Disk → DCIM → 100PHOTO. 8 Drag or save files to the computer. Transferring files to a computer Connect the camera to a computer to transfer files from the camera's memory card to your computer. Playback/Editing 84 If the cable is not responsible for you to your computer as a removable disk. 1 On the...
... Computer → Removable Disk → DCIM → 100PHOTO. 8 Drag or save files to the computer. Transferring files to a computer Connect the camera to a computer to transfer files from the camera's memory card to your computer. Playback/Editing 84 If the cable is not responsible for you to your computer as a removable disk. 1 On the...

User Manual Ver.1.0 (English)
Page 92
...display a WLAN enabled printer on the conditions of your camera must comply with radio transmission laws in your ID and password to connect to the WLAN. The manufacturer is not liable for any payment or credit card information on your network service provider. • Depending on...8226; A WLAN connection may not be possible in all surroundings. • The camera may differ, depending on network conditions. • Do not access a network that you are not available if you do not insert a memory card. • The quality of the network connection will be determined by the device...
...display a WLAN enabled printer on the conditions of your camera must comply with radio transmission laws in your ID and password to connect to the WLAN. The manufacturer is not liable for any payment or credit card information on your network service provider. • Depending on...8226; A WLAN connection may not be possible in all surroundings. • The camera may differ, depending on network conditions. • Do not access a network that you are not available if you do not insert a memory card. • The quality of the network connection will be determined by the device...

User Manual Ver.1.0 (English)
Page 110
... Set the file number to start from 0001 when you insert a new memory card, format a memory card, or delete all files. • Series*: Set the file number to resume from the previous file number when you insert a new memory card, format a memory card, or delete all files. • The default name of the first ...(12 Hr, 24 Hr) The default time type may differ depending on the language selected. Settings 109 Set the time zone for your camera. Settings menu General Item Network Information Language Time Zone Date/Time Set Date Type Time Type * Default Description View the Mac address and ...
... Set the file number to start from 0001 when you insert a new memory card, format a memory card, or delete all files. • Series*: Set the file number to resume from the previous file number when you insert a new memory card, format a memory card, or delete all files. • The default name of the first ...(12 Hr, 24 Hr) The default time type may differ depending on the language selected. Settings 109 Set the time zone for your camera. Settings menu General Item Network Information Language Time Zone Date/Time Set Date Type Time Type * Default Description View the Mac address and ...

User Manual Ver.1.0 (English)
Page 111
...; Your settings will not change when you replace the battery. • The camera will not turn on the bottom right corner of camera, a memory card reader, or a computer. Start a preset Wi-Fi function by pressing [ ]. (AutoShare, MobileLink*, Remote Viewfinder, Email, SNS & Cloud, Samsung Link) Set a Wi-Fi function to launch by another brand of the...
...; Your settings will not change when you replace the battery. • The camera will not turn on the bottom right corner of camera, a memory card reader, or a computer. Start a preset Wi-Fi function by pressing [ ]. (AutoShare, MobileLink*, Remote Viewfinder, Email, SNS & Cloud, Samsung Link) Set a Wi-Fi function to launch by another brand of the...

User Manual Ver.1.0 (English)
Page 112
Error messages 112 Camera maintenance 113 Cleaning your camera 113 Using or storing the camera 114 About memory cards 115 About the battery 118 Upgrading the firmware 122 Before contacting a service center 123 Camera specifications 126 Glossary 130 Index 135 Appendixes Get information about error messages, specifications, and maintenance.
Error messages 112 Camera maintenance 113 Cleaning your camera 113 Using or storing the camera 114 About memory cards 115 About the battery 118 Upgrading the firmware 122 Before contacting a service center 123 Camera specifications 126 Glossary 130 Index 135 Appendixes Get information about error messages, specifications, and maintenance.

User Manual Ver.1.0 (English)
Page 113
... disconnected while photos are being transferred to the network using the selected access point. Initialization failed. Format the memory card on the network that support Samsung Link. The camera has failed to other devices. Insert a charged battery or recharge the battery. Enter the correct password. &#... these remedies. Capture photos or insert a memory card that supports Samsung Link. Suggested remedies Delete the damaged file or contact a service center. • Turn off your camera, and then turn it on again. • Remove your memory card, and then insert it again. •...
... disconnected while photos are being transferred to the network using the selected access point. Initialization failed. Format the memory card on the network that support Samsung Link. The camera has failed to other devices. Insert a charged battery or recharge the battery. Enter the correct password. &#... these remedies. Capture photos or insert a memory card that supports Samsung Link. Suggested remedies Delete the damaged file or contact a service center. • Turn off your camera, and then turn it on again. • Remove your memory card, and then insert it again. •...

User Manual Ver.1.0 (English)
Page 115
... where the humidity changes drastically. • Avoid exposing the camera to direct sunlight and storing it . In this situation, turn the camera on the memory card, remove the memory card from a cold environment to your camera. • Do not paint your camera by the strap. ventilated areas, such as silica gel. ... before use it . Do not handle the battery, adapter, or memory card with an absorbent material, such as in humid environments When you turn off the camera when not using or storing your camera in the same compartment as paint can form on beaches or in ...
... where the humidity changes drastically. • Avoid exposing the camera to direct sunlight and storing it . In this situation, turn the camera on the memory card, remove the memory card from a cold environment to your camera. • Do not paint your camera by the strap. ventilated areas, such as silica gel. ... before use it . Do not handle the battery, adapter, or memory card with an absorbent material, such as in humid environments When you turn off the camera when not using or storing your camera in the same compartment as paint can form on beaches or in ...

User Manual Ver.1.0 (English)
Page 116
... returned to milder temperatures. • Paint or metal on the camera to use it away from fingerprints and scratches. Take the camera to a Samsung service center to have it to protect the memory card. Heat can cause a fire or explosion. • Do not... expose the lens to service the camera yourself. Damage due to the camera. • Protect the display from unqualified service is cracked or broken. About memory cards Supported memory cards Your camera...
... returned to milder temperatures. • Paint or metal on the camera to use it away from fingerprints and scratches. Take the camera to a Samsung service center to have it to protect the memory card. Heat can cause a fire or explosion. • Do not... expose the lens to service the camera yourself. Damage due to the camera. • Protect the display from unqualified service is cracked or broken. About memory cards Supported memory cards Your camera...

User Manual Ver.1.0 (English)
Page 117
These capacities are based on a 2 GB microSD card: Photo Size Super Fine Fine 231 485 262 525 303 606 359 719 669 1139 969 1609 1381 2262 2628 3185 Normal 669 719 808 ... may differ depending on the scenes you use the zoom. • Several videos were recorded in succession to determine the total recording time. Appendixes 116 Camera maintenance Memory card capacity The memory capacity may vary if you shoot or shooting conditions.
These capacities are based on a 2 GB microSD card: Photo Size Super Fine Fine 231 485 262 525 303 606 359 719 669 1139 969 1609 1381 2262 2628 3185 Normal 669 719 808 ... may differ depending on the scenes you use the zoom. • Several videos were recorded in succession to determine the total recording time. Appendixes 116 Camera maintenance Memory card capacity The memory capacity may vary if you shoot or shooting conditions.


