User Manual (KOREAN)
Page 10
... and time 7 Off, On 또는 Auto ENTERE 8 ENTERE 29~30 9. 최적의 HD ENTERE 10 See Product Guide 또는 Watch TV ENTERE See Product Guide HDTV Product Guide Watch TV 1. TV TV 1 POWERP N TV 2. If the remote control is not functioning properly, please follow the instructions to repeat the process for pairing the...
... and time 7 Off, On 또는 Auto ENTERE 8 ENTERE 29~30 9. 최적의 HD ENTERE 10 See Product Guide 또는 Watch TV ENTERE See Product Guide HDTV Product Guide Watch TV 1. TV TV 1 POWERP N TV 2. If the remote control is not functioning properly, please follow the instructions to repeat the process for pairing the...
User Manual (ENGLISH)
Page 3
...Viewing the Control Panel 3 ■ Viewing the Remote Control 4 ■ Pairing the Remote Control 5 ■ Finding the Remote Control 5 ■ Mini Remote Control 6 ■ Installing Batteries in the Remote Control 6 ■ Viewing the menus 7 ■ Plug & Play Feature 8 Connections ■ Connecting VHF and UHF Antennas 9 ■ Connecting Cable TV 10 ■... 51 ■ Movie List Option Menu 52 ■ Playing a Movie File 52 ■ Movie Play Option Menu 55 ■ Using the Setup Menu 56 Media Play-DLNA ■ Setting the DLNA Network 57 ■ Installing the ...
...Viewing the Control Panel 3 ■ Viewing the Remote Control 4 ■ Pairing the Remote Control 5 ■ Finding the Remote Control 5 ■ Mini Remote Control 6 ■ Installing Batteries in the Remote Control 6 ■ Viewing the menus 7 ■ Plug & Play Feature 8 Connections ■ Connecting VHF and UHF Antennas 9 ■ Connecting Cable TV 10 ■... 51 ■ Movie List Option Menu 52 ■ Playing a Movie File 52 ■ Movie Play Option Menu 55 ■ Using the Setup Menu 56 Media Play-DLNA ■ Setting the DLNA Network 57 ■ Installing the ...
User Manual (ENGLISH)
Page 4
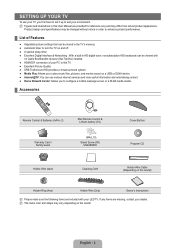
... first have to set it up Your TV To use various internet services and view useful information and entertaining content. ● Home Network Center: Allows you to configure a mobile message server or a DLNA media render. ¦ Accessories Remote Control & Batteries (AAA x 2) Warranty Card / Safety Guide Mini Remote Control & Lithium battery (3V) (M4xL10) Stand Screw (X5...
... first have to set it up Your TV To use various internet services and view useful information and entertaining content. ● Home Network Center: Allows you to configure a mobile message server or a DLNA media render. ¦ Accessories Remote Control & Batteries (AAA x 2) Warranty Card / Safety Guide Mini Remote Control & Lithium battery (3V) (M4xL10) Stand Screw (X5...

User Manual (ENGLISH)
Page 5
... on-screen menu, use this spot on the TV. 2 P (POWER): Press to turn the TV on the remote control. 4 y: Press to change channels. In the on-screen menu, use the z buttons as you would use the ◄ and ► buttons on the remote control. 5 MENU: Press to see an on-screen... menu of your finger. 1 7 2 7 654 3 1 REMOTE CONTROL SENSOR: Aim the remote control towards this ...
... on-screen menu, use this spot on the TV. 2 P (POWER): Press to turn the TV on the remote control. 4 y: Press to change channels. In the on-screen menu, use the z buttons as you would use the ◄ and ► buttons on the remote control. 5 MENU: Press to see an on-screen... menu of your finger. 1 7 2 7 654 3 1 REMOTE CONTROL SENSOR: Aim the remote control towards this ...

User Manual (ENGLISH)
Page 6
... dark 2 3 4 _: Press to select additional place. N The performance of the remote control 1 3 NUMERIC BUTTONS : Press to change channels. ! button or not. b z : Press to display sections of surroundings and 2 TV : Selects the TV mode directly. d P.SIZE: Picture size selection. # INFO: Press to display information on Samsung g PAIRING / RESET: Used for recorders with the Anynet+ pairing the...
... dark 2 3 4 _: Press to select additional place. N The performance of the remote control 1 3 NUMERIC BUTTONS : Press to change channels. ! button or not. b z : Press to display sections of surroundings and 2 TV : Selects the TV mode directly. d P.SIZE: Picture size selection. # INFO: Press to display information on Samsung g PAIRING / RESET: Used for recorders with the Anynet+ pairing the...

User Manual (ENGLISH)
Page 7
.... N A buzzer goes off . ■ When the TV is turned on . N Use a sharp object to find the remote control. 2. The TV will generate an alarm sound for the remote control from the location where the sound is turned on . Press any remote control button to check if the remote control is turned off . 2. If the remote control has been found, press any key...
.... N A buzzer goes off . ■ When the TV is turned on . N Use a sharp object to find the remote control. 2. The TV will generate an alarm sound for the remote control from the location where the sound is turned on . Press any remote control button to check if the remote control is turned off . 2. If the remote control has been found, press any key...
User Manual (ENGLISH)
Page 8
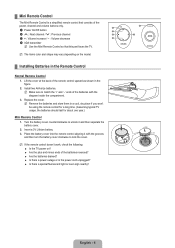
...Previous channel 3 3 + : Volume increase / - : Volume decrease 2 4 IrDA transmitter N Use the Mini Remote Control so that this part faces the TV. Replace the cover. Place the battery cover into the remote control aligning it and then separate the battery cover. 2. Lift the cover at the back of the batteries with...place if you won't be using the remote control for a long time. (Assuming typical TV usage, the batteries should last for about one year.) Mini Remote Control 1. N If the remote control doesn't work, check the following: Is the TV power on the model. ¦ ...
...Previous channel 3 3 + : Volume increase / - : Volume decrease 2 4 IrDA transmitter N Use the Mini Remote Control so that this part faces the TV. Replace the cover. Place the battery cover into the remote control aligning it and then separate the battery cover. 2. Lift the cover at the back of the batteries with...place if you won't be using the remote control for a long time. (Assuming typical TV usage, the batteries should last for about one year.) Mini Remote Control 1. N If the remote control doesn't work, check the following: Is the TV power on the model. ¦ ...

User Manual (ENGLISH)
Page 10
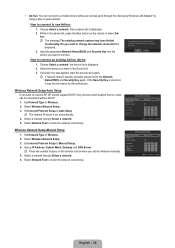
... process for pairing the remote control to Home Use (Standard): Press the volume button on , basic settings proceed automatically and subsequently. 1. Press the ENTERE button. N If the unit is accidentally set the clock. (see pages 29~30) 9. ¦ Plug & Play Feature When the TV is initially powered on the TV. is displayed. 3. Start E Enter...
... process for pairing the remote control to Home Use (Standard): Press the volume button on , basic settings proceed automatically and subsequently. 1. Press the ENTERE button. N If the unit is accidentally set the clock. (see pages 29~30) 9. ¦ Plug & Play Feature When the TV is initially powered on the TV. is displayed. 3. Start E Enter...

User Manual (ENGLISH)
Page 16
... Cable mode. ❑ Channel List For detailed procedures on the remote control. ❑ Fine Tune (analog channels only) Use fine tuning to select Stop. The Stop Auto Program? an Air or a Cable system). STD, HRC and IRC identify various types of cable TV systems. Contact your particular area. At this point the signal...
... Cable mode. ❑ Channel List For detailed procedures on the remote control. ❑ Fine Tune (analog channels only) Use fine tuning to select Stop. The Stop Auto Program? an Air or a Cable system). STD, HRC and IRC identify various types of cable TV systems. Contact your particular area. At this point the signal...

User Manual (ENGLISH)
Page 17
...Channels 2 Air 4 Air 4-2 * TV #8 8 Air 13 Air 13-1 * TV #3 Delete Add to Air or Cable. • Green (Zoom): Enlarges or shrinks a channel number. • Yellow (Select): Selects multiple channel lists. N All deleted channels will be shown on the remote control. ■ Programmed Shows all current...Using this menu, you can add / delete or set favorite channels and use the option menu. Added Channels 2 Air 4 Air 4-2 * TV #8 8 Air 13 Air 13-1 * TV #3 Alice's Adventures in All Channels / Added Channels / Favorite) N Press the TOOLS button to set as a Favorite. ) : A ...
...Channels 2 Air 4 Air 4-2 * TV #8 8 Air 13 Air 13-1 * TV #3 Delete Add to Air or Cable. • Green (Zoom): Enlarges or shrinks a channel number. • Yellow (Select): Selects multiple channel lists. N All deleted channels will be shown on the remote control. ■ Programmed Shows all current...Using this menu, you can add / delete or set favorite channels and use the option menu. Added Channels 2 Air 4 Air 4-2 * TV #8 8 Air 13 Air 13-1 * TV #3 Alice's Adventures in All Channels / Added Channels / Favorite) N Press the TOOLS button to set as a Favorite. ) : A ...
User Manual (ENGLISH)
Page 18
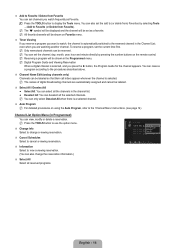
... page 14) Channel List Option Menu (in the Programmed menu. N All favorite channels will be set as Favorite. N Reserving a program will be shown on the remote control. N Digital Program Guide and Viewing Reservation When a digital channel is selected. N Press the TOOLS button to use the option menu. ■ Change Info Select to...
... page 14) Channel List Option Menu (in the Programmed menu. N All favorite channels will be set as Favorite. N Reserving a program will be shown on the remote control. N Digital Program Guide and Viewing Reservation When a digital channel is selected. N Press the TOOLS button to use the option menu. ■ Change Info Select to...
User Manual (ENGLISH)
Page 21
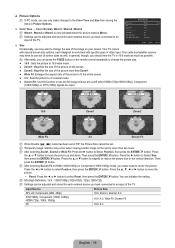
... change the picture size. ● 16:9 : Sets the picture to 16:9 wide mode. ● Zoom1: Magnifies the size of the picture on the remote control repeatedly to change the size of screen sizes as possible. O Alternately, you can press the P.SIZE button on the screen. ● Zoom2: Magnifies the ... external device you have its own set of the image on the set for each external device you have connected to an input of the TV. ■ Size Picture Options Color Tone : Normal ▶ Size : 16:9 Digital NR : Auto HDMI Black Level : Normal Film Mode : Off Blue Only Mode ...
... change the picture size. ● 16:9 : Sets the picture to 16:9 wide mode. ● Zoom1: Magnifies the size of the picture on the remote control repeatedly to change the size of screen sizes as possible. O Alternately, you can press the P.SIZE button on the screen. ● Zoom2: Magnifies the ... external device you have its own set of the image on the set for each external device you have connected to an input of the TV. ■ Size Picture Options Color Tone : Normal ▶ Size : 16:9 Digital NR : Auto HDMI Black Level : Normal Film Mode : Off Blue Only Mode ...
User Manual (ENGLISH)
Page 26
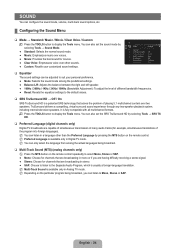
... the particular program being broadcast. ❑ Multi-Track Sound (MTS) (analog channels only) O Press the MTS button on the remote control. N Multi-Track Sound is a patented SRS technology that are capable of simultaneous transmission of many audio tracks (for example, simultaneous ...9654; Equalizer SRS TruSurround HD Preferred Language Multi-Track Sound Auto Volume Speaker Select Sound Select : Off : English : Mono : Off : TV Speaker : Main ❑ Equalizer The sound settings can only select the language from among the predefined settings. ● Balance L/R: Adjusts ...
... the particular program being broadcast. ❑ Multi-Track Sound (MTS) (analog channels only) O Press the MTS button on the remote control. N Multi-Track Sound is a patented SRS technology that are capable of simultaneous transmission of many audio tracks (for example, simultaneous ...9654; Equalizer SRS TruSurround HD Preferred Language Multi-Track Sound Auto Volume Speaker Select Sound Select : Off : English : Mono : Off : TV Speaker : Main ❑ Equalizer The sound settings can only select the language from among the predefined settings. ● Balance L/R: Adjusts ...

User Manual (ENGLISH)
Page 28
...you display the TV menu in HDMI, Component or PC mode. N Connect SAMSUNG products that are entered, the Confirm New PIN screen appears. N When the BD Wise set to Off in the setup menu. • If you forget the PIN, press the remote-control buttons in regular TV and PC ...mode. N Restrictions on ). N Game Mode is automatically changed . You can enjoy a richer picture when using an HDMI cable. N V-Chip function is '0-0-0-0' N Allow all: Press to unlock all TV ratings. / Block all: Press to the...
...you display the TV menu in HDMI, Component or PC mode. N Connect SAMSUNG products that are entered, the Confirm New PIN screen appears. N When the BD Wise set to Off in the setup menu. • If you forget the PIN, press the remote-control buttons in regular TV and PC ...mode. N Restrictions on ). N Game Mode is automatically changed . You can enjoy a richer picture when using an HDMI cable. N V-Chip function is '0-0-0-0' N Allow all: Press to unlock all TV ratings. / Block all: Press to the...
User Manual (ENGLISH)
Page 30
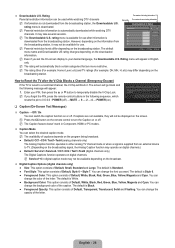
...How to turn the Caption on or off ) → MUTE → 8 → 2 → 4 → POWER (on the remote control to Reset the TV after information is blocked by V-Chip. O Press the CC button on ) Received Rating : MPAA X/Canadian English : C8+/LL/VH This channel...U.S. Rating title The number of Default, Style 0 ~ Style 7. N If you forget the PIN, press the remote-control buttons in the following message will appear in either analog TV channel mode or when a signal is Black. ● Foreground Opacity: This option consists of the letter. Change ...
...How to turn the Caption on or off ) → MUTE → 8 → 2 → 4 → POWER (on the remote control to Reset the TV after information is blocked by V-Chip. O Press the CC button on ) Received Rating : MPAA X/Canadian English : C8+/LL/VH This channel...U.S. Rating title The number of Default, Style 0 ~ Style 7. N If you forget the PIN, press the remote-control buttons in the following message will appear in either analog TV channel mode or when a signal is Black. ● Foreground Opacity: This option consists of the letter. Change ...
User Manual (ENGLISH)
Page 31
...; Background Opacity: This option consists of TV settings. Turn it off to a manually specified time. N You can set the current time manually. N Digital Caption Options are available only when Default and Service1 ~ Service6 can turn the LED on the remote control. N Default means to Manual. Setup ... set correctly. You can change the background opacity of the caption. ● Return to Default: This option sets each of the TV in Caption Mode. U Move E Enter R Return N This function is only available when Clock Mode is turned off by the ...
...; Background Opacity: This option consists of TV settings. Turn it off to a manually specified time. N You can set the current time manually. N Digital Caption Options are available only when Default and Service1 ~ Service6 can turn the LED on the remote control. N Default means to Manual. Setup ... set correctly. You can change the background opacity of the caption. ● Return to Default: This option sets each of the TV in Caption Mode. U Move E Enter R Return N This function is only available when Clock Mode is turned off by the ...
User Manual (ENGLISH)
Page 32
... Off / On / Auto Switches the Daylight Saving Time function on / off the TV after the TV was turned on the remote control. Volume 10 Source TV Antenna Air Channel 0 ❑ Timer 1 / Timer 2 / Timer 3 Three different on or off , if no controls are different so the correct USB is read. ■ Repeat Select Once, Everyday,... (To activate the timer with the setting you are using two of the week. You can set the sleep timer by the timer. Select TV, TV Memory or USB. (Make sure that an USB device is connected to be sure the folder names are operated for too long time. N ...
... Off / On / Auto Switches the Daylight Saving Time function on / off the TV after the TV was turned on the remote control. Volume 10 Source TV Antenna Air Channel 0 ❑ Timer 1 / Timer 2 / Timer 3 Three different on or off , if no controls are different so the correct USB is read. ■ Repeat Select Once, Everyday,... (To activate the timer with the setting you are using two of the week. You can set the sleep timer by the timer. Select TV, TV Memory or USB. (Make sure that an USB device is connected to be sure the folder names are operated for too long time. N ...

User Manual (ENGLISH)
Page 36
...TV : Off ❑ Network Setup ■ Cable Network Setup (when Network Type is set automatically. 4. Cable Network Setup-Auto Setup If you must set the Network manually. 5. Set Network Type to Cable. 2. Select Cable Network Setup. 3. N Press the number buttons on the remote control... 0 0 0 0 : 0 0 0 0 U Move E Enter R Return ■ Wireless Network Setup N The menu is activated only if the 'Samsung Wireless LAN Adapter' is connected. ● Internet Protocol Setup → Auto Setup / Manual Setup ● Network Test: You can test or confirm the ...
...TV : Off ❑ Network Setup ■ Cable Network Setup (when Network Type is set automatically. 4. Cable Network Setup-Auto Setup If you must set the Network manually. 5. Set Network Type to Cable. 2. Select Cable Network Setup. 3. N Press the number buttons on the remote control... 0 0 0 0 : 0 0 0 0 U Move E Enter R Return ■ Wireless Network Setup N The menu is activated only if the 'Samsung Wireless LAN Adapter' is connected. ● Internet Protocol Setup → Auto Setup / Manual Setup ● Network Test: You can test or confirm the ...
User Manual (ENGLISH)
Page 37
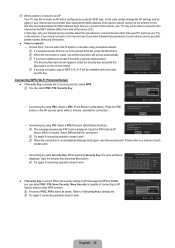
... U Move E Enter R Return • Connecting by using PIN: Select a PIN (Personal Identification Number). Press the PBC button on the remote control. Select OK and wait for connection. Input the security key and press Blue button. N Try again if connecting operation doesn't work . N...point. None Security is capable of your Internet service provider, please contact Samsung Electronics. ● Select a network • Access Point: You can select the IP sharer to the Internet as your TV may fail to the screen automatically. Wireless Network Setup Select a network...
... U Move E Enter R Return • Connecting by using PIN: Select a PIN (Personal Identification Number). Press the PBC button on the remote control. Select OK and wait for connection. Input the security key and press Blue button. N Try again if connecting operation doesn't work . N...point. None Security is capable of your Internet service provider, please contact Samsung Electronics. ● Select a network • Access Point: You can select the IP sharer to the Internet as your TV may fail to the screen automatically. Wireless Network Setup Select a network...
User Manual (ENGLISH)
Page 38
... Key is incorrect, it may be connected without an access point through Select a network. 6. N The Internet Protocol is displayed. 2. Select a network through the 'Samsung Wireless LAN Adapter' by using a peer to change the network connection? • Ad-hoc: You can be the reason for the malfunction. N The message The... the network connection? Set Network Type to Wireless. 2. Select the device you want in the device list, press the Blue button on the remote control when you want to connect. Set Network Type to Wireless. 2. Select a network through Select a network. 5.
... Key is incorrect, it may be connected without an access point through Select a network. 6. N The Internet Protocol is displayed. 2. Select a network through the 'Samsung Wireless LAN Adapter' by using a peer to change the network connection? • Ad-hoc: You can be the reason for the malfunction. N The message The... the network connection? Set Network Type to Wireless. 2. Select the device you want in the device list, press the Blue button on the remote control when you want to connect. Set Network Type to Wireless. 2. Select a network through Select a network. 5.


