Quick Guide (easy Manual) (ver.1.0) (English)
Page 1
... Manual if you don't, or if you select Store Demo, the TV Plug & Play will reset your remote to display the menu. 3. screen appears. Then press the ENTERE button. We recommend using four screws (M4 X Stand L12) as shown s s s s s Rear 2 3 With your TV is displayed. HDMI Cable (Not Supplied) HDMI to DVI Cable (Not Supplied) Audio Cable (Not Supplied) Best Connection HD connection (up to 1080p) Using an HDMI Cable HDMI OUT Device DVD / Blu-ray player / HD Cable Box / HD Satellite receiver (STB) Very Good Connection...
... Manual if you don't, or if you select Store Demo, the TV Plug & Play will reset your remote to display the menu. 3. screen appears. Then press the ENTERE button. We recommend using four screws (M4 X Stand L12) as shown s s s s s Rear 2 3 With your TV is displayed. HDMI Cable (Not Supplied) HDMI to DVI Cable (Not Supplied) Audio Cable (Not Supplied) Best Connection HD connection (up to 1080p) Using an HDMI Cable HDMI OUT Device DVD / Blu-ray player / HD Cable Box / HD Satellite receiver (STB) Very Good Connection...

Quick Guide (easy Manual) (ver.1.0) (English)
Page 2
... a USB device by connecting it to the TV and using the Media Play feature. Displays the channel list on your TV. 2. Adjusts the volume. Changes channels. S.MODE: Press to directly access channels. With the power on, press the MENU button on your remote, select Picture Mode. 3. Press to select the sound mode. Thereafter, each time you press the P.MODE button, you can set automatically using the time from a source connected to a different source. To change the screen size, press the P.SIZE button on your remote control, follow these steps: 1. Quickly...
... a USB device by connecting it to the TV and using the Media Play feature. Displays the channel list on your TV. 2. Adjusts the volume. Changes channels. S.MODE: Press to directly access channels. With the power on, press the MENU button on your remote, select Picture Mode. 3. Press to select the sound mode. Thereafter, each time you press the P.MODE button, you can set automatically using the time from a source connected to a different source. To change the screen size, press the P.SIZE button on your remote control, follow these steps: 1. Quickly...
User Manual (user Manual) (ver.1.0) (English)
Page 3
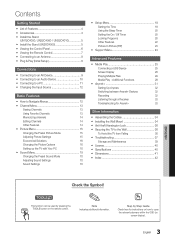
... Timer 20 Locking Programs 20 Other Features 22 Picture In Picture (PIP) 23 yy Support Menu 23 Advanced Features yy Media Play 25 Connecting a USB Device 25 Screen Display 26 Playing Multiple Files 29 Media Play - Note Indicates additional information. Contents Getting Started yy List of Features 4 yy Accessories 4 yy Install the Stand (UN19C4000, UN22C4000 / UN22C4010 5 yy Install the Stand (UN26C4000 5 yy Viewing the Control Panel 6 yy Viewing the Remote Control 7 yy Connecting to an Antenna 8 yy Plug & Play (Initial Setup 8 Connections yy Connecting to...
... Timer 20 Locking Programs 20 Other Features 22 Picture In Picture (PIP) 23 yy Support Menu 23 Advanced Features yy Media Play 25 Connecting a USB Device 25 Screen Display 26 Playing Multiple Files 29 Media Play - Note Indicates additional information. Contents Getting Started yy List of Features 4 yy Accessories 4 yy Install the Stand (UN19C4000, UN22C4000 / UN22C4010 5 yy Install the Stand (UN26C4000 5 yy Viewing the Control Panel 6 yy Viewing the Remote Control 7 yy Connecting to an Antenna 8 yy Plug & Play (Initial Setup 8 Connections yy Connecting to...

User Manual (user Manual) (ver.1.0) (English)
Page 7
... remote control for Samsung recorders that have the Anynet+ feature) PRE-CH MEDIA.P CHLIST MENU FAV.CH TOOLS INFO RETURN EXIT A B CD S.MODE SLEEP MTS P.MODE P.SIZE CC Returns to the previous channel. HDMI Displays and selects the available video sources (p. 12). Buttons used functions. Use these buttons in the Channel List, Media Play menu, etc. Displays Favorite Channel Lists on the TV screen. Displays information on the screen (p. 13). Press to select the picture mode (p. 15). "and "3". Quickly select frequently used in Media Play...
... remote control for Samsung recorders that have the Anynet+ feature) PRE-CH MEDIA.P CHLIST MENU FAV.CH TOOLS INFO RETURN EXIT A B CD S.MODE SLEEP MTS P.MODE P.SIZE CC Returns to the previous channel. HDMI Displays and selects the available video sources (p. 12). Buttons used functions. Use these buttons in the Channel List, Media Play menu, etc. Displays Favorite Channel Lists on the TV screen. Displays information on the screen (p. 13). Press to select the picture mode (p. 15). "and "3". Quickly select frequently used in Media Play...
User Manual (user Manual) (ver.1.0) (English)
Page 8
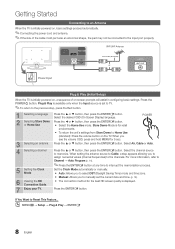
... and hold MENU for 5 sec. 3 Selecting an antenna Press the ▲ or ▼ button, then press the ENTERE button. OO MENUm → Setup → Plug & Play → ENTERE 8 English Store Demo Mode is for the best HD screen quality is set the current date and time. (p. 19). 6 Viewing the HD Connection Guide. Select the channel source to interrupt the memorisation process. For more information, refer to Channel → Auto Program (p. 14...
... and hold MENU for 5 sec. 3 Selecting an antenna Press the ▲ or ▼ button, then press the ENTERE button. OO MENUm → Setup → Plug & Play → ENTERE 8 English Store Demo Mode is for the best HD screen quality is set the current date and time. (p. 19). 6 Viewing the HD Connection Guide. Select the channel source to interrupt the memorisation process. For more information, refer to Channel → Auto Program (p. 14...

User Manual (user Manual) (ver.1.0) (English)
Page 9
... player, HD cable box, HD STB (Set-Top-Box) satellite receiver HDMI Cable (Not Supplied) HDMI OUT Device HDMI to DVI Cable (Not Supplied) DVI OUT R W Red White Audio Cable (Not Supplied) AUDIO OUT R-AUDIO-L Device ✎✎HDMI IN 1(DVI), 2, PC/DVI AUDIO IN xx When using the HDMI connection for video. xx The picture may not display normally (if at all) or the audio may not work if an external device that uses an older version of HDMI mode is required for audio...
... player, HD cable box, HD STB (Set-Top-Box) satellite receiver HDMI Cable (Not Supplied) HDMI OUT Device HDMI to DVI Cable (Not Supplied) DVI OUT R W Red White Audio Cable (Not Supplied) AUDIO OUT R-AUDIO-L Device ✎✎HDMI IN 1(DVI), 2, PC/DVI AUDIO IN xx When using the HDMI connection for video. xx The picture may not display normally (if at all) or the audio may not work if an external device that uses an older version of HDMI mode is required for audio...

User Manual (user Manual) (ver.1.0) (English)
Page 12
...;✎When connecting an HDMI/DVI cable to the HDMI IN 1(DVI) port, you should set the TV to select TV or an external input sources such as a DVD / Blu-ray player / cable box / STB satellite receiver. Confirm the setting. 3 RETURN butPt.oMOnD: EReturPn.SsIZtoE the pCreCvious menu. 4 EXIT button: Exits the on the screen: Picture, Sound, Channel, Setup, Input, Application, Support. How to Operate the OSD (On Screen Display) The access step may differ depending on -screen menu. 2 ENTERE...
...;✎When connecting an HDMI/DVI cable to the HDMI IN 1(DVI) port, you should set the TV to select TV or an external input sources such as a DVD / Blu-ray player / cable box / STB satellite receiver. Confirm the setting. 3 RETURN butPt.oMOnD: EReturPn.SsIZtoE the pCreCvious menu. 4 EXIT button: Exits the on the screen: Picture, Sound, Channel, Setup, Input, Application, Support. How to Operate the OSD (On Screen Display) The access step may differ depending on -screen menu. 2 ENTERE...

User Manual (user Manual) (ver.1.0) (English)
Page 16
... Color Tone, Size, Digital Noise Filter and Auto Protection Time. R-Offset / G-Offset / B-Offset: Adjust each color's (red, green, blue) brightness. Picture Options OO MENUm → Picture → Picture Options → ENTERE ✎✎In PC mode, you can be used to it 's not receiving a signal. ✎✎ Disabled when the PC is in power saving mode. ¦¦ Changing the Picture Options Advanced Settings OO MENUm → Picture → Advanced Settings → ENTERE (Advanced Settings...
... Color Tone, Size, Digital Noise Filter and Auto Protection Time. R-Offset / G-Offset / B-Offset: Adjust each color's (red, green, blue) brightness. Picture Options OO MENUm → Picture → Picture Options → ENTERE ✎✎In PC mode, you can be used to it 's not receiving a signal. ✎✎ Disabled when the PC is in power saving mode. ¦¦ Changing the Picture Options Advanced Settings OO MENUm → Picture → Advanced Settings → ENTERE (Advanced Settings...
User Manual (user Manual) (ver.1.0) (English)
Page 19
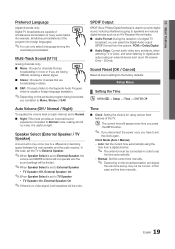
... station and signal, the auto time set the clock again. Sound Reset (OK / Cancel) Reset all sound settings to Mono, Stereo or SAP. Speaker Select (External Speaker / TV Speaker) A sound echo may not be correct. OO The current time will appear every time you press the INFO button. ✎✎ If you disconnect the power cord, you have to set up may occur due to digital audio output using various timer features of a digital TV broadcast...
... station and signal, the auto time set the clock again. Sound Reset (OK / Cancel) Reset all sound settings to Mono, Stereo or SAP. Speaker Select (External Speaker / TV Speaker) A sound echo may not be correct. OO The current time will appear every time you press the INFO button. ✎✎ If you disconnect the power cord, you have to set up may occur due to digital audio output using various timer features of a digital TV broadcast...

User Manual (user Manual) (ver.1.0) (English)
Page 20
.... Auto Power Off (available only when the TV is turned on the remote control. The user must set to Auto. ¦¦ Using the Sleep Timer OO MENUm → Setup → Time → Sleep Timer → ENTERE ■■ Sleep Timer t : Automatically shuts off after a preset period of being left idle to prevent overheating. ¦¦ Locking Programs OO MENUm → Setup → Security → ENTERE Security The PIN input screen appears...
.... Auto Power Off (available only when the TV is turned on the remote control. The user must set to Auto. ¦¦ Using the Sleep Timer OO MENUm → Setup → Time → Sleep Timer → ENTERE ■■ Sleep Timer t : Automatically shuts off after a preset period of being left idle to prevent overheating. ¦¦ Locking Programs OO MENUm → Setup → Security → ENTERE Security The PIN input screen appears...

User Manual (user Manual) (ver.1.0) (English)
Page 22
... will not be selected in Component, HDMI or PC modes. ■■ Caption Mode: You can select the desired caption mode. ✎✎ The availability of captions depends on the program being broadcasted. Default / CC1~CC4 / Text1~Text4: (analog channels only) The Analog Caption function operates in either analog TV channel mode or when a signal is supplied from an external device to Movie. -- Background Color: Options include Default, White, Black, Red, Green, Blue, Yellow, Magenta and Cyan...
... will not be selected in Component, HDMI or PC modes. ■■ Caption Mode: You can select the desired caption mode. ✎✎ The availability of captions depends on the program being broadcasted. Default / CC1~CC4 / Text1~Text4: (analog channels only) The Analog Caption function operates in either analog TV channel mode or when a signal is supplied from an external device to Movie. -- Background Color: Options include Default, White, Black, Red, Green, Blue, Yellow, Magenta and Cyan...

User Manual (user Manual) (ver.1.0) (English)
Page 23
... sound to view a game or karaoke. Yes: If you use the main screen to check for picture problems. Yes: If the test pattern does not appear or there is noise in the PIP window becomes slightly unnatural when you can watch the TV tuner and one speaker or not at all during the test even if Speaker Select is set to the Sound Select instructions. Support Menu...
... sound to view a game or karaoke. Yes: If you use the main screen to check for picture problems. Yes: If the test pattern does not appear or there is noise in the PIP window becomes slightly unnatural when you can watch the TV tuner and one speaker or not at all during the test even if Speaker Select is set to the Sound Select instructions. Support Menu...

User Manual (user Manual) (ver.1.0) (English)
Page 25
... drives, Flash Card Readers and USB HDD (USB HUB are connected, you can be recognized or the files on the back or side panel of USB Digital camera and audio devices may not be displayed in Auto Protection Time, the Screensaver will run , use one at a time. x Connect a USB HDD to the TV's USB port. x If more than 500mA or 5V) may not be supported. x The power-saving mode of...
... drives, Flash Card Readers and USB HDD (USB HUB are connected, you can be recognized or the files on the back or side panel of USB Digital camera and audio devices may not be displayed in Auto Protection Time, the Screensaver will run , use one at a time. x Connect a USB HDD to the TV's USB port. x If more than 500mA or 5V) may not be supported. x The power-saving mode of...

User Manual (user Manual) (ver.1.0) (English)
Page 31
... Digital Audio Input on it. If you to 3 devices of the same type. 31 English xx Anynet+ works when the AV device supporting Anynet+ is an Anynet+ logo on the Home Theater. To connect to hear 5.1 channel audio, connect the DIGITAL AUDIO OUT (OPTICAL) jack on the DVD / Satellite Box (i.e. xx When following the connection above, the Optical jack only outputs 2 channel audio. xx You can connect an Anynet+ device using the HDMI cable...
... Digital Audio Input on it. If you to 3 devices of the same type. 31 English xx Anynet+ works when the AV device supporting Anynet+ is an Anynet+ logo on the Home Theater. To connect to hear 5.1 channel audio, connect the DIGITAL AUDIO OUT (OPTICAL) jack on the DVD / Satellite Box (i.e. xx When following the connection above, the Optical jack only outputs 2 channel audio. xx You can connect an Anynet+ device using the HDMI cable...

User Manual (user Manual) (ver.1.0) (English)
Page 32
... the Red button to the recording device. Sound is set to TV broadcast mode. To properly connect an antenna to a recording device, refer to search devices. 2. Shows the play menu of the DVD recorder will only appear when you set to On. ✎✎ When the Anynet+ (HDMI-CEC) function is not displayed, select Device List and press the Red button to the recording device's users manual. 32...
... the Red button to the recording device. Sound is set to TV broadcast mode. To properly connect an antenna to a recording device, refer to search devices. 2. Shows the play menu of the DVD recorder will only appear when you set to On. ✎✎ When the Anynet+ (HDMI-CEC) function is not displayed, select Device List and press the Red button to the recording device's users manual. 32...
User Manual (user Manual) (ver.1.0) (English)
Page 33
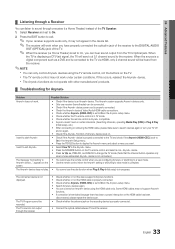
... Anynet+ Setup menu. • Press the TOOLS button to display the Anynet+ menu and select a menu you are configuring Anynet+ or switching to a view mode. • Use the remote control when the Anynet+ setting or switching to start Anynet+. Some HDMI cables may not work in certain situations. (Searching channels, operating Media Play (USB) or Plug & Play (initial setup), etc.) • When connecting or removing the HDMI cable, please make sure to search devices again or turn your receiver supports audio only, it...
... Anynet+ Setup menu. • Press the TOOLS button to display the Anynet+ menu and select a menu you are configuring Anynet+ or switching to a view mode. • Use the remote control when the Anynet+ setting or switching to start Anynet+. Some HDMI cables may not work in certain situations. (Searching channels, operating Media Play (USB) or Plug & Play (initial setup), etc.) • When connecting or removing the HDMI cable, please make sure to search devices again or turn your receiver supports audio only, it...
User Manual (user Manual) (ver.1.0) (English)
Page 37
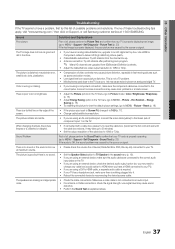
... box video output resolution to HDMI cable, a separate audio cable is a dotted line on Support, or call Samsung customer service at maximum volume. Sound Problem First of device (Cable/Sat Box, DVD, Blu-ray etc) connected to MENU - Support - you have an analog cable/satellite box, upgrade to an audio input. • For antenna or Cable connections, check the signal strength. Picture - Make sure a video cable is nothing plugged into it. • Reboot the connected device by reconnecting the device's power cable. There is no sound. • Set the Speaker...
... box video output resolution to HDMI cable, a separate audio cable is a dotted line on Support, or call Samsung customer service at maximum volume. Sound Problem First of device (Cable/Sat Box, DVD, Blu-ray etc) connected to MENU - Support - you have an analog cable/satellite box, upgrade to an audio input. • For antenna or Cable connections, check the signal strength. Picture - Make sure a video cable is nothing plugged into it. • Reboot the connected device by reconnecting the device's power cable. There is no sound. • Set the Speaker...
User Manual (user Manual) (ver.1.0) (English)
Page 38
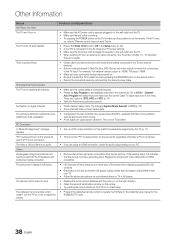
... from the TV speakers with an HDMI connection. The TV turns off , or adjust the volume. • Program the Cable/Set remote control to the wall outlet and the TV. • When watching TV from your TV. • Adjust the picture size options on your PC's output resolution so they match the resolutions supported by reconnecting the device's power cable. Go to the Cable/Set user manual for the SAMSUNG TV code. 38 English The video is OK...
... from the TV speakers with an HDMI connection. The TV turns off , or adjust the volume. • Program the Cable/Set remote control to the wall outlet and the TV. • When watching TV from your TV. • Adjust the picture size options on your PC's output resolution so they match the resolutions supported by reconnecting the device's power cable. Go to the Cable/Set user manual for the SAMSUNG TV code. 38 English The video is OK...

User Manual (user Manual) (ver.1.0) (English)
Page 39
... Home Use under Plug & Play mode. The PIP menu is turned off. Press the SOURCE button to select TV mode, and go to Plug & Play Feature (p. 8). ✎✎This TFT LED panel uses a panel consisting of the TV, and adjust the external device's output resolution accordingly. POP (TV's internal banner ad) appears on the performance of audio or video can not be selected in the TV menu when connected via HDMI or Component (p. 22). • Caption must...
... Home Use under Plug & Play mode. The PIP menu is turned off. Press the SOURCE button to select TV mode, and go to Plug & Play Feature (p. 8). ✎✎This TFT LED panel uses a panel consisting of the TV, and adjust the external device's output resolution accordingly. POP (TV's internal banner ad) appears on the performance of audio or video can not be selected in the TV menu when connected via HDMI or Component (p. 22). • Caption must...
User Manual (user Manual) (ver.1.0) (Spanish)
Page 42
... 18 External Speaker 19 H HDMI HEADPHONE Home Theater 9, 31 10 10, 31 I Installation Space 2 L Language 22 License 39 M Media Play 25 Melody 23 Menu Transparency 23 Mono 19 Music 28 N Navigate 12 O Optimal resolution 11 P Photos Picture Size PIP (Picture in Picture) Plug & Play Power Indicator 28 17, 30 23 8 6 S Select All Self Diagnosis Sharpness Signal Information Sleep Timer Slide Show Software Upgrade Source List Speaker Select Specifications Standby mode Symbol T Timer Title Tools Troubleshooting TV Speaker U USB Drive V Video Formats Videos Virtual...
... 18 External Speaker 19 H HDMI HEADPHONE Home Theater 9, 31 10 10, 31 I Installation Space 2 L Language 22 License 39 M Media Play 25 Melody 23 Menu Transparency 23 Mono 19 Music 28 N Navigate 12 O Optimal resolution 11 P Photos Picture Size PIP (Picture in Picture) Plug & Play Power Indicator 28 17, 30 23 8 6 S Select All Self Diagnosis Sharpness Signal Information Sleep Timer Slide Show Software Upgrade Source List Speaker Select Specifications Standby mode Symbol T Timer Title Tools Troubleshooting TV Speaker U USB Drive V Video Formats Videos Virtual...


