User Manual
Page 2
... 19 Installing a Wall-mount Kit or Desktop Stand (U28H750UQ*) 20 Installing a Wall-mount Kit or Desktop Stand (U32H850UM*) 21 Installation 22 Attaching the Stand (U28H750UQ*) 22 Attaching the Stand (U32H850UM*) 23 Removing the Stand (U28H750UQ*) 24 Removing the Stand (U32H850UM*) 25 Connecting and Using a Source ... the product 32 Driver Installation 32 Setting Optimum Resolution 32 Screen Setup SAMSUNG MAGIC Bright 33 Black Equalizer 34 Brightness 34 Contrast 34 Sharpness 34 Color 35 SAMSUNG MAGIC Angle (U28H750UQ*) 35 HDMI Black Level 36 Eye Saver Mode ...
... 19 Installing a Wall-mount Kit or Desktop Stand (U28H750UQ*) 20 Installing a Wall-mount Kit or Desktop Stand (U32H850UM*) 21 Installation 22 Attaching the Stand (U28H750UQ*) 22 Attaching the Stand (U32H850UM*) 23 Removing the Stand (U28H750UQ*) 24 Removing the Stand (U32H850UM*) 25 Connecting and Using a Source ... the product 32 Driver Installation 32 Setting Optimum Resolution 32 Screen Setup SAMSUNG MAGIC Bright 33 Black Equalizer 34 Brightness 34 Contrast 34 Sharpness 34 Color 35 SAMSUNG MAGIC Angle (U28H750UQ*) 35 HDMI Black Level 36 Eye Saver Mode ...

User Manual
Page 20
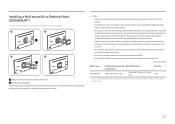
... be held liable for any damage or injury caused by using improper screws or attaching the wall-mount kit or desktop stand using excessive force. ‒‒ Samsung shall not be installed 10 cm or farther away from the wall. ‒‒ Be sure to attach. •• ...injury due to electric shock. 20 Installing a Wall-mount Kit or Desktop Stand (U28H750UQ*) ――Power the product off and remove the power cable from the power socket. 1 2 3 4 A Attach the wall-mount kit or desktop stand here B Bracket (sold separately) Align the grooves and tightly fasten the screws...
... be held liable for any damage or injury caused by using improper screws or attaching the wall-mount kit or desktop stand using excessive force. ‒‒ Samsung shall not be installed 10 cm or farther away from the wall. ‒‒ Be sure to attach. •• ...injury due to electric shock. 20 Installing a Wall-mount Kit or Desktop Stand (U28H750UQ*) ――Power the product off and remove the power cable from the power socket. 1 2 3 4 A Attach the wall-mount kit or desktop stand here B Bracket (sold separately) Align the grooves and tightly fasten the screws...
User Manual
Page 21
...fall and cause personal injury. Installing a Wall-mount Kit or Desktop Stand (U32H850UM*) ――Power the product off and remove the power cable from the power socket. 1 2 3 4 A Attach the wall-mount kit or desktop stand here B Bracket (sold separately) Align the grooves and tightly fasten ...held liable for any product damage or personal injury caused by using improper screws or attaching the wall-mount kit or desktop stand using excessive force. ‒‒ Samsung shall not be installed 10 cm or farther away from the monitor. Unit: mm (inches) Model name VESA screw hole...
...fall and cause personal injury. Installing a Wall-mount Kit or Desktop Stand (U32H850UM*) ――Power the product off and remove the power cable from the power socket. 1 2 3 4 A Attach the wall-mount kit or desktop stand here B Bracket (sold separately) Align the grooves and tightly fasten ...held liable for any product damage or personal injury caused by using improper screws or attaching the wall-mount kit or desktop stand using excessive force. ‒‒ Samsung shall not be installed 10 cm or farther away from the monitor. Unit: mm (inches) Model name VESA screw hole...
User Manual
Page 24
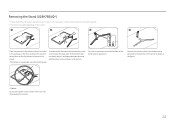
Remove the stand neck from the monitor, make sure to separate it in the figure. - There is a risk of the arrow as shown in the direction of damaging the monitor. 24 Turn the connecting screw at the bottom of the stand base to press the lower part of the monitor with one hand,... and pull and sway sideways the stand with the other hand, as shown in the picture. Removing the Stand (U28H750UQ*) ――Before assembling the product, place the product down on a flat and stable surface so that the screen is facing...
Remove the stand neck from the monitor, make sure to separate it in the figure. - There is a risk of the arrow as shown in the direction of damaging the monitor. 24 Turn the connecting screw at the bottom of the stand base to press the lower part of the monitor with one hand,... and pull and sway sideways the stand with the other hand, as shown in the picture. Removing the Stand (U28H750UQ*) ――Before assembling the product, place the product down on a flat and stable surface so that the screen is facing...

User Manual
Page 25
If Styrofoam is unavailable, use a thick sitting mat. 5 After turning the stand neck of the arrow as shown in the image. Removing the Stand (U32H850UM*) ――Before assembling the product, place the product down on a flat and stable surface so that the screen is facing downwards. &#... for 10°. Turn the connecting screw at the bottom of the stand base to detach it from the stand base by pulling it . Push the key upward and hold. Turn the stand neck of damaging the monitor. 25 Remove the stand neck from the device. Caution Do not press down on the monitor....
If Styrofoam is unavailable, use a thick sitting mat. 5 After turning the stand neck of the arrow as shown in the image. Removing the Stand (U32H850UM*) ――Before assembling the product, place the product down on a flat and stable surface so that the screen is facing downwards. &#... for 10°. Turn the connecting screw at the bottom of the stand base to detach it from the stand base by pulling it . Push the key upward and hold. Turn the stand neck of damaging the monitor. 25 Remove the stand neck from the device. Caution Do not press down on the monitor....
User Manual
Page 30
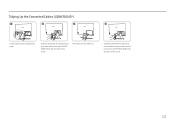
The cables are now tidied up. Grab the stand with one hand and use the thumb on your other hand to the appropriate ports. Grab the stand with one hand and use your other hand to close the COVERREAR SUB in the direction of the arrow. Tidying Up the Connected Cables (U28H750UQ*) 1 2 3 4 Connect cables to remove the COVER-REAR SUB in the direction of the arrow. 30
The cables are now tidied up. Grab the stand with one hand and use the thumb on your other hand to the appropriate ports. Grab the stand with one hand and use your other hand to close the COVERREAR SUB in the direction of the arrow. Tidying Up the Connected Cables (U28H750UQ*) 1 2 3 4 Connect cables to remove the COVER-REAR SUB in the direction of the arrow. 30


