

Open Source Guide (ENGLISH)
Page 1
... free programs whose permissions for other reason (not limited to patent issues), conditions are not required to accept this License, since you have the option of this License, you receive source code or can redistribute and change the software or use pieces of it , when started running the Program). This License applies to any other pertinent obligations, then as to work based...
... free programs whose permissions for other reason (not limited to patent issues), conditions are not required to accept this License, since you have the option of this License, you receive source code or can redistribute and change the software or use pieces of it , when started running the Program). This License applies to any other pertinent obligations, then as to work based...

Open Source Guide (ENGLISH)
Page 2
...USE OR INABILITY TO USE THE LIBRARY (INCLUDING BUT NOT LIMITED TO LOSS OF DATA OR DATA BEING RENDERED INACCURATE OR LOSSES SUSTAINED BY YOU OR THIRD PARTIES OR A FAILURE OF THE LIBRARY TO OPERATE WITH ANY OTHER SOFTWARE...use to be of the ordinary General Public License). 16. How to Apply These Terms to Your New Libraries If you develop a new library, and you want it to the public, we recommend making it free software... that everyone can do so by permitting redistribution under these terms, attach the following notices to most effectively convey the exclusion of warranty;...
...USE OR INABILITY TO USE THE LIBRARY (INCLUDING BUT NOT LIMITED TO LOSS OF DATA OR DATA BEING RENDERED INACCURATE OR LOSSES SUSTAINED BY YOU OR THIRD PARTIES OR A FAILURE OF THE LIBRARY TO OPERATE WITH ANY OTHER SOFTWARE...use to be of the ordinary General Public License). 16. How to Apply These Terms to Your New Libraries If you develop a new library, and you want it to the public, we recommend making it free software... that everyone can do so by permitting redistribution under these terms, attach the following notices to most effectively convey the exclusion of warranty;...
User Manual (user Manual) (ver.1.0) (English)
Page 3
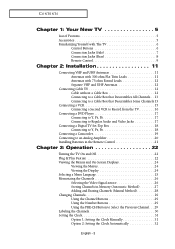
... 16 Connecting a DVD Player 17 Connecting to Y, PB, PR 17 Connecting to Regular Audio and Video Jacks 17 Connecting a Digital TV Set-Top Box 18 Connecting to Y, PB, PR 18 Connecting a Camcorder 19 Connecting to an Analog Amplifier 20 Installing Batteries in the Remote Control 21 Chapter 3: Operation 22 Turning the TV On and Off 22 Plug & Play Feature 22 Viewing the Menus and On-Screen Displays 24 Viewing the Menus 24 Viewing the Display 24 Selecting a Menu Language...
... 16 Connecting a DVD Player 17 Connecting to Y, PB, PR 17 Connecting to Regular Audio and Video Jacks 17 Connecting a Digital TV Set-Top Box 18 Connecting to Y, PB, PR 18 Connecting a Camcorder 19 Connecting to an Analog Amplifier 20 Installing Batteries in the Remote Control 21 Chapter 3: Operation 22 Turning the TV On and Off 22 Plug & Play Feature 22 Viewing the Menus and On-Screen Displays 24 Viewing the Menus 24 Viewing the Display 24 Selecting a Menu Language...
User Manual (user Manual) (ver.1.0) (English)
Page 4
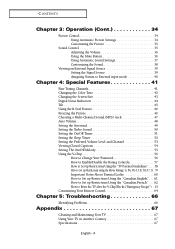
... Picture 35 Sound Control 35 Adjusting the Volume 36 Using the Mute Button 36 Using Automatic Sound Settings 37 Customizing the Sound 38 Viewing an External Signal Source 39 Setting the Signal Source 39 Assigning Names to External input mode 40 Chapter 4: Special Features 41 Fine Tuning Channels 41 Changing the Color Tone 42 Changing the Screen Size 43 Digital Noise Reduction 44 Tilt 45 Using the R.Surf Feature 46 Freezing the Picture 46 Choosing a Multi-Channel Sound (MTS) track 47 Auto Volume 48 Setting...
... Picture 35 Sound Control 35 Adjusting the Volume 36 Using the Mute Button 36 Using Automatic Sound Settings 37 Customizing the Sound 38 Viewing an External Signal Source 39 Setting the Signal Source 39 Assigning Names to External input mode 40 Chapter 4: Special Features 41 Fine Tuning Channels 41 Changing the Color Tone 42 Changing the Screen Size 43 Digital Noise Reduction 44 Tilt 45 Using the R.Surf Feature 46 Freezing the Picture 46 Choosing a Multi-Channel Sound (MTS) track 47 Auto Volume 48 Setting...
User Manual (user Manual) (ver.1.0) (English)
Page 5
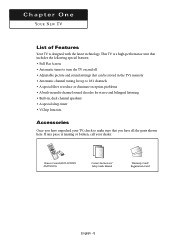
... the parts shown here. If any piece is missing or broken, call your TV, check to reduce or eliminate reception problems • A built-in multi-channel sound decoder for stereo and bilingual listening • Built-in, dual channel speakers • A special sleep timer • V-Chip function Accessories Once you have unpacked your dealer. Remote Control(AA59-00322B)/ AAA Batteries Owner's Instructions/ Safety Guide Manual Warranty...
... the parts shown here. If any piece is missing or broken, call your TV, check to reduce or eliminate reception problems • A built-in multi-channel sound decoder for stereo and bilingual listening • Built-in, dual channel speakers • A special sleep timer • V-Chip function Accessories Once you have unpacked your dealer. Remote Control(AA59-00322B)/ AAA Batteries Owner's Instructions/ Safety Guide Manual Warranty...
User Manual (user Manual) (ver.1.0) (English)
Page 6
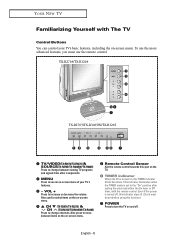
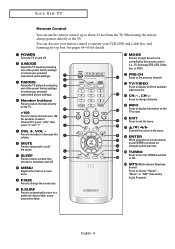
... timer, with The TV Control Buttons You can control your TV's features. ˇ - TX-R2764/TX-R3264 TX-R2765/TX-R3065W/TX-R3265 Œ TV/VIDEO(TX-R2676/TX-R3276) & SOURCE(TX-R2765/TX-R3065W/TX-R3265) Press to change channels. YOUR NEW TV Familiarizing Yourself with the remote control. To use the more advanced features, you must be set to change between items on the on-screen menu. ˆ Remote Control Sensor Aim the remote control towards this function.) ∏ POWER...
... timer, with The TV Control Buttons You can control your TV's features. ˇ - TX-R2764/TX-R3264 TX-R2765/TX-R3065W/TX-R3265 Œ TV/VIDEO(TX-R2676/TX-R3276) & SOURCE(TX-R2765/TX-R3065W/TX-R3265) Press to change channels. YOUR NEW TV Familiarizing Yourself with the remote control. To use the more advanced features, you must be set to change between items on the on-screen menu. ˆ Remote Control Sensor Aim the remote control towards this function.) ∏ POWER...
User Manual (user Manual) (ver.1.0) (English)
Page 9
... the sound. ∏ SLEEP Press to select channels over 100. " MENU Displays the main on-screen menu. ' P.SIZE Press to change the screen size. ˝ R.SURF Press to automatically return to a preferred channel after a userpreset time delay. Ô MODE Selects a target device to be controlled by selecting one of the preset factory settings (or select your personal, customized sound settings). ˇ P.MODE Adjust the TV picture by this remote control (i.e., TV, Samsung STB, VCR, Cable box, or DVD...
... the sound. ∏ SLEEP Press to select channels over 100. " MENU Displays the main on-screen menu. ' P.SIZE Press to change the screen size. ˝ R.SURF Press to automatically return to a preferred channel after a userpreset time delay. Ô MODE Selects a target device to be controlled by selecting one of the preset factory settings (or select your personal, customized sound settings). ˇ P.MODE Adjust the TV picture by this remote control (i.e., TV, Samsung STB, VCR, Cable box, or DVD...
User Manual (user Manual) (ver.1.0) (English)
Page 13
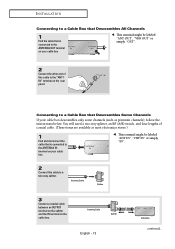
... ANTENNA IN terminal on your cable box descrambles only some channels (such as premium channels), follow the instructions below. Incoming Cable Splitter 3 Connect a coaxial cable between an OUTPUT terminal on the splitter and the IN terminal on the rear panel. Incoming Cable Splitter English - 13 Cable Box continued... You will need a two-way splitter, an RF (A/B) switch, and four lengths of this cable to a two-way splitter. Connecting to a Cable Box...
... ANTENNA IN terminal on your cable box descrambles only some channels (such as premium channels), follow the instructions below. Incoming Cable Splitter 3 Connect a coaxial cable between an OUTPUT terminal on the splitter and the IN terminal on the rear panel. Incoming Cable Splitter English - 13 Cable Box continued... You will need a two-way splitter, an RF (A/B) switch, and four lengths of this cable to a two-way splitter. Connecting to a Cable Box...
User Manual (user Manual) (ver.1.0) (English)
Page 14
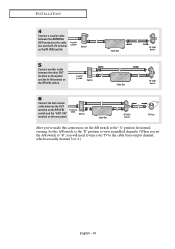
... the ANTENNA OUT terminal on the cable box and the B-IN terminal on the RF (A/B) switch. Set the A/B switch to the "B" position to view scrambled channels. (When you set the A/B switch to "B", you 've made this connection, set the A/B switch to the cable box's output channel, which is usually channel 3 or 4.) English - 14 Cable Box RF (A/B) Switch TV Rear After you will need to tune your TV to the "A" position for normal viewing. INSTALLATION 4 Connect a coaxial cable...
... the ANTENNA OUT terminal on the cable box and the B-IN terminal on the RF (A/B) switch. Set the A/B switch to the "B" position to view scrambled channels. (When you set the A/B switch to "B", you 've made this connection, set the A/B switch to the cable box's output channel, which is usually channel 3 or 4.) English - 14 Cable Box RF (A/B) Switch TV Rear After you will need to tune your TV to the "A" position for normal viewing. INSTALLATION 4 Connect a coaxial cable...
User Manual (user Manual) (ver.1.0) (English)
Page 15
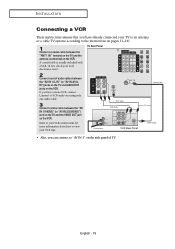
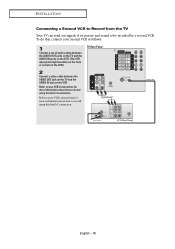
... Rear Panel 2 Connect a set of TV. INSTALLATION Connecting a VCR These instructions assume that you have already connected your TV to an antenna or a cable TV system (according to the instructions on pages 11~14). 1 Connect a coaxial cable between the "ANT 1 IN " terminal on the TV and the antenna out terminal on the VCR. Refer to your VCR's instructions for more information about how to view your...
... Rear Panel 2 Connect a set of TV. INSTALLATION Connecting a VCR These instructions assume that you have already connected your TV to an antenna or a cable TV system (according to the instructions on pages 11~14). 1 Connect a coaxial cable between the "ANT 1 IN " terminal on the TV and the antenna out terminal on the VCR. Refer to your VCR's instructions for more information about how to view your...
User Manual (user Manual) (ver.1.0) (English)
Page 16
... can send out signals of the VCR.) TV Rear Panel 2 Connect a video cable between the AUDIO OUT jacks on the TV and the AUDIO IN jacks on the VCR. (The VCR input jacks might be either on the front or on the VCR. English - 16 To do this, connect your second VCR as follows: 1 Connect a set of audio cables between the VIDEO OUT jack on...
... can send out signals of the VCR.) TV Rear Panel 2 Connect a video cable between the AUDIO OUT jacks on the TV and the AUDIO IN jacks on the VCR. (The VCR input jacks might be either on the front or on the VCR. English - 16 To do this, connect your second VCR as follows: 1 Connect a set of audio cables between the VIDEO OUT jack on...
User Manual (user Manual) (ver.1.0) (English)
Page 17
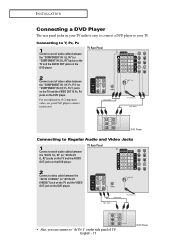
... and the AUDIO OUT jacks on the DVD player. Connecting to Y, PB, PR 1 Connect a set of audio cables between the "COMPONENT IN 1 (Y, PB, PR)" (or "COMPONENT IN 2 (Y, PB, PR)") jacks on the TV and the VIDEO OUT (Y, PB, PR) jacks on the DVD player. INSTALLATION Connecting a DVD Player The rear panel jacks on your TV make it easy to connect a DVD player to your DVD player's owner's instruction. TV Rear Panel 2 Connect a set of video cables between the "COMPONENT IN 1 (L, R)" (or "COMPONENT IN 2 (L, R)") jacks...
... and the AUDIO OUT jacks on the DVD player. Connecting to Y, PB, PR 1 Connect a set of audio cables between the "COMPONENT IN 1 (Y, PB, PR)" (or "COMPONENT IN 2 (Y, PB, PR)") jacks on the TV and the VIDEO OUT (Y, PB, PR) jacks on the DVD player. INSTALLATION Connecting a DVD Player The rear panel jacks on your TV make it easy to connect a DVD player to your DVD player's owner's instruction. TV Rear Panel 2 Connect a set of video cables between the "COMPONENT IN 1 (L, R)" (or "COMPONENT IN 2 (L, R)") jacks...
User Manual (user Manual) (ver.1.0) (English)
Page 18
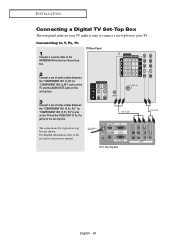
Connecting to Y, PB, PR 1 Connect a coaxial cable to the ANTENNA IN terminal on your TV make it easy to connect a set-top box to the set -top box are shown. English - 18 The connections for a typical set -top box instruction manual. For detailed information, refer to your TV. INSTALLATION Connecting a Digital TV Set-Top Box The rear panel jacks on the set-top box. TV Rear Panel 2 Connect a set of audio cables between the "COMPONENT IN 1 (L, R)" (or "COMPONENT IN 2 (L, R)") jacks on the...
Connecting to Y, PB, PR 1 Connect a coaxial cable to the ANTENNA IN terminal on your TV make it easy to connect a set-top box to the set -top box are shown. English - 18 The connections for a typical set -top box instruction manual. For detailed information, refer to your TV. INSTALLATION Connecting a Digital TV Set-Top Box The rear panel jacks on the set-top box. TV Rear Panel 2 Connect a set of audio cables between the "COMPONENT IN 1 (L, R)" (or "COMPONENT IN 2 (L, R)") jacks on the...
User Manual (user Manual) (ver.1.0) (English)
Page 22
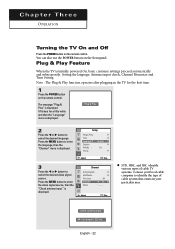
... settings proceed automatically and subsequently: Setting the language, Antenna input check, Channel Memorize and Time Setting. Check antenna input. The message "Plug & Play" is displayed. Plug & Play 2 Press the œ or √ button to enter the video signal source, then the "Check antenna input." Adjust Skip œ STD, HRC, and IRC identify various types of cable TV systems. Contact your local cable company to select the desired video signal source. You can also use the POWER button on the remote control. C h a pOtPEeRArTIOTN h r e e OPERATION Turning...
... settings proceed automatically and subsequently: Setting the language, Antenna input check, Channel Memorize and Time Setting. Check antenna input. The message "Plug & Play" is displayed. Plug & Play 2 Press the œ or √ button to enter the video signal source, then the "Check antenna input." Adjust Skip œ STD, HRC, and IRC identify various types of cable TV systems. Contact your local cable company to select the desired video signal source. You can also use the POWER button on the remote control. C h a pOtPEeRArTIOTN h r e e OPERATION Turning...

User Manual (user Manual) (ver.1.0) (English)
Page 23
... watching.. 7 If you have finished, press the MENU button. OPERATION 4 Make sure that the antenna is connected to "Setting the Clock" on page 27.) Auto program Air 3 Exit 5 Press the √ button to move to select "Plug & Play". Set the hour or minute by pressing the ▲ or ▼ button. (refer to the TV. am On Timer - - : - - Setup Plug & Play Time Language : Caption Melody : V-chip √ √ English √...
... watching.. 7 If you have finished, press the MENU button. OPERATION 4 Make sure that the antenna is connected to "Setting the Clock" on page 27.) Auto program Air 3 Exit 5 Press the √ button to move to select "Plug & Play". Set the hour or minute by pressing the ▲ or ▼ button. (refer to the TV. am On Timer - - : - - Setup Plug & Play Time Language : Caption Melody : V-chip √ √ English √...
User Manual (user Manual) (ver.1.0) (English)
Page 53
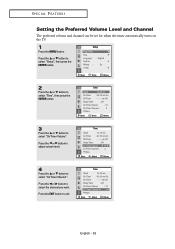
... "On Timer Volume". am Off Sleep Timer : Off On Timer Volume : 10 On Timer Channel œ 3 √ ▼ More Move Adjust Return English - 53 am Off Sleep Timer : Off On Timer Volume œ 10 √ On Timer Channel : 3 ▼ More Move Adjust Return 4 Press the ... SPECIAL FEATURES Setting the Preferred Volume Level and Channel The preferred volume and channel can be set for when the timer automatically turns on the TV. 1 Press the MENU button. Press...
... "On Timer Volume". am Off Sleep Timer : Off On Timer Volume : 10 On Timer Channel œ 3 √ ▼ More Move Adjust Return English - 53 am Off Sleep Timer : Off On Timer Volume œ 10 √ On Timer Channel : 3 ▼ More Move Adjust Return 4 Press the ... SPECIAL FEATURES Setting the Preferred Volume Level and Channel The preferred volume and channel can be set for when the timer automatically turns on the TV. 1 Press the MENU button. Press...
User Manual (user Manual) (ver.1.0) (English)
Page 56
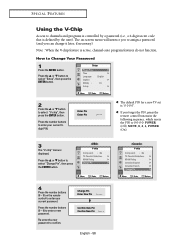
... Lock : No TV Parental Guidelines √ MPAA Rating √ Change Pin √ Move Enter Return 4 Press the number buttons (0 ~ 9) on -screen menu will instruct you to assign a password (and you forget the PIN, press the remote control buttons in the following sequence, which resets the PIN to channels and programs is controlled by a password (i.e., a 4-digit secret code that is defined by the user). Change Pin Enter New Pin : - - - - Press the number buttons (0 ~ 9) to Change...
... Lock : No TV Parental Guidelines √ MPAA Rating √ Change Pin √ Move Enter Return 4 Press the number buttons (0 ~ 9) on -screen menu will instruct you to assign a password (and you forget the PIN, press the remote control buttons in the following sequence, which resets the PIN to channels and programs is controlled by a password (i.e., a 4-digit secret code that is defined by the user). Change Pin Enter New Pin : - - - - Press the number buttons (0 ~ 9) to Change...
User Manual (user Manual) (ver.1.0) (English)
Page 58
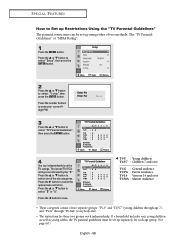
...MENU button. Press the ▲ or ▼ button to save. Press the œ button to select "B" or "U". Press the √ button to select "Setup", then press the ENTER button. The locked TV (FCC) ratings are indicated by the "B". Press the ▲ or ▼ button to select the appropriate restriction. Setup Plug & Play Time Language : Caption...Set up Restrictions Using the "TV Parental Guidelines" The parental restrictions can independently lock the TV ratings. Press the ▲ or ▼ button to select "V-chip", then press the ENTER button. Press the number buttons...
...MENU button. Press the ▲ or ▼ button to save. Press the œ button to select "B" or "U". Press the √ button to select "Setup", then press the ENTER button. The locked TV (FCC) ratings are indicated by the "B". Press the ▲ or ▼ button to select the appropriate restriction. Setup Plug & Play Time Language : Caption...Set up Restrictions Using the "TV Parental Guidelines" The parental restrictions can independently lock the TV ratings. Press the ▲ or ▼ button to select "V-chip", then press the ENTER button. Press the number buttons...
User Manual (user Manual) (ver.1.0) (English)
Page 64
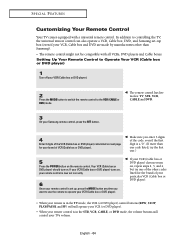
... DVD player) does not turn on. Your VCR (Cable box or DVD player) should turn on the remote control. English - 64 In addition to controlling the TV, the universal remote control can also operate a VCR, Cable box, DVD, and Samsung set up, press the MODE button any time you want to use the remote to the VCR (CABLE or DVD) mode. œ The remote control has five modes: TV, STB, VCR, CABLE and DVD. 3 On your Samsung remote control, press the SET button. 4 Enter 3 digits of the VCR (Cable box or DVD player) code listed...
... DVD player) does not turn on. Your VCR (Cable box or DVD player) should turn on the remote control. English - 64 In addition to controlling the TV, the universal remote control can also operate a VCR, Cable box, DVD, and Samsung set up, press the MODE button any time you want to use the remote to the VCR (CABLE or DVD) mode. œ The remote control has five modes: TV, STB, VCR, CABLE and DVD. 3 On your Samsung remote control, press the SET button. 4 Enter 3 digits of the VCR (Cable box or DVD player) code listed...
User Manual (user Manual) (ver.1.0) (English)
Page 66
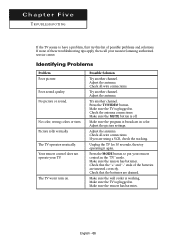
... list of these troubleshooting tips apply, then call your remote control in . Make sure the wall outlet is off. No color, wrong colors or tints. Possible Solution Try another channel. Make sure the MUTE button is working. Adjust the picture settings. Check that the "+" and "-" ends of the batteries are drained. If none of possible problems and solutions. Your remote control does not operate your TV. Adjust the antenna. Adjust...
... list of these troubleshooting tips apply, then call your remote control in . Make sure the wall outlet is off. No color, wrong colors or tints. Possible Solution Try another channel. Make sure the MUTE button is working. Adjust the picture settings. Check that the "+" and "-" ends of the batteries are drained. If none of possible problems and solutions. Your remote control does not operate your TV. Adjust the antenna. Adjust...


