

Open Source Guide (ENGLISH)
Page 1
... started running the Program is not restricted, and the output from the same place counts as a special exception, the source code distributed need to make restrictions that work which are outside its recipients to avoid the danger that choice. Any attempt otherwise to share and change free software--to control the distribution of derivative or collective works based on the Program (independent of...
... started running the Program is not restricted, and the output from the same place counts as a special exception, the source code distributed need to make restrictions that work which are outside its recipients to avoid the danger that choice. Any attempt otherwise to share and change free software--to control the distribution of derivative or collective works based on the Program (independent of...

Open Source Guide (ENGLISH)
Page 2
...the library. How to Apply These Terms to be of warranty; It is found. and each file should have at ...use to the public, we recommend making it to Your New Libraries If you develop a new library, and you want it free software that everyone can do so by permitting redistribution under the terms of the ordinary General Public License). You can redistribute and change...USE OR INABILITY TO USE THE LIBRARY (INCLUDING BUT NOT LIMITED TO LOSS OF DATA OR DATA BEING RENDERED INACCURATE OR LOSSES SUSTAINED BY YOU OR THIRD PARTIES OR A FAILURE OF THE LIBRARY TO OPERATE WITH ANY OTHER SOFTWARE...
...the library. How to Apply These Terms to be of warranty; It is found. and each file should have at ...use to the public, we recommend making it to Your New Libraries If you develop a new library, and you want it free software that everyone can do so by permitting redistribution under the terms of the ordinary General Public License). You can redistribute and change...USE OR INABILITY TO USE THE LIBRARY (INCLUDING BUT NOT LIMITED TO LOSS OF DATA OR DATA BEING RENDERED INACCURATE OR LOSSES SUSTAINED BY YOU OR THIRD PARTIES OR A FAILURE OF THE LIBRARY TO OPERATE WITH ANY OTHER SOFTWARE...
User Manual (user Manual) (ver.1.0) (English)
Page 3
... 17 Connecting a DVD Player 17 Connecting a Camcorder 18 Installing Batteries in the Remote Control 19 Chapter 3: Operation 20 Turning the TV On and Off 20 Plug & Play Feature 20 Viewing the Menus and On-Screen Displays 22 Viewing the Menus 22 Viewing the Display 22 Selecting a Menu Language 23 Memorizing the Channels 24 Selecting the Video Signal-source 24 Storing Channels in Memory (Automatic Method 25 Adding and Erasing Channels (Manual Method 26 Changing Channels 27 Using the Channel Buttons...
... 17 Connecting a DVD Player 17 Connecting a Camcorder 18 Installing Batteries in the Remote Control 19 Chapter 3: Operation 20 Turning the TV On and Off 20 Plug & Play Feature 20 Viewing the Menus and On-Screen Displays 22 Viewing the Menus 22 Viewing the Display 22 Selecting a Menu Language 23 Memorizing the Channels 24 Selecting the Video Signal-source 24 Storing Channels in Memory (Automatic Method 25 Adding and Erasing Channels (Manual Method 26 Changing Channels 27 Using the Channel Buttons...
User Manual (user Manual) (ver.1.0) (English)
Page 6
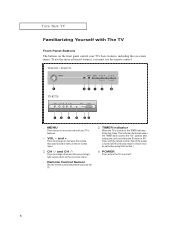
... Front Panel Buttons The buttons on -screen menu. YOUR NEW TV Familiarizing Yourself with the remote control. Even if the power is set before using this function.) fl POWER Press to select items on the on and off , this spot on , the TIMER indicator blinks five times. Also used to turn the TV on -screen menu. Also press to highlight various items on the on-screen menu. ‹ Remote Control Sensor Aim the remote control...
... Front Panel Buttons The buttons on -screen menu. YOUR NEW TV Familiarizing Yourself with the remote control. Even if the power is set before using this function.) fl POWER Press to select items on the on and off , this spot on , the TIMER indicator blinks five times. Also used to turn the TV on -screen menu. Also press to highlight various items on the on-screen menu. ‹ Remote Control Sensor Aim the remote control...

User Manual (user Manual) (ver.1.0) (English)
Page 9
...source is connected to a cable TV system. a DVD player when using the DVD jacks, these jacks to A/V signals being displayed on the model) devices. OUTPUT jacks These audio-video signals are output jacks. jacks Use these audio from a monitor in DVD mode. When not using the DVD video input Note: Only black and white signals are identical to connect the audio signals from Connect video from a DVD player. AUDIO-VIDEO MONITOR fl VHF/UHF Connect to an antenna or to the side audio input jacks (AV2). (INPUT 2) Audio signals from VCRs, DVD players and similar COMPONENT...
...source is connected to a cable TV system. a DVD player when using the DVD jacks, these jacks to A/V signals being displayed on the model) devices. OUTPUT jacks These audio-video signals are output jacks. jacks Use these audio from a monitor in DVD mode. When not using the DVD video input Note: Only black and white signals are identical to connect the audio signals from Connect video from a DVD player. AUDIO-VIDEO MONITOR fl VHF/UHF Connect to an antenna or to the side audio input jacks (AV2). (INPUT 2) Audio signals from VCRs, DVD players and similar COMPONENT...

User Manual (user Manual) (ver.1.0) (English)
Page 15
... Rear Panel TV Rear Panel Audio Cable 5 Connect a video cable between the AUDIO OUT jacks on the VCR and the AUDIO jacks on the TV. VCR Rear Panel Video Cable TV Rear Panel Follow the instructions in "Viewing an External Signal Source" to view your local electronics store). 4 Connect a set of the VCR. Skip step 1 if you have not yet connected to an antenna or a cable system. 1 Unplug the cable or antenna from the back of the TV. 2 Connect the cable or antenna...
... Rear Panel TV Rear Panel Audio Cable 5 Connect a video cable between the AUDIO OUT jacks on the VCR and the AUDIO jacks on the TV. VCR Rear Panel Video Cable TV Rear Panel Follow the instructions in "Viewing an External Signal Source" to view your local electronics store). 4 Connect a set of the VCR. Skip step 1 if you have not yet connected to an antenna or a cable system. 1 Unplug the cable or antenna from the back of the TV. 2 Connect the cable or antenna...

User Manual (user Manual) (ver.1.0) (English)
Page 17
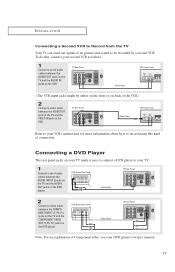
DVD Player Rear Panel Video Cable TV Rear Panel Note: For an explanation of Component video, see your TV. 1 Connect a set of audio cables between the AUDIO OUT jacks on the TV and the AUDIO IN jacks on the VCR. INSTALLATION Connecting a Second VCR to Record from the TV Your TV can send out signals of its picture and sound to record using this , connect your second VCR as follows: 1 Connect a set of audio cables between the AUDIO INPUT 2 jacks...
DVD Player Rear Panel Video Cable TV Rear Panel Note: For an explanation of Component video, see your TV. 1 Connect a set of audio cables between the AUDIO OUT jacks on the TV and the AUDIO IN jacks on the VCR. INSTALLATION Connecting a Second VCR to Record from the TV Your TV can send out signals of its picture and sound to record using this , connect your second VCR as follows: 1 Connect a set of audio cables between the AUDIO INPUT 2 jacks...
User Manual (user Manual) (ver.1.0) (English)
Page 20
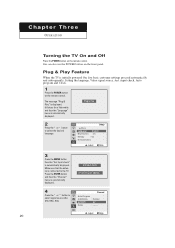
C h a pOtPEeRArTIOTN h r e e OPERATION Turning the TV On and Off Press the POWER button on the remote control. Press the ENTER button and then the "Channel" menu is displayed. The message "Plug & Play" is automatically displayed. Setup ▲ More Language : English Blue Screen : On ˆ Melody : On ˆ Demonstration ˆ Adjust Skip 3 Press the MENU button then the "Ant Input check" is automatically displayed. input check, Auto program and Clock. 1 Press the POWER button on the remote control. It flickers...
C h a pOtPEeRArTIOTN h r e e OPERATION Turning the TV On and Off Press the POWER button on the remote control. Press the ENTER button and then the "Channel" menu is displayed. The message "Plug & Play" is automatically displayed. Setup ▲ More Language : English Blue Screen : On ˆ Melody : On ˆ Demonstration ˆ Adjust Skip 3 Press the MENU button then the "Ant Input check" is automatically displayed. input check, Auto program and Clock. 1 Press the POWER button on the remote control. It flickers...

User Manual (user Manual) (ver.1.0) (English)
Page 22
... Then press the ENTER button to access the icon's sub-menu. 3 Press the EXIT button to highlight one of certain audio-video settings. 1 Press the INFO button. The on the screen. Viewing the Display The display identifies the current channel and the status of the 5 icons. The main menu appears on -screen display shows any or all of the following: Active channel, the channel label, signal, picture mode, sound mode, MTS and the...
... Then press the ENTER button to access the icon's sub-menu. 3 Press the EXIT button to highlight one of certain audio-video settings. 1 Press the INFO button. The on the screen. Viewing the Display The display identifies the current channel and the status of the 5 icons. The main menu appears on -screen display shows any or all of the following: Active channel, the channel label, signal, picture mode, sound mode, MTS and the...

User Manual (user Manual) (ver.1.0) (English)
Page 49
... FEATURES Using the V-Chip The V-Chip feature automatically locks out programming that is "0-0-0-0". 3 After entering a valid PIN number, the "V-Chip" screen will appear. Press the EXIT button to exit. ▼ Note: If you forget the PIN, press the remote-control keys in the following sequence, which resets the pin to display the menu. Enter your 4digit PIN number, Note: The default PIN number for...
... FEATURES Using the V-Chip The V-Chip feature automatically locks out programming that is "0-0-0-0". 3 After entering a valid PIN number, the "V-Chip" screen will appear. Press the EXIT button to exit. ▼ Note: If you forget the PIN, press the remote-control keys in the following sequence, which resets the pin to display the menu. Enter your 4digit PIN number, Note: The default PIN number for...
User Manual (user Manual) (ver.1.0) (English)
Page 3
... 17 Connecting a DVD Player 17 Connecting a Camcorder 18 Installing Batteries in the Remote Control 19 Chapter 3: Operation 20 Turning the TV On and Off 20 Plug & Play Feature 20 Viewing the Menus and On-Screen Displays 22 Viewing the Menus 22 Viewing the Display 22 Selecting a Menu Language 23 Memorizing the Channels 24 Selecting the Video Signal-source 24 Storing Channels in Memory (Automatic Method 25 Adding and Erasing Channels (Manual Method 26 Changing Channels 27 Using the Channel Buttons...
... 17 Connecting a DVD Player 17 Connecting a Camcorder 18 Installing Batteries in the Remote Control 19 Chapter 3: Operation 20 Turning the TV On and Off 20 Plug & Play Feature 20 Viewing the Menus and On-Screen Displays 22 Viewing the Menus 22 Viewing the Display 22 Selecting a Menu Language 23 Memorizing the Channels 24 Selecting the Video Signal-source 24 Storing Channels in Memory (Automatic Method 25 Adding and Erasing Channels (Manual Method 26 Changing Channels 27 Using the Channel Buttons...

User Manual (user Manual) (ver.1.0) (English)
Page 15
... instructions on pages 11-14). VCR Rear Panel TV Rear Panel Audio Cable 5 Connect a video cable between the ANTENNA OUT terminal on the VCR and the antenna terminal on the TV. Incoming Cable or Antenna VCR Rear Panel 3 Connect a coaxial cable between the VIDEO OUT jack on the VCR and the VIDEO jack on the TV. VCR Rear Panel Video Cable TV Rear Panel Follow the instructions in "Viewing an External Signal Source" to view your local electronics store). 4 Connect a set of audio cables between the AUDIO...
... instructions on pages 11-14). VCR Rear Panel TV Rear Panel Audio Cable 5 Connect a video cable between the ANTENNA OUT terminal on the VCR and the antenna terminal on the TV. Incoming Cable or Antenna VCR Rear Panel 3 Connect a coaxial cable between the VIDEO OUT jack on the VCR and the VIDEO jack on the TV. VCR Rear Panel Video Cable TV Rear Panel Follow the instructions in "Viewing an External Signal Source" to view your local electronics store). 4 Connect a set of audio cables between the AUDIO...
User Manual (user Manual) (ver.1.0) (English)
Page 17
... jacks on the DVD player. TV Rear Panel VCR Input Panel Audio Cable (The VCR input jacks might be recorded by a second VCR. DVD Player Rear Panel Audio Cable TV Rear Panel 2 Connect a video cable between the COMPONENT INPUT (Y, Pb, Pr) jacks on the TV and the COMPONENT VIDEO OUT (Y, Pb, Pr) jacks on the DVD player. INSTALLATION Connecting a Second VCR to Record from the TV Your TV can send out signals of its picture and sound to be either on...
... jacks on the DVD player. TV Rear Panel VCR Input Panel Audio Cable (The VCR input jacks might be recorded by a second VCR. DVD Player Rear Panel Audio Cable TV Rear Panel 2 Connect a video cable between the COMPONENT INPUT (Y, Pb, Pr) jacks on the TV and the COMPONENT VIDEO OUT (Y, Pb, Pr) jacks on the DVD player. INSTALLATION Connecting a Second VCR to Record from the TV Your TV can send out signals of its picture and sound to be either on...

User Manual (user Manual) (ver.1.0) (English)
Page 22
... On-Screen Displays Viewing the Menus 1 With the power on the screen. Its left side has five icons: Input, Picture, Sound, Channel Move and Setup. The on-screen display shows any or all of the TV to exit. ▼ ▼ The on the control panel of the following: Active channel, the channel label, signal, picture mode, sound mode, MTS and the current time. You can also use the MENU, CH and VOL buttons on -screen menus...
... On-Screen Displays Viewing the Menus 1 With the power on the screen. Its left side has five icons: Input, Picture, Sound, Channel Move and Setup. The on-screen display shows any or all of the TV to exit. ▼ ▼ The on the control panel of the following: Active channel, the channel label, signal, picture mode, sound mode, MTS and the current time. You can also use the MENU, CH and VOL buttons on -screen menus...
User Manual (user Manual) (ver.1.0) (English)
Page 7
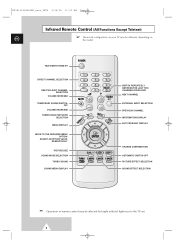
TELEVISION STAND-BY DIRECT CHANNEL SELECTION ONE/TWO-DIGIT CHANNEL SELECTION VOLUME INCREASE TEMPORARY SOUND SWITCHOFF VOLUME DECREASE TUNER/CABLE NETWORK SELECTION MENU DISPLAY MOVE TO THE REQUIRED MENU OPTION/ ADJUST AN OPTION VALUE RESPECTIVELY PICTURE SIZE SOUND MODE SELECTION TURBO SOUND SOUND MENU DISPLAY SWITCH REPEATEDLY BETWEEN THE LAST TWO CHANNELS DISPLAYED NEXT CHANNEL EXTERNAL INPUT SELECTION PREVIOUS CHANNEL INFORMATION DISPLAY EXIT FROM ANY DISPLAY CHANGE CONFIRMATION AUTOMATIC SWITCH-OFF PICTURE EFFECT SELECTION SOUND EFFECT SELECTION ➣ Operation of remote control may...
TELEVISION STAND-BY DIRECT CHANNEL SELECTION ONE/TWO-DIGIT CHANNEL SELECTION VOLUME INCREASE TEMPORARY SOUND SWITCHOFF VOLUME DECREASE TUNER/CABLE NETWORK SELECTION MENU DISPLAY MOVE TO THE REQUIRED MENU OPTION/ ADJUST AN OPTION VALUE RESPECTIVELY PICTURE SIZE SOUND MODE SELECTION TURBO SOUND SOUND MENU DISPLAY SWITCH REPEATEDLY BETWEEN THE LAST TWO CHANNELS DISPLAYED NEXT CHANNEL EXTERNAL INPUT SELECTION PREVIOUS CHANNEL INFORMATION DISPLAY EXIT FROM ANY DISPLAY CHANGE CONFIRMATION AUTOMATIC SWITCH-OFF PICTURE EFFECT SELECTION SOUND EFFECT SELECTION ➣ Operation of remote control may...

User Manual (user Manual) (ver.1.0) (English)
Page 34
... Child Lock. You can access by locking the channels of the channel to be locked by using the remote control only. Result: The options available in the Setup group are displayed. 3 Press the ENTER ( ) button. 4 Press the M or L button to select the On. Select the number of your children from watching unsuitable programmes. 1 Press the MENU ( ) button. ENG TV Setup Plug & Play √ Language : English Time √ Child Lock √ Blue screen...
... Child Lock. You can access by locking the channels of the channel to be locked by using the remote control only. Result: The options available in the Setup group are displayed. 3 Press the ENTER ( ) button. 4 Press the M or L button to select the On. Select the number of your children from watching unsuitable programmes. 1 Press the MENU ( ) button. ENG TV Setup Plug & Play √ Language : English Time √ Child Lock √ Blue screen...
User Manual (user Manual) (ver.1.0) (English)
Page 43
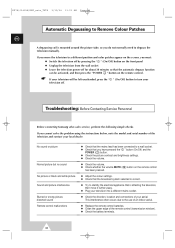
... picture Normal picture but no sound No picture or black and white picture Sound and picture interference Blurred or snowy picture, distorted sound Remote control malfunctions N Check that the automatic degauss function can be left unattended, press the " " (On/Off) button to a wall socket. N Replace the remote control batteries. N Check the direction, location and connections of the remote control (transmission window). N Check that you cannot solve the problem using the instructions below, note the model and serial number...
... picture Normal picture but no sound No picture or black and white picture Sound and picture interference Blurred or snowy picture, distorted sound Remote control malfunctions N Check that the automatic degauss function can be left unattended, press the " " (On/Off) button to a wall socket. N Replace the remote control batteries. N Check the direction, location and connections of the remote control (transmission window). N Check that you cannot solve the problem using the instructions below, note the model and serial number...

User Manual (user Manual) (ver.1.0) (English)
Page 3
... 16 Connecting a DVD Player 17 Connecting a Camcorder 18 Installing Batteries in the Remote Control 19 Chapter 3: Operation 20 Turning the TV On and Off 20 Plug & Play Feature 20 Viewing the Menus and On-Screen Displays 22 Viewing the Menus 22 Viewing the Display 22 Selecting a Menu Language 23 Memorizing the Channels 24 Selecting the Video Signal-source 24 Storing Channels in Memory (Automatic Method 25 Adding and Erasing Channels (Manual Method 26 Changing Channels 27 Using the Channel Buttons...
... 16 Connecting a DVD Player 17 Connecting a Camcorder 18 Installing Batteries in the Remote Control 19 Chapter 3: Operation 20 Turning the TV On and Off 20 Plug & Play Feature 20 Viewing the Menus and On-Screen Displays 22 Viewing the Menus 22 Viewing the Display 22 Selecting a Menu Language 23 Memorizing the Channels 24 Selecting the Video Signal-source 24 Storing Channels in Memory (Automatic Method 25 Adding and Erasing Channels (Manual Method 26 Changing Channels 27 Using the Channel Buttons...

User Manual (user Manual) (ver.1.0) (English)
Page 14
... you have not yet connected to an antenna or a cable system. 1 Unplug the cable or antenna from the back of audio cables between the AUDIO OUT jacks on the VCR and the AUDIO jacks on the TV. VCR Rear Panel Video Cable TV Rear Panel Follow the instructions in "Viewing an External Signal Source" to view your local electronics store). 4 Connect a set of the TV. 2 Connect the cable or antenna to the instructions on the back of...
... you have not yet connected to an antenna or a cable system. 1 Unplug the cable or antenna from the back of audio cables between the AUDIO OUT jacks on the VCR and the AUDIO jacks on the TV. VCR Rear Panel Video Cable TV Rear Panel Follow the instructions in "Viewing an External Signal Source" to view your local electronics store). 4 Connect a set of the TV. 2 Connect the cable or antenna to the instructions on the back of...

User Manual (user Manual) (ver.1.0) (English)
Page 17
English - 17 DVD Player Rear Panel Audio Cable TV Rear Panel 2 Connect a video cable between the AUDIO INPUT 2 jacks on the TV and the AUDIO OUT jacks on the DVD player. DVD Player Rear Panel Video Cable TV Rear Panel Note: For an explanation of Component video, see your TV. 1 Connect a set of audio cables between the COMPONENT INPUT (Y, Pb, Pr) jacks on the TV and the COMPONENT VIDEO OUT (Y, PB, PR) jacks on the DVD player. INSTALLATION Connecting a DVD Player The rear panel jacks on your TV make it easy to connect a DVD player to your DVD player's owner's manual.
English - 17 DVD Player Rear Panel Audio Cable TV Rear Panel 2 Connect a video cable between the AUDIO INPUT 2 jacks on the TV and the AUDIO OUT jacks on the DVD player. DVD Player Rear Panel Video Cable TV Rear Panel Note: For an explanation of Component video, see your TV. 1 Connect a set of audio cables between the COMPONENT INPUT (Y, Pb, Pr) jacks on the TV and the COMPONENT VIDEO OUT (Y, PB, PR) jacks on the DVD player. INSTALLATION Connecting a DVD Player The rear panel jacks on your TV make it easy to connect a DVD player to your DVD player's owner's manual.


