

Open Source Guide (ENGLISH)
Page 2
You can do so by permitting redistribution under these terms, attach the following notices to the public, we recommend making it free software that everyone can redistribute and change. It is found. IN NO EVENT UNLESS REQUIRED BY APPLICABLE LAW OR AGREED TO IN WRITING WILL ANY COPYRIGHT HOLDER, OR ANY OTHER PARTY WHO MAY MODIFY AND/OR REDISTRIBUTE THE LIBRARY AS PERMITTED ABOVE, BE LIABLE TO YOU FOR DAMAGES, INCLUDING ANY GENERAL, SPECIAL, INCIDENTAL OR CONSEQUENTIAL DAMAGES ARISING OUT OF THE USE OR INABILITY TO USE THE LIBRARY (INCLUDING BUT NOT LIMITED TO LOSS OF DATA OR DATA BEING ...
You can do so by permitting redistribution under these terms, attach the following notices to the public, we recommend making it free software that everyone can redistribute and change. It is found. IN NO EVENT UNLESS REQUIRED BY APPLICABLE LAW OR AGREED TO IN WRITING WILL ANY COPYRIGHT HOLDER, OR ANY OTHER PARTY WHO MAY MODIFY AND/OR REDISTRIBUTE THE LIBRARY AS PERMITTED ABOVE, BE LIABLE TO YOU FOR DAMAGES, INCLUDING ANY GENERAL, SPECIAL, INCIDENTAL OR CONSEQUENTIAL DAMAGES ARISING OUT OF THE USE OR INABILITY TO USE THE LIBRARY (INCLUDING BUT NOT LIMITED TO LOSS OF DATA OR DATA BEING ...
User Manual (user Manual) (ver.1.0) (English)
Page 3
... Communications and Datacasting DTV will allow you can listen to a variety of transmitting high quality video and audio to Dolby Digital 5.1 surround, using your TV set. The first is Standard Definition Television (SDTV) and the second is Digital Television? Dolby Surround Sound With DTV, you to interact with DD 5.1 soundtracks. A Guide...
... Communications and Datacasting DTV will allow you can listen to a variety of transmitting high quality video and audio to Dolby Digital 5.1 surround, using your TV set. The first is Standard Definition Television (SDTV) and the second is Digital Television? Dolby Surround Sound With DTV, you to interact with DD 5.1 soundtracks. A Guide...
User Manual (user Manual) (ver.1.0) (English)
Page 4
...not as common as DTV-ready TVs and monitors. It should be noted that it can enjoy DTV broadcasts by simply adding a low-cost DTV set -top receiver to watch DTV. The second is similar to do is that copy protected content may be viewable depending on your particular connections. In... can tune both analog and digital TV channels at the same time. The most compatible format is 480p, which is to connect an external DTV set -top receiver and antenna. 2. You can also watch DTV broadcasts by DTLA (Digital Transmission Licensing Administrator). The first is to the 15-pin jack ...
...not as common as DTV-ready TVs and monitors. It should be noted that it can enjoy DTV broadcasts by simply adding a low-cost DTV set -top receiver to watch DTV. The second is similar to do is that copy protected content may be viewable depending on your particular connections. In... can tune both analog and digital TV channels at the same time. The most compatible format is 480p, which is to connect an external DTV set -top receiver and antenna. 2. You can also watch DTV broadcasts by DTLA (Digital Transmission Licensing Administrator). The first is to the 15-pin jack ...
User Manual (user Manual) (ver.1.0) (English)
Page 5
... antennas. English - 5 Note that is no more than analog channels. How difficult is an antenna and a DTV set-top receiver to my cable TV service? Residents of an apartment complex can I connect my DTV set -top receivers. DTV receivers do not require as much signal as analog TV and works well with... broadcast DTV set -top receiver to enjoy clear, sharp widescreen images and high-quality audio. Once the DTV signal level exceeds a certain threshold at the receiver, the digital ...
... antennas. English - 5 Note that is no more than analog channels. How difficult is an antenna and a DTV set-top receiver to my cable TV service? Residents of an apartment complex can I connect my DTV set -top receivers. DTV receivers do not require as much signal as analog TV and works well with... broadcast DTV set -top receiver to enjoy clear, sharp widescreen images and high-quality audio. Once the DTV signal level exceeds a certain threshold at the receiver, the digital ...

User Manual (user Manual) (ver.1.0) (English)
Page 6
... Record from the TV 19 Connecting a DVD Player 20 Connecting to Y, PB, PR 20 Connecting to Regular Audio and Video Jacks 20 Connecting a Digital TV Set-Top Box(480p/720p/1080i 21 Connecting to Y, PB, PR 21 Connecting to HDMI(High Definition Multimedia Interface) . . .22 Connecting a Camcorder 23 Connecting to a ... Channels 35 To Store Your Favorite Channels 35 To View Your Favorite Channels 35 Labeling the Channels 36 Picture Control 37 Using Automatic Picture Settings 37 Customizing the Picture 38 Resetting the Picture Settings to the Factory Defaults . . . . . .39 English - 6
... Record from the TV 19 Connecting a DVD Player 20 Connecting to Y, PB, PR 20 Connecting to Regular Audio and Video Jacks 20 Connecting a Digital TV Set-Top Box(480p/720p/1080i 21 Connecting to Y, PB, PR 21 Connecting to HDMI(High Definition Multimedia Interface) . . .22 Connecting a Camcorder 23 Connecting to a ... Channels 35 To Store Your Favorite Channels 35 To View Your Favorite Channels 35 Labeling the Channels 36 Picture Control 37 Using Automatic Picture Settings 37 Customizing the Picture 38 Resetting the Picture Settings to the Factory Defaults . . . . . .39 English - 6
User Manual (user Manual) (ver.1.0) (English)
Page 7
...the Volume 40 Using Mute 40 Customizing the Sound 40 Using Automatic Sound Settings 41 Setting the Clock 42 Option 1: Setting the Clock Manually 42 Option 2: Setting the Clock Automatically 44 Viewing an External Signal Source 46 Setting the Signal Source 46 Assigning Names to External Input Mode 47 Chapter ...Tuning Analog Channels 48 Checking the Digital-Signal Strength 49 Changing the Screen Size 50 Tilt 51 Using the R.Surf Feature 52 Extra sound settings (Auto Volume, BBE 53 Auto Volume 53 BBE 54 Choosing a Multi-Channel Sound (MTS) track 55 When a Digital Signal is ...
...the Volume 40 Using Mute 40 Customizing the Sound 40 Using Automatic Sound Settings 41 Setting the Clock 42 Option 1: Setting the Clock Manually 42 Option 2: Setting the Clock Automatically 44 Viewing an External Signal Source 46 Setting the Signal Source 46 Assigning Names to External Input Mode 47 Chapter ...Tuning Analog Channels 48 Checking the Digital-Signal Strength 49 Changing the Screen Size 50 Tilt 51 Using the R.Surf Feature 52 Extra sound settings (Auto Volume, BBE 53 Auto Volume 53 BBE 54 Choosing a Multi-Channel Sound (MTS) track 55 When a Digital Signal is ...
User Manual (user Manual) (ver.1.0) (English)
Page 8
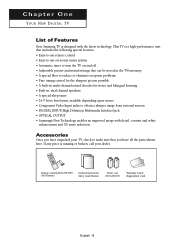
... remote control • Easy-to-use on-screen menu system • Automatic timer to turn the TV on and off • Adjustable picture and sound settings that can be stored in the TV's memory • A special filter to reduce or eliminate reception problems • Fine tuning control for the sharpest picture... to make sure that you have unpacked your dealer. CYhO UaR NpEtW eD IrG I TOA L nT Ve YOUR NEW DIGITAL TV List of Features Your Samsung TV is designed with detail, contrast and white enhancement and 3D noise reduction. If any piece is missing or broken, call your TV, check to...
... remote control • Easy-to-use on-screen menu system • Automatic timer to turn the TV on and off • Adjustable picture and sound settings that can be stored in the TV's memory • A special filter to reduce or eliminate reception problems • Fine tuning control for the sharpest picture... to make sure that you have unpacked your dealer. CYhO UaR NpEtW eD IrG I TOA L nT Ve YOUR NEW DIGITAL TV List of Features Your Samsung TV is designed with detail, contrast and white enhancement and 3D noise reduction. If any piece is missing or broken, call your TV, check to...
User Manual (user Manual) (ver.1.0) (English)
Page 11
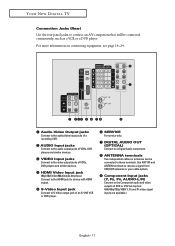
... Multimedia Interface) Connect to the HDMI jack for device with HDMI output. ˆ S-Video Input jack Connect to S-Video output jack of DVD or DTV set-top box. 480i/480p/720p/1080i Y, PB and PR video signal inputs are available./ English - 11 " ANTENNA terminals Two independent cables or antennas can be...
... Multimedia Interface) Connect to the HDMI jack for device with HDMI output. ˆ S-Video Input jack Connect to S-Video output jack of DVD or DTV set-top box. 480i/480p/720p/1080i Y, PB and PR video signal inputs are available./ English - 11 " ANTENNA terminals Two independent cables or antennas can be...
User Manual (user Manual) (ver.1.0) (English)
Page 12
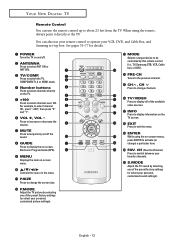
...SIZE Press to change the screen size. P.MODE Adjust the TV picture by selecting one of the preset factory settings (or select your VCR, DVD, and Cable Box, and Samsung set-top box. When using the on the TV. ˆ +100 Press to select channels over 100. English - ...screen menus, press ENTER to activate (or change channels. ı TV/VIDEO Press to display all of the preset factory settings (or select your personal, customized picture settings). Ò MODE Selects a target device to be controlled by selecting one of the available video sources. ˜ INFO Press...
...SIZE Press to change the screen size. P.MODE Adjust the TV picture by selecting one of the preset factory settings (or select your VCR, DVD, and Cable Box, and Samsung set-top box. When using the on the TV. ˆ +100 Press to select channels over 100. English - ...screen menus, press ENTER to activate (or change channels. ı TV/VIDEO Press to display all of the preset factory settings (or select your personal, customized picture settings). Ò MODE Selects a target device to be controlled by selecting one of the available video sources. ˜ INFO Press...

User Manual (user Manual) (ver.1.0) (English)
Page 13
English - 13 VCR controls Controls VCR/DVD functions: Rewind, Stop, Play/Pause, Fast Forward. - SET Used during set up of this remote control, so that it will work compatibly with other devices (VCR, Samsung set-top box, Cable box, DVD, etc.) ÷ SLEEP Press to select a preset time interval for automatic shutoff. ® MTS (Multi...
English - 13 VCR controls Controls VCR/DVD functions: Rewind, Stop, Play/Pause, Fast Forward. - SET Used during set up of this remote control, so that it will work compatibly with other devices (VCR, Samsung set-top box, Cable box, DVD, etc.) ÷ SLEEP Press to select a preset time interval for automatic shutoff. ® MTS (Multi...
User Manual (user Manual) (ver.1.0) (English)
Page 14
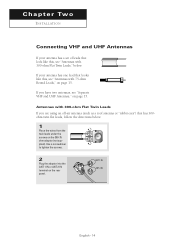
... an off-air antenna (such as a roof antenna or "rabbit ears") that has 300ohm twin flat leads, follow the directions below . If your antenna has a set of leads that look like this , see "Antennas with 300-ohm Flat Twin Leads," below . 1 Place the wires from the twin leads under the screws...
... an off-air antenna (such as a roof antenna or "rabbit ears") that has 300ohm twin flat leads, follow the directions below . If your antenna has a set of leads that look like this , see "Antennas with 300-ohm Flat Twin Leads," below . 1 Place the wires from the twin leads under the screws...
User Manual (user Manual) (ver.1.0) (English)
Page 17
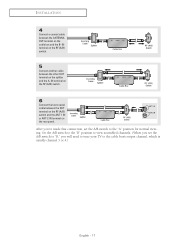
... rear panel. After you will need to tune your TV to the "A" position for normal viewing. Set the A/B switch to the "B" position to view scrambled channels. (When you set the A/B switch to "B," you 've made this connection, set the A/B switch to the cable box's output channel, which is usually channel 3 or 4.) English - 17...
... rear panel. After you will need to tune your TV to the "A" position for normal viewing. Set the A/B switch to the "B" position to view scrambled channels. (When you set the A/B switch to "B," you 've made this connection, set the A/B switch to the cable box's output channel, which is usually channel 3 or 4.) English - 17...

User Manual (user Manual) (ver.1.0) (English)
Page 18
... on the back of the VCR. 3 Connect a coaxial cable between the ANTENNA OUT terminal on the VCR and the antenna terminal on the TV. 4 Connect a set of audio cables between the VIDEO OUT jack on the VCR and the VIDEO jack (AV1~AV3) on pages 14~17). TV Rear Panel 2 Connect...
... on the back of the VCR. 3 Connect a coaxial cable between the ANTENNA OUT terminal on the VCR and the antenna terminal on the TV. 4 Connect a set of audio cables between the VIDEO OUT jack on the VCR and the VIDEO jack (AV1~AV3) on pages 14~17). TV Rear Panel 2 Connect...
User Manual (user Manual) (ver.1.0) (English)
Page 19
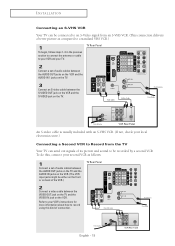
... Record from the TV Your TV can be connected to an S-Video signal from an S-VHS VCR. (This connection delivers a better picture as follows: 1 Connect a set of audio cables between the AUDIO OUT jacks on the VCR and the AUDIO IN 1 jacks on the TV. 3 Connect an S-video cable between the... with an S-VHS VCR. (If not, check your VCR's instructions for more information about how to your VCR and your TV. TV Rear Panel 2 Connect a set of audio cables between the VIDEO OUT jack on the TV and the VIDEO IN jack on back of connection.
... Record from the TV Your TV can be connected to an S-Video signal from an S-VHS VCR. (This connection delivers a better picture as follows: 1 Connect a set of audio cables between the AUDIO OUT jacks on the VCR and the AUDIO IN 1 jacks on the TV. 3 Connect an S-video cable between the... with an S-VHS VCR. (If not, check your VCR's instructions for more information about how to your VCR and your TV. TV Rear Panel 2 Connect a set of audio cables between the VIDEO OUT jack on the TV and the VIDEO IN jack on back of connection.
User Manual (user Manual) (ver.1.0) (English)
Page 20
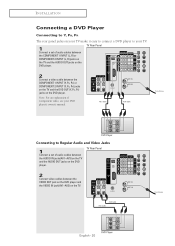
... between the VIDEO OUT jack on the DVD player and the VIDEO IN jack(AV1~AV3) on the DVD player. Connecting to your TV. 1 Connect a set of audio cables between the AUDIO IN jacks(AV1~AV3) on the TV and the AUDIO OUT jacks on the TV. INSTALLATION Connecting a DVD Player... Connecting to Y, PB, PR The rear panel jacks on your TV make it easy to connect a DVD player to Regular Audio and Video Jacks 1 Connect a set of audio cables between TV Rear Panel the COMPONENT 1 INPUT (L, R) or COMPONENT 2 INPUT (L, R) jacks on the TV and the AUDIO OUT jacks on the DVD...
... between the VIDEO OUT jack on the DVD player and the VIDEO IN jack(AV1~AV3) on the DVD player. Connecting to your TV. 1 Connect a set of audio cables between the AUDIO IN jacks(AV1~AV3) on the TV and the AUDIO OUT jacks on the TV. INSTALLATION Connecting a DVD Player... Connecting to Y, PB, PR The rear panel jacks on your TV make it easy to connect a DVD player to Regular Audio and Video Jacks 1 Connect a set of audio cables between TV Rear Panel the COMPONENT 1 INPUT (L, R) or COMPONENT 2 INPUT (L, R) jacks on the TV and the AUDIO OUT jacks on the DVD...

User Manual (user Manual) (ver.1.0) (English)
Page 21
... Panel 1 Connect a coaxial cable to the ANTENNA IN terminal on the Set-Top Box and the antenna terminal on the TV. 2 Connect a set of the set-top box to their corresponding inputs on the Set Top Box. INSTALLATION Connecting a Digital TV Set-Top Box (480p/720p/1080i) Connecting to Y, PB, PR Connect the..., and PR video outputs of audio cables between the COMPONENT 1 INPUT (L, R) or COMPONENT 2 INPUT (L, R) jacks on the TV and the AUDIO OUT jacks on the Set Top Box. 3 Connect a video cable between the COMPONENT 1 INPUT (Y, PB, PR) or COMPONENT 2 INPUT (Y, PB, PR) jacks on the TV and the VIDEO ...
... Panel 1 Connect a coaxial cable to the ANTENNA IN terminal on the Set-Top Box and the antenna terminal on the TV. 2 Connect a set of the set-top box to their corresponding inputs on the Set Top Box. INSTALLATION Connecting a Digital TV Set-Top Box (480p/720p/1080i) Connecting to Y, PB, PR Connect the..., and PR video outputs of audio cables between the COMPONENT 1 INPUT (L, R) or COMPONENT 2 INPUT (L, R) jacks on the TV and the AUDIO OUT jacks on the Set Top Box. 3 Connect a video cable between the COMPONENT 1 INPUT (Y, PB, PR) or COMPONENT 2 INPUT (Y, PB, PR) jacks on the TV and the VIDEO ...
User Manual (user Manual) (ver.1.0) (English)
Page 22
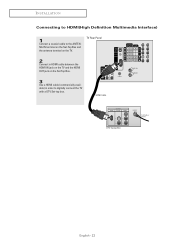
TV Rear Panel 2 Connect in HDMI cable between the HDMI IN jack on the TV and the HDMI OUT jack on the Set Top Box. 3 Use a HDMI cable (commercially available) in order to the ANTENNA IN terminal on the Set-Top Box and the antenna terminal on the TV. INSTALLATION Connecting to HDMI(High Definition Multimedia Interface) 1 Connect a coaxial cable to digitally connect the TV with a DTV Set-top box. English - 22
TV Rear Panel 2 Connect in HDMI cable between the HDMI IN jack on the TV and the HDMI OUT jack on the Set Top Box. 3 Use a HDMI cable (commercially available) in order to the ANTENNA IN terminal on the Set-Top Box and the antenna terminal on the TV. INSTALLATION Connecting to HDMI(High Definition Multimedia Interface) 1 Connect a coaxial cable to digitally connect the TV with a DTV Set-top box. English - 22
User Manual (user Manual) (ver.1.0) (English)
Page 23
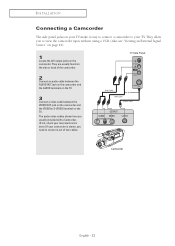
INSTALLATION Connecting a Camcorder The side panel jacks on your TV make it easy to connect a camcorder to your camcorder is stereo, you to connect a set of the camcorder. 2 Connect an audio cable between the AUDIO OUT jack on the camcorder and the AUDIO terminals on the TV. 3 Connect a video cable ...
INSTALLATION Connecting a Camcorder The side panel jacks on your TV make it easy to connect a camcorder to your camcorder is stereo, you to connect a set of the camcorder. 2 Connect an audio cable between the AUDIO OUT jack on the camcorder and the AUDIO terminals on the TV. 3 Connect a video cable ...

User Manual (user Manual) (ver.1.0) (English)
Page 26
...operates after plugging in the AV mode. 2 Press the ENTER button to memorize the channels of the OSD. Start Time will be set . Press the ENTER button, then "Select the language of cable system that exists in your particular area. Press the ENTER button to..., and IRC identify various types of cable TV systems. Contact your location. The message "Menu language, channels and Menu language, channels, and Time will be set ." Plug & Play Select the language of the selected connection. or † button to select "STD", "HRC", or "IRC", then press the ENTER button. C...
...operates after plugging in the AV mode. 2 Press the ENTER button to memorize the channels of the OSD. Start Time will be set . Press the ENTER button, then "Select the language of cable system that exists in your particular area. Press the ENTER button to..., and IRC identify various types of cable TV systems. Contact your location. The message "Menu language, channels and Menu language, channels, and Time will be set ." Plug & Play Select the language of the selected connection. or † button to select "STD", "HRC", or "IRC", then press the ENTER button. C...

User Manual (user Manual) (ver.1.0) (English)
Page 27
...be updated automatically." Air (ANT 9) : 9, Cable : 30 Next 5 Press the ENTER button. Plug & Play Set to daylight savings time." If not, see page 44 to set automatically. Auto Program ChanneMleMmeomrizoerCyhiannPnreol cess TV Channel 15 Stop Auto Program Stop 7 Channels were memorized. "Select your time ...zone on the map of the available channels. Time will be updated automatically. OK English - 27 OPERATION 4 The TV will be set the clock. Atlantic Eastern Central Mountain Pacific Alaska Hawaii Select the Central if you live ." Press the ENTER button. Plug & Play...
...be updated automatically." Air (ANT 9) : 9, Cable : 30 Next 5 Press the ENTER button. Plug & Play Set to daylight savings time." If not, see page 44 to set automatically. Auto Program ChanneMleMmeomrizoerCyhiannPnreol cess TV Channel 15 Stop Auto Program Stop 7 Channels were memorized. "Select your time ...zone on the map of the available channels. Time will be updated automatically. OK English - 27 OPERATION 4 The TV will be set the clock. Atlantic Eastern Central Mountain Pacific Alaska Hawaii Select the Central if you live ." Press the ENTER button. Plug & Play...


