Quick Guide (ENGLISH)
Page 4
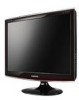
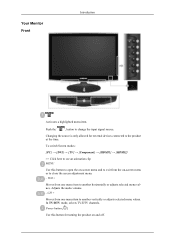
...Use this button to open the on-screen menu and to exit from the on and off. VOL+ Moves from one menu item to change the input signal source. CH + Moves from one menu item to close the screen adjustment menu. - Adjusts the audio volume. - Changing ...the source is only allowed for turning the product on -screen menu or to another horizontally or adjusts selected menu values. Push the ' ', button to another vertically or adjusts selected menu values. Your Monitor Front...
...Use this button to open the on-screen menu and to exit from the on and off. VOL+ Moves from one menu item to change the input signal source. CH + Moves from one menu item to close the screen adjustment menu. - Adjusts the audio volume. - Changing ...the source is only allowed for turning the product on -screen menu or to another horizontally or adjusts selected menu values. Push the ' ', button to another vertically or adjusts selected menu values. Your Monitor Front...
Quick Guide (ENGLISH)
Page 9
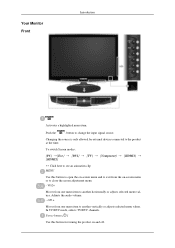
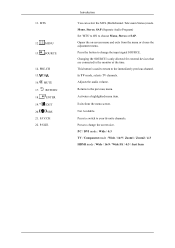
Press to change the channel. (One/Two-Digit channel selection) Use to select a channel numbered ten or over. Introduction POWER Number Buttons TV/DTV CH LIST MUTE MENU Up-Down Left-Right buttons ENTER RETURN SOURCE PRE-CH GUIDE D.MENU P EXIT INFO TTX/MIX COLOR BUTTON P.MODE, M/B (MagicBright) S.MODE AUTO P.SIZE DUAL SUBTITLE SOURCE PIP Turns the product On/Off. Number buttons 3. Press this button, and the "--" symbol is displayed. POWER 2. Remote Control 1.
Press to change the channel. (One/Two-Digit channel selection) Use to select a channel numbered ten or over. Introduction POWER Number Buttons TV/DTV CH LIST MUTE MENU Up-Down Left-Right buttons ENTER RETURN SOURCE PRE-CH GUIDE D.MENU P EXIT INFO TTX/MIX COLOR BUTTON P.MODE, M/B (MagicBright) S.MODE AUTO P.SIZE DUAL SUBTITLE SOURCE PIP Turns the product On/Off. Number buttons 3. Press this button, and the "--" symbol is displayed. POWER 2. Remote Control 1.
Quick Guide (ENGLISH)
Page 10
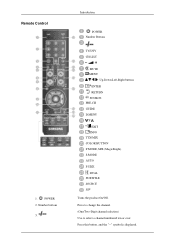
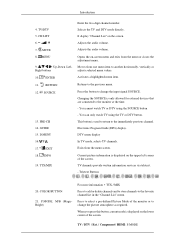
... picture information is used to return to the monitor at the time. - P.MODE, M/B (MagicBright) For more information > TTX / MIX Press to add or delete channels and to store channels to the previous menu. Introduction 4. GUIDE 15. Activates a highlighted menu item. MUTE 8. Up-Down Left- ENTER 11... EXIT 18. INFO 19. Opens the on the upper left corner of the monitor or to another horizontally, vertically or adjusts selected menu values. Returns to the favorite channel list in the "Channel List" menu. You cannot watch TV using the SOURCE button - Electronic Program Guide (EPG...
... picture information is used to return to the monitor at the time. - P.MODE, M/B (MagicBright) For more information > TTX / MIX Press to add or delete channels and to store channels to the previous menu. Introduction 4. GUIDE 15. Activates a highlighted menu item. MUTE 8. Up-Down Left- ENTER 11... EXIT 18. INFO 19. Opens the on the upper left corner of the monitor or to another horizontally, vertically or adjusts selected menu values. Returns to the favorite channel list in the "Channel List" menu. You cannot watch TV using the SOURCE button - Electronic Program Guide (EPG...
Quick Guide (ENGLISH)
Page 17
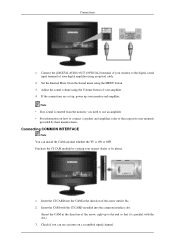
... up your nearest dealer or by their manufacturers. Connecting COMMON INTERFACE Note You can install the CAM anytime whether the TV is emitted from the monitor, you can see a picture on how to connect a speaker and amplifier, refer to use an amplifier. • For information on a ... amplifier. Adjust the sound volume using the Volume button of your monitor to the end so that it fits. 2. Connections 1. Connect the [DIGITAL AUDIO OUT (OPTICAL)] terminal of your digital amplifier using the MENU button. 3. Check if you need to the respective user manuals provided by phone. 1. Note ...
... up your nearest dealer or by their manufacturers. Connecting COMMON INTERFACE Note You can install the CAM anytime whether the TV is emitted from the monitor, you can see a picture on how to connect a speaker and amplifier, refer to use an amplifier. • For information on a ... amplifier. Adjust the sound volume using the Volume button of your monitor to the end so that it fits. 2. Connections 1. Connect the [DIGITAL AUDIO OUT (OPTICAL)] terminal of your digital amplifier using the MENU button. 3. Check if you need to the respective user manuals provided by phone. 1. Note ...
Quick Guide (ENGLISH)
Page 22
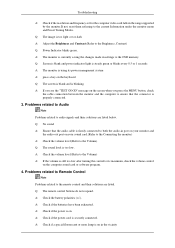
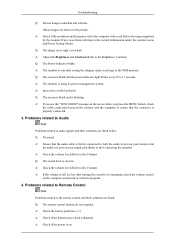
... to Remote Control Note Problems related to the remote control and their solutions are listed. A: If you press the MENU button, check the cable connection between the monitor and the computer to ensure that the audio cable is using its maximum, check the volume control on the keyboard ...Q: The screen is blank and is currently saving the changes made in the range supported by the monitor.If not, reset them referring to the current Information under the monitor menu and Preset Timing Modes. Problems related to Audio Note Problems related to audio signals and their solutions are...
... to Remote Control Note Problems related to the remote control and their solutions are listed. A: If you press the MENU button, check the cable connection between the monitor and the computer to ensure that the audio cable is using its maximum, check the volume control on the keyboard ...Q: The screen is blank and is currently saving the changes made in the range supported by the monitor.If not, reset them referring to the current Information under the monitor menu and Preset Timing Modes. Problems related to Audio Note Problems related to audio signals and their solutions are...
Quick Guide (ENGLISH)
Page 4
...HDMI1] → [HDMI2] >> Click here to see an animation clip MENU Use this button for external devices connected to another horizontally or adjusts selected menu values. Changing the source is only allowed for turning the product on -screen menu or to change the input signal source. Power button [ ] Use ...this button to open the on-screen menu and to exit from the on and off. In TV/DTV mode, selects TV/DTV channels. Adjusts the audio volume. - Your Monitor Front Introduction Activates a...
...HDMI1] → [HDMI2] >> Click here to see an animation clip MENU Use this button for external devices connected to another horizontally or adjusts selected menu values. Changing the source is only allowed for turning the product on -screen menu or to change the input signal source. Power button [ ] Use ...this button to open the on-screen menu and to exit from the on and off. In TV/DTV mode, selects TV/DTV channels. Adjusts the audio volume. - Your Monitor Front Introduction Activates a...

Quick Guide (ENGLISH)
Page 9
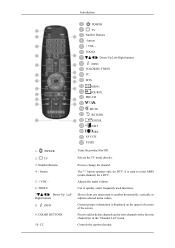
button + VOL TOOLS Down-Up Left-Right buttons INFO COLOR BUTTONS CC MTS MENU SOURCE PRE-CH CH MUTE RETURN ENTER EXIT SRS FAV.CH P.SIZE 1. TV 3. Down-Up Left- COLOR BUTTONS 10. The "-" button operates only for a DTV. ... TV mode directly. Controls the caption decoder. POWER 2. TOOLS 7. INFO 9. Press to quickly select frequently used to the favorite channel list in the "Channel List" menu. Use to change the channel. Moves from one menu item to another horizontally, vertically or adjusts selected menu values. Current picture information is used functions.
button + VOL TOOLS Down-Up Left-Right buttons INFO COLOR BUTTONS CC MTS MENU SOURCE PRE-CH CH MUTE RETURN ENTER EXIT SRS FAV.CH P.SIZE 1. TV 3. Down-Up Left- COLOR BUTTONS 10. The "-" button operates only for a DTV. ... TV mode directly. Controls the caption decoder. POWER 2. TOOLS 7. INFO 9. Press to quickly select frequently used to the favorite channel list in the "Channel List" menu. Use to change the channel. Moves from one menu item to another horizontally, vertically or adjusts selected menu values. Current picture information is used functions.
Quick Guide (ENGLISH)
Page 10
.... Changing the SOURCE is used to return to the immediately previous channel. In TV mode, selects TV channels. Activates a highlighted menu item. Press to switch to the monitor at the time. MENU 13. ENTER 19. FAV.CH 22. Press the button to change the input signal SOURCE. Not Available. Press to change the...
.... Changing the SOURCE is used to return to the immediately previous channel. In TV mode, selects TV channels. Activates a highlighted menu item. Press to switch to the monitor at the time. MENU 13. ENTER 19. FAV.CH 22. Press the button to change the input signal SOURCE. Not Available. Press to change the...

Quick Guide (ENGLISH)
Page 16
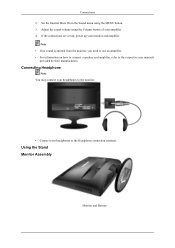
If the connections are set up, power up your amplifier 4. Using the Stand Monitor Assembly Monitor and Bottom Note • If no sound is emitted from the monitor, you need to use an amplifier. • For information on how to connect a speaker and amplifier, refer to the Headphone ...connection terminal. Connecting Headphone Note You may connect your headphones to the monitor. • Connect your headphones to the respective user manuals provided by their manufacturers. Connections 2. Adjust the sound volume using the...
If the connections are set up, power up your amplifier 4. Using the Stand Monitor Assembly Monitor and Bottom Note • If no sound is emitted from the monitor, you need to use an amplifier. • For information on how to connect a speaker and amplifier, refer to the Headphone ...connection terminal. Connecting Headphone Note You may connect your headphones to the monitor. • Connect your headphones to the respective user manuals provided by their manufacturers. Connections 2. Adjust the sound volume using the...
Quick Guide (ENGLISH)
Page 21
A: If you see the "TEST GOOD" message on the screen when you press the MENU button, check the cable connection between the monitor and the computer to its power management system. A: Check the volume level.(Refer to the Volume) A: If the volume is still too low ...its maximum, check the volume control on the computer sound card or software program. 4. A: press a key on your sound card.(Refer to the Connecting the monitor) A: Check the volume level.(Refer to the OSD memory. A: Check the battery polarities (+/-). A: Check if the power is unstable and vibrates. Troubleshooting Q: Picture...
A: If you see the "TEST GOOD" message on the screen when you press the MENU button, check the cable connection between the monitor and the computer to its power management system. A: Check the volume level.(Refer to the Volume) A: If the volume is still too low ...its maximum, check the volume control on the computer sound card or software program. 4. A: press a key on your sound card.(Refer to the Connecting the monitor) A: Check the volume level.(Refer to the OSD memory. A: Check the battery polarities (+/-). A: Check if the power is unstable and vibrates. Troubleshooting Q: Picture...

User Manual (ENGLISH)
Page 12
...[Component] → [HDMI1] → [HDMI2] >> Click here to another horizontally or adjusts selected menu values. VOL+ Moves from one menu item to see an animation clip MENU Use this button for external devices connected to change the input signal source. CH + Moves from the on...on-screen menu and to exit from one menu item to close the screen adjustment menu. - Changing the source is only allowed for turning the product on -screen menu or to another vertically or adjusts selected menu values. Your Monitor Front Introduction Activates a highlighted menu item. ...
...[Component] → [HDMI1] → [HDMI2] >> Click here to another horizontally or adjusts selected menu values. VOL+ Moves from one menu item to see an animation clip MENU Use this button for external devices connected to change the input signal source. CH + Moves from the on...on-screen menu and to exit from one menu item to close the screen adjustment menu. - Changing the source is only allowed for turning the product on -screen menu or to another vertically or adjusts selected menu values. Your Monitor Front Introduction Activates a highlighted menu item. ...
User Manual (ENGLISH)
Page 17
... 6. Right buttons 8. COLOR BUTTONS 10. The "-" button operates only for a DTV. Use to another horizontally, vertically or adjusts selected menu values. Moves from one menu item to quickly select frequently used to select MMS (multi-channel) for DTV. Controls the caption decoder. Down-Up Left- Selects the ...Off. Number Buttons 4. - Press to the favorite channel list in the "Channel List" menu. POWER 2. INFO 9. button + VOL TOOLS Down-Up Left-Right buttons INFO COLOR BUTTONS CC MTS MENU SOURCE PRE-CH CH MUTE RETURN ENTER EXIT SRS FAV.CH P.SIZE 1. TOOLS 7. ...
... 6. Right buttons 8. COLOR BUTTONS 10. The "-" button operates only for a DTV. Use to another horizontally, vertically or adjusts selected menu values. Moves from one menu item to quickly select frequently used to select MMS (multi-channel) for DTV. Controls the caption decoder. Down-Up Left- Selects the ...Off. Number Buttons 4. - Press to the favorite channel list in the "Channel List" menu. POWER 2. INFO 9. button + VOL TOOLS Down-Up Left-Right buttons INFO COLOR BUTTONS CC MTS MENU SOURCE PRE-CH CH MUTE RETURN ENTER EXIT SRS FAV.CH P.SIZE 1. TOOLS 7. ...

User Manual (ENGLISH)
Page 18
... 17. ENTER 19. Mono, Stereo, SAP (Separate Audio Program) Set 'MTS' to ON to your favorite channels. In TV mode, selects TV channels. Activates a highlighted menu item. RETURN 18. EXIT 20. Adjusts the audio volume. PC / DVI mode : Wide / 4:3 TV / Component mode : Wide / 16:9 / Zoom1 / Zoom2 / 4:3 .... This button is only allowed for external devices that are connected to the previous menu. Opens the on-screen menu and exits from the menu screen. Press to switch to choose Mono, Stereo or SAP. 11. MENU 13. FAV.CH 22. Returns to the monitor at the time.
... 17. ENTER 19. Mono, Stereo, SAP (Separate Audio Program) Set 'MTS' to ON to your favorite channels. In TV mode, selects TV channels. Activates a highlighted menu item. RETURN 18. EXIT 20. Adjusts the audio volume. PC / DVI mode : Wide / 4:3 TV / Component mode : Wide / 16:9 / Zoom1 / Zoom2 / 4:3 .... This button is only allowed for external devices that are connected to the previous menu. Opens the on-screen menu and exits from the menu screen. Press to switch to choose Mono, Stereo or SAP. 11. MENU 13. FAV.CH 22. Returns to the monitor at the time.
User Manual (ENGLISH)
Page 24
... Bottom Connections 2. Adjust the sound volume using the MENU button. 3. Note • If no sound is emitted from the monitor, you need to use an amplifier. • For information on how to connect a speaker and amplifier, refer to the monitor. • Connect your amplifier 4. Connecting Headphone Note You... your headphones to the respective user manuals provided by their manufacturers. If the connections are set up, power up your monitor and amplifier. Set the Internal Mute On in the Sound menu using the Volume button of your headphones to the Headphone connection terminal.
... Bottom Connections 2. Adjust the sound volume using the MENU button. 3. Note • If no sound is emitted from the monitor, you need to use an amplifier. • For information on how to connect a speaker and amplifier, refer to the monitor. • Connect your amplifier 4. Connecting Headphone Note You... your headphones to the respective user manuals provided by their manufacturers. If the connections are set up, power up your monitor and amplifier. Set the Internal Mute On in the Sound menu using the Volume button of your headphones to the Headphone connection terminal.
User Manual (ENGLISH)
Page 34
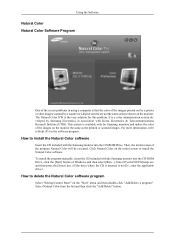
...) in the software program. Then, the initial screen of the images printed out by a printer or other images scanned by Samsung Electronics in association with the Samsung monitor into the CD-ROM Drive. Select Natural Color from the list and then click the "Add/Delete" button. Using the Software... enter the applicable drive.) How to install the Natural Color software Insert the CD included with the Samsung monitor into the CD-ROM Drive, click the [Start] button of the images on the "Start" menu and then double-click "Add/Delete a program". Enter D:\color\NCProSetup.exe and then press the ...
...) in the software program. Then, the initial screen of the images printed out by a printer or other images scanned by Samsung Electronics in association with the Samsung monitor into the CD-ROM Drive. Select Natural Color from the list and then click the "Add/Delete" button. Using the Software... enter the applicable drive.) How to install the Natural Color software Insert the CD included with the Samsung monitor into the CD-ROM Drive, click the [Start] button of the images on the "Start" menu and then double-click "Add/Delete a program". Enter D:\color\NCProSetup.exe and then press the ...

User Manual (ENGLISH)
Page 36
... Adjustment The values of Fine, Coarse and Position are carefully chosen by using the OSD menu. If this is the case, adjust the Brightness and Contrast by our engineers, the pre-configured values may not be comfortable to your ...to create an optimum contrast. • Custom Although the values are adjusted automatically. MENU MENU,EXIT Contrast / Brightness / Sharpness (Not available in MagicBright mode of Dynamic Contrast.) You can use the on your taste. Adjusting the Monitor Dynamic Contrast automatically detects the distribution of the visual signal and adjusts to personal ...
... Adjustment The values of Fine, Coarse and Position are carefully chosen by using the OSD menu. If this is the case, adjust the Brightness and Contrast by our engineers, the pre-configured values may not be comfortable to your ...to create an optimum contrast. • Custom Although the values are adjusted automatically. MENU MENU,EXIT Contrast / Brightness / Sharpness (Not available in MagicBright mode of Dynamic Contrast.) You can use the on your taste. Adjusting the Monitor Dynamic Contrast automatically detects the distribution of the visual signal and adjusts to personal ...

User Manual (ENGLISH)
Page 37
... adjusting the frequency (clock speed). If the noise persists even after Fine tuning, repeat it to the center using the horizontal control menu. • Fine Removes noise such as vertical stripes. MENU MENU,EXIT Adjusting the Monitor By changing the resolution in the control panel, auto function is performed. (Available in PC Mode Only...
... adjusting the frequency (clock speed). If the noise persists even after Fine tuning, repeat it to the center using the horizontal control menu. • Fine Removes noise such as vertical stripes. MENU MENU,EXIT Adjusting the Monitor By changing the resolution in the control panel, auto function is performed. (Available in PC Mode Only...
User Manual (ENGLISH)
Page 38
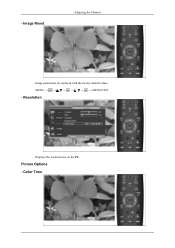
Color Tone - MENU MENU,EXIT - Image Reset Adjusting the Monitor Image parameters are replaced with the factory default values. Picture Options - Resolution Displays the resolution set on the PC.
Color Tone - MENU MENU,EXIT - Image Reset Adjusting the Monitor Image parameters are replaced with the factory default values. Picture Options - Resolution Displays the resolution set on the PC.

User Manual (ENGLISH)
Page 39
Size Adjusts the individual R, G, B color controls. Adjusting the Monitor The tone of the color can switch the Size. MENU MENU,EXIT You can be changed. (Available in PC / DVI mode only) Cool / Normal / Warm / Custom MENU - Wide / 4:3 MENU → , → → , → MENU,EXIT R-Gain / G-Gain / B-Gain → MENU,EXIT -
Size Adjusts the individual R, G, B color controls. Adjusting the Monitor The tone of the color can switch the Size. MENU MENU,EXIT You can be changed. (Available in PC / DVI mode only) Cool / Normal / Warm / Custom MENU - Wide / 4:3 MENU → , → → , → MENU,EXIT R-Gain / G-Gain / B-Gain → MENU,EXIT -

User Manual (ENGLISH)
Page 40
You can activate either Dynamic, Standard, or Movie. • Dynamic Selects the picture for high-definition in a bright room. • Standard Selects the picture for optimum display in a normal environment. • Movie Selects the picture for viewing movies in a dark room. Reset Adjusting the Monitor Picture parameters are replaced with the factory default values. • OK • Cancel MENU MENU,EXIT Picture : TV / Component / HDMI Mode The Monitor has three automatic picture settings ("Dynamic", "Standard", and "Movie") that are preset at the factory.
You can activate either Dynamic, Standard, or Movie. • Dynamic Selects the picture for high-definition in a bright room. • Standard Selects the picture for optimum display in a normal environment. • Movie Selects the picture for viewing movies in a dark room. Reset Adjusting the Monitor Picture parameters are replaced with the factory default values. • OK • Cancel MENU MENU,EXIT Picture : TV / Component / HDMI Mode The Monitor has three automatic picture settings ("Dynamic", "Standard", and "Movie") that are preset at the factory.


