Quick Guide (ENGLISH)
Page 7
... to a desk or a heavy stationary object. AUDIO - AUDIO - Connect the Kensington Lock cable. 3. COMPONENT IN ANT IN R - L Connect the port of your monitor to the HDMI terminal of the DVD, VCR (DVD / DTV Set-Top Box) to the [ R - HDMI IN 1 Introduction The Kensington Lock is a device used...the manual provided with the Kensington Lock for proper use. L] port of the Kensington Lock may differ from the illustration depending on its model. Note The location of the product. Using the Anti-Theft Kensington Lock 1. The locking device has to be purchased separately. The locking...
... to a desk or a heavy stationary object. AUDIO - AUDIO - Connect the Kensington Lock cable. 3. COMPONENT IN ANT IN R - L Connect the port of your monitor to the HDMI terminal of the DVD, VCR (DVD / DTV Set-Top Box) to the [ R - HDMI IN 1 Introduction The Kensington Lock is a device used...the manual provided with the Kensington Lock for proper use. L] port of the Kensington Lock may differ from the illustration depending on its model. Note The location of the product. Using the Anti-Theft Kensington Lock 1. The locking device has to be purchased separately. The locking...
Quick Guide (ENGLISH)
Page 7
...is a device used to the manual provided with the Kensington Lock for proper use. The appearance and locking method may be different depending on its model. HDMI IN 1 Connect the [HDMI IN 1] terminal at the back of your digital output device using it in a public place. Refer to... physically fix the system when using a HDMI cable. Note The location of your monitor to the [ PR, PB,Y ] input ports using a component video cable ( PR, PB,Y ). Connect the Kensington Lock cable. 3. AUDIO - L Connect the port of ...
...is a device used to the manual provided with the Kensington Lock for proper use. The appearance and locking method may be different depending on its model. HDMI IN 1 Connect the [HDMI IN 1] terminal at the back of your digital output device using it in a public place. Refer to... physically fix the system when using a HDMI cable. Note The location of your monitor to the [ PR, PB,Y ] input ports using a component video cable ( PR, PB,Y ). Connect the Kensington Lock cable. 3. AUDIO - L Connect the port of ...

User Manual (ENGLISH)
Page 15
...PR, PB,Y ] input ports using a HDMI cable. Insert the locking device into the Kensington slot on its model. HDMI IN 1 Connect the [HDMI IN 1] terminal at the back of your monitor to the HDMI terminal of the DVD / DTV Set-Top Box to be purchased separately. AUDIO - The locking.... 3. Refer to a desk or a heavy stationary object. Using the Anti-Theft Kensington Lock 1. The appearance and locking method may be different depending on the Monitor ( ) and turn it in the locking direction ( ). 2. L Connect the port of the product. HDMI IN 1 Introduction The Kensington Lock is a device...
...PR, PB,Y ] input ports using a HDMI cable. Insert the locking device into the Kensington slot on its model. HDMI IN 1 Connect the [HDMI IN 1] terminal at the back of your monitor to the HDMI terminal of the DVD / DTV Set-Top Box to be purchased separately. AUDIO - The locking.... 3. Refer to a desk or a heavy stationary object. Using the Anti-Theft Kensington Lock 1. The appearance and locking method may be different depending on the Monitor ( ) and turn it in the locking direction ( ). 2. L Connect the port of the product. HDMI IN 1 Introduction The Kensington Lock is a device...

User Manual (ENGLISH)
Page 26
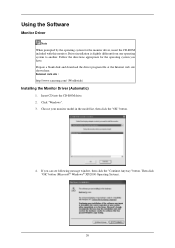
Internet web site : http://www.samsung.com/ (Worldwide) Installing the Monitor Driver (Automatic) 1. If you have. Insert CD into the CD-ROM drive. 2. Choose your monitor model in the model list, then click the "OK" button. 4. Then click "OK" button (Microsoft® Windows® XP/2000 Operating System). Click "Windows". 3. Follow the directions appropriate for ...
Internet web site : http://www.samsung.com/ (Worldwide) Installing the Monitor Driver (Automatic) 1. If you have. Insert CD into the CD-ROM drive. 2. Choose your monitor model in the model list, then click the "OK" button. 4. Then click "OK" button (Microsoft® Windows® XP/2000 Operating System). Click "Windows". 3. Follow the directions appropriate for ...
User Manual (ENGLISH)
Page 29
Select the model that matches your monitor from the list of monitor models on the following screens displayed in sequence. Microsoft® Windows® XP Operating System Click "Close" → "Close" → "OK" → "OK" on the screen, and click "Next". 10. Using the Software 9.
Select the model that matches your monitor from the list of monitor models on the following screens displayed in sequence. Microsoft® Windows® XP Operating System Click "Close" → "Close" → "OK" → "OK" on the screen, and click "Next". 10. Using the Software 9.

User Manual (ENGLISH)
Page 31
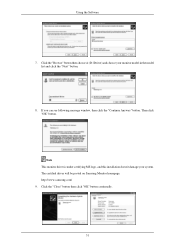
Using the Software 7. The certified driver will be posted on Samsung Monitor homepage. If you can see following message window, then click the "Continue Anyway" button. Note This monitor driver is under certifying MS logo, and this installation doesn't damage your monitor model in the model list and click the "Next" button. 8. http://www.samsung.com/ 9. Then click "OK" button. Click the "Close" button then click "OK" button continually. Click the "Browse" button then choose A:(D:\Driver) and choose your system.
Using the Software 7. The certified driver will be posted on Samsung Monitor homepage. If you can see following message window, then click the "Continue Anyway" button. Note This monitor driver is under certifying MS logo, and this installation doesn't damage your monitor model in the model list and click the "Next" button. 8. http://www.samsung.com/ 9. Then click "OK" button. Click the "Close" button then click "OK" button continually. Click the "Browse" button then choose A:(D:\Driver) and choose your system.
User Manual (ENGLISH)
Page 32
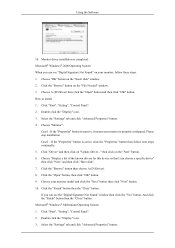
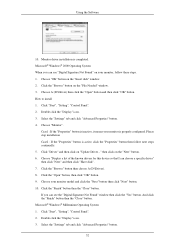
... "Digital Signature Not Found" window then click the "Yes" button. How to install 1. Microsoft® Windows® Millennium Operating System 1. Monitor driver installation is properly configured. Click "Driver" and then click on the "Insert disk" window. 2. Double click the "Display" icon....and click "Advanced Properties" button. Microsoft® Windows® 2000 Operating System When you can see "Digital Signature Not Found" on your monitor model and click the "Next" button then click "Next" button. 10. Click the "Browse" button on the "Next" button. 6. ...
... "Digital Signature Not Found" window then click the "Yes" button. How to install 1. Microsoft® Windows® Millennium Operating System 1. Monitor driver installation is properly configured. Click "Driver" and then click on the "Insert disk" window. 2. Double click the "Display" icon....and click "Advanced Properties" button. Microsoft® Windows® 2000 Operating System When you can see "Digital Signature Not Found" on your monitor model and click the "Next" button then click "Next" button. 10. Click the "Browse" button on the "Next" button. 6. ...

User Manual (ENGLISH)
Page 33
...at All Display Modes, select the level of your computer and click "OK". 11. Set a Keyboard for your monitor. (You can enter the frequency directly.) 8. Enter the model name of resolution and vertical frequency by referring to make the X86Config file, which is for your mouse. 3. ...Click the "Have Disk" button. 9. Continue choosing "Close" button and "OK" button until you wish to your monitor. Click "Apply" button if you need to the Preset Timing Modes in the "Monitor Type" area. 6. First of all , set a horizontal frequency for selecting a keyboard. 5. Select "Show all...
...at All Display Modes, select the level of your computer and click "OK". 11. Set a Keyboard for your monitor. (You can enter the frequency directly.) 8. Enter the model name of resolution and vertical frequency by referring to make the X86Config file, which is for your mouse. 3. ...Click the "Have Disk" button. 9. Continue choosing "Close" button and "OK" button until you wish to your monitor. Click "Apply" button if you need to the Preset Timing Modes in the "Monitor Type" area. 6. First of all , set a horizontal frequency for selecting a keyboard. 5. Select "Show all...
User Manual (ENGLISH)
Page 73
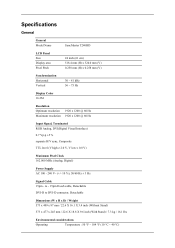
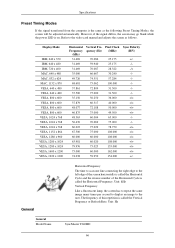
... mm / 22.6 X 18.8 X 9.6 inch (With Stand) / 7.3 kg / 16.1 Ibs Environmental considerations Operating Temperature : 50 °F ~ 104 °F (10 °C ~ 40 °C) Specifications General General Model Name SyncMaster T240HD LCD Panel Size Display area Pixel Pitch 24 inch (61 cm) 518.4 mm (H) x 324.0 mm (V) 0.258 mm (H) x 0.258 mm (V) Synchronization Horizontal Vertical 30 ~ 81 kHz...
... mm / 22.6 X 18.8 X 9.6 inch (With Stand) / 7.3 kg / 16.1 Ibs Environmental considerations Operating Temperature : 50 °F ~ 104 °F (10 °C ~ 40 °C) Specifications General General Model Name SyncMaster T240HD LCD Panel Size Display area Pixel Pitch 24 inch (61 cm) 518.4 mm (H) x 324.0 mm (V) 0.258 mm (H) x 0.258 mm (V) Synchronization Horizontal Vertical 30 ~ 81 kHz...
User Manual (ENGLISH)
Page 75
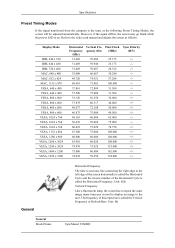
... is called the Vertical Frequency or Refresh Rate. Specifications Preset Timing Modes If the signal transferred from the computer is on. Unit: Hz SyncMaster T260HD Display Mode IBM, 640 x 350 IBM, 640 x 480 IBM, 720 x 400 MAC, 640 x 480 MAC, 832 x 624 MAC...069 75.029 75.000 60.000 60.020 75.025 60.000 59.950 Pixel Clock (MHz) 25.175 25.175 28.322 30.240 57.284 100.000 31.500 31.500 36.000 40.000 50....000 49.500 65.000 75.000 78.750 108.000 108.000 108.000 135.000 162.000 154.000 Sync Polarity (H/V) General General Model...
... is called the Vertical Frequency or Refresh Rate. Specifications Preset Timing Modes If the signal transferred from the computer is on. Unit: Hz SyncMaster T260HD Display Mode IBM, 640 x 350 IBM, 640 x 480 IBM, 720 x 400 MAC, 640 x 480 MAC, 832 x 624 MAC...069 75.029 75.000 60.000 60.020 75.025 60.000 59.950 Pixel Clock (MHz) 25.175 25.175 28.322 30.240 57.284 100.000 31.500 31.500 36.000 40.000 50....000 49.500 65.000 75.000 78.750 108.000 108.000 108.000 135.000 162.000 154.000 Sync Polarity (H/V) General General Model...

User Manual (ENGLISH)
Page 15
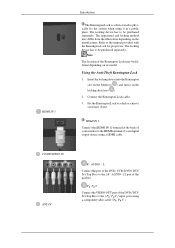
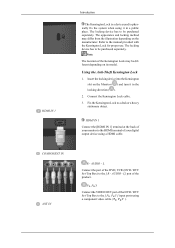
...to be purchased separately. AUDIO - Using the Anti-Theft Kensington Lock 1. Insert the locking device into the Kensington slot on the Monitor ( ) and turn it in the locking direction ( ). 2. The appearance and locking method may be purchased separately. Connect the...AUDIO - The locking device has to the manual provided with the Kensington Lock for proper use. Note The location of your monitor to the [ PR, PB,Y ] input ports using a HDMI cable. HDMI IN 1 Connect the [HDMI IN 1] terminal...terminal of the Kensington Lock may differ from the illustration depending on its model.
...to be purchased separately. AUDIO - Using the Anti-Theft Kensington Lock 1. Insert the locking device into the Kensington slot on the Monitor ( ) and turn it in the locking direction ( ). 2. The appearance and locking method may be purchased separately. Connect the...AUDIO - The locking device has to the manual provided with the Kensington Lock for proper use. Note The location of your monitor to the [ PR, PB,Y ] input ports using a HDMI cable. HDMI IN 1 Connect the [HDMI IN 1] terminal...terminal of the Kensington Lock may differ from the illustration depending on its model.
User Manual (ENGLISH)
Page 27
Prepare a blank disk and download the driver program file at the Internet web site shown here. Internet web site : http://www.samsung.com/ (Worldwide) Installing the Monitor Driver (Automatic) 1. Choose your monitor model in the model list, then click the "OK" button. 4. Insert CD into the CD-ROM drive. 2. Then click "OK" button (Microsoft® Windows...
Prepare a blank disk and download the driver program file at the Internet web site shown here. Internet web site : http://www.samsung.com/ (Worldwide) Installing the Monitor Driver (Automatic) 1. Choose your monitor model in the model list, then click the "OK" button. 4. Insert CD into the CD-ROM drive. 2. Then click "OK" button (Microsoft® Windows...

User Manual (ENGLISH)
Page 30
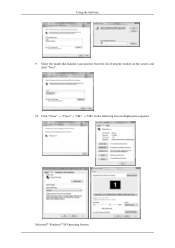
Microsoft® Windows® XP Operating System 29 Select the model that matches your monitor from the list of monitor models on the following screens displayed in sequence. Click "Close" "Close" "OK" "OK" on the screen, and click "Next". 10. Using the Software 9.
Microsoft® Windows® XP Operating System 29 Select the model that matches your monitor from the list of monitor models on the following screens displayed in sequence. Click "Close" "Close" "OK" "OK" on the screen, and click "Next". 10. Using the Software 9.
User Manual (ENGLISH)
Page 32
Click the "Browse" button then choose A:(D:\Driver) and choose your system. http://www.samsung.com/ 9. Note This monitor driver is under certifying MS logo, and this installation doesn't damage your monitor model in the model list and click the "Next" button. 8. If you can see following message window, then click the "Continue Anyway" button. Click the "Close" button then click "OK" button continually. 31 The certified driver will be posted on Samsung Monitor homepage. Using the Software 7. Then click "OK" button.
Click the "Browse" button then choose A:(D:\Driver) and choose your system. http://www.samsung.com/ 9. Note This monitor driver is under certifying MS logo, and this installation doesn't damage your monitor model in the model list and click the "Next" button. 8. If you can see following message window, then click the "Continue Anyway" button. Click the "Close" button then click "OK" button continually. 31 The certified driver will be posted on Samsung Monitor homepage. Using the Software 7. Then click "OK" button.
User Manual (ENGLISH)
Page 33
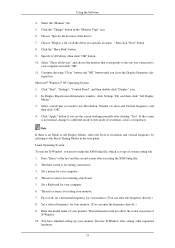
...the known drivers for this device so that I can see "Digital Signature Not Found" on your monitor model and click the "Next" button then click "Next" button. 10. Choose your monitor, follow next steps continually. 5. Double click the "Display" icon. 3. Using the Software 10. ...and then click "Have disk". 7. Click the "Open" button, then click "OK" button. 9. Click "Start", "Setting", "Control Panel". 2. Choose "Monitor". Please stop installation Case2 : If the "Properties" button is active, click the "Properties" button then follow these steps. 1. Click the "Browse" button then...
...the known drivers for this device so that I can see "Digital Signature Not Found" on your monitor model and click the "Next" button then click "Next" button. 10. Choose your monitor, follow next steps continually. 5. Double click the "Display" icon. 3. Using the Software 10. ...and then click "Have disk". 7. Click the "Open" button, then click "OK" button. 9. Click "Start", "Setting", "Control Panel". 2. Choose "Monitor". Please stop installation Case2 : If the "Properties" button is active, click the "Properties" button then follow these steps. 1. Click the "Browse" button then...
User Manual (ENGLISH)
Page 34
...Number of system setting file. 1. Set a Keyboard for your monitor. (You can enter the frequency directly.) 8. Specify A:\(D:\driver) then click "OK" button. 10. Enter the model name of all, set a horizontal frequency for your monitor. 7. Choose "Specify the location of X-Window. 10. ...Microsoft® Windows® NT Operating System 1. Set a vertical frequency for your monitor. (You can enter the frequency directly.) 9....
...Number of system setting file. 1. Set a Keyboard for your monitor. (You can enter the frequency directly.) 8. Specify A:\(D:\driver) then click "OK" button. 10. Enter the model name of all, set a horizontal frequency for your monitor. 7. Choose "Specify the location of X-Window. 10. ...Microsoft® Windows® NT Operating System 1. Set a vertical frequency for your monitor. (You can enter the frequency directly.) 9....

User Manual (ENGLISH)
Page 65
... (With Stand) / 8.6 kg / 19.0 Ibs Environmental considerations Operating Temperature : 50 °F ~ 104 °F (10 °C ~ 40 °C) 64 Specifications General General Model Name SyncMaster T260HD LCD Panel Size Display area Pixel Pitch 25.5 inch (64 cm) 550.08 mm (H) x 343.8mm (V) 0.282 mm (H) x 0.282 mm (V) Synchronization Horizontal Vertical 30 ~ 81 kHz 56 ~ 75 Hz Display...
... (With Stand) / 8.6 kg / 19.0 Ibs Environmental considerations Operating Temperature : 50 °F ~ 104 °F (10 °C ~ 40 °C) 64 Specifications General General Model Name SyncMaster T260HD LCD Panel Size Display area Pixel Pitch 25.5 inch (64 cm) 550.08 mm (H) x 343.8mm (V) 0.282 mm (H) x 0.282 mm (V) Synchronization Horizontal Vertical 30 ~ 81 kHz 56 ~ 75 Hz Display...
User Manual (ENGLISH)
Page 67
Specifications Preset Timing Modes If the signal transferred from the computer is on. Unit: Hz General Model Name SyncMaster T240HD 66 Pixel Clock Frequency quency (Hz) (MHz) (kHz) 31.469 70.086 25.175 31.469 59.940 25.175 31.469 70.087 28.322 35.000 66.667 30.240 49.726 74...
Specifications Preset Timing Modes If the signal transferred from the computer is on. Unit: Hz General Model Name SyncMaster T240HD 66 Pixel Clock Frequency quency (Hz) (MHz) (kHz) 31.469 70.086 25.175 31.469 59.940 25.175 31.469 70.087 28.322 35.000 66.667 30.240 49.726 74...


