
Quick Guide (easy Manual) (ver.1.0) (English)
Page 2
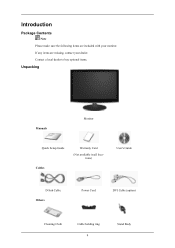
If any items are included with your dealer. Introduction Package Contents Note Please make sure the following items are missing, contact your monitor. Contact a local dealer to buy optional items. Unpacking Manuals Monitor Quick Setup Guide Cables Warranty Card (Not available in all locations) User's Guide D-Sub Cable Others Power Cord DVI Cable (option) Cleaning Cloth Cable holding ring 9 Stand Body
If any items are included with your dealer. Introduction Package Contents Note Please make sure the following items are missing, contact your monitor. Contact a local dealer to buy optional items. Unpacking Manuals Monitor Quick Setup Guide Cables Warranty Card (Not available in all locations) User's Guide D-Sub Cable Others Power Cord DVI Cable (option) Cleaning Cloth Cable holding ring 9 Stand Body
Quick Guide (easy Manual) (ver.1.0) (English)
Page 4
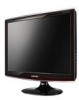
... select the digital mode, you to the right of the screen displaying the current mode -- Touch a button lightly with your monitor to the graphic card's DVI port using the DVI cable. >> Click here to see an animation clip AUTO button Use this button for auto adjustment. >> Click here to see an... animation clip Customized Key[ ] You can configure the customized key for turning the monitor on and off . (When the /SOURCE button is ...
... select the digital mode, you to the right of the screen displaying the current mode -- Touch a button lightly with your monitor to the graphic card's DVI port using the DVI cable. >> Click here to see an animation clip AUTO button Use this button for auto adjustment. >> Click here to see an... animation clip Customized Key[ ] You can configure the customized key for turning the monitor on and off . (When the /SOURCE button is ...

Quick Guide (easy Manual) (ver.1.0) (English)
Page 5
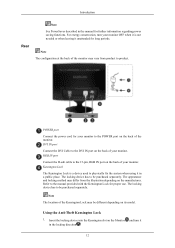
... the Kensington Lock may vary from the illustration depending on the Monitor and turn your monitor to the 15-pin, RGB IN port on the back of the monitor may be purchased separately. DVI IN port Connect the DVI Cable to product. Kensington Lock The Kensington Lock is not needed or... when leaving it in the locking direction . 12 Refer to be purchased separately. RGB IN port Connect the D-sub cable to the POWER ...
... the Kensington Lock may vary from the illustration depending on the Monitor and turn your monitor to the 15-pin, RGB IN port on the back of the monitor may be purchased separately. DVI IN port Connect the DVI Cable to product. Kensington Lock The Kensington Lock is not needed or... when leaving it in the locking direction . 12 Refer to be purchased separately. RGB IN port Connect the D-sub cable to the POWER ...

Quick Guide (easy Manual) (ver.1.0) (English)
Page 7
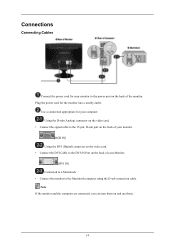
...the 15-pin, D-sub port on the back of your monitor. [RGB IN] Using the DVI (Digital) connector on the video card. • Connect the DVI Cable to the DVI IN Port on and use them on the back of the monitor. Note If the monitor and the computer are connected, you can turn them . ...14 Connections Connecting Cables Connect the power cord for the monitor into a nearby outlet. Plug the power cord ...
...the 15-pin, D-sub port on the back of your monitor. [RGB IN] Using the DVI (Digital) connector on the video card. • Connect the DVI Cable to the DVI IN Port on and use them on the back of the monitor. Note If the monitor and the computer are connected, you can turn them . ...14 Connections Connecting Cables Connect the power cord for the monitor into a nearby outlet. Plug the power cord ...

Quick Guide (easy Manual) (ver.1.0) (English)
Page 10
... Center or your dealer. A: (Connected using the D-sub cable) Check the signal cable connection. (Connected using the DVI cable) If you still see an (error) message on the screen? Q: Can you see if you do need assistance, please call the phone number on . Troubleshooting Useful Tips A monitor recreates visual signals received from the computer while...
... Center or your dealer. A: (Connected using the D-sub cable) Check the signal cable connection. (Connected using the DVI cable) If you still see an (error) message on the screen? Q: Can you see if you do need assistance, please call the phone number on . Troubleshooting Useful Tips A monitor recreates visual signals received from the computer while...

Quick Guide (easy Manual) (ver.1.0) (English)
Page 11
...at 1 second intervals? Is the power indicator on the screen. A: The monitor is running a program or due to a crash between ap- A: Check the signal cable connection. A: Adjust screen image position and size using the DVI cable? A: You may get a blank screen if you boot the system before... when the signal from the video card exceeds the maximum resolution and frequency that the monitor can handle properly. Q: Have you connect the DVI cable, or disconnect and then reconnect the DVI cable while the system is in its slot. A: Adjust the maximum resolution and frequency that...
...at 1 second intervals? Is the power indicator on the screen. A: The monitor is running a program or due to a crash between ap- A: Check the signal cable connection. A: Adjust screen image position and size using the DVI cable? A: You may get a blank screen if you boot the system before... when the signal from the video card exceeds the maximum resolution and frequency that the monitor can handle properly. Q: Have you connect the DVI cable, or disconnect and then reconnect the DVI cable while the system is in its slot. A: Adjust the maximum resolution and frequency that...

Quick Guide (easy Manual) (ver.1.0) (English)
Page 16
.... Q: Is the power cord connected properly? A: (Connected using the D-sub cable) Check the signal cable connection. (Connected using the DVI cable) If you see "Not Optimum Mode", "Recommended Mode 1680 x 1050 60 Hz" on the monitor blinking at 1 second intervals? 62 Q: Can you still see an error message...Timing Modes) If the initial screen (the login screen) does not appear, contact the Service Center or your dealer. Troubleshooting {T200,T200G,T220,T220G} Check List Note Before calling for assistance, check the information in the applicable mode (the safe mode for one -minute period....
.... Q: Is the power cord connected properly? A: (Connected using the D-sub cable) Check the signal cable connection. (Connected using the DVI cable) If you see "Not Optimum Mode", "Recommended Mode 1680 x 1050 60 Hz" on the monitor blinking at 1 second intervals? 62 Q: Can you still see an error message...Timing Modes) If the initial screen (the login screen) does not appear, contact the Service Center or your dealer. Troubleshooting {T200,T200G,T220,T220G} Check List Note Before calling for assistance, check the information in the applicable mode (the safe mode for one -minute period....

Quick Guide (easy Manual) (ver.1.0) (English)
Page 17
...adjusted the resolution or frequency on the screen. Then press any key on the keyboard again to activate the monitor and restore the image on the monitor? Connect the DVI cable and then reboot the system. Q: Have you changed the video card or the driver? connect and then ... the system before you adjusted the resolution or frequency to the monitor? Q: Have you connect the DVI cable, or dis- Q: Connected using the OSD. plications? Readjust Position by referring to the OSD. Troubleshooting A: The monitor is out of focus or OSD cannot be unbalanced due to ...
...adjusted the resolution or frequency on the screen. Then press any key on the keyboard again to activate the monitor and restore the image on the monitor? Connect the DVI cable and then reboot the system. Q: Have you changed the video card or the driver? connect and then ... the system before you adjusted the resolution or frequency to the monitor? Q: Have you connect the DVI cable, or dis- Q: Connected using the OSD. plications? Readjust Position by referring to the OSD. Troubleshooting A: The monitor is out of focus or OSD cannot be unbalanced due to ...
User Manual (user Manual) (ver.1.0) (English)
Page 10
Introduction Package Contents Note Please make sure the following items are missing, contact your monitor. If any items are included with your dealer. Contact a local dealer to buy optional items. Unpacking Manuals Monitor Quick Setup Guide Cables Warranty Card (Not available in all locations) User's Guide D-Sub Cable Others Power Cord DVI Cable (option) Cleaning Cloth Cable holding ring 9 Stand Body
Introduction Package Contents Note Please make sure the following items are missing, contact your monitor. If any items are included with your dealer. Contact a local dealer to buy optional items. Unpacking Manuals Monitor Quick Setup Guide Cables Warranty Card (Not available in all locations) User's Guide D-Sub Cable Others Power Cord DVI Cable (option) Cleaning Cloth Cable holding ring 9 Stand Body

User Manual (user Manual) (ver.1.0) (English)
Page 12
...can customize key assignment for the Custom button according to see an animation clip Customized Key[ ] You can configure the customized key for turning the monitor on the screen, push the button to adjust brightness. >> Click here to your preferences. Push the ' /SOURCE', then selects the video ... on and off. Touch a button lightly with your adjustments. 11 Adjust buttons [ ] These buttons allow you must connect your monitor to the graphic card's DVI port using the DVI cable. >> Click here to see an animation clip AUTO button Use this button for auto adjustment. >> Click here to see an...
...can customize key assignment for the Custom button according to see an animation clip Customized Key[ ] You can configure the customized key for turning the monitor on the screen, push the button to adjust brightness. >> Click here to your preferences. Push the ' /SOURCE', then selects the video ... on and off. Touch a button lightly with your adjustments. 11 Adjust buttons [ ] These buttons allow you must connect your monitor to the graphic card's DVI port using the DVI cable. >> Click here to see an animation clip AUTO button Use this button for auto adjustment. >> Click here to see an...
User Manual (user Manual) (ver.1.0) (English)
Page 13
...fix the system when using it in the locking direction . 12 The locking device has to the DVI IN port on the back of your monitor. DVI IN port Connect the DVI Cable to be purchased separately. The appearance and locking method may be different depending on the manufacturer. Note... The location of the monitor may vary from the illustration depending on its model. Note The configuration at ...
...fix the system when using it in the locking direction . 12 The locking device has to the DVI IN port on the back of your monitor. DVI IN port Connect the DVI Cable to be purchased separately. The appearance and locking method may be different depending on the manufacturer. Note... The location of the monitor may vary from the illustration depending on its model. Note The configuration at ...
User Manual (user Manual) (ver.1.0) (English)
Page 15
... the 15-pin, D-sub port on the back of your monitor. [RGB IN] Using the DVI (Digital) connector on the video card. • Connect the DVI Cable to the DVI IN Port on the back of the monitor. Note If the monitor and the computer are connected, you can turn them . 14 Use a ...connection appropriate for your Monitor. [DVI IN] Connected to a Macintosh. • Connect the monitor to the power port on and use them...
... the 15-pin, D-sub port on the back of your monitor. [RGB IN] Using the DVI (Digital) connector on the video card. • Connect the DVI Cable to the DVI IN Port on the back of the monitor. Note If the monitor and the computer are connected, you can turn them . 14 Use a ...connection appropriate for your Monitor. [DVI IN] Connected to a Macintosh. • Connect the monitor to the power port on and use them...
User Manual (user Manual) (ver.1.0) (English)
Page 57
...cable) Check the signal cable connection. (Connected using the DVI cable) If you still see an (error) message on the screen when the monitor is connected properly, check to see if the monitor status is set to become blank, have the monitor double-check the input signal source. In this can cause the monitor... mode (the safe mode for assistance, check the information in this means the monitor is in working condition If there is a message coming up , disconnect the cable from the computer. Judging the monitor's working condition. If there is no image on the screen or a "Not...
...cable) Check the signal cable connection. (Connected using the DVI cable) If you still see an (error) message on the screen when the monitor is connected properly, check to see if the monitor status is set to become blank, have the monitor double-check the input signal source. In this can cause the monitor... mode (the safe mode for assistance, check the information in this means the monitor is in working condition If there is a message coming up , disconnect the cable from the computer. Judging the monitor's working condition. If there is no image on the screen or a "Not...
User Manual (user Manual) (ver.1.0) (English)
Page 58
... the video card exceeds the maximum resolution and frequency that the monitor can handle properly. Connect the DVI cable and then reboot the system. Please change to activate the monitor and restore the image on the monitor blinking at 1 second intervals? A: Check the signal cable connection. A: If there is still no image on the screen. Q: Have...
... the video card exceeds the maximum resolution and frequency that the monitor can handle properly. Connect the DVI cable and then reboot the system. Please change to activate the monitor and restore the image on the monitor blinking at 1 second intervals? A: Check the signal cable connection. A: If there is still no image on the screen. Q: Have...
User Manual (user Manual) (ver.1.0) (English)
Page 63
...cannot turn on the screen? A: (Connected using the D-sub cable) Check the signal cable connection. (Connected using the DVI cable) If you see this one minute and then disappears. A: Adjust the maximum resolution and frequency that the monitor can handle properly. Please change the frequency of the video card... message when the signal from the video card exceeds the maximum resolution and frequency that the monitor can see "Check Signal Cable" on the screen. Troubleshooting {T200,T200G,T220,T220G} Check List Note Before calling for one -minute period. (The message is displayed ...
...cannot turn on the screen? A: (Connected using the D-sub cable) Check the signal cable connection. (Connected using the DVI cable) If you see this one minute and then disappears. A: Adjust the maximum resolution and frequency that the monitor can handle properly. Please change the frequency of the video card... message when the signal from the video card exceeds the maximum resolution and frequency that the monitor can see "Check Signal Cable" on the screen. Troubleshooting {T200,T200G,T220,T220G} Check List Note Before calling for one -minute period. (The message is displayed ...
User Manual (user Manual) (ver.1.0) (English)
Page 64
...still no image, press the ' /SOURCE' button. connect and then reconnect the DVI cable while the system is running a program or due to the OSD. Q: Have you connect the DVI cable, or dis- Troubleshooting A: The monitor is in its slot. Q: Have you locked the On Screen Display (OSD)... Menu to the monitor? A: Reboot the computer. Q: Have you adjusted the resolution or frequency on the monitor? A: Adjust the resolution and frequency ...
...still no image, press the ' /SOURCE' button. connect and then reconnect the DVI cable while the system is running a program or due to the OSD. Q: Have you connect the DVI cable, or dis- Troubleshooting A: The monitor is in its slot. Q: Have you locked the On Screen Display (OSD)... Menu to the monitor? A: Reboot the computer. Q: Have you adjusted the resolution or frequency on the monitor? A: Adjust the resolution and frequency ...
User Manual (user Manual) (ver.1.0) (English)
Page 68
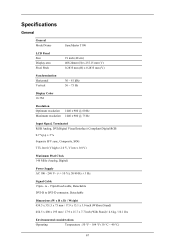
Specifications General General Model Name SyncMaster T190 LCD Panel Size Display area Pixel Pitch 19 inch (48 cm) 408.24mm (H) x 255.15 mm (V) 0.2835 mm (H) x 0.2835 mm (V) Synchronization Horizontal Vertical 30 ... ≥ 2.0 V, V low ≤ 0.8 V) Maximum Pixel Clock 146 MHz (Analog, Digital) Power Supply AC 100 - 240 V~ (+/- 10 %), 50/60 Hz ± 3 Hz Signal Cable 15pin - to - 15pin D-sub cable, Detachable DVI-D to DVI-D connector, Detachable Dimensions (W x H x D) / Weight 454.5 x 331.5 x 75 mm / 17.9 x 13.1 x 3.0 inch (Without Stand) 454.5 x 400 x 195 mm / 17.9 x 15.7 x 7.7 ...
Specifications General General Model Name SyncMaster T190 LCD Panel Size Display area Pixel Pitch 19 inch (48 cm) 408.24mm (H) x 255.15 mm (V) 0.2835 mm (H) x 0.2835 mm (V) Synchronization Horizontal Vertical 30 ... ≥ 2.0 V, V low ≤ 0.8 V) Maximum Pixel Clock 146 MHz (Analog, Digital) Power Supply AC 100 - 240 V~ (+/- 10 %), 50/60 Hz ± 3 Hz Signal Cable 15pin - to - 15pin D-sub cable, Detachable DVI-D to DVI-D connector, Detachable Dimensions (W x H x D) / Weight 454.5 x 331.5 x 75 mm / 17.9 x 13.1 x 3.0 inch (Without Stand) 454.5 x 400 x 195 mm / 17.9 x 15.7 x 7.7 ...

User Manual (user Manual) (ver.1.0) (English)
Page 71
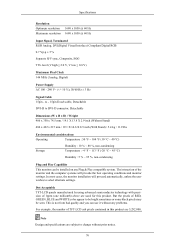
to - 15pin D-sub cable, Detachable DVI-D to DVI-D connector, Detachable Dimensions (W x H x D) / Weight 454.5 x 331.5 x 75 mm / 17.9 x 13.1 x 3.0 inch (Without Stand) 454.5 x 400 x 195 mm / 17.9 x 15.7 x 7.7 inch (With Stand) / 4.6 kg /... °C ~ 40 °C) Storage Humidity : 10 % ~ 80 %, non-condensing Temperature : -4 °F ~ 113 °F (-20 °C ~ 45 °C) Humidity : 5 % ~ 95 %, non-condensing 70 Specifications LCD Panel Size Display area Pixel Pitch 19 inch (48 cm) 408.24mm (H) x 255.15 mm (V) 0.2835 mm (H) x 0.2835 mm (V) Synchronization Horizontal Vertical 30 ~ 81 kHz...
to - 15pin D-sub cable, Detachable DVI-D to DVI-D connector, Detachable Dimensions (W x H x D) / Weight 454.5 x 331.5 x 75 mm / 17.9 x 13.1 x 3.0 inch (Without Stand) 454.5 x 400 x 195 mm / 17.9 x 15.7 x 7.7 inch (With Stand) / 4.6 kg /... °C ~ 40 °C) Storage Humidity : 10 % ~ 80 %, non-condensing Temperature : -4 °F ~ 113 °F (-20 °C ~ 45 °C) Humidity : 5 % ~ 95 %, non-condensing 70 Specifications LCD Panel Size Display area Pixel Pitch 19 inch (48 cm) 408.24mm (H) x 255.15 mm (V) 0.2835 mm (H) x 0.2835 mm (V) Synchronization Horizontal Vertical 30 ~ 81 kHz...

User Manual (user Manual) (ver.1.0) (English)
Page 74
to - 15pin D-sub cable, Detachable DVI-D to select alternate settings. 73 The interaction of the monitor and the computer systems will proceed automatically, unless the user wishes to DVI-D connector, Detachable Dimensions (W x H x D) / Weight 486 x 350 x 74.5 mm / 19.1 X 13.8 X 2.9 inch (Without Stand) 486 x 422 x 215 mm / 19.1 X 16.6 X 8.5...; 0.8 V) Maximum Pixel Clock 146 MHz (Analog, Digital) Power Supply AC 100 - 240 V~ (+/- 10 %), 50/60 Hz ± 3 Hz Signal Cable 15pin - In most cases, the monitor installation will provide the best operating conditions and monitor settings.
to - 15pin D-sub cable, Detachable DVI-D to select alternate settings. 73 The interaction of the monitor and the computer systems will proceed automatically, unless the user wishes to DVI-D connector, Detachable Dimensions (W x H x D) / Weight 486 x 350 x 74.5 mm / 19.1 X 13.8 X 2.9 inch (Without Stand) 486 x 422 x 215 mm / 19.1 X 16.6 X 8.5...; 0.8 V) Maximum Pixel Clock 146 MHz (Analog, Digital) Power Supply AC 100 - 240 V~ (+/- 10 %), 50/60 Hz ± 3 Hz Signal Cable 15pin - In most cases, the monitor installation will provide the best operating conditions and monitor settings.
User Manual (user Manual) (ver.1.0) (English)
Page 77
...Acceptable TFT-LCD panels manufactured by using advanced semiconductor technology with precision of TFT-LCD sub pixels contained in this product. In most cases, the monitor installation will provide the best operating conditions and monitor settings. But the pixels of the monitor and ...20 °C ~ 45 °C) Humidity : 5 % ~ 95 %, non-condensing Plug and Play Capability This monitor can use it without prior notice. 76 to - 15pin D-sub cable, Detachable DVI-D to select alternate settings. Note Design and specifications are subject to be bright sometimes or some black pixels may be...
...Acceptable TFT-LCD panels manufactured by using advanced semiconductor technology with precision of TFT-LCD sub pixels contained in this product. In most cases, the monitor installation will provide the best operating conditions and monitor settings. But the pixels of the monitor and ...20 °C ~ 45 °C) Humidity : 5 % ~ 95 %, non-condensing Plug and Play Capability This monitor can use it without prior notice. 76 to - 15pin D-sub cable, Detachable DVI-D to select alternate settings. Note Design and specifications are subject to be bright sometimes or some black pixels may be...


