
User Manual
Page 9
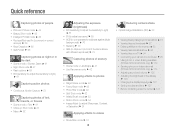
...; Viewing files on a TV 94 • Connecting your camera to a computer 95 • Using photo or video sharing websites (ST200F/ST201F/ST205F only) 110 • Sending photos or videos via email (ST200F/ST201F/ST205F only) 113 • Adjusting sound and volume 125 • Adjusting the brightness of the display 126 • Changing the display language 127 • Setting the date and time ...
...; Viewing files on a TV 94 • Connecting your camera to a computer 95 • Using photo or video sharing websites (ST200F/ST201F/ST205F only) 110 • Sending photos or videos via email (ST200F/ST201F/ST205F only) 113 • Adjusting sound and volume 125 • Adjusting the brightness of the display 126 • Changing the display language 127 • Setting the date and time ...

User Manual
Page 10
... the battery and memory card 17 Charging the battery and turning on your camera ....... 18 Charging the battery 18 Turning on your camera 18 Performing the initial setup 19 Learning icons 21 Using the Home screen 22 Accessing the Home screen 22 Icons on the Home screen 23 Setting Wallpaper 25 Selecting options or menus 26 Setting the display and sound 28 Setting the display type 28 Setting the sound 29 Capturing photos 30 Zooming 31 Reducing camera shake...
... the battery and memory card 17 Charging the battery and turning on your camera ....... 18 Charging the battery 18 Turning on your camera 18 Performing the initial setup 19 Learning icons 21 Using the Home screen 22 Accessing the Home screen 22 Icons on the Home screen 23 Setting Wallpaper 25 Selecting options or menus 26 Setting the display and sound 28 Setting the display type 28 Setting the sound 29 Capturing photos 30 Zooming 31 Reducing camera shake...

User Manual
Page 11
... Capturing a self portrait shot 66 Capturing a smile shot 66 Detecting eye blinking 67 Using Smart Face Recognition 67 Registering faces as your favorites (My Star 68 Adjusting brightness and color 69 Adjusting the exposure manually (EV 69 Compensating for backlighting (ACB 70 Changing the metering option 70 Selecting a White Balance setting 71 Using burst modes 73 Adjusting images 74 Reducing the sound of the zoom 75 Available shooting options by shooting mode 76 ...
... Capturing a self portrait shot 66 Capturing a smile shot 66 Detecting eye blinking 67 Using Smart Face Recognition 67 Registering faces as your favorites (My Star 68 Adjusting brightness and color 69 Adjusting the exposure manually (EV 69 Compensating for backlighting (ACB 70 Changing the metering option 70 Selecting a White Balance setting 71 Using burst modes 73 Adjusting images 74 Reducing the sound of the zoom 75 Available shooting options by shooting mode 76 ...

User Manual
Page 12
... Starting Playback mode 79 Viewing photos 84 Playing a video 87 Editing a photo 89 Resizing photos 89 Cropping portraits automatically 89 Rotating a photo 90 Applying Smart Filter effects 90 Adjusting your photos 91 Creating a print order (DPOF 93 Viewing files on a TV 94 Transferring files to your Windows computer 95 Transferring files with Intelli-studio 96 Transferring files by connecting the camera as a removable disk 98 Disconnecting the camera (for Windows XP 99 Transferring files to your Mac computer 100 Printing photos with a PictBridge photo printer...
... Starting Playback mode 79 Viewing photos 84 Playing a video 87 Editing a photo 89 Resizing photos 89 Cropping portraits automatically 89 Rotating a photo 90 Applying Smart Filter effects 90 Adjusting your photos 91 Creating a print order (DPOF 93 Viewing files on a TV 94 Transferring files to your Windows computer 95 Transferring files with Intelli-studio 96 Transferring files by connecting the camera as a removable disk 98 Disconnecting the camera (for Windows XP 99 Transferring files to your Mac computer 100 Printing photos with a PictBridge photo printer...

User Manual
Page 14
... battery and memory card ... ... 17 Charging the battery and turning on your camera 18 Charging the battery 18 Turning on the Home screen 23 Setting Wallpaper 25 Selecting options or menus 26 Setting the display and sound 28 Setting the display type 28 Setting the sound 29 Capturing photos 30 Zooming 31 Reducing camera shake (OIS 33 Tips for shooting. Basic functions Learn about your camera 18 Performing the initial setup 19 Learning icons 21 Using the Home screen...
... battery and memory card ... ... 17 Charging the battery and turning on your camera 18 Charging the battery 18 Turning on the Home screen 23 Setting Wallpaper 25 Selecting options or menus 26 Setting the display and sound 28 Setting the display type 28 Setting the sound 29 Capturing photos 30 Zooming 31 Reducing camera shake (OIS 33 Tips for shooting. Basic functions Learn about your camera 18 Performing the initial setup 19 Learning icons 21 Using the Home screen...

User Manual
Page 17
... Playback mode: Zoom in on part of focus, or there is a problem charging the battery (On ST200F/ ST201F/ST205F, when the camera is connecting to WLAN or sending a photo) • Steady: When the camera is connected to a computer, charging the battery, or when the image is out of a photo or view files as thumbnails, or adjust the volume Display Attaching the strap Buttons (See the table below) Button Description Basic functions Change the display option. Basic functions 16 Delete files...
... Playback mode: Zoom in on part of focus, or there is a problem charging the battery (On ST200F/ ST201F/ST205F, when the camera is connecting to WLAN or sending a photo) • Steady: When the camera is connected to a computer, charging the battery, or when the image is out of a photo or view files as thumbnails, or adjust the volume Display Attaching the strap Buttons (See the table below) Button Description Basic functions Change the display option. Basic functions 16 Delete files...

User Manual
Page 35
...; Set ISO sensitivity options. (p. 61) Basic functions 34 Tips for getting a clearer photo Holding your camera correctly Ensure nothing is displayed Camera shake The camera sets the aperture value and shutter speed automatically. The camera adjusts the focus and exposure automatically. Reducing camera shake Set the Optical Image Stabilization option to Slow Sync or Off. When you shoot in red. press [Shutter] again if the focus frame appears in the dark, avoid setting the flash...
...; Set ISO sensitivity options. (p. 61) Basic functions 34 Tips for getting a clearer photo Holding your camera correctly Ensure nothing is displayed Camera shake The camera sets the aperture value and shutter speed automatically. The camera adjusts the focus and exposure automatically. Reducing camera shake Set the Optical Image Stabilization option to Slow Sync or Off. When you shoot in red. press [Shutter] again if the focus frame appears in the dark, avoid setting the flash...

User Manual
Page 46
Using the Beauty Shot mode In Beauty Shot mode, you select a background photo from your saved photos, black bars may be less than in other shooting modes. • In Picture in Picture mode, you cannot set to or smaller. • When capturing a background photo, a vertical photo captured in the vertical position is displayed horizontally without auto rotate. • The maximum size of the insertion window is in -picture photos or videos are saved as one combined...
Using the Beauty Shot mode In Beauty Shot mode, you select a background photo from your saved photos, black bars may be less than in other shooting modes. • In Picture in Picture mode, you cannot set to or smaller. • When capturing a background photo, a vertical photo captured in the vertical position is displayed horizontally without auto rotate. • The maximum size of the insertion window is in -picture photos or videos are saved as one combined...

User Manual
Page 56
... 56 Selecting an image quality 57 Using the timer 58 Shooting in Shooting mode. Shooting options Learn how to set the options in the dark 59 Preventing red-eye 59 Using the flash 59 Adjusting the ISO sensitivity 61 Changing the camera's focus 62 Using macro 62 Using tracking auto focus 63 Adjusting the focus area 64 Using Face Detection 65 Detecting faces 65 Capturing a self portrait shot 66 Capturing a smile shot 66 Detecting eye blinking 67 Using Smart Face Recognition...
... 56 Selecting an image quality 57 Using the timer 58 Shooting in Shooting mode. Shooting options Learn how to set the options in the dark 59 Preventing red-eye 59 Using the flash 59 Adjusting the ISO sensitivity 61 Changing the camera's focus 62 Using macro 62 Using tracking auto focus 63 Adjusting the focus area 64 Using Face Detection 65 Detecting faces 65 Capturing a self portrait shot 66 Capturing a smile shot 66 Detecting eye blinking 67 Using Smart Face Recognition...

User Manual
Page 80
... to manage files. Photo file information Memory in use File Information Album/Zoom In Icon Description Current file/Total files Folder name-File name GIF file Protected file Print order has been set (DPOF) To display file information on and display the most recent file will be displayed. • If the camera is off, it will turn on the screen, press [ ]. Viewing photos or videos in Playback mode Learn how to play back photos or videos and how to edit or play back files that...
... to manage files. Photo file information Memory in use File Information Album/Zoom In Icon Description Current file/Total files Folder name-File name GIF file Protected file Print order has been set (DPOF) To display file information on and display the most recent file will be displayed. • If the camera is off, it will turn on the screen, press [ ]. Viewing photos or videos in Playback mode Learn how to play back photos or videos and how to edit or play back files that...
User Manual
Page 98
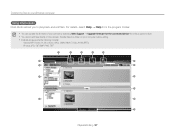
... 10 11 Playback/Editing 97 Transferring files to your Windows computer Using Intelli-studio Intelli-studio allows you to a folder on your camera by selecting Web Support → Upgrade firmware for the connected device from the program toolbar. • You cannot edit files directly on the camera. Videos: MP4 (Video: H.264, Audio: AAC), WMV (WMV 7/8/9), AVI (MJPEG) -- Transfer files to play back and edit files. For details, select Help → Help from...
... 10 11 Playback/Editing 97 Transferring files to your Windows computer Using Intelli-studio Intelli-studio allows you to a folder on your camera by selecting Web Support → Upgrade firmware for the connected device from the program toolbar. • You cannot edit files directly on the camera. Videos: MP4 (Video: H.264, Audio: AAC), WMV (WMV 7/8/9), AVI (MJPEG) -- Transfer files to play back and edit files. For details, select Help → Help from...

User Manual
Page 102
...of paper. Option Print Size Layout Type Quality Date Print File Name Reset Description Select whether to print. • Printing starts. Reset settings to cancel printing. Press [ ] to their default values. Set the type of photos to print the file name. Set the print quality. Printing photos with a PictBridge photo printer Print photos with the USB cable. Set the number of paper. Set to be supported by connecting your camera directly to the printer. 1 On the Home screen, scroll to . 2 Select . 3 Select Connectivity → USB → Printer. 4 Turn on . •...
...of paper. Option Print Size Layout Type Quality Date Print File Name Reset Description Select whether to print. • Printing starts. Reset settings to cancel printing. Press [ ] to their default values. Set the type of photos to print the file name. Set the print quality. Printing photos with a PictBridge photo printer Print photos with the USB cable. Set the number of paper. Set to be supported by connecting your camera directly to the printer. 1 On the Home screen, scroll to . 2 Select . 3 Select Connectivity → USB → Printer. 4 Turn on . •...

User Manual
Page 103
... a remote shutter release 108 Using photo or video sharing websites ... ...110 Accessing a website 110 Uploading photos or videos 110 Sending photos or videos via email 112 Changing email settings 112 Sending photos or videos via email ... ...... 113 Uploading photos to a cloud server 115 Using Auto Backup to send photos or videos 116 Installing the program for Auto Backup on your PC 116 Sending photos or videos to wireless local area networks (WLANs) and use functions. Wireless...
... a remote shutter release 108 Using photo or video sharing websites ... ...110 Accessing a website 110 Uploading photos or videos 110 Sending photos or videos via email 112 Changing email settings 112 Sending photos or videos via email ... ...... 113 Uploading photos to a cloud server 115 Using Auto Backup to send photos or videos 116 Installing the program for Auto Backup on your PC 116 Sending photos or videos to wireless local area networks (WLANs) and use functions. Wireless...
User Manual
Page 106
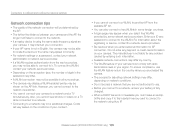
...; For network settings or a password, contact your network administrator or network service provider. • If a WLAN requires authentication from the available AP list. • You can also connect to free WLANs in all surroundings. • The camera may display a WLAN-enabled printer may be shown on the AP lists. txt file and copy it to the inserted memory card to connect to the...
...; For network settings or a password, contact your network administrator or network service provider. • If a WLAN requires authentication from the available AP list. • You can also connect to free WLANs in all surroundings. • The camera may display a WLAN-enabled printer may be shown on the AP lists. txt file and copy it to the inserted memory card to connect to the...
User Manual
Page 127
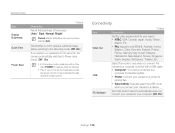
... Connectivity Item Video Out USB PC Software * Default Description Set the video signal output for 30 seconds, the camera automatically switches to Power save mode. (Off*, On) • In Power save power. Set whether or not to review a captured image before returning to the Shooting mode. (Off, On*) If you have selected Auto. Settings menu Item Display Brightness Quick View Power Save Description Adjust the brightness of the screen. (Auto*, Dark, Normal, Bright) * Default Normal is fixed in Playback mode even if you perform no operations...
... Connectivity Item Video Out USB PC Software * Default Description Set the video signal output for 30 seconds, the camera automatically switches to Power save mode. (Off*, On) • In Power save power. Set whether or not to review a captured image before returning to the Shooting mode. (Off, On*) If you have selected Auto. Settings menu Item Display Brightness Quick View Power Save Description Adjust the brightness of the screen. (Auto*, Dark, Normal, Bright) * Default Normal is fixed in Playback mode even if you perform no operations...
User Manual
Page 130
Appendixes Get information about error messages, specifications, and maintenance. Error messages 130 Camera maintenance 132 Cleaning your camera 132 Using or storing the camera 133 About memory cards 134 About the battery 137 Before contacting a service center 141 Camera specifications 144 Glossary 148 FCC notice 153 Declaration sentence in official languages 156 Index 158
Appendixes Get information about error messages, specifications, and maintenance. Error messages 130 Camera maintenance 132 Cleaning your camera 132 Using or storing the camera 133 About memory cards 134 About the battery 137 Before contacting a service center 141 Camera specifications 144 Glossary 148 FCC notice 153 Declaration sentence in official languages 156 Index 158
User Manual
Page 131
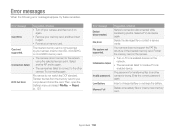
...; Remove your memory card, and then insert it again. • Format your camera. The inserted memory card is wrong. Memory Full Delete unnecessary files or insert a new memory card. File names do not match the DCF standard. Transfer the files from the memory card to the network using the selected access point. Then, open the Settings menu and select File No. → Reset. (p. 127) Error message Suggested remedies Device disconnected. File Error Network connection disconnected while transferring photos. File system not supported...
...; Remove your memory card, and then insert it again. • Format your camera. The inserted memory card is wrong. Memory Full Delete unnecessary files or insert a new memory card. File names do not match the DCF standard. Transfer the files from the memory card to the network using the selected access point. Then, open the Settings menu and select File No. → Reset. (p. 127) Error message Suggested remedies Device disconnected. File Error Network connection disconnected while transferring photos. File system not supported...

User Manual
Page 146
...Retro, Zooming Shot • Image Adjust: Sharpness, Contrast, Saturation Video Shooting mode Movie Filter (Smart Filter): Miniature, Vignetting, Half Tone Dot, Sketch, Fish-eye, Classic, Retro, Palette Effect 1, Palette Effect 2, Palette Effect 3, Palette Effect 4 White Balance Auto WB, Daylight, Cloudy, Fluorescent_H, Fluorescent_L, Tungsten, Custom Set Date Imprinting Off, Date, Date & Time Shooting Photos Videos • Modes: Smart Auto (Portrait, Night Portrait, Backlight Portrait, Night, Backlight, Landscape, White, Natural Green, Blue Sky, Sunset, Macro, Macro text, Macro Color...
...Retro, Zooming Shot • Image Adjust: Sharpness, Contrast, Saturation Video Shooting mode Movie Filter (Smart Filter): Miniature, Vignetting, Half Tone Dot, Sketch, Fish-eye, Classic, Retro, Palette Effect 1, Palette Effect 2, Palette Effect 3, Palette Effect 4 White Balance Auto WB, Daylight, Cloudy, Fluorescent_H, Fluorescent_L, Tungsten, Custom Set Date Imprinting Off, Date, Date & Time Shooting Photos Videos • Modes: Smart Auto (Portrait, Night Portrait, Backlight Portrait, Night, Backlight, Landscape, White, Natural Green, Blue Sky, Sunset, Macro, Macro text, Macro Color...

User Manual
Page 159
... Beauty Shot mode 45 Blink Detection 67 Brightness Playback mode 91 Shooting mode 69 Burst modes Auto Exposure Bracket (AEB) 73 Continuous 73 Motion Capture 73 C Camera maintenance 132 Camera specifications 144 Capturing an image from video 88 Charging 18 Cleaning Camera body 132 Display 132 Lens 132 Close-up Shot mode 47 Connecting to a computer Mac 100 Windows 95 Contrast Playback mode 91 Shooting mode 74 D Date/Time Set 127 Deleting files 83 Digital Print Order Format (DPOF) 93 Digital zoom 31 Disconnecting the camera 99 Display brightness 126 Display type...
... Beauty Shot mode 45 Blink Detection 67 Brightness Playback mode 91 Shooting mode 69 Burst modes Auto Exposure Bracket (AEB) 73 Continuous 73 Motion Capture 73 C Camera maintenance 132 Camera specifications 144 Capturing an image from video 88 Charging 18 Cleaning Camera body 132 Display 132 Lens 132 Close-up Shot mode 47 Connecting to a computer Mac 100 Windows 95 Contrast Playback mode 91 Shooting mode 74 D Date/Time Set 127 Deleting files 83 Digital Print Order Format (DPOF) 93 Digital zoom 31 Disconnecting the camera 99 Display brightness 126 Display type...
User Manual
Page 161
... Shooting portraits Blink Detection 67 Face Detection 65 Red-eye 60 Red-eye fix 60 Self portrait 66 Smart Face Recognition 67 Smile Shot 66 Shutter button 15 Slide show 86 Smart Album 81 Smart Auto mode 37 Smart Face Recognition 67 Smart Filter Photo shooting mode 49 Playback mode 90 Video recording mode 51 Smart Movie mode 39 Smile Shot 66 Sound settings 29 Split Shot mode 52 Start Image 125 Status lamp 16 T Thumbnails 82 Timer Shooting mode 58 Timer lamp 15 Time settings...
... Shooting portraits Blink Detection 67 Face Detection 65 Red-eye 60 Red-eye fix 60 Self portrait 66 Smart Face Recognition 67 Smile Shot 66 Shutter button 15 Slide show 86 Smart Album 81 Smart Auto mode 37 Smart Face Recognition 67 Smart Filter Photo shooting mode 49 Playback mode 90 Video recording mode 51 Smart Movie mode 39 Smile Shot 66 Sound settings 29 Split Shot mode 52 Start Image 125 Status lamp 16 T Thumbnails 82 Timer Shooting mode 58 Timer lamp 15 Time settings...


