

Open Source Guide (ENGLISH)
Page 1
... works. The original manual has wrong versions of this License incorporates the limitation as part of a whole which are distributed under these conditions, and telling the user how to refrain entirely from you can get the source code. This product uses some software programs which applies to it is up to the author/donor to control compilation and installation of the Program...
... works. The original manual has wrong versions of this License incorporates the limitation as part of a whole which are distributed under these conditions, and telling the user how to refrain entirely from you can get the source code. This product uses some software programs which applies to it is up to the author/donor to control compilation and installation of the Program...

Open Source Guide (ENGLISH)
Page 2
... OR CONSEQUENTIAL DAMAGES ARISING OUT OF THE USE OR INABILITY TO USE THE LIBRARY (INCLUDING BUT NOT LIMITED TO... LOSS OF DATA OR DATA BEING RENDERED INACCURATE OR LOSSES SUSTAINED BY YOU OR THIRD PARTIES OR A FAILURE OF THE LIBRARY TO OPERATE WITH ANY OTHER SOFTWARE...you develop a new library, and you want it free software that everyone can do so by permitting redistribution under ...line and a pointer to where the full notice is safest to attach them to the start of each source file to most effectively convey the exclusion of the greatest possible use...
... OR CONSEQUENTIAL DAMAGES ARISING OUT OF THE USE OR INABILITY TO USE THE LIBRARY (INCLUDING BUT NOT LIMITED TO... LOSS OF DATA OR DATA BEING RENDERED INACCURATE OR LOSSES SUSTAINED BY YOU OR THIRD PARTIES OR A FAILURE OF THE LIBRARY TO OPERATE WITH ANY OTHER SOFTWARE...you develop a new library, and you want it free software that everyone can do so by permitting redistribution under ...line and a pointer to where the full notice is safest to attach them to the start of each source file to most effectively convey the exclusion of the greatest possible use...
User Manual (ENGLISH)
Page 4
... the Sound 32 Setting the TruSurround XT 33 Choosing a Multi-Channel Sound (MTS) track - Digital .. 48 Viewing Closed Captions (On-Screen Text Messages) - Analog 34 Automatic Volume Control 34 Selecting the Internal Mute 35 Setting the On/Off Melody 35 Listening to the Sound of Screen Burn 52 Setting the Function Help 52 Using the V-Chip 53 APPENDIX Identifying Problems 59 Wall Installation Instructions 60 How to assemble the Stand-Base 62 Specifications 62 Dimensions (SP-S4223...
... the Sound 32 Setting the TruSurround XT 33 Choosing a Multi-Channel Sound (MTS) track - Digital .. 48 Viewing Closed Captions (On-Screen Text Messages) - Analog 34 Automatic Volume Control 34 Selecting the Internal Mute 35 Setting the On/Off Melody 35 Listening to the Sound of Screen Burn 52 Setting the Function Help 52 Using the V-Chip 53 APPENDIX Identifying Problems 59 Wall Installation Instructions 60 How to assemble the Stand-Base 62 Specifications 62 Dimensions (SP-S4223...

User Manual (ENGLISH)
Page 5
... are used to turn the TV on and off. If any items are included with no Set-Top Box needed. Remote Control (BN59-00511A) / AAA Batteries (4301-000103) Power Cord (3903-000144) Owner's Instructions / Quick Setup Guide Warranty Card / Registration Card / Safety Guide Manual (Not available in the TV's memory. When connecting a cable, open the ferrite core and clip it around the cable near the plug. Remote Control The supplied remote can be stored in all locations...
... are used to turn the TV on and off. If any items are included with no Set-Top Box needed. Remote Control (BN59-00511A) / AAA Batteries (4301-000103) Power Cord (3903-000144) Owner's Instructions / Quick Setup Guide Warranty Card / Registration Card / Safety Guide Manual (Not available in the TV's memory. When connecting a cable, open the ferrite core and clip it around the cable near the plug. Remote Control The supplied remote can be stored in all locations...

User Manual (ENGLISH)
Page 6
... available input sources (TV, AV1, AV2, S-Video1, S-Video2, Component1, Component2, PC, HDMI1, or HDMI2). ´ MENU Press to increase or decrease the volume. To use the more advanced features, you would use the œ and √ buttons on the remote control. ¨ CH Press to turn the TV on and off when the power is on and lights up in stand-by mode. Viewing the Control Panel Buttons...
... available input sources (TV, AV1, AV2, S-Video1, S-Video2, Component1, Component2, PC, HDMI1, or HDMI2). ´ MENU Press to increase or decrease the volume. To use the more advanced features, you would use the œ and √ buttons on the remote control. ¨ CH Press to turn the TV on and off when the power is on and lights up in stand-by mode. Viewing the Control Panel Buttons...

User Manual (ENGLISH)
Page 7
... panel jacks to a Digital Audio component. Æ AUDIO OUT (L/R) Ø COAXIAL DIGITAL AUDIO OUT Audio outputs for external devices with separate analog audio inputs. Connect to watch a television program without disturbing other people in the room. " PC AUDIO IN Connect to the HDMI jack of an external device. Ú COMPONENT IN 1, 2 Video (Y/PB/PR) and audio (L-AUDIO-R) ˆ OPTICAL DIGITAL AUDIO OUT component inputs. English-7 HDMI output. ˝ SERVICE 1/SERVICE 2 ˇ HDMI 1/DVI IN These jacks are for Air/Cable Network. Side Panel Jacks Use...
... panel jacks to a Digital Audio component. Æ AUDIO OUT (L/R) Ø COAXIAL DIGITAL AUDIO OUT Audio outputs for external devices with separate analog audio inputs. Connect to watch a television program without disturbing other people in the room. " PC AUDIO IN Connect to the HDMI jack of an external device. Ú COMPONENT IN 1, 2 Video (Y/PB/PR) and audio (L-AUDIO-R) ˆ OPTICAL DIGITAL AUDIO OUT component inputs. English-7 HDMI output. ˝ SERVICE 1/SERVICE 2 ˇ HDMI 1/DVI IN These jacks are for Air/Cable Network. Side Panel Jacks Use...
User Manual (ENGLISH)
Page 8
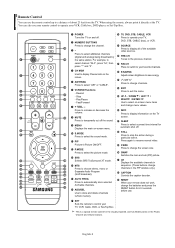
... Displays the available channels in sequence. (These buttons change the channel. ˇ- Fast/Forward ∏ + VOL - " MUTE Press to temporarily cut off the sound. ' MENU Displays the main on-screen menu. ˝ S.MODE Press to select the sound mode. Ô PIP Picture-in the PIP window only.) ¥ CAPTION Controls the caption decoder. ≥ RESET When your remote does not work, change menu values. - You can use your remote control to operate your VCR, Cable box, DVD player, or Set-Top Box. Œ POWER Turns...
... Displays the available channels in sequence. (These buttons change the channel. ˇ- Fast/Forward ∏ + VOL - " MUTE Press to temporarily cut off the sound. ' MENU Displays the main on-screen menu. ˝ S.MODE Press to select the sound mode. Ô PIP Picture-in the PIP window only.) ¥ CAPTION Controls the caption decoder. ≥ RESET When your remote does not work, change menu values. - You can use your remote control to operate your VCR, Cable box, DVD player, or Set-Top Box. Œ POWER Turns...
User Manual (ENGLISH)
Page 12
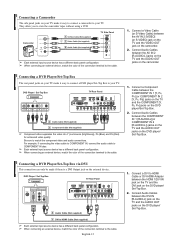
... cable. 1. Connecting a DVD Player/Set-Top Box The rear panel jacks on the DVD player/ Set-Top Box. 2. Be sure to the cable. Connect Audio Cables between the DVI IN [R-AUDIO-L] jack on the TV and the AUDIO OUT jacks on the DVD player/ Set-Top Box. They allow you to view the camcorder tapes without using a VCR Camcorder 1 S-Video Cable (Not supplied) or 1 Video Cable (Not supplied) 2 Audio Cable (Not supplied) TV Side Panel ➢ Each external input source device has a different back panel configuration. ➢ When connecting an external...
... cable. 1. Connecting a DVD Player/Set-Top Box The rear panel jacks on the DVD player/ Set-Top Box. 2. Be sure to the cable. Connect Audio Cables between the DVI IN [R-AUDIO-L] jack on the TV and the AUDIO OUT jacks on the DVD player/ Set-Top Box. They allow you to view the camcorder tapes without using a VCR Camcorder 1 S-Video Cable (Not supplied) or 1 Video Cable (Not supplied) 2 Audio Cable (Not supplied) TV Side Panel ➢ Each external input source device has a different back panel configuration. ➢ When connecting an external...
User Manual (ENGLISH)
Page 13
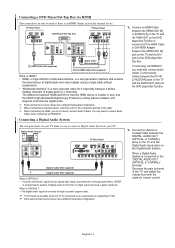
... digital audio in size, has the HDCP (High Bandwidth Digital Copy Protection) coding feature installed, and supports multi-channel digital audio. ➢ Each external input source device has a different back panel configuration. ➢ When connecting an external device, match the color of digital audio and video signals using a single cable without compression. • "Multimedia interface" is connected to HDMI Cable or DVI-HDMI Adapter between the DIGITAL AUDIO OUT (OPTICAL or COAXIAL) jacks on the TV and the Digital Audio Input jacks on the DVD player/Set-Top Box...
... digital audio in size, has the HDCP (High Bandwidth Digital Copy Protection) coding feature installed, and supports multi-channel digital audio. ➢ Each external input source device has a different back panel configuration. ➢ When connecting an external device, match the color of digital audio and video signals using a single cable without compression. • "Multimedia interface" is connected to HDMI Cable or DVI-HDMI Adapter between the DIGITAL AUDIO OUT (OPTICAL or COAXIAL) jacks on the TV and the Digital Audio Input jacks on the DVD player/Set-Top Box...

User Manual (ENGLISH)
Page 14
...Connecting an Amplifier/DVD Home Theater Amplifier/DVD Home Theater TV Rear Panel Audio Cable (Not supplied) ➢ Each external input source device has a different back panel configuration. ➢ When connecting an external device, match the color of the connection terminal to the cable. ➢ The HDMI/DVI jacks do not support PC connection. 1. Internal Speakers Audio Out (Optical, Coaxial, L/R Out) TV AV, S-Video Component, PC, HDMI TV AV, S-Video Component, PC, HDMI Internal Mute Off Speaker Output Speaker Output Speaker Output Sound Output Sound Output Sound Output...
...Connecting an Amplifier/DVD Home Theater Amplifier/DVD Home Theater TV Rear Panel Audio Cable (Not supplied) ➢ Each external input source device has a different back panel configuration. ➢ When connecting an external device, match the color of the connection terminal to the cable. ➢ The HDMI/DVI jacks do not support PC connection. 1. Internal Speakers Audio Out (Optical, Coaxial, L/R Out) TV AV, S-Video Component, PC, HDMI TV AV, S-Video Component, PC, HDMI Internal Mute Off Speaker Output Speaker Output Speaker Output Sound Output Sound Output Sound Output...
User Manual (ENGLISH)
Page 15
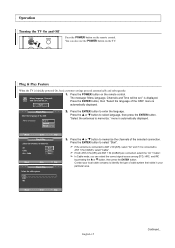
... ANT 1 IN (CABLE) are connected, select the "Air + Cable". ➢ In Cable mode, you can also use the POWER button on the TV. i Menu language, Channels and Time will be set ." Press the ENTER button to memorize." "Select the antennas to enter the language. Operation Turning the TV On and Off Press the POWER button on the remote control. Move Enter Skip Plug & Play Select the antennas to memorize the channels of the...
... ANT 1 IN (CABLE) are connected, select the "Air + Cable". ➢ In Cable mode, you can also use the POWER button on the TV. i Menu language, Channels and Time will be set ." Press the ENTER button to memorize." "Select the antennas to enter the language. Operation Turning the TV On and Off Press the POWER button on the remote control. Move Enter Skip Plug & Play Select the antennas to memorize the channels of the...
User Manual (ENGLISH)
Page 19
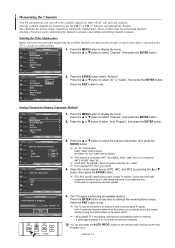
... ... Select the correct signal source (STD, HRC, and IRC) by using the number buttons on the remote control to display the menu. Memorizing the Channels Your TV can memorize and store all available stations. Press the ... Air Start Cable Start Air + Cable Start Move Enter Return TV Auto Program Select the cable system. Air+Cable: "Air" and "Cable" antenna signals. ➢ If the antenna is connected to ANT 1 IN (CABLE), select "Cable" and if...
... ... Select the correct signal source (STD, HRC, and IRC) by using the number buttons on the remote control to display the menu. Memorizing the Channels Your TV can memorize and store all available stations. Press the ... Air Start Cable Start Air + Cable Start Move Enter Return TV Auto Program Select the cable system. Air+Cable: "Air" and "Cable" antenna signals. ➢ If the antenna is connected to ANT 1 IN (CABLE), select "Cable" and if...
User Manual (ENGLISH)
Page 41
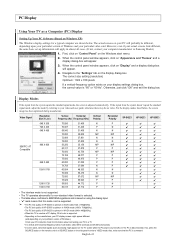
... • The interlace mode is not supported. • The TV operates abnormally if a non-standard video format is selected. • The table above conforms to IBM/VESA regulations and is based on using the Analog Input. • "✔" mark means that the PC is connected. If so, press the SOURCE button on the remote control or SOURCE button on the display dialog-box. The actual screens on your PC...
... • The interlace mode is not supported. • The TV operates abnormally if a non-standard video format is selected. • The table above conforms to IBM/VESA regulations and is based on using the Analog Input. • "✔" mark means that the PC is connected. If so, press the SOURCE button on the remote control or SOURCE button on the display dialog-box. The actual screens on your PC...

User Manual (ENGLISH)
Page 44
... "Manual", then press the ENTER button. Press the ... Set the date and time you want by pressing the Move Adjust Return number buttons on the remote control. or † button to select "Clock". Press the ... English-44 Continued... Clock Sleep Timer On Timer Off Timer √ : Off √ : Inactivated √ : Inactivated √ Move Enter Return TV Clock Mode Clock Set Time Zone DST Clock : AMuatonual Auto : Off...
... "Manual", then press the ENTER button. Press the ... Set the date and time you want by pressing the Move Adjust Return number buttons on the remote control. or † button to select "Clock". Press the ... English-44 Continued... Clock Sleep Timer On Timer Off Timer √ : Off √ : Inactivated √ : Inactivated √ Move Enter Return TV Clock Mode Clock Set Time Zone DST Clock : AMuatonual Auto : Off...
User Manual (ENGLISH)
Page 47
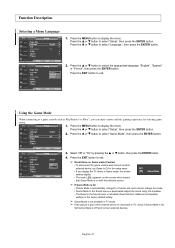
... and users cannot change the mode. • Sound Mode in TV mode. ➢ If the picture is poor when external device is connected to the factory default setting. ➢ Game Mode is not available in the Sound menu is On. Adjust the sound using the equalizer. • The Reset in the setup menu. • If you can enjoy a more realistic gaming experience by pressing the ... Press the ... Move Enter Return TV Plug & Play Language Time Game Mode V-Chip Caption...
... and users cannot change the mode. • Sound Mode in TV mode. ➢ If the picture is poor when external device is connected to the factory default setting. ➢ Game Mode is not available in the Sound menu is On. Adjust the sound using the equalizer. • The Reset in the setup menu. • If you can enjoy a more realistic gaming experience by pressing the ... Press the ... Move Enter Return TV Plug & Play Language Time Game Mode V-Chip Caption...

User Manual (ENGLISH)
Page 48
...: This option consists of "Default", "Transparent", "Translucent", "Solid", and "Flashing". Press the CAPTION button on the broadcast. 6. Press the ... or † button to display the menu. You can change the background opacity of the caption. • Return to Default: This option sets each of "Default", "White", "Black", "Red", "Green", "Blue", "Yellow", "Magenta", and "Cyan". Press the MENU button to select the desired sub-menu options Caption Caption Mode : On √ : Default √ (see options...
...: This option consists of "Default", "Transparent", "Translucent", "Solid", and "Flashing". Press the CAPTION button on the broadcast. 6. Press the ... or † button to display the menu. You can change the background opacity of the caption. • Return to Default: This option sets each of "Default", "White", "Black", "Red", "Green", "Blue", "Yellow", "Magenta", and "Cyan". Press the MENU button to select the desired sub-menu options Caption Caption Mode : On √ : Default √ (see options...

User Manual (ENGLISH)
Page 49
..., PC, HDMI(DVI) modes. • The availability of captions depends on the program being broadcast. Alternate program-related caption data, typically second language captions. • CC4: Special Non-Synchronous Use Captions. Similar to select "Caption", then press the ENTER button. You can also press the CAPTION button on digital channels.) TV Plug & Play Language Time Game Mode V-Chip Caption † More Setup √ : English √ √ : Off √ √ √ 1. Viewing Closed Captions (On-Screen Text Messages...
..., PC, HDMI(DVI) modes. • The availability of captions depends on the program being broadcast. Alternate program-related caption data, typically second language captions. • CC4: Special Non-Synchronous Use Captions. Similar to select "Caption", then press the ENTER button. You can also press the CAPTION button on digital channels.) TV Plug & Play Language Time Game Mode V-Chip Caption † More Setup √ : English √ √ : Off √ √ √ 1. Viewing Closed Captions (On-Screen Text Messages...
User Manual (ENGLISH)
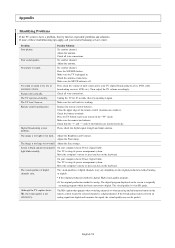
Page 59
... battery terminals. Power, Signal Cable. light blinks steadily. Power, Signal Cable. English-59 The TV won't turn on the screen is a digital channel. Make sure the TV is using its power management system. The TV is plugged in the "TV" mode. Although the TV caption shows HD, the visual quality is off. Check all wire connections. Please check the digital signal strength and input antenna. Adjust the Brightness and Contrast. Adjust the Size settings. The TV...
... battery terminals. Power, Signal Cable. light blinks steadily. Power, Signal Cable. English-59 The TV won't turn on the screen is a digital channel. Make sure the TV is using its power management system. The TV is plugged in the "TV" mode. Although the TV caption shows HD, the visual quality is off. Check all wire connections. Please check the digital signal strength and input antenna. Adjust the Brightness and Contrast. Adjust the Size settings. The TV...

User Manual (ENGLISH)
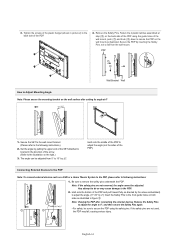
Page 60
... in the direction of the arrow after hanging the SET on the wall mount bracket. • Please avoid catching your dealer.) Please use only the parts and components provided for installing on cement walls. ASSY-HINGE (RIGHT) Fixing the TV panel to the installation guide supplied with your fingers while installing and adjusting the angle. • Please tightly secure the wall mount bracket to the wall to assemble the Wall Mount Bracket 1.
... in the direction of the arrow after hanging the SET on the wall mount bracket. • Please avoid catching your dealer.) Please use only the parts and components provided for installing on cement walls. ASSY-HINGE (RIGHT) Fixing the TV panel to the installation guide supplied with your fingers while installing and adjusting the angle. • Please tightly secure the wall mount bracket to the wall to assemble the Wall Mount Bracket 1.
User Manual (ENGLISH)
Page 61
... Adjust Mounting Angle Note: Please secure the mounting bracket on the wall surface after connecting the external devices Remove the Safety Pins to adjust the angle to 0°, and then secure the Safety Pins again. • For safety, be sure to secure the PDP using the guide holes of the PDP). Be sure to adjust the angle (not the sides of the wall mount, push (!) and hook...
... Adjust Mounting Angle Note: Please secure the mounting bracket on the wall surface after connecting the external devices Remove the Safety Pins to adjust the angle to 0°, and then secure the Safety Pins again. • For safety, be sure to secure the PDP using the guide holes of the PDP). Be sure to adjust the angle (not the sides of the wall mount, push (!) and hook...


