

Open Source Guide (ENGLISH)
Page 1
... conditions for questions regarding open sources, contact Samsung via Email (vdswmanager@samsung. they , too, receive or can change under the scope of this General Public License. c) If the modified program normally reads commands interactively when run, you must be distributed under the terms of Sections 1 and 2 above .) The source code for a work based on a medium customarily used for each copy an...
... conditions for questions regarding open sources, contact Samsung via Email (vdswmanager@samsung. they , too, receive or can change under the scope of this General Public License. c) If the modified program normally reads commands interactively when run, you must be distributed under the terms of Sections 1 and 2 above .) The source code for a work based on a medium customarily used for each copy an...

Open Source Guide (ENGLISH)
Page 2
... to most effectively convey the exclusion of warranty; You can redistribute and change. To apply these terms (or, alternatively, under the terms of each file should have at least the "copyright" line and a pointer to where the full notice is safest to attach them to the library. It is found. ...How to Apply These Terms to Your New Libraries If you develop a new library, and you want it to be of the greatest possible use to the public, we recommend making it free software ...
... to most effectively convey the exclusion of warranty; You can redistribute and change. To apply these terms (or, alternatively, under the terms of each file should have at least the "copyright" line and a pointer to where the full notice is safest to attach them to the library. It is found. ...How to Apply These Terms to Your New Libraries If you develop a new library, and you want it to be of the greatest possible use to the public, we recommend making it free software ...
User Manual (ENGLISH)
Page 6
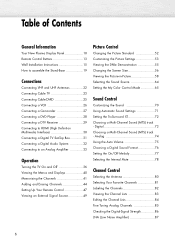
... Your New Plasma Display Panel 10 Remote Control Buttons 13 Wall Installation Instructions 15 How to assemble the Stand-Base 19 Connections Connecting VHF and UHF Antennas 22 Connecting Cable TV 23 Connecting CableCARD 25 Connecting a VCR 26 Connecting a Camcorder 27 Connecting a DVD Player 28 Connecting a DTV Receiver 29 Connecting to HDMI (High Definition Multimedia Interface 30 Connecting a Digital TV Set-Top Box 31 Connecting a Digital Audio System 32 Connecting to an Analog Amplifier 33 Operation Turning the TV On and Off 36 Viewing the Menus...
... Your New Plasma Display Panel 10 Remote Control Buttons 13 Wall Installation Instructions 15 How to assemble the Stand-Base 19 Connections Connecting VHF and UHF Antennas 22 Connecting Cable TV 23 Connecting CableCARD 25 Connecting a VCR 26 Connecting a Camcorder 27 Connecting a DVD Player 28 Connecting a DTV Receiver 29 Connecting to HDMI (High Definition Multimedia Interface 30 Connecting a Digital TV Set-Top Box 31 Connecting a Digital Audio System 32 Connecting to an Analog Amplifier 33 Operation Turning the TV On and Off 36 Viewing the Menus...
User Manual (ENGLISH)
Page 7
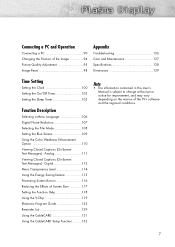
... the Image 94 Picture Quality Adjustment 95 Image Reset 98 Appendix Troubleshooting 136 Care and Maintenance 137 Specifications 138 Dimensions 139 Time Setting Setting the Clock 100 Setting the On/Off Timer 102 Setting the Sleep Timer 103 Function Description Selecting a Menu Language 106 Digital Noise Reduction 107 Selecting the Film Mode 108 Setting the Blue Screen 109 Using the Color Weakness Enhancement Option 110 Viewing Closed Captions (On-Screen Text Messages) - Connecting a PC and Operation Connecting a PC 90 Changing...
... the Image 94 Picture Quality Adjustment 95 Image Reset 98 Appendix Troubleshooting 136 Care and Maintenance 137 Specifications 138 Dimensions 139 Time Setting Setting the Clock 100 Setting the On/Off Timer 102 Setting the Sleep Timer 103 Function Description Selecting a Menu Language 106 Digital Noise Reduction 107 Selecting the Film Mode 108 Setting the Blue Screen 109 Using the Color Weakness Enhancement Option 110 Viewing Closed Captions (On-Screen Text Messages) - Connecting a PC and Operation Connecting a PC 90 Changing...
User Manual (ENGLISH)
Page 12
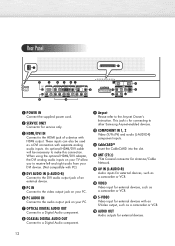
... for Antenna/Cable Network. Ò AV IN (L-AUDIO-R) Audio inputs for external devices, such as a camcorder or VCR. Ú VIDEO Video input for external devices, such as a camcorder or VCR. Æ S-VIDEO Video input for external devices with an S-Video output, such as a DVI connection with PC) ¨ DVI AUDIO IN (L-AUDIO-R) Connect to the DVI audio output jack of a device with HDMI output. Rear Panel Œ POWER IN Connect the supplied power cord. ´ SERVICE ONLY Connector for external devices. 12 When using the optional HDMI/DVI adapter, the DVI analog audio inputs...
... for Antenna/Cable Network. Ò AV IN (L-AUDIO-R) Audio inputs for external devices, such as a camcorder or VCR. Ú VIDEO Video input for external devices, such as a camcorder or VCR. Æ S-VIDEO Video input for external devices with an S-Video output, such as a DVI connection with PC) ¨ DVI AUDIO IN (L-AUDIO-R) Connect to the DVI audio output jack of a device with HDMI output. Rear Panel Œ POWER IN Connect the supplied power cord. ´ SERVICE ONLY Connector for external devices. 12 When using the optional HDMI/DVI adapter, the DVI analog audio inputs...

User Manual (ENGLISH)
Page 13
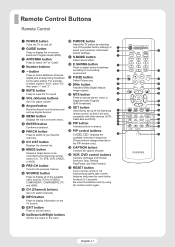
... available video sources (TV, AV, S-VIDEO, COMPONENT1, COMPONENT2, PC, and HDMI). ı CH (Channel) buttons Use it to select "Air" or "Cable". ¨ Number buttons ˆ - For example, to select channel "54-3", press "54", then press "-" and "3". Ø MUTE button Press to mute the TV sound. ∏ VOL (Volume) buttons Use it to switch channels. ˜ INFO button Press to display information on -screen Electronic Program Guide (EPG). ˇ ANTENNA button Press to adjust volume. Remote Control Buttons Remote Control Œ POWER button Turns the...
... available video sources (TV, AV, S-VIDEO, COMPONENT1, COMPONENT2, PC, and HDMI). ı CH (Channel) buttons Use it to select "Air" or "Cable". ¨ Number buttons ˆ - For example, to select channel "54-3", press "54", then press "-" and "3". Ø MUTE button Press to mute the TV sound. ∏ VOL (Volume) buttons Use it to switch channels. ˜ INFO button Press to display information on -screen Electronic Program Guide (EPG). ˇ ANTENNA button Press to adjust volume. Remote Control Buttons Remote Control Œ POWER button Turns the...
User Manual (ENGLISH)
Page 38
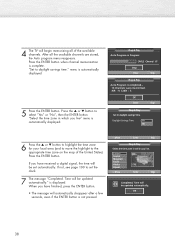
Press the ENTER button when channel memorization is automatically displayed. 5 Press the ENTER button. "Select the time zone in which you have received a digital signal, the time will be updated automatically. If you live . If not, see page 100 to set automatically. "Set to select "Yes" or "No", then the ENTER button. menu is complete. CABLE Channel 67 Stop Enter Skip Plug & Play Auto Program is displayed. AIR : 9, Cable : 5. OK 38 After all...
Press the ENTER button when channel memorization is automatically displayed. 5 Press the ENTER button. "Select the time zone in which you have received a digital signal, the time will be updated automatically. If you live . If not, see page 100 to set automatically. "Set to select "Yes" or "No", then the ENTER button. menu is complete. CABLE Channel 67 Stop Enter Skip Plug & Play Auto Program is displayed. AIR : 9, Cable : 5. OK 38 After all...
User Manual (ENGLISH)
Page 47
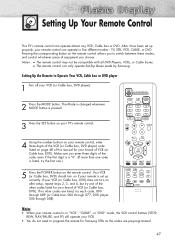
... button on the remote control allows you to program the remote for your remote is pressed. 3 Press the SET button on your TV's remote control. 4 Using the number buttons on your remote control, enter three digits of the VCR (or Cable box, DVD player) code listed on if your brand of the other codes are pre-programmed. 47 The Mode is changed whenever MODE button is set up correctly. Setting Up Your Remote Control This TV's remote control can only operate Set-Top Boxes made by Samsung...
... button on the remote control allows you to program the remote for your remote is pressed. 3 Press the SET button on your TV's remote control. 4 Using the number buttons on your remote control, enter three digits of the VCR (or Cable box, DVD player) code listed on if your brand of the other codes are pre-programmed. 47 The Mode is changed whenever MODE button is set up correctly. Setting Up Your Remote Control This TV's remote control can only operate Set-Top Boxes made by Samsung...
User Manual (ENGLISH)
Page 57
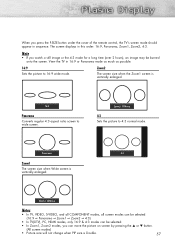
... 4:3 mode for a long time (over 2 hours), an image may be selected. • In Zoom1, Zoom2 modes, you press the P.SIZE button under the cover of the remote control, the TV's screen mode should appear in 16:9 or Panorama mode as much as possible. 16:9 Sets the picture to 16:9 wide mode. When you can be burned onto the screen. Panorama 4:3 Zoom1 The screen size when Wide screen is vertically enlarged...
... 4:3 mode for a long time (over 2 hours), an image may be selected. • In Zoom1, Zoom2 modes, you press the P.SIZE button under the cover of the remote control, the TV's screen mode should appear in 16:9 or Panorama mode as much as possible. 16:9 Sets the picture to 16:9 wide mode. When you can be burned onto the screen. Panorama 4:3 Zoom1 The screen size when Wide screen is vertically enlarged...
User Manual (ENGLISH)
Page 136
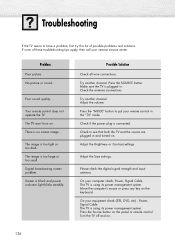
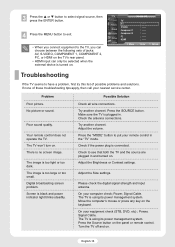
... TV is too light or too dark. Adjust the volume. Please check the digital signal strength and input antenna. Power, Signal Cable. The TV is no screen image. Press the Source button on the keyboard. Problem Poor picture. Digital broadcasting screen problem. Check to put your remote control in and turned on. Your remote control does not operate the TV. Try another channel. Power, Signal Cable. Adjust the Size settings. There is using its power management system. Check the antenna connections. Press the "MODE" button to see...
... TV is too light or too dark. Adjust the volume. Please check the digital signal strength and input antenna. Power, Signal Cable. The TV is no screen image. Press the Source button on the keyboard. Problem Poor picture. Digital broadcasting screen problem. Check to put your remote control in and turned on. Your remote control does not operate the TV. Try another channel. Power, Signal Cable. Adjust the Size settings. There is using its power management system. Check the antenna connections. Press the "MODE" button to see...
User Manual (ENGLISH)
Page 138
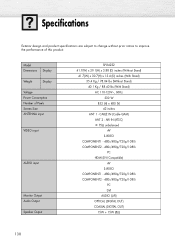
... Pixels Screen Size ANTENNA input VIDEO input AUDIO input Monitor Output Audio Output Speaker Output SP-R4232 41.7(W) x 29.1(H) x 3.88 (D) inches (Without Stand) 41.7(W) x 30.7(H) x 13.4 (D) inches (With Stand) 35.4 Kg / 78.04 lbs (Without Stand) 40.1 Kg / 88.40 lbs (With Stand) AC 110-120V~, 60Hz 330 W 852 (H) x 480 (V) 42 inches ANT 1 - AIR IN (ATSC) 75Ω unbalanced AV S-VIDEO COMPONENT1 - 480i/480p/720p/1080i COMPONENT2 - 480i/480p/720p/1080i PC HDMI (DVI Compatible) AV S-VIDEO COMPONENT1...
... Pixels Screen Size ANTENNA input VIDEO input AUDIO input Monitor Output Audio Output Speaker Output SP-R4232 41.7(W) x 29.1(H) x 3.88 (D) inches (Without Stand) 41.7(W) x 30.7(H) x 13.4 (D) inches (With Stand) 35.4 Kg / 78.04 lbs (Without Stand) 40.1 Kg / 88.40 lbs (With Stand) AC 110-120V~, 60Hz 330 W 852 (H) x 480 (V) 42 inches ANT 1 - AIR IN (ATSC) 75Ω unbalanced AV S-VIDEO COMPONENT1 - 480i/480p/720p/1080i COMPONENT2 - 480i/480p/720p/1080i PC HDMI (DVI Compatible) AV S-VIDEO COMPONENT1...
Quick Guide (ENGLISH)
Page 11
... to adjust screen brightness according to surrounding environment. ◊ P.SIZE button Select Picture size. ± DNIe button Activates DNIe (Digital Natural Image engine). ≠ MTS button Press to choose stereo, mono or Separate Audio Program (SAP broadcast). - " Anynet button Runs the Anynet view functions and sets up of the available video sources (TV, AV, S-VIDEO, COMPONENT1, COMPONENT2, PC, and HDMI). ı CH (Channel) buttons Use it will work compatibly with other devices (VCR, Cable Box and DVD). -
... to adjust screen brightness according to surrounding environment. ◊ P.SIZE button Select Picture size. ± DNIe button Activates DNIe (Digital Natural Image engine). ≠ MTS button Press to choose stereo, mono or Separate Audio Program (SAP broadcast). - " Anynet button Runs the Anynet view functions and sets up of the available video sources (TV, AV, S-VIDEO, COMPONENT1, COMPONENT2, PC, and HDMI). ı CH (Channel) buttons Use it will work compatibly with other devices (VCR, Cable Box and DVD). -

Quick Guide (ENGLISH)
Page 15
... ENTER button at any time to select "Digital Channel or Analog Channel", then select the cable system. Note • The TV must be connected to an antenna in memory when channels are selected by using the number buttons on the remote control. 2 Press the ENTER button to select "Source List". Move Enter Return TV Auto Program Select the cable system. Setting the Signal Source 1 Press the MENU button. Press the ▲ or ▼ button to interrupt...
... ENTER button at any time to select "Digital Channel or Analog Channel", then select the cable system. Note • The TV must be connected to an antenna in memory when channels are selected by using the number buttons on the remote control. 2 Press the ENTER button to select "Source List". Move Enter Return TV Auto Program Select the cable system. Setting the Signal Source 1 Press the MENU button. Press the ▲ or ▼ button to interrupt...
Quick Guide (ENGLISH)
Page 16
... too dark. Digital broadcasting screen problem. Make sure the TV is no screen image. Power, Signal Cable. There is plugged in. Screen is using its power management system. Try another channel. Power, Signal Cable. The TV is black and power indicator light blinks steadily. Press the Source button on . Turn the TV off and on the panel or remote control. Problem Poor picture. The TV won't turn on the keyboard. Possible Solution Check all wire connections. Check the antenna connections. Check to...
... too dark. Digital broadcasting screen problem. Make sure the TV is no screen image. Power, Signal Cable. There is plugged in. Screen is using its power management system. Try another channel. Power, Signal Cable. The TV is black and power indicator light blinks steadily. Press the Source button on . Turn the TV off and on the panel or remote control. Problem Poor picture. The TV won't turn on the keyboard. Possible Solution Check all wire connections. Check the antenna connections. Check to...

User Manual (user Manual) (ver.1.0) (English)
Page 6
... 87 6 Digital 73 Choosing a Multi-Channel Sound (MTS) track - Table of Contents General Information Your New Plasma Display Panel 10 Remote Control Buttons 13 Wall Installation Instructions 15 How to assemble the Stand-Base 19 Connections Connecting VHF and UHF Antennas 22 Connecting Cable TV 23 Connecting CableCARD 25 Connecting a VCR 26 Connecting a Camcorder 27 Connecting a DVD Player 28 Connecting a DTV Receiver 29 Connecting to HDMI (High Definition Multimedia Interface 30 Connecting a Digital TV Set-Top Box 31 Connecting a Digital Audio System 32 Connecting to an...
... 87 6 Digital 73 Choosing a Multi-Channel Sound (MTS) track - Table of Contents General Information Your New Plasma Display Panel 10 Remote Control Buttons 13 Wall Installation Instructions 15 How to assemble the Stand-Base 19 Connections Connecting VHF and UHF Antennas 22 Connecting Cable TV 23 Connecting CableCARD 25 Connecting a VCR 26 Connecting a Camcorder 27 Connecting a DVD Player 28 Connecting a DTV Receiver 29 Connecting to HDMI (High Definition Multimedia Interface 30 Connecting a Digital TV Set-Top Box 31 Connecting a Digital Audio System 32 Connecting to an...

User Manual (user Manual) (ver.1.0) (English)
Page 12
... Owner's Instruction. These inputs can also be used as a camcorder or VCR. Æ S-VIDEO Video input for external devices with PC) ¨ DVI AUDIO IN (L-AUDIO-R) Connect to the DVI audio output jack of a device with separate analog audio inputs. An optional HDMI/DVI cable will be sure to match the color coded input terminals and cable jacks. 12 Note • Please be necessary to make this connection. Rear Panel Œ POWER IN Connect the supplied power cord. ´ SERVICE ONLY Connector for service...
... Owner's Instruction. These inputs can also be used as a camcorder or VCR. Æ S-VIDEO Video input for external devices with PC) ¨ DVI AUDIO IN (L-AUDIO-R) Connect to the DVI audio output jack of a device with separate analog audio inputs. An optional HDMI/DVI cable will be sure to match the color coded input terminals and cable jacks. 12 Note • Please be necessary to make this connection. Rear Panel Œ POWER IN Connect the supplied power cord. ´ SERVICE ONLY Connector for service...

User Manual (user Manual) (ver.1.0) (English)
Page 13
... on-screen menu. ˝ ENTER button Confirms a selection. Ô FAV.CH button Press to switch to your favorite channels. CH LIST button Displays the channel list. Ò MODE button Selects a target device to be controlled by the Samsung remote control (i.e., TV, STB, VCR, CABLE, or DVD). Ú PRE-CH button Tunes to the previous channel. Æ SOURCE button Press to display all of the available video sources (TV, AV, S-VIDEO, COMPONENT1, COMPONENT2, PC, and HDMI). ı CH (Channel) buttons Use...
... on-screen menu. ˝ ENTER button Confirms a selection. Ô FAV.CH button Press to switch to your favorite channels. CH LIST button Displays the channel list. Ò MODE button Selects a target device to be controlled by the Samsung remote control (i.e., TV, STB, VCR, CABLE, or DVD). Ú PRE-CH button Tunes to the previous channel. Æ SOURCE button Press to display all of the available video sources (TV, AV, S-VIDEO, COMPONENT1, COMPONENT2, PC, and HDMI). ı CH (Channel) buttons Use...

User Manual (user Manual) (ver.1.0) (English)
Page 38
... the United States). "Set to select "Yes" or "No", then the ENTER button. 4 The TV will begin memorizing all the available channels are stored, the Auto program menu reappears. Press the ENTER button to select OK when channel memorization is completed. 14 Channels were memorized. Press the ▲ or ▼ button to daylight savings time." Cable Channel 67 Stop Enter Skip Plug & Play Auto Program is complete. is...
... the United States). "Set to select "Yes" or "No", then the ENTER button. 4 The TV will begin memorizing all the available channels are stored, the Auto program menu reappears. Press the ENTER button to select OK when channel memorization is completed. 14 Channels were memorized. Press the ▲ or ▼ button to daylight savings time." Cable Channel 67 Stop Enter Skip Plug & Play Auto Program is complete. is...
User Manual (user Manual) (ver.1.0) (English)
Page 136
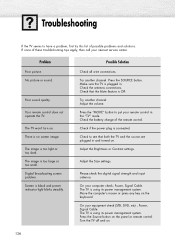
... TV and the source are plugged in and turned on. Check the battery charge of these troubleshooting tips apply, then call your remote control in . Press the Source button on . There is using its power management system. Power, Signal Cable. The TV is no screen image. The TV won't turn on the panel or remote control. The image is connected. Try another channel. Digital broadcasting screen problem. Adjust the volume. Check if the power plug is too light or too...
... TV and the source are plugged in and turned on. Check the battery charge of these troubleshooting tips apply, then call your remote control in . Press the Source button on . There is using its power management system. Power, Signal Cable. The TV is no screen image. The TV won't turn on the panel or remote control. The image is connected. Try another channel. Digital broadcasting screen problem. Adjust the volume. Check if the power plug is too light or too...

User Manual (user Manual) (ver.1.0) (English)
Page 138
... (8Ω) 138 Specifications Exterior design and product specifications are subject to change without prior notice to improve the performance of Pixels Screen Size ANTENNA input VIDEO input AUDIO input Sound Output Audio Output Speaker Output SP-R4232 41.7(W) x 29.1(H) x 3.88 (D) inches (Without Stand) 41.7(W) x 30.7(H) x 13.4 (D) inches (With Stand) 35.4 Kg / 78.04 lbs (Without Stand) 40.1 Kg / 88.40 lbs (With Stand) AC 110-120V~, 60Hz 330 W 852 (H) x 480 (V) 42 inches ANT 1 - Model Dimensions Display Weight Display Voltage Power Consumption Number of this...
... (8Ω) 138 Specifications Exterior design and product specifications are subject to change without prior notice to improve the performance of Pixels Screen Size ANTENNA input VIDEO input AUDIO input Sound Output Audio Output Speaker Output SP-R4232 41.7(W) x 29.1(H) x 3.88 (D) inches (Without Stand) 41.7(W) x 30.7(H) x 13.4 (D) inches (With Stand) 35.4 Kg / 78.04 lbs (Without Stand) 40.1 Kg / 88.40 lbs (With Stand) AC 110-120V~, 60Hz 330 W 852 (H) x 480 (V) 42 inches ANT 1 - Model Dimensions Display Weight Display Voltage Power Consumption Number of this...


