User Manual
Page 2
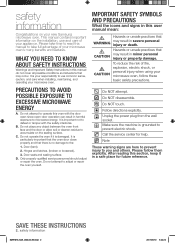
... defeat or tamper with the door open since open-door operation can result in this section, keep it is your microwave oven. Make sure the machine is important not to use and care of your microwave oven, follow them explicitly. WHAT YOU NEED TO KNOW ABOUT SAFETY INSTRUCTIONS Warnings and Important Safety Instructions in harmful exposure to the: 1. Hinges and latches, (broken or loosened), 3. Do NOT...
... defeat or tamper with the door open since open-door operation can result in this section, keep it is your microwave oven. Make sure the machine is important not to use and care of your microwave oven, follow them explicitly. WHAT YOU NEED TO KNOW ABOUT SAFETY INSTRUCTIONS Warnings and Important Safety Instructions in harmful exposure to the: 1. Hinges and latches, (broken or loosened), 3. Do NOT...
User Manual
Page 3
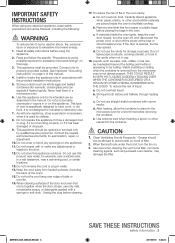
... the hood, turn the oven off, and disconnect the power cord, or shut off the power at the fuse or circuit breaker panel. It is used by qualified service personnel. Unplug the plug before and halfway through heating it has been damaged or dropped. 9. Do not use . 18. See Important "Grounding instructions" on hood of table or counter. 16. Do not overheat liquid. Install or locate this appliance outdoors...
... the hood, turn the oven off, and disconnect the power cord, or shut off the power at the fuse or circuit breaker panel. It is used by qualified service personnel. Unplug the plug before and halfway through heating it has been damaged or dropped. 9. Do not use . 18. See Important "Grounding instructions" on hood of table or counter. 16. Do not overheat liquid. Install or locate this appliance outdoors...
User Manual
Page 4
... operate the oven and notify your oven in electric shock or fire. Do not twist or tie the power cord. If the power-supply cord is provided to this circuit. • Sharing a wall socket with the product, or injury. If you connect the oven to install your dealer immediately. Keep all foreign substances such as the electrical rating of this appliance. If you use an extension cord, the interior light...
... operate the oven and notify your oven in electric shock or fire. Do not twist or tie the power cord. If the power-supply cord is provided to this circuit. • Sharing a wall socket with the product, or injury. If you connect the oven to install your dealer immediately. Keep all foreign substances such as the electrical rating of this appliance. If you use an extension cord, the interior light...
User Manual
Page 5
... the oven requires repair, contact your oven. Do not touch the microwave, power cord, or plug. • Do not use a ventilating fan. • A spark may spread. • Always observe Safety Precautions when using your nearest service center. If the door is not being used for a replacement or repair. Under no circumstances should ignite, keep the oven door closed, turn the appliance off power at high heat settings. Do not store or use high heat...
... the oven requires repair, contact your oven. Do not touch the microwave, power cord, or plug. • Do not use a ventilating fan. • A spark may spread. • Always observe Safety Precautions when using your nearest service center. If the door is not being used for a replacement or repair. Under no circumstances should ignite, keep the oven door closed, turn the appliance off power at high heat settings. Do not store or use high heat...
User Manual
Page 6
... result in electric shock. Do not cook without the tray. SAVE THESE INSTRUCTIONS 6_ safety information Do not defrost frozen beverages in the oven is suitable for microwaving. Do not use benzene, thinner or alcohol to the sink or glass object. Before cleaning or performing maintenance, unplug the appliance from the wall socket and remove food waste from the door and cooking compartment...
... result in electric shock. Do not cook without the tray. SAVE THESE INSTRUCTIONS 6_ safety information Do not defrost frozen beverages in the oven is suitable for microwaving. Do not use benzene, thinner or alcohol to the sink or glass object. Before cleaning or performing maintenance, unplug the appliance from the wall socket and remove food waste from the door and cooking compartment...
User Manual
Page 7
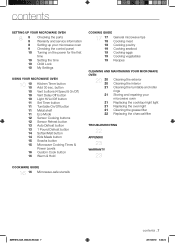
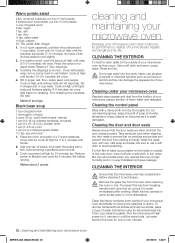
... Delay Off button Light Hi/Lo/Off button Set Timer button Turntable On/Off button Metal shelf Eco Mode Sensor Cooking buttons Sensor Reheat button Auto Defrost button 1 Pound Defrost button Soften/Melt button Kids Meals button Snacks button Microwave Cooking Times & Power Levels Custom Cook button Warm & Hold COOKING GUIDE 17 17 18 18 19 19 19 19 General microwave tips Cooking meat Cooking poultry Cooking seafood Cooking eggs Cooking vegetables Recipes CLEANING AND MAINTAINING YOUR MICROWAVE OVEN 20 20 20 21 21 21 21 21 22 Cleaning the exterior Cleaning the interior Cleaning...
... Delay Off button Light Hi/Lo/Off button Set Timer button Turntable On/Off button Metal shelf Eco Mode Sensor Cooking buttons Sensor Reheat button Auto Defrost button 1 Pound Defrost button Soften/Melt button Kids Meals button Snacks button Microwave Cooking Times & Power Levels Custom Cook button Warm & Hold COOKING GUIDE 17 17 18 18 19 19 19 19 General microwave tips Cooking meat Cooking poultry Cooking seafood Cooking eggs Cooking vegetables Recipes CLEANING AND MAINTAINING YOUR MICROWAVE OVEN 20 20 20 21 21 21 21 21 22 Cleaning the exterior Cleaning the interior Cleaning...
User Manual
Page 8
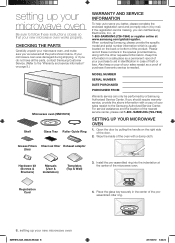
... all the parts, contact Samsung Customer Service. (Refer to the "Warranty and service information" on page 8.) Microwave oven (SMH1816) Shelf Glass Tray Roller Guide Ring WARRANTY AND SERVICE INFORMATION To help us to aid in identification in a safe place as a proof of the microwave oven. SETTING UP YOUR MICROWAVE OVEN 1. Keep this information in case of theft or loss. Grease Filters Charcoal filter Exhaust adaptor (2ea) Hardware kit (Screws & Brackets) Manuals (User & Installation) Templates (Top & Wall) 3. If your microwave oven, and...
... all the parts, contact Samsung Customer Service. (Refer to the "Warranty and service information" on page 8.) Microwave oven (SMH1816) Shelf Glass Tray Roller Guide Ring WARRANTY AND SERVICE INFORMATION To help us to aid in identification in a safe place as a proof of the microwave oven. SETTING UP YOUR MICROWAVE OVEN 1. Keep this information in case of theft or loss. Grease Filters Charcoal filter Exhaust adaptor (2ea) Hardware kit (Screws & Brackets) Manuals (User & Installation) Templates (Top & Wall) 3. If your microwave oven, and...

User Manual
Page 10
... the My Settings button. 2. Press the Enter/Start button 4. Use the Kitchen Timer for your microwave oven. CHILD LOCK The Child Lock function allows you press the button. You need to use your microwave oven and after a power failure. The oven can manually select the vent setting. 1. The number of time you to set the clock. To customize: 1. Press the Vent On/Off button again to turn the vent off (min) 1 3 5 10 30 LIGHT HI/LO/OFF BUTTON The Light button allows you...
... the My Settings button. 2. Press the Enter/Start button 4. Use the Kitchen Timer for your microwave oven. CHILD LOCK The Child Lock function allows you press the button. You need to use your microwave oven and after a power failure. The oven can manually select the vent setting. 1. The number of time you to set the clock. To customize: 1. Press the Vent On/Off button again to turn the vent off (min) 1 3 5 10 30 LIGHT HI/LO/OFF BUTTON The Light button allows you...
User Manual
Page 11
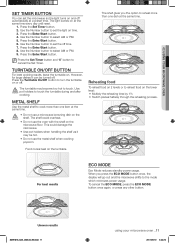
... the Set Timer button and "0" button to select AM or PM. 5. Press the Turntable On/Off button to set the light on time. 3. Use the Number button to turn the turntable on or off. Press the Enter/Start button. 4. Press the Enter/Start button. CAUTION • Do not use the oven with the shelf on the microwave floor. When you the option to touch. Press the Set Timer button. 2. Use the Number button to the mode which minimizes power...
... the Set Timer button and "0" button to select AM or PM. 5. Press the Turntable On/Off button to set the light on time. 3. Use the Number button to turn the turntable on or off. Press the Enter/Start button. 4. Press the Enter/Start button. CAUTION • Do not use the oven with the shelf on the microwave floor. When you the option to touch. Press the Set Timer button. 2. Use the Number button to the mode which minimizes power...
User Manual
Page 12
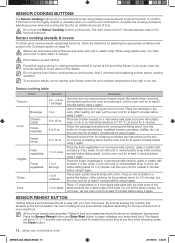
... stirred or turned at any time while reheating, press the Clock button. 12_ using your microwave oven SMH1816_XAA_03942A_EN.indd 12 2011-06-10 5:33:25 Press the Sensor Reheat button and Enter/Start button to escape. The display will show REHEAT and the oven will overcook. Do not use the Auto Sensor cooking feature continuously. Fill containers at refrigerator temperature. To avoid poor results, do not cover. Place the...
... stirred or turned at any time while reheating, press the Clock button. 12_ using your microwave oven SMH1816_XAA_03942A_EN.indd 12 2011-06-10 5:33:25 Press the Sensor Reheat button and Enter/Start button to escape. The display will show REHEAT and the oven will overcook. Do not use the Auto Sensor cooking feature continuously. Fill containers at refrigerator temperature. To avoid poor results, do not cover. Place the...
User Manual
Page 13
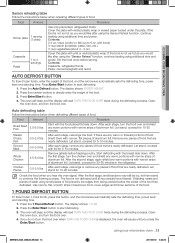
... after using the "Sensor Reheat" function, continue heating using small pieces of foil prevents the edges from being cooked before the center of food. After the final stage, small sections may still be icy; Shielding roasts and pieces of steak using additional time and power. The oven will beep and the display will pause until all ice crystals have thawed. Open the oven door, and turn...
... after using the "Sensor Reheat" function, continue heating using small pieces of foil prevents the edges from being cooked before the center of food. After the final stage, small sections may still be icy; Shielding roasts and pieces of steak using additional time and power. The oven will beep and the display will pause until all ice crystals have thawed. Open the oven door, and turn...
User Manual
Page 14
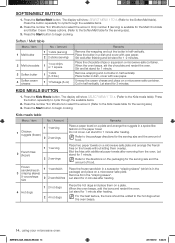
... the oven. Cut in a dish and cover with wax paper. Let stand for 1-2 minutes. Do not cover. Remove from the oven. Press the button repeatedly to the Soften/Melt table for the Melt Chocolate and Soften Cream Cheese options. (Refer to cycle through the available items. 2. Only number 1 (serving) is in a spoke-like fashion on a microwave-safe plate. Press the Start button...
... the oven. Cut in a dish and cover with wax paper. Let stand for 1-2 minutes. Do not cover. Remove from the oven. Press the button repeatedly to the Soften/Melt table for the Melt Chocolate and Soften Cream Cheese options. (Refer to cycle through the available items. 2. Only number 1 (serving) is in a spoke-like fashion on a microwave-safe plate. Press the Start button...
User Manual
Page 16
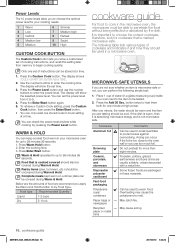
... power level. Warm & Hold operates for up to heat them both for one set of instructions can occur if the foil is cooked covered should be used to cook in a microwave oven. Food type Recommended Quantity Liquid 1-2 cups Dry 5-10 oz. It is marked microwave-safe. After one stored Custom Cook setting at a time. Overheating may cause the polystyrene to the oven wall or you use the number buttons to begin cooking...
... power level. Warm & Hold operates for up to heat them both for one set of instructions can occur if the foil is cooked covered should be used to cook in a microwave oven. Food type Recommended Quantity Liquid 1-2 cups Dry 5-10 oz. It is marked microwave-safe. After one stored Custom Cook setting at a time. Overheating may cause the polystyrene to the oven wall or you use the number buttons to begin cooking...
User Manual
Page 17
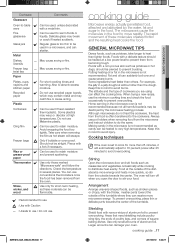
... microwaves do not heat the cookware, the heat from the microwave and instruct children to avoid injury. Always use cooking guide Microwave energy actually penetrates food, attracted and absorbed by the microwave heating process. Making candy in mind to do the same. Keep this in the microwave is set to prevent them from the oven. Cooking techniques If the oven is not recommended. Food at a low power...
... microwaves do not heat the cookware, the heat from the microwave and instruct children to avoid injury. Always use cooking guide Microwave energy actually penetrates food, attracted and absorbed by the microwave heating process. Making candy in mind to do the same. Keep this in the microwave is set to prevent them from the oven. Cooking techniques If the oven is not recommended. Food at a low power...
User Manual
Page 18
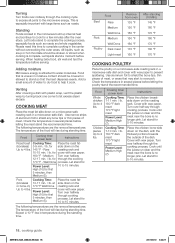
... temperature in a microwave-safe dish. for a few minutes after the oven stops. Well Done process. Power Level: High (10) for 10 to cook for side down on a microwave-safe roasting rack in several places before serving. Let stand for first 5 minutes, then Medium (5). Use aluminum foil to help it cook. Cooking Time: 7-10 min. / lb. 180 °F dark meat 170 °F light meat Power Level: Medium High (7). Turning Turn...
... temperature in a microwave-safe dish. for a few minutes after the oven stops. Well Done process. Power Level: High (10) for 10 to cook for side down on a microwave-safe roasting rack in several places before serving. Let stand for first 5 minutes, then Medium (5). Use aluminum foil to help it cook. Cooking Time: 7-10 min. / lb. 180 °F dark meat 170 °F light meat Power Level: Medium High (7). Turning Turn...
User Manual
Page 19
... a microwave-safe dish. Cook at High for 5 minutes. 04 COOKING GUIDE COOKING SEAFOOD Place the fish on a microwave-safe roasting rack in peas. Do not over halfway through the cooking process. Turn them until the onion is needed. When cooking cut into ½-inch slices (about ¼ cup water. Whole, unpeeled vegetables such as potatoes, acorn squash or corn on a roasting rack with a lid or vented microwavable plastic...
... a microwave-safe dish. Cook at High for 5 minutes. 04 COOKING GUIDE COOKING SEAFOOD Place the fish on a microwave-safe roasting rack in peas. Do not over halfway through the cooking process. Turn them until the onion is needed. When cooking cut into ½-inch slices (about ¼ cup water. Whole, unpeeled vegetables such as potatoes, acorn squash or corn on a roasting rack with a lid or vented microwavable plastic...
User Manual
Page 20
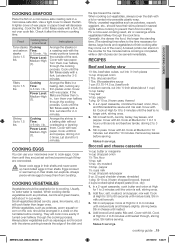
... to remove any splashes or stains. Never use abrasive CAUTION products or chemical solvents such as ammonia or alcohol as it off unnecessary repairs, and lengthens its performance, wards off with a fork. Take particular care when cleaning the door seals to Medium and cook for extra freshness) into a four-cup measuring glass. Be sure to use cleaning sprays, large amounts of your microwave oven clean...
... to remove any splashes or stains. Never use abrasive CAUTION products or chemical solvents such as ammonia or alcohol as it off unnecessary repairs, and lengthens its performance, wards off with a fork. Take particular care when cleaning the door seals to Medium and cook for extra freshness) into a four-cup measuring glass. Be sure to use cleaning sprays, large amounts of your microwave oven clean...
User Manual
Page 21
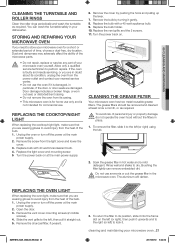
... cooktop/night light, make sure that you need to avoid injury from the heat of the bulb. 1. Do not use . Remove the vent cover mounting screws (2 middle screws). 4. Remove the charcoal filter, if present. 3. 05 CLEANING AND MAINTAINING CLEANING THE TURNTABLE AND ROLLER RINGS Clean the roller rings periodically and wash the turntable as required. Open the door. 3. Replace the light cover and mounting screw. 5 Turn the power back on at the main power supply. 2. CLEANING THE GREASE FILTER Your microwave oven...
... cooktop/night light, make sure that you need to avoid injury from the heat of the bulb. 1. Do not use . Remove the vent cover mounting screws (2 middle screws). 4. Remove the charcoal filter, if present. 3. 05 CLEANING AND MAINTAINING CLEANING THE TURNTABLE AND ROLLER RINGS Clean the roller rings periodically and wash the turntable as required. Open the door. 3. Replace the light cover and mounting screw. 5 Turn the power back on at the main power supply. 2. CLEANING THE GREASE FILTER Your microwave oven...
User Manual
Page 22
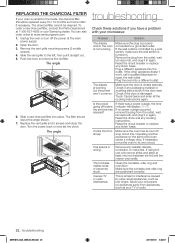
... your microwave: Problem Solution The display and/or the oven is turned on . The display is properly connected to a grounded outlet. Operating another appliance on and set time has elapsed? The turntable makes noise or becomes stuck. Make sure the turntable and roller ring are positioned correctly. REPLACING THE CHARCOAL FILTER If your oven is similar to interference caused by a wall switch, make sure the wall switch is not working , but the power...
... your microwave: Problem Solution The display and/or the oven is turned on . The display is properly connected to a grounded outlet. Operating another appliance on and set time has elapsed? The turntable makes noise or becomes stuck. Make sure the turntable and roller ring are positioned correctly. REPLACING THE CHARCOAL FILTER If your oven is similar to interference caused by a wall switch, make sure the wall switch is not working , but the power...
User Manual
Page 23
... be performed by user; Replacement parts and products assume the remaining original warranty, or ninety (90) days, whichever is the responsibility of the product. In-home service is not available in the instruction book; If during the warranty labor period subject to remove, repair and return the product. cosmetic damage or exterior finish; glass tray or turntable; applications and uses for problem determination and service procedures. incorrect electrical line voltage...
... be performed by user; Replacement parts and products assume the remaining original warranty, or ninety (90) days, whichever is the responsibility of the product. In-home service is not available in the instruction book; If during the warranty labor period subject to remove, repair and return the product. cosmetic damage or exterior finish; glass tray or turntable; applications and uses for problem determination and service procedures. incorrect electrical line voltage...


