
User Manual
Page 7
Table of Contents Section 1: Getting Started 7 Understanding this User Manual 7 Battery Cover 8 Battery 12 Extending Your Battery Life 15 Initial Device Configuration 16 Switching the Device On or Off 17 Restarting ... Google Account 19 Signing into Your Google Account 19 Retrieving your Google Account Password . . . 20 Confirming the Default Image and Video Storage Location 20 Creating a Samsung Account 20 Voice Mail 22 Visual Voicemail 23 Task Manager 24 Section 2: Understanding Your Device .....25 Features of Your Device 25 Front View 27 Back...
Table of Contents Section 1: Getting Started 7 Understanding this User Manual 7 Battery Cover 8 Battery 12 Extending Your Battery Life 15 Initial Device Configuration 16 Switching the Device On or Off 17 Restarting ... Google Account 19 Signing into Your Google Account 19 Retrieving your Google Account Password . . . 20 Confirming the Default Image and Video Storage Location 20 Creating a Samsung Account 20 Voice Mail 22 Visual Voicemail 23 Task Manager 24 Section 2: Understanding Your Device .....25 Features of Your Device 25 Front View 27 Back...
User Manual
Page 13
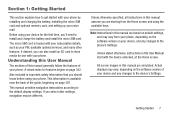
...Settings. The micro SIM card is important safety information that you are simulated. Understanding this User Manual The sections of this manual are starting from your phone, depending on the software version on page 307. This information is available near the back of your phone. Unless... this manual are based on default settings, and may be different. Section 1: Getting Started This section explains how to the default display settings. All screen images in this User Manual start with your subscription details, such as your device and any changes to store media for...
...Settings. The micro SIM card is important safety information that you are simulated. Understanding this User Manual The sections of this manual are starting from your phone, depending on the software version on page 307. This information is available near the back of your phone. Unless... this manual are based on default settings, and may be different. Section 1: Getting Started This section explains how to the default display settings. All screen images in this User Manual start with your subscription details, such as your device and any changes to store media for...

User Manual
Page 15
... micro SIM card and its information can be unlocked by scratching or bending, so be easily damaged by using the new micro SIM card. Getting Started 9 Some features on your device (such as your subscription details such as Wi-Fi Calling) can be careful when handling, inserting, or removing the card...
... micro SIM card and its information can be unlocked by scratching or bending, so be easily damaged by using the new micro SIM card. Getting Started 9 Some features on your device (such as your subscription details such as Wi-Fi Calling) can be careful when handling, inserting, or removing the card...
User Manual
Page 17
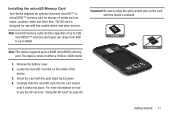
... the microSD card into the card socket until it clicks into place. Orient the card with this mobile device and other files. Correct Incorrect Getting Started 11 Installing the microSD Memory Card Your device supports an optional (external) microSD™ or microSDHC™ memory card for use the SD card see...
... the microSD card into the card socket until it clicks into place. Orient the card with this mobile device and other files. Correct Incorrect Getting Started 11 Installing the microSD Memory Card Your device supports an optional (external) microSD™ or microSDHC™ memory card for use the SD card see...

User Manual
Page 19
... for the first time. 1. A wall charger, which is recommended you fully charge the battery before you must fully charge the battery. Before using your local Samsung dealer for charging the battery, is included with the screen locked and indicates both the wall charger is connected and the battery is powered by...
... for the first time. 1. A wall charger, which is recommended you fully charge the battery before you must fully charge the battery. Before using your local Samsung dealer for charging the battery, is included with the screen locked and indicates both the wall charger is connected and the battery is powered by...

User Manual
Page 21
...: • Reduce your battery resources. In this process of a complete discharge and recharge can provide a better idea of the remaining charge on the display. Getting Started 15 Extending Your Battery Life Active applications, light levels, Bluetooth usage, and GPS functionality all act to review what features or functions have been consuming...
...: • Reduce your battery resources. In this process of a complete discharge and recharge can provide a better idea of the remaining charge on the display. Getting Started 15 Extending Your Battery Life Active applications, light levels, Bluetooth usage, and GPS functionality all act to review what features or functions have been consuming...

User Manual
Page 22
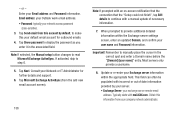
... will help to continue. 4. Tap Finish to navigate the screens. Read the on -screen tutorials to learn how to complete the setup process. 10. Tap Start. Note: Enabling Google location services can , over time, cause your Backup and Restore settings by placing a check mark alongside the associated field and tap Next...
... will help to continue. 4. Tap Finish to navigate the screens. Read the on -screen tutorials to learn how to complete the setup process. 10. Tap Start. Note: Enabling Google location services can , over time, cause your Backup and Restore settings by placing a check mark alongside the associated field and tap Next...

User Manual
Page 23
... Once the device has been configured, you can choose to either More Info.. (to read additional information) or Close to English at the factory. Getting Started 17 The device searches for your network and after finding it, you will not be prompted with setup screens again. 1. Press and hold (Power/End...
... Once the device has been configured, you can choose to either More Info.. (to read additional information) or Close to English at the factory. Getting Started 17 The device searches for your network and after finding it, you will not be prompted with setup screens again. 1. Press and hold (Power/End...

User Manual
Page 25
... create a Google™ Account when you first use your device in order to access Google applications, you must enter your account information. Before you are starting the device, tap ➔ (Gmail). If this is not the first time you only need to www.google.com. 2. Note: If you already have a Google... navigate to sign in . Signing into Your Google Account 1. Tap the Email and Password fields and enter your online Google account. Tap Sign in . Getting Started 19
... create a Google™ Account when you first use your device in order to access Google applications, you must enter your account information. Before you are starting the device, tap ➔ (Gmail). If this is not the first time you only need to www.google.com. 2. Note: If you already have a Google... navigate to sign in . Signing into Your Google Account 1. Tap the Email and Password fields and enter your online Google account. Tap Sign in . Getting Started 19

User Manual
Page 27
... you have already setup your email account on -screen instructions. - or - Tap and tap any of the screen. If you have previously created a Samsung account, tap Sign in the I accept all the terms above mentioned applications (such as AllShare Play). - Enter your first time, tap Create new account... following the steps outlined to Mailbox and follow the on the device, tap Go to complete your account via email. 6. Getting Started 21 or - Verify your registration. - If you have already verified your credentials via email by accessing the email address provided during...
... you have already setup your email account on -screen instructions. - or - Tap and tap any of the screen. If you have previously created a Samsung account, tap Sign in the I accept all the terms above mentioned applications (such as AllShare Play). - Enter your first time, tap Create new account... following the steps outlined to Mailbox and follow the on the device, tap Go to complete your account via email. 6. Getting Started 21 or - Verify your registration. - If you have already verified your credentials via email by accessing the email address provided during...

User Manual
Page 29
... left a voicemail message, and listen to the any message they want to delete. 3. Tap (Play). From the Home screen, tap (Visual Voicemail). (Applications) ➔ 2. Getting Started 23 Visual Voicemail Visual Voicemail enables users to view a list of the voicemail messages displays. From the Home screen, tap (Applications) ➔ (Visual Voicemail). 2. Important...
... left a voicemail message, and listen to the any message they want to delete. 3. Tap (Play). From the Home screen, tap (Visual Voicemail). (Applications) ➔ 2. Getting Started 23 Visual Voicemail Visual Voicemail enables users to view a list of the voicemail messages displays. From the Home screen, tap (Applications) ➔ (Visual Voicemail). 2. Important...

User Manual
Page 44
... your Home screen (#4 of these panels. Menu Key The Menu key ( ) activates an available menu function for using the applications on -screen keyboard is the starting point for the current screen or application. Function Keys Your device comes equipped with default shortcuts or applications.
... your Home screen (#4 of these panels. Menu Key The Menu key ( ) activates an available menu function for using the applications on -screen keyboard is the starting point for the current screen or application. Function Keys Your device comes equipped with default shortcuts or applications.

User Manual
Page 52
.... For more information, refer to "Kies Air" on page 242. 46 Latitude Lets you see your friends' locations and share yours with advanced functionality to start surfing the web.
.... For more information, refer to "Kies Air" on page 242. 46 Latitude Lets you see your friends' locations and share yours with advanced functionality to start surfing the web.

User Manual
Page 58
... left or right on the Home screen to scroll among the seven panels. • Drag: Press and hold your finger with some pressure before you start to access a menu of focus or to landscape by turning the device sideways. This allows you have reached the target position. • Rotate: Automatically change...
... left or right on the Home screen to scroll among the seven panels. • Drag: Press and hold your finger with some pressure before you start to access a menu of focus or to landscape by turning the device sideways. This allows you have reached the target position. • Rotate: Automatically change...

User Manual
Page 106
... touched, and those of the following advanced options: • Word completion tells your device to attempt to predict how to complete the word you have started. (A green check mark indicates the feature is enabled.) • Word completion point sets how many letters should be entered before a word prediction is enabled.) •...
... touched, and those of the following advanced options: • Word completion tells your device to attempt to predict how to complete the word you have started. (A green check mark indicates the feature is enabled.) • Word completion point sets how many letters should be entered before a word prediction is enabled.) •...
User Manual
Page 144
... password to manually place the cursor in the associated field. Important! Most servers only provide a username. 8. Update or re-enter your company network administrator. Typically starts with incorrect or out of necessary information. 7. Obtain this your user name and Password information. Tap Next. If activated, skip to make this information from...
... password to manually place the cursor in the associated field. Important! Most servers only provide a username. 8. Update or re-enter your company network administrator. Typically starts with incorrect or out of necessary information. 7. Obtain this your user name and Password information. Tap Next. If activated, skip to make this information from...
User Manual
Page 147
...: Lets you attach a customized signature to the bottom of all new outgoing emails. - Lets you always receive a copy of office settings, and configure both the start/ end dates and your outgoing message. • Size to retrieve emails configures the incoming email size allowed to pass through to automatically download email attachments...
...: Lets you attach a customized signature to the bottom of all new outgoing emails. - Lets you always receive a copy of office settings, and configure both the start/ end dates and your outgoing message. • Size to retrieve emails configures the incoming email size allowed to pass through to automatically download email attachments...

User Manual
Page 154
... friends together into a simple group conversation. to create another account. 4. In the upper text field, enter a name, email address, or circle. 9. 4. Tap Add account to start a new 8. At the Messenger screen, tap message. Messenger Messenger allows you get a new conversation in to use Google+. 5. From the Home screen, tap (Apps) ➔...
... friends together into a simple group conversation. to create another account. 4. In the upper text field, enter a name, email address, or circle. 9. 4. Tap Add account to start a new 8. At the Messenger screen, tap message. Messenger Messenger allows you get a new conversation in to use Google+. 5. From the Home screen, tap (Apps) ➔...

User Manual
Page 166
...the picture via : allows you to open it in a clockwise direction. Configure the slideshow settings (Effect, Music, and Speed) then tap Start to configure the fade effects used when the image progresses from either of the current image in the Image viewer. Copy to clipboard: allows you... to copy one to another. • Music: allows you to begin the slideshow. Tap Start to delete the current picture. 4. Picture Options 1. From the Home screen, tap (Apps) ➔ (Gallery). 2. Face tag: allows you to begin ...
...the picture via : allows you to open it in a clockwise direction. Configure the slideshow settings (Effect, Music, and Speed) then tap Start to configure the fade effects used when the image progresses from either of the current image in the Image viewer. Copy to clipboard: allows you... to copy one to another. • Music: allows you to begin the slideshow. Tap Start to delete the current picture. 4. Picture Options 1. From the Home screen, tap (Apps) ➔ (Gallery). 2. Face tag: allows you to begin ...
User Manual
Page 167
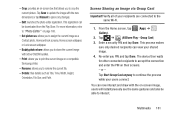
...: provides an on-screen box that allows you to crop the current picture. Rename: allows you to update the image with the on a compatible Samsung printer. - Tap Save to print the current image on -screen image, users will instantaneously see the same gestures and also be downloaded from the Play... Store. Set picture as: allows you PIN and tap Done. From the Home screen, tap (Apps) ➔ (Gallery). 2. Tap Start Group Cast anyway to accept the connection and enter the PIN on page 168. - Edit: launches the photo editor application. For more information, refer to...
...: provides an on-screen box that allows you to crop the current picture. Rename: allows you to update the image with the on a compatible Samsung printer. - Tap Save to print the current image on -screen image, users will instantaneously see the same gestures and also be downloaded from the Play... Store. Set picture as: allows you PIN and tap Done. From the Home screen, tap (Apps) ➔ (Gallery). 2. Tap Start Group Cast anyway to accept the connection and enter the PIN on page 168. - Edit: launches the photo editor application. For more information, refer to...


