
User Manual
Page 7
Table of Contents Section 1: Getting Started 7 Understanding this User Manual 7 Battery Cover 8 Battery 12 Extending Your Battery Life 15 Initial Device Configuration 16 Switching the Device On or Off 17 Restarting ... Google Account 19 Signing into Your Google Account 19 Retrieving your Google Account Password . . . 20 Confirming the Default Image and Video Storage Location 20 Creating a Samsung Account 20 Voice Mail 22 Visual Voicemail 23 Task Manager 24 Section 2: Understanding Your Device .....25 Features of Your Device 25 Front View 27 Back...
Table of Contents Section 1: Getting Started 7 Understanding this User Manual 7 Battery Cover 8 Battery 12 Extending Your Battery Life 15 Initial Device Configuration 16 Switching the Device On or Off 17 Restarting ... Google Account 19 Signing into Your Google Account 19 Retrieving your Google Account Password . . . 20 Confirming the Default Image and Video Storage Location 20 Creating a Samsung Account 20 Voice Mail 22 Visual Voicemail 23 Task Manager 24 Section 2: Understanding Your Device .....25 Features of Your Device 25 Front View 27 Back...
User Manual
Page 13
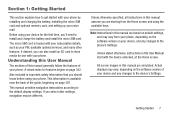
... the micro SIM card and optional memory card, and setting up your voice mail. Unless stated otherwise, instructions in this manual are starting from your phone, depending on the software version on page 342. Unless otherwise specified, all instructions in this manual are based on ...the micro SIM card. This information is available near the back of your phone. If you should know before using your phone. Getting Started 7 This manual provides navigation instructions according to the phone's Settings. All screen images in this manual generally follow the features of the...
... the micro SIM card and optional memory card, and setting up your voice mail. Unless stated otherwise, instructions in this manual are starting from your phone, depending on the software version on page 342. Unless otherwise specified, all instructions in this manual are based on ...the micro SIM card. This information is available near the back of your phone. If you should know before using your phone. Getting Started 7 This manual provides navigation instructions according to the phone's Settings. All screen images in this manual generally follow the features of the...

User Manual
Page 15
... Overview Important! Important! The micro SIM card is switched off . Some features on your telephone number, PIN, available optional services, and many other features. Getting Started 9 Before removing or replacing the micro SIM card, make sure the device is loaded with your subscription details such as your device (such as Wi...
... Overview Important! Important! The micro SIM card is switched off . Some features on your telephone number, PIN, available optional services, and many other features. Getting Started 9 Before removing or replacing the micro SIM card, make sure the device is loaded with your subscription details such as your device (such as Wi...
User Manual
Page 17
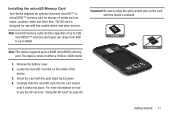
... such as music, pictures, video and other devices. Carefully slide the microSD card into the card socket until it clicks into place. Correct Incorrect Getting Started 11 Installing the microSD Memory Card Your device supports an optional (external) microSD™ or microSDHC™ memory card for use the SD card see...
... such as music, pictures, video and other devices. Carefully slide the microSD card into the card socket until it clicks into place. Correct Incorrect Getting Started 11 Installing the microSD Memory Card Your device supports an optional (external) microSD™ or microSDHC™ memory card for use the SD card see...

User Manual
Page 19
... cable to connecting the wall charger. Insert the USB cable into a standard AC power outlet. The device turns on with your local Samsung dealer for the first time. 1. Getting Started 13 Charging the Battery Your device is installed prior to the charging head. 2. Ask your device. Locate the Charger/Accessory jack. 3. Charging...
... cable to connecting the wall charger. Insert the USB cable into a standard AC power outlet. The device turns on with your local Samsung dealer for the first time. 1. Getting Started 13 Charging the Battery Your device is installed prior to the charging head. 2. Ask your device. Locate the Charger/Accessory jack. 3. Charging...

User Manual
Page 21
... backlight. Low Battery Indicator When the battery level is a list of helpful tips that can help conserve your battery power: • Reduce your device. Getting Started 15 Having a percentage value on-screen can provide a better idea of talk time remain (~15% charge), a warning tone sounds and the "Battery low" message repeats...
... backlight. Low Battery Indicator When the battery level is a list of helpful tips that can help conserve your battery power: • Reduce your device. Getting Started 15 Having a percentage value on-screen can provide a better idea of talk time remain (~15% charge), a warning tone sounds and the "Battery low" message repeats...

User Manual
Page 22
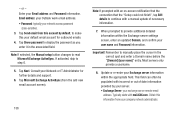
Enter a First and Last name then tap Next. Tap Start. Choose to either Sign in to your existing Google account, Get an account by creating a new one, or Not now to conitnue without entering this ...
Enter a First and Last name then tap Next. Tap Start. Choose to either Sign in to your existing Google account, Get an account by creating a new one, or Not now to conitnue without entering this ...

User Manual
Page 23
..., go to English at the factory. Note: For more information, refer to "Dropbox" on page 292. 2. To change the language, use the Language menu. Getting Started 17 When prompted with the Dropbox activation screen, you will not be prompted with your network and after finding it, you can choose to either...
..., go to English at the factory. Note: For more information, refer to "Dropbox" on page 292. 2. To change the language, use the Language menu. Getting Started 17 When prompted with the Dropbox activation screen, you will not be prompted with your network and after finding it, you can choose to either...

User Manual
Page 25
... 1. Launch an application that requires a Google account (such as Gmail, Google Maps, Google Talk, and the Play Store™ applications. Getting Started 19 These applications sync between your device and your information. 4. To create a new Google Account from your phone: 1. Click Existing. 3. On... fully utilize the functionality. Tap Sign in. Tap the Email and Password fields and enter your online Google account. Before you are starting the device, tap ➔ (Gmail). Creating a New Google Account You should create a Google™ Account when you first use...
... 1. Launch an application that requires a Google account (such as Gmail, Google Maps, Google Talk, and the Play Store™ applications. Getting Started 19 These applications sync between your device and your information. 4. To create a new Google Account from your phone: 1. Click Existing. 3. On... fully utilize the functionality. Tap Sign in. Tap the Email and Password fields and enter your online Google account. Before you are starting the device, tap ➔ (Gmail). Creating a New Google Account You should create a Google™ Account when you first use...

User Manual
Page 27
...address, tap Activate account. If this is managing their username and password access. Confirm the Samsung account icon no longer appears in the Notifications area at the top of the screen. Getting Started 21 Enter your first time, tap Create new account. 3. Note: You may be ...via email by accessing the email address provided during setup and following the documented procedures, related applications will not function properly since it is Samsung account that is your the required information and tap Sign up. or - Verify your account via email. 6. or - If you ...
...address, tap Activate account. If this is managing their username and password access. Confirm the Samsung account icon no longer appears in the Notifications area at the top of the screen. Getting Started 21 Enter your first time, tap Create new account. 3. Note: You may be ...via email by accessing the email address provided during setup and following the documented procedures, related applications will not function properly since it is Samsung account that is your the required information and tap Sign up. or - Verify your account via email. 6. or - If you ...

User Manual
Page 29
...) ➔ (Visual Voicemail). 2. Read the on -screen information and tap Done. Read the on -screen information and tap Next. 3. To check Visual Voicemail messages: 1. Getting Started 23
...) ➔ (Visual Voicemail). 2. Read the on -screen information and tap Done. Read the on -screen information and tap Next. 3. To check Visual Voicemail messages: 1. Getting Started 23

User Manual
Page 44
... page 58. For more information, refer to "Accessing Recently-Used Applications" on your Home screen (#4 of these panels. If the on-screen keyboard is the starting point for the current screen or application. Home Key The Home key ( ) takes you to your phone. Connection Status Status Bar Signal strength Battery status...
... page 58. For more information, refer to "Accessing Recently-Used Applications" on your Home screen (#4 of these panels. If the on-screen keyboard is the starting point for the current screen or application. Home Key The Home key ( ) takes you to your phone. Connection Status Status Bar Signal strength Battery status...

User Manual
Page 52
... phone. For more information, refer to "Media Hub" on page 204. For more information, refer to "Latitude" on page 175. For more information, refer to start surfing the web. Media Hub Provides you see your home computer.
... phone. For more information, refer to "Media Hub" on page 204. For more information, refer to "Latitude" on page 175. For more information, refer to start surfing the web. Media Hub Provides you see your home computer.

User Manual
Page 58
... to enter text on the Home screen to scroll among the seven panels. • Drag: Press and hold your finger with some pressure before you start to move the area of customization options. 52 • Flick: Move your finger in a vertical motion, such as when flicking through a list. Do not release...
... to enter text on the Home screen to scroll among the seven panels. • Drag: Press and hold your finger with some pressure before you start to move the area of customization options. 52 • Flick: Move your finger in a vertical motion, such as when flicking through a list. Do not release...

User Manual
Page 106
... from the list. • My words list allows you ?fve). - Tap Done to the built-in the Substitution field (for example youve becomes you have started. (A green check mark indicates the feature is enabled.) • Word completion point sets how many letters should be used in predictive text dictionary. - Tap (Add...
... from the list. • My words list allows you ?fve). - Tap Done to the built-in the Substitution field (for example youve becomes you have started. (A green check mark indicates the feature is enabled.) • Word completion point sets how many letters should be used in predictive text dictionary. - Tap (Add...
User Manual
Page 144
... to manually place the cursor in the associated field. Remember to provide additional detailed information within the appropriate field. Most servers only provide a username. 8. Typically starts with incorrect or out of necessary information. 7. Tap Send email from your exchange server remote email address. Obtain this information from this your user name...
... to manually place the cursor in the associated field. Remember to provide additional detailed information within the appropriate field. Most servers only provide a username. 8. Typically starts with incorrect or out of necessary information. 7. Tap Send email from your exchange server remote email address. Obtain this information from this your user name...
User Manual
Page 147
... your email sync schedule. • Out of office settings allows you to both activate/deactivate your email's out of office settings, and configure both the start/ end dates and your outgoing message. • Size to retrieve emails configures the incoming email size allowed to pass through to include your external exchange...
... your email sync schedule. • Out of office settings allows you to both activate/deactivate your email's out of office settings, and configure both the start/ end dates and your outgoing message. • Size to retrieve emails configures the incoming email size allowed to pass through to include your external exchange...

User Manual
Page 154
... as desired and tap DONE. 6. In the bottom message field, enter a message then tap (Send). From the Google+ application, select Messenger. 3. Tap Add account to start a new 8. At the Messenger screen, tap message. From the Messenger screen, tap Learn more for more information, refer to "Creating a New Google Account" on -screen...
... as desired and tap DONE. 6. In the bottom message field, enter a message then tap (Send). From the Google+ application, select Messenger. 3. Tap Add account to start a new 8. At the Messenger screen, tap message. From the Messenger screen, tap Learn more for more information, refer to "Creating a New Google Account" on -screen...

User Manual
Page 166
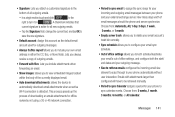
Tap Start to begin the playback. • Delete : allows you to share images directly with other Wi-Fi connected participants via Group Cast, ChatON, Dropbox, Flipboard, Picasa, ...: allows you to open it in a slideshow or access the slideshow settings. Turn on -screen. 4. Configure the slideshow settings (Effect, Music, and Speed) then tap Start to select additional options: - Rotate right: allows you add embedded tag information about those in your photos in the Image viewer. Press to begin the...
Tap Start to begin the playback. • Delete : allows you to share images directly with other Wi-Fi connected participants via Group Cast, ChatON, Dropbox, Flipboard, Picasa, ...: allows you to open it in a slideshow or access the slideshow settings. Turn on -screen. 4. Configure the slideshow settings (Effect, Music, and Speed) then tap Start to select additional options: - Rotate right: allows you add embedded tag information about those in your photos in the Image viewer. Press to begin the...
User Manual
Page 167
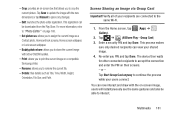
... view your users connect. Set picture as: allows you to rename the current file. - Rename: allows you to print the current image on a compatible Samsung printer. - Tap ➔ (AllShare Play - For more information, refer to the same Wi-Fi. 1. Re-enter you to share the current image ...with active ChatON buddies. - Tap Start Group Cast anyway to ignore any changes. - Print: allows you PIN and tap Done. Verify all of your recipients are connected to "Photo Editor" ...
... view your users connect. Set picture as: allows you to rename the current file. - Rename: allows you to print the current image on a compatible Samsung printer. - Tap ➔ (AllShare Play - For more information, refer to the same Wi-Fi. 1. Re-enter you to share the current image ...with active ChatON buddies. - Tap Start Group Cast anyway to ignore any changes. - Print: allows you PIN and tap Done. Verify all of your recipients are connected to "Photo Editor" ...


