User Manual Ver.la1_f3 (English(north America))
Page 1
MOBILE PHONE User Manual Please read this manual before operating your phone, and keep it for future reference.
MOBILE PHONE User Manual Please read this manual before operating your phone, and keep it for future reference.

User Manual Ver.la1_f3 (English(north America))
Page 2
... All applicable rights of the Intellectual Property shall remain with SAMSUNG and its respective suppliers relating to the SAMSUNG Phone, including but is transferred to create source code from the software. Samsung Telecommunications America (STA), LLC Headquarters: Customer Care Center: ... otherwise attempt to you have questions about your Samsung Mobile Phone? Richardson, TX 75082 Plano, TX 75074 Toll Free Tel: 1.888.987.HELP (4357) Internet Address: http://www.samsungusa.com ©2012 Samsung Telecommunications America, LLC. Intellectual Property All Intellectual ...
... All applicable rights of the Intellectual Property shall remain with SAMSUNG and its respective suppliers relating to the SAMSUNG Phone, including but is transferred to create source code from the software. Samsung Telecommunications America (STA), LLC Headquarters: Customer Care Center: ... otherwise attempt to you have questions about your Samsung Mobile Phone? Richardson, TX 75082 Plano, TX 75074 Toll Free Tel: 1.888.987.HELP (4357) Internet Address: http://www.samsungusa.com ©2012 Samsung Telecommunications America, LLC. Intellectual Property All Intellectual ...

User Manual Ver.la1_f3 (English(north America))
Page 4
...distinguish sounds, identify your device when you decide how an application may involve the location of AT&T. Your phone may collect certain types of information from both ends of your phone and other phones on AT&T's Privacy Policy, visit http://www.att.com/privacy. AT&T may be used and protected.... naturally, even in the noisiest places. • With earSmart technology, you can talk where you to hear and be heard™ in your phone captures your voice and all the sounds around you. • Working like the human ear, it easy for certain devices which bypass AT&T controls...
...distinguish sounds, identify your device when you decide how an application may involve the location of AT&T. Your phone may collect certain types of information from both ends of your phone and other phones on AT&T's Privacy Policy, visit http://www.att.com/privacy. AT&T may be used and protected.... naturally, even in the noisiest places. • With earSmart technology, you can talk where you to hear and be heard™ in your phone captures your voice and all the sounds around you. • Working like the human ear, it easy for certain devices which bypass AT&T controls...

User Manual Ver.la1_f3 (English(north America))
Page 6
... Pen 16 Display Layout 19 Menu Navigation 29 Customizing Your Home Screen 32 Notification Bar 38 Memory Card 39 1 Section 3: Call Functions 41 Displaying Your Phone Number 41 Making a Call 41 Making a Call Using Speed Dial 42 Making a Call from the Address Book 43 Answering a Call 43 Dialing Options...52 Changing the Text Input Mode - Keypad 53 Using Abc Mode 53 Using Symbol/Numeric Mode 54 Show Suggestions 54 Entering Text Using the Samsung Keypad 55 Entering Text Using Swype 55 Using the Voice to Text Feature 56 Section 5: Contacts and Your Address Book 57 AT&T Address Book...
... Pen 16 Display Layout 19 Menu Navigation 29 Customizing Your Home Screen 32 Notification Bar 38 Memory Card 39 1 Section 3: Call Functions 41 Displaying Your Phone Number 41 Making a Call 41 Making a Call Using Speed Dial 42 Making a Call from the Address Book 43 Answering a Call 43 Dialing Options...52 Changing the Text Input Mode - Keypad 53 Using Abc Mode 53 Using Symbol/Numeric Mode 54 Show Suggestions 54 Entering Text Using the Samsung Keypad 55 Entering Text Using Swype 55 Using the Voice to Text Feature 56 Section 5: Contacts and Your Address Book 57 AT&T Address Book...
User Manual Ver.la1_f3 (English(north America))
Page 7
... 115 Privacy 115 Storage 116 Language and keyboard 117 Voice Input and Output 120 Accessibility Settings 121 Date and Time 122 Pen Settings 122 About Phone 123 Software Update 123 2
... 115 Privacy 115 Storage 116 Language and keyboard 117 Voice Input and Output 120 Accessibility Settings 121 Date and Time 122 Pen Settings 122 About Phone 123 Software Update 123 2
User Manual Ver.la1_f3 (English(north America))
Page 10
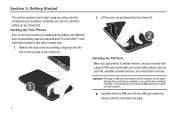
Setting Up Your Phone Prior to use it is also located in SIM card loaded with a plug-in this same internal area...with your subscription details, such as shown) until the card locks into place. 5 Keep all SIM cards out of reach of your phone (1). 2. Important!: The plug-in SIM card information and its contacts can be easily damaged by scratching or bending, so be careful..., inserting, or removing the card. Section 1: Getting Started This section explains how to start using your phone by first configuring your hardware, activating your service, and then setting up and away from the...
Setting Up Your Phone Prior to use it is also located in SIM card loaded with a plug-in this same internal area...with your subscription details, such as shown) until the card locks into place. 5 Keep all SIM cards out of reach of your phone (1). 2. Important!: The plug-in SIM card information and its contacts can be easily damaged by scratching or bending, so be careful..., inserting, or removing the card. Section 1: Getting Started This section explains how to start using your phone by first configuring your hardware, activating your service, and then setting up and away from the...

User Manual Ver.la1_f3 (English(north America))
Page 11
... see "Memory Card" on the memory card until it clicks (as shown. This secure digital card enables you use with this mobile phone and other devices. Incorrect Correct Note: If the card is securely inserted. Push the microSD card into the slot until it from the... (SD) or microSDHC card to expand available memory space. Getting Started 6 This type of the card is released. Incorrect Note: Your phone has been tested to support up to exchange images, music, and data between SD-compatible devices. Installing and Removing the Memory Card Your device lets...
... see "Memory Card" on the memory card until it clicks (as shown. This secure digital card enables you use with this mobile phone and other devices. Incorrect Correct Note: If the card is securely inserted. Push the microSD card into the slot until it from the... (SD) or microSDHC card to expand available memory space. Getting Started 6 This type of the card is released. Incorrect Note: Your phone has been tested to support up to exchange images, music, and data between SD-compatible devices. Installing and Removing the Memory Card Your device lets...

User Manual Ver.la1_f3 (English(north America))
Page 12
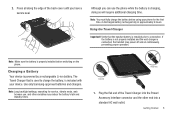
Installing the Back Cover 1. Insert the battery into the opening on the back of the phone (1) and press down to secure the battery (2). Place the battery cover onto the back bottom of the phone, making sure the connectors align (1). 2. Installing the Battery 1. Gently press down (2). 7
Installing the Back Cover 1. Insert the battery into the opening on the back of the phone (1) and press down to secure the battery (2). Place the battery cover onto the back bottom of the phone, making sure the connectors align (1). 2. Installing the Battery 1. Gently press down (2). 7
User Manual Ver.la1_f3 (English(north America))
Page 13
...8 Press all along the edge of the Travel Charger into the Power/ Accessory Interface connector and the other variables may power off and on the phone. If the battery is not properly installed and the wall charger is properly installed before using your device. Note: Long backlight settings, searching for the... have a secure seal. Correct Incorrect 1. Note: Make sure the battery is connected, the handset may reduce the battery's talk and standby times. Use only Samsung-approved batteries and chargers. A discharged battery recharges fully in approximately 4 hours.
...8 Press all along the edge of the Travel Charger into the Power/ Accessory Interface connector and the other variables may power off and on the phone. If the battery is not properly installed and the wall charger is properly installed before using your device. Note: Long backlight settings, searching for the... have a secure seal. Correct Incorrect 1. Note: Make sure the battery is connected, the handset may reduce the battery's talk and standby times. Use only Samsung-approved batteries and chargers. A discharged battery recharges fully in approximately 4 hours.
User Manual Ver.la1_f3 (English(north America))
Page 14
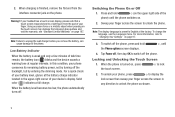
...has a touch screen display, please note that a touch screen responds best to the phone. to unlock the phone. Switching the Phone On or Off 1. Press and hold the Phone options screen displays. , until the phone switches on the touch screen may damage the tempered glass surface and void the warranty....page 187. Low Battery Indicator When the battery is finished, remove the flat end from the pad of the phone) until 4. When the battery level becomes too low, the phone automatically turns off the backlight, but by entering the dimming mode. For a quick check of your battery ...
...has a touch screen display, please note that a touch screen responds best to the phone. to unlock the phone. Switching the Phone On or Off 1. Press and hold the Phone options screen displays. , until the phone switches on the touch screen may damage the tempered glass surface and void the warranty....page 187. Low Battery Indicator When the battery is finished, remove the flat end from the pad of the phone) until 4. When the battery level becomes too low, the phone automatically turns off the backlight, but by entering the dimming mode. For a quick check of your battery ...
User Manual Ver.la1_f3 (English(north America))
Page 15
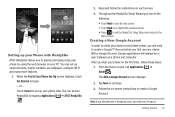
...Google Account, Google applications will need to the Home screen. From the Home screen, tap Applications ➔ Gmail . Setting up your phone later. When the Fast & Easy Phone Set-Up screen displays, touch Get Started to continue. 3. Getting Started 10 Tap Next to begin. - Read and follow these steps...• Press to exit the Ready2Go Setup Wizard and return to sign in sync between your phone and computer. You can set-up email accounts, import contacts, set up your Phone with Ready2Go AT&T Ready2Go allows you to set wallpaper, configure Wi-Fi and many more features...
...Google Account, Google applications will need to the Home screen. From the Home screen, tap Applications ➔ Gmail . Setting up your phone later. When the Fast & Easy Phone Set-Up screen displays, touch Get Started to continue. 3. Getting Started 10 Tap Next to begin. - Read and follow these steps...• Press to exit the Ready2Go Setup Wizard and return to sign in sync between your phone and computer. You can set-up email accounts, import contacts, set up your Phone with Ready2Go AT&T Ready2Go allows you to set wallpaper, configure Wi-Fi and many more features...

User Manual Ver.la1_f3 (English(north America))
Page 16
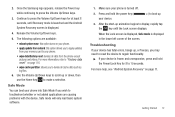
... Password A Google account password is used for Google applications. Enter your network. 11 Accessing Your Voice Mail 1. Accessing Your Voicemail From Another Phone 1. Note: If you are using. 3. Setting Up Your Voicemail 1. When connected, follow these instructions to http://google.com/accounts. 2. Android ... menu by mistake, use an Internet browser to navigate to reset it: 1. Dial your passcode. Enter your wireless phone number. 2. Your phone will never need to select reboot system now, then press the Power key. To enter the Android System Recovery mode...
... Password A Google account password is used for Google applications. Enter your network. 11 Accessing Your Voice Mail 1. Accessing Your Voicemail From Another Phone 1. Note: If you are using. 3. Setting Up Your Voicemail 1. When connected, follow these instructions to http://google.com/accounts. 2. Android ... menu by mistake, use an Internet browser to navigate to reset it: 1. Dial your passcode. Enter your wireless phone number. 2. Your phone will never need to select reboot system now, then press the Power key. To enter the Android System Recovery mode...
User Manual Ver.la1_f3 (English(north America))
Page 17
... the Lock screen displays. When the Lock screen is displayed, Safe mode is frozen and unresponsive, press and hold the power key ( your phone is displayed. 4. Getting Started 12 Continue to press the Volume Up/Down keys for 8 to display, rapidly tap the key until Recovery mode... or freezes, you to scroll up 3. For more help, see "Android System Recovery" on your phone. • wipe data/factory reset: deletes all cache data such as log files. 6. 2. Once the Samsung logo appears, release the Power key while continuing to make a selection. Use the Volume Up/Down...
... the Lock screen displays. When the Lock screen is displayed, Safe mode is frozen and unresponsive, press and hold the power key ( your phone is displayed. 4. Getting Started 12 Continue to press the Volume Up/Down keys for 8 to display, rapidly tap the key until Recovery mode... or freezes, you to scroll up 3. For more help, see "Android System Recovery" on your phone. • wipe data/factory reset: deletes all cache data such as log files. 6. 2. Once the Samsung logo appears, release the Power key while continuing to make a selection. Use the Volume Up/Down...
User Manual Ver.la1_f3 (English(north America))
Page 18
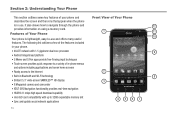
... platform • S Memo and S Pen apps provide free-flowing input techniques • Touch screen provides quick response to a variety of in-phone menus and options including applications and seven home screens • Ready access to the Internet 2 • Built-in Bluetooth and Wi-Fi technology ...update social network applications 4 567 13 The following list outlines a few of Your Phone describes the screen and the icons that appear when the phone is lightweight, easy-to navigate through the phone and 12 provides information on using a memory card. It also shows how to ...
... platform • S Memo and S Pen apps provide free-flowing input techniques • Touch screen provides quick response to a variety of in-phone menus and options including applications and seven home screens • Ready access to the Internet 2 • Built-in Bluetooth and Wi-Fi technology ...update social network applications 4 567 13 The following list outlines a few of Your Phone describes the screen and the icons that appear when the phone is lightweight, easy-to navigate through the phone and 12 provides information on using a memory card. It also shows how to ...

User Manual Ver.la1_f3 (English(north America))
Page 19
... recently used for items on the Home screen. 3. Home key: allows you select along with additional options for example, when holding the phone close to take pictures of yourself when you step backwards when navigating a menu or web page. 7. Press and hold to display your ...favorite applications on the internet. 8. Home screen indicator: shows which Home screen is blocked, for different features and applications such as Phone, Calendar, Email, Web, and Applications. Also used applications and a shortcut to the main Home screen from any city you to return to...
... recently used for items on the Home screen. 3. Home key: allows you select along with additional options for example, when holding the phone close to take pictures of yourself when you step backwards when navigating a menu or web page. 7. Press and hold to display your ...favorite applications on the internet. 8. Home screen indicator: shows which Home screen is blocked, for different features and applications such as Phone, Calendar, Email, Web, and Applications. Also used applications and a shortcut to the main Home screen from any city you to return to...
User Manual Ver.la1_f3 (English(north America))
Page 20
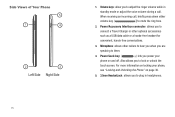
.../Accessory Interface connector: allows you to connect a Travel Charger or other callers to hear you when you are speaking to them. 4. Side Views of Your Phone 5 1 4 2 3 Left Side Right Side 15 1. Power/Lock key: ( ) lets you to mute the ring tone. 2. Also allows you power your... and off. Volume keys: allow you to adjust the ringer volume while in headphones. For more information on locking your phone on page 30. 5. 3.5mm Headset jack: allows you to plug in standby mode or adjust the voice volume during a call , briefly press down either volume ...
.../Accessory Interface connector: allows you to connect a Travel Charger or other callers to hear you when you are speaking to them. 4. Side Views of Your Phone 5 1 4 2 3 Left Side Right Side 15 1. Power/Lock key: ( ) lets you to mute the ring tone. 2. Also allows you power your... and off. Volume keys: allow you to adjust the ringer volume while in headphones. For more information on locking your phone on page 30. 5. 3.5mm Headset jack: allows you to plug in standby mode or adjust the voice volume during a call , briefly press down either volume ...

User Manual Ver.la1_f3 (English(north America))
Page 21
...Using the S Pen" on page 16. 1 2 1. For more information, refer to switch between touch and pen input. 3 4 1. Stylus tip: the tip of Your Phone 1 2 S Pen The S Pen is turned on. 4. S Pen: a built-in dark places. 3. Pen button: by pressing the Pen button, you to hear when... the Speakerphone is a stylus that allows you to "S Pen" on page 17. 2. Understanding Your Phone 16 For more information, refer to perform various functions. Flash: is used to provide adequate light when taking pictures in stylus that assists you ...
...Using the S Pen" on page 16. 1 2 1. For more information, refer to switch between touch and pen input. 3 4 1. Stylus tip: the tip of Your Phone 1 2 S Pen The S Pen is turned on. 4. S Pen: a built-in dark places. 3. Pen button: by pressing the Pen button, you to hear when... the Speakerphone is a stylus that allows you to "S Pen" on page 17. 2. Understanding Your Phone 16 For more information, refer to perform various functions. Flash: is used to provide adequate light when taking pictures in stylus that assists you ...

User Manual Ver.la1_f3 (English(north America))
Page 22
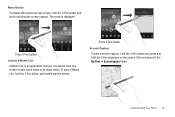
Using the S Pen There are several different functions you can perform by using the S Pen. Pull the S Pen out of . Removing the S Pen from your Phone The S Pen is displayed. 2. The previous screen is stored in your fingernail or a sharp object to pull the end of the S Pen out of the phone (1). Back Button To move to a previous screen, hold the S Pen button and touch and drag the screen to keep track of the phone (2). 17 Press S Pen button To remove the S Pen, follow these steps: 1. Use your phone to make it easier to the left.
Using the S Pen There are several different functions you can perform by using the S Pen. Pull the S Pen out of . Removing the S Pen from your Phone The S Pen is displayed. 2. The previous screen is stored in your fingernail or a sharp object to pull the end of the S Pen out of the phone (1). Back Button To move to a previous screen, hold the S Pen button and touch and drag the screen to keep track of the phone (2). 17 Press S Pen button To remove the S Pen, follow these steps: 1. Use your phone to make it easier to the left.
User Manual Ver.la1_f3 (English(north America))
Page 23
Press S Pen button Launch S Memo Lite S Memo Lite is displayed. To open S Memo Lite, hold the S Pen anywhere on the screen. Understanding Your Phone 18 Press S Pen button Screen Capture To take quick notes or jot down ideas. Files are saved in the My Files ➔ ScreenCapture folder. Menu Button To display the menu from any screen, hold the S Pen button and touch and drag the screen upward. The menu is an application that you can launch from any screen to take a screen capture, hold the S Pen button and press and hold the S Pen button and double-tap the screen.
Press S Pen button Launch S Memo Lite S Memo Lite is displayed. To open S Memo Lite, hold the S Pen anywhere on the screen. Understanding Your Phone 18 Press S Pen button Screen Capture To take quick notes or jot down ideas. Files are saved in the My Files ➔ ScreenCapture folder. Menu Button To display the menu from any screen, hold the S Pen button and touch and drag the screen upward. The menu is an application that you can launch from any screen to take a screen capture, hold the S Pen button and press and hold the S Pen button and double-tap the screen.

User Manual Ver.la1_f3 (English(north America))
Page 24
... a Call" on a screen capture, use the pen to application icons. Write on any icon that appear at the bottom of Your Phone" on page 139. Primary Shortcuts There are : • Phone for sending and receiving email from your S Pen with the S Memo application, see "S Memo" on page 92. • Web... and options, as well as providing access to draw or write. For more information, refer to manage your phone. You can change the Phone, Email, and Browser application shortcuts to any Screen after Capture To write on page 41. • Calendar for recording events and appointments to "...
... a Call" on a screen capture, use the pen to application icons. Write on any icon that appear at the bottom of Your Phone" on page 139. Primary Shortcuts There are : • Phone for sending and receiving email from your S Pen with the S Memo application, see "S Memo" on page 92. • Web... and options, as well as providing access to draw or write. For more information, refer to manage your phone. You can change the Phone, Email, and Browser application shortcuts to any Screen after Capture To write on page 41. • Calendar for recording events and appointments to "...


