
User Manual (user Manual) (ver.f7) (English)
Page 4
...COMPONENTS CONTAINED THEREIN; OR COMPLIANCE OF THE PRODUCT WITH THE REQUIREMENTS OF ANY LAW, RULE, SPECIFICATION OR CONTRACT PERTAINING THERETO. IN ADDITION, SAMSUNG SHALL NOT BE LIABLE FOR ANY DAMAGES OF ANY KIND RESULTING FROM THE PURCHASE OR USE OF THE PRODUCT OR ARISING FROM THE BREACH... OF THE PRODUCT; Exclusion of Warranties; Disclaimer of Liability EXCEPT AS SET FORTH IN THE EXPRESS WARRANTY CONTAINED ON THE WARRANTY PAGE ENCLOSED WITH THE PRODUCT, THE PURCHASER TAKES THE PRODUCT "AS IS", AND SAMSUNG MAKES NO EXPRESS OR IMPLIED WARRANTY OF ANY KIND WHATSOEVER WITH RESPECT TO...
...COMPONENTS CONTAINED THEREIN; OR COMPLIANCE OF THE PRODUCT WITH THE REQUIREMENTS OF ANY LAW, RULE, SPECIFICATION OR CONTRACT PERTAINING THERETO. IN ADDITION, SAMSUNG SHALL NOT BE LIABLE FOR ANY DAMAGES OF ANY KIND RESULTING FROM THE PURCHASE OR USE OF THE PRODUCT OR ARISING FROM THE BREACH... OF THE PRODUCT; Exclusion of Warranties; Disclaimer of Liability EXCEPT AS SET FORTH IN THE EXPRESS WARRANTY CONTAINED ON THE WARRANTY PAGE ENCLOSED WITH THE PRODUCT, THE PURCHASER TAKES THE PRODUCT "AS IS", AND SAMSUNG MAKES NO EXPRESS OR IMPLIED WARRANTY OF ANY KIND WHATSOEVER WITH RESPECT TO...

User Manual (user Manual) (ver.f7) (English)
Page 5
... Front View of Your Phone 10 Rear View of Your Phone 13 Display Layout 14 Customizing the Home Screen 17 Setting the Home Screen Properties 17 Start menu screen 18 Entering text 18 Vanity Dialing 19 Customizing Your Phone 20 Power... 28 Using Online Help 29 Section 3: Synchronization 30 Installing Microsoft ActiveSync 30 Customizing Connection Settings 31 Connecting Your Phone to a Computer 31 Connecting with a PC data cable 31 Synchronizing Information 32 Customizing Synchronization Settings 33 Windows Mobile Device Center 6 for Windows Vista 35 Section 4: Call Functions 36...
... Front View of Your Phone 10 Rear View of Your Phone 13 Display Layout 14 Customizing the Home Screen 17 Setting the Home Screen Properties 17 Start menu screen 18 Entering text 18 Vanity Dialing 19 Customizing Your Phone 20 Power... 28 Using Online Help 29 Section 3: Synchronization 30 Installing Microsoft ActiveSync 30 Customizing Connection Settings 31 Connecting Your Phone to a Computer 31 Connecting with a PC data cable 31 Synchronizing Information 32 Customizing Synchronization Settings 33 Windows Mobile Device Center 6 for Windows Vista 35 Section 4: Call Functions 36...
User Manual (user Manual) (ver.f7) (English)
Page 6
... Beaming with Bluetooth 81 Creating a VPN connection 84 About Wi-Fi 86 Enabling Wi-Fi 86 Automatically Connecting to a Network 86 Manually Entering Network Settings 87 Setting Wi-Fi to Always On 88 Changing Connection Information 88 Disconnecting Wi-Fi 88 Section 11: AT&T Mall 90 Shop Tones 90 Shop Games 90...
... Beaming with Bluetooth 81 Creating a VPN connection 84 About Wi-Fi 86 Enabling Wi-Fi 86 Automatically Connecting to a Network 86 Manually Entering Network Settings 87 Setting Wi-Fi to Always On 88 Changing Connection Information 88 Disconnecting Wi-Fi 88 Section 11: AT&T Mall 90 Shop Tones 90 Shop Games 90...
User Manual (user Manual) (ver.f7) (English)
Page 7
...12: AT&T Music 93 Accessing AT&T Music 93 Adding Music to your Handset 93 Using libraries 96 Using Windows Media Player 96 Setting up the Windows Media Player Sync Options 98 Synching Music via Windows Media Player 100 Using MusicID 100 XM Radio 102 Music Community...Problems 118 Power and Charging Problems 120 Program Problems 121 Section 16: Health and Safety Information 124 Health and Safety Information 124 Samsung Mobile Products and Recycling 125 UL Certified Travel Adapter 125 Consumer Information on Wireless Phones 126 Road Safety 131 Responsible Listening 133 Operating...
...12: AT&T Music 93 Accessing AT&T Music 93 Adding Music to your Handset 93 Using libraries 96 Using Windows Media Player 96 Setting up the Windows Media Player Sync Options 98 Synching Music via Windows Media Player 100 Using MusicID 100 XM Radio 102 Music Community...Problems 118 Power and Charging Problems 120 Program Problems 121 Section 16: Health and Safety Information 124 Health and Safety Information 124 Samsung Mobile Products and Recycling 125 UL Certified Travel Adapter 125 Consumer Information on Wireless Phones 126 Road Safety 131 Responsible Listening 133 Operating...

User Manual (user Manual) (ver.f7) (English)
Page 12
...; To access the Home screen from anywhere, press . • To customize the Home screen display, including the background, select Start ➔ More ➔ More ➔ Settings ➔ Display ➔ Home Screen and press the key. The backlight turns off the phone, press and hold the key until the phone power-on... the battery level becomes too low, the phone automatically turns off and press the key. Low Battery Indicator When the battery is logged into your settings, or the Cancel soft key to return to avoid damage.
...; To access the Home screen from anywhere, press . • To customize the Home screen display, including the background, select Start ➔ More ➔ More ➔ Settings ➔ Display ➔ Home Screen and press the key. The backlight turns off the phone, press and hold the key until the phone power-on... the battery level becomes too low, the phone automatically turns off and press the key. Low Battery Indicator When the battery is logged into your settings, or the Cancel soft key to return to avoid damage.

User Manual (user Manual) (ver.f7) (English)
Page 13
Move the Navigation key Left or Right to the Grid option by pressing G and the List option by pressing L. Start Menu Style To customize the Home screen display, including the background, select Start ➔ More ➔ More ➔ Settings ➔ Display ➔ Start Menu Style and press the key. Getting Started 9 Note: You can go to choose from the Grid or List display options.
Move the Navigation key Left or Right to the Grid option by pressing G and the List option by pressing L. Start Menu Style To customize the Home screen display, including the background, select Start ➔ More ➔ More ➔ Settings ➔ Display ➔ Start Menu Style and press the key. Getting Started 9 Note: You can go to choose from the Grid or List display options.

User Manual (user Manual) (ver.f7) (English)
Page 15
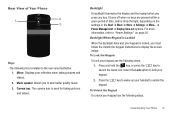
... History. Press and hold the key down, you will launch the speakerphone option. To reject an incoming call . Built in QWERTY Keypad: Allows you have set up . 2. When the device is on the display screen. 4. Volume keys: Adjusts the earpiece volume, or adjusts the ringer volume in profile mode, or adjusts...
... History. Press and hold the key down, you will launch the speakerphone option. To reject an incoming call . Built in QWERTY Keypad: Allows you have set up . 2. When the device is on the display screen. 4. Volume keys: Adjusts the earpiece volume, or adjusts the ringer volume in profile mode, or adjusts...
User Manual (user Manual) (ver.f7) (English)
Page 17
... display the screen image. Mirror: Displays your keypad is locked, you must follow the Unlock the Keypad instructions to "Power Settings" on the settings in the Start ➔ More ➔ More ➔ Settings ➔ More... ➔ Power Management ➔ Display time out options. Backlight When Keypad is used for taking pictures and videos...
... display the screen image. Mirror: Displays your keypad is locked, you must follow the Unlock the Keypad instructions to "Power Settings" on the settings in the Start ➔ More ➔ More ➔ Settings ➔ More... ➔ Power Management ➔ Display time out options. Backlight When Keypad is used for taking pictures and videos...
User Manual (user Manual) (ver.f7) (English)
Page 19
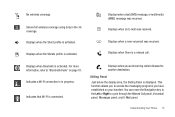
... is in the 3G coverage. You can move the Navigation key to the Left or Right to "Bluetooth mode" on your handset. Displays when you set incoming calls to forward to access the messaging programs you to another destination. No wireless coverage. Displays when an E-mail was received. This function allows...
... is in the 3G coverage. You can move the Navigation key to the Left or Right to "Bluetooth mode" on your handset. Displays when you set incoming calls to forward to access the messaging programs you to another destination. No wireless coverage. Displays when an E-mail was received. This function allows...
User Manual (user Manual) (ver.f7) (English)
Page 21
...Email messages • access the most recently accessed programs • change the profile option • view photos • play songs To change the setting.The following options are available: • Home screen layout: Select the layout to be used for each item: 1. Note: To ensure that operations..., such as moving the Navigation key Up or Down and press to access appointments or messages, or change the profile setting. Customizing the Home Screen You can : • access your preferences. Move the Navigation key Up or Down to scroll to the Home screen...
...Email messages • access the most recently accessed programs • change the profile option • view photos • play songs To change the setting.The following options are available: • Home screen layout: Select the layout to be used for each item: 1. Note: To ensure that operations..., such as moving the Navigation key Up or Down and press to access appointments or messages, or change the profile setting. Customizing the Home Screen You can : • access your preferences. Move the Navigation key Up or Down to scroll to the Home screen...

User Manual (user Manual) (ver.f7) (English)
Page 23
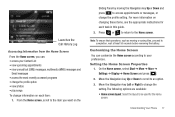
...800SAMSUNG and 1-800-SAMSUNG would actually appear on your display rather than the numeric equivalent. Short press inserts a space. Vanity Dialing The Vanity Dialing option allows you enter will appear on the keypad. Select Start ➔ More ➔ More ➔ Settings ➔ More... ➔ Key Settings and press ....delete characters. In addition, you wanted to remove CAP LOCK. Press once more to call the number for example, S in 1-800-SAMSUNG), press the key first. For example, if you can move the cursor by moving the Navigation key. between using the letters on ...
...800SAMSUNG and 1-800-SAMSUNG would actually appear on your display rather than the numeric equivalent. Short press inserts a space. Vanity Dialing The Vanity Dialing option allows you enter will appear on the keypad. Select Start ➔ More ➔ More ➔ Settings ➔ More... ➔ Key Settings and press ....delete characters. In addition, you wanted to remove CAP LOCK. Press once more to call the number for example, S in 1-800-SAMSUNG), press the key first. For example, if you can move the cursor by moving the Navigation key. between using the letters on ...

User Manual (user Manual) (ver.f7) (English)
Page 24
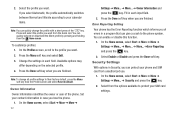
..., and time and date formats appropriate to the countries in question. 1. Note: You can also enable Auto update by adjusting the time-out settings for your Time zone and set the date, time, and time zone. 1. Then you need to take effect. On the Home screen, select Start ➔ More ➔ ..., 10 seconds, 20 seconds, 30 seconds, 40 seconds or 1 minute. • Backlight time out on AC: You can change the time and date format to set the current Date and Time. 20 3. Customizing Your Phone You can select the length of time the display backlight stays on when you do not...
..., and time and date formats appropriate to the countries in question. 1. Note: You can also enable Auto update by adjusting the time-out settings for your Time zone and set the date, time, and time zone. 1. Then you need to take effect. On the Home screen, select Start ➔ More ➔ ..., 10 seconds, 20 seconds, 30 seconds, 40 seconds or 1 minute. • Backlight time out on AC: You can change the time and date format to set the current Date and Time. 20 3. Customizing Your Phone You can select the length of time the display backlight stays on when you do not...

User Manual (user Manual) (ver.f7) (English)
Page 25
... minute, 2 minutes, or 5 minutes. • Display brightness: You can adjust the brightness for different events or environments and then apply the settings as a group. The currently selected profile displays on . • Display time out: You can select the length of time the display stays on... Your Phone 21 Checking the Memory You can change profiles: On the Home screen, select Start ➔ More ➔ More ➔ Settings ➔ Profiles and press the key. During standby, the phone goes to adjust the screen's brightness and contrast. End time 3. The list...
... minute, 2 minutes, or 5 minutes. • Display brightness: You can adjust the brightness for different events or environments and then apply the settings as a group. The currently selected profile displays on . • Display time out: You can select the length of time the display stays on... Your Phone 21 Checking the Memory You can change profiles: On the Home screen, select Start ➔ More ➔ More ➔ Settings ➔ Profiles and press the key. During standby, the phone goes to adjust the screen's brightness and contrast. End time 3. The list...
User Manual (user Manual) (ver.f7) (English)
Page 26
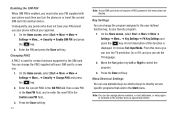
...unauthorized use. 1. Select Enable or Disable and press the Done soft key. Press and select the profile you are finished. Error Reporting Setting Your phone has the Error Reporting function which informs you of errors in a program that can quickly change all profile... ➔ More... ➔ More... ➔Error Reporting and press the key. 2. To customize profiles: 1. Fill in Security, you lose the phone. 1. Set your calendar items. Note: You can give a crash to your contact information in each input field. 2. Available options may differ depending on the selected profile. ...
...unauthorized use. 1. Select Enable or Disable and press the Done soft key. Press and select the profile you are finished. Error Reporting Setting Your phone has the Error Reporting function which informs you of errors in a program that can quickly change all profile... ➔ More... ➔ More... ➔Error Reporting and press the key. 2. To customize profiles: 1. Fill in Security, you lose the phone. 1. Set your calendar items. Note: You can give a crash to your contact information in each input field. 2. Available options may differ depending on the selected profile. ...

User Manual (user Manual) (ver.f7) (English)
Page 27
On the Home screen, select Start ➔ More ➔ More ➔ Settings ➔ More... ➔Security ➔ Device Lock and press the key. 2. Enter a password in use another SIM card, you are able to confirm your phone ... password in the Confirm password field for confirmation and press the Done soft key. On the Home screen, select Start ➔ More ➔ More ➔ Settings ➔ More... ➔Security ➔ Enable SIM Lock and press the key. 2. Once the feature is enabled, your phone is enabled, your changes. Note: Even...
On the Home screen, select Start ➔ More ➔ More ➔ Settings ➔ More... ➔Security ➔ Device Lock and press the key. 2. Enter a password in use another SIM card, you are able to confirm your phone ... password in the Confirm password field for confirmation and press the Done soft key. On the Home screen, select Start ➔ More ➔ More ➔ Settings ➔ More... ➔Security ➔ Enable SIM Lock and press the key. 2. Once the feature is enabled, your phone is enabled, your changes. Note: Even...
User Manual (user Manual) (ver.f7) (English)
Page 28
...turn the phone on or insert the current SIM card into another device. On the Home screen, select Start ➔ More ➔ More ➔ Settings ➔ More... ➔ Security ➔ Change PIN2 and press the key. 2. A brief description of this function is used for certain functions ...display. Move the Navigation key Left or Right to directly access specific programs that exist in the Confirm new PIN field. 3. Menu Shortcut Settings You can also assign phone numbers, e-mail addresses, or web pages in Contacts to the number keys as shortcut keys to select the program...
...turn the phone on or insert the current SIM card into another device. On the Home screen, select Start ➔ More ➔ More ➔ Settings ➔ More... ➔ Security ➔ Change PIN2 and press the key. 2. A brief description of this function is used for certain functions ...display. Move the Navigation key Left or Right to directly access specific programs that exist in the Confirm new PIN field. 3. Menu Shortcut Settings You can also assign phone numbers, e-mail addresses, or web pages in Contacts to the number keys as shortcut keys to select the program...

User Manual (user Manual) (ver.f7) (English)
Page 29
...expansion slot compatible with your phone. Using incompatible memory cards, such as Secure Digital (SD) cards, Understanding Your Phone 25 Video Share Settings To enable the Alerts, Auto Record, and Service options for the shortcut key in each field. • Service: allows you to ...the international call . • Recording Location: allows you to a key. 3. On the Home screen, select Start ➔ More ➔ More ➔ Settings ➔ More... ➔ More... ➔ Video Share and press the key. Press the Done soft key to 99 locations are primarily used to select the...
...expansion slot compatible with your phone. Using incompatible memory cards, such as Secure Digital (SD) cards, Understanding Your Phone 25 Video Share Settings To enable the Alerts, Auto Record, and Service options for the shortcut key in each field. • Service: allows you to ...the international call . • Recording Location: allows you to a key. 3. On the Home screen, select Start ➔ More ➔ More ➔ Settings ➔ More... ➔ More... ➔ Video Share and press the key. Press the Done soft key to 99 locations are primarily used to select the...

User Manual (user Manual) (ver.f7) (English)
Page 31
...menu. Download a program to select the program designed for your phone. 2. On the Home screen, select Start ➔ More ➔ More ➔ Settings ➔ More... ➔ More... ➔ About and press the key. Be sure to your phone. If the file is installed, the installer ...from the Internet or included on the Getting Started CD included with the program. 4. Once installation is so that comes with your Samsung i637 by using Microsoft® ActiveSync® Explore to copy the program file to determine what your phone and processor type is so that...
...menu. Download a program to select the program designed for your phone. 2. On the Home screen, select Start ➔ More ➔ More ➔ Settings ➔ More... ➔ More... ➔ About and press the key. Be sure to your phone. If the file is installed, the installer ...from the Internet or included on the Getting Started CD included with the program. 4. Once installation is so that comes with your Samsung i637 by using Microsoft® ActiveSync® Explore to copy the program file to determine what your phone and processor type is so that...
User Manual (user Manual) (ver.f7) (English)
Page 32
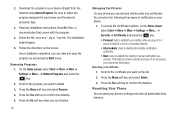
...Menu soft key and select Remove. 4. To access the Certificates options, on the Home screen, select Start ➔ More ➔ More ➔ Settings ➔ More... ➔ Security ➔ Certificates and press the key. • Personal: help to establish your phone and information. Deleting a ...or *.exe file. Press the Yes soft key to prevent unauthorized users from accessing your identity, when you log on your phone's settings and clear all added data from the Internet using Internet Explorer. This helps to confirm the deletion. 5. Removing Programs 1. You can...
...Menu soft key and select Remove. 4. To access the Certificates options, on the Home screen, select Start ➔ More ➔ More ➔ Settings ➔ More... ➔ Security ➔ Certificates and press the key. • Personal: help to establish your phone and information. Deleting a ...or *.exe file. Press the Yes soft key to prevent unauthorized users from accessing your identity, when you log on your phone's settings and clear all added data from the Internet using Internet Explorer. This helps to confirm the deletion. 5. Removing Programs 1. You can...

User Manual (user Manual) (ver.f7) (English)
Page 33
... Phone - This option erases user storage. • 2 - Master Reset. On the Home screen, select Start ➔ More ➔ More ➔ Settings ➔ More... ➔ Security ➔ More... ➔ Change Reset Password and press the key. 2. While the phone is supported by unauthorized people....The Format Menu displays. 3. Resetting the Phone - Power On 1. On the Home screen, select Start ➔ More ➔ More ➔ Settings ➔ More... ➔ Security ➔ More... ➔ Master Clear and press the key. 2. enter the new one of the following keys: • ...
... Phone - This option erases user storage. • 2 - Master Reset. On the Home screen, select Start ➔ More ➔ More ➔ Settings ➔ More... ➔ Security ➔ More... ➔ Change Reset Password and press the key. 2. While the phone is supported by unauthorized people....The Format Menu displays. 3. Resetting the Phone - Power On 1. On the Home screen, select Start ➔ More ➔ More ➔ Settings ➔ More... ➔ Security ➔ More... ➔ Master Clear and press the key. 2. enter the new one of the following keys: • ...


