Samsung SGH-I617 Battery
Related Manual Pages


Related Videos

How to Unlock {AT&T/ Samsung/ SGH-i617} cell phone
Duration: :58
Total Views: 6,248
Duration: :58
Total Views: 6,248
Similar Questions

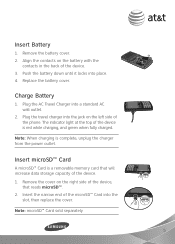
How To Remove Battery Cover On Samsung Blackjack Ii Sgh-i617
(Posted by rogerin 9 years ago)


Battery Life
GOOD EVENIN I WAS IN A VERY IMPORTANT SCHOOL RELATED CELL PHONE CONVERSATION AND MY CALL AND PHONE J...
GOOD EVENIN I WAS IN A VERY IMPORTANT SCHOOL RELATED CELL PHONE CONVERSATION AND MY CALL AND PHONE J...
(Posted by susan14suzyq 11 years ago)