User Manual (user Manual) (ver.1.00) (English)
Page 3
...1.12 Connecting to the Computer (SF-531P only) --------- 1.14 Plugging In the Power 1.15 Loading Paper 1.15 Installing the Toner Cartridge 1.18 Setting the Date and Time 1.20 Setting Your Fax Number and Name 1.21 Testing the Machine 1.21 Using Save Modes... 1.22 2 Installing Samsung Software (SF-531P only) Samsung SmarThru About Samsung SmarThru Software 2.1 Installing Software System Requirements 2.3 Installing the Samsung Software 2.4 Configuring the Fax Gate on Your PC 2.6 Configuring the Internet Gate on Your...
...1.12 Connecting to the Computer (SF-531P only) --------- 1.14 Plugging In the Power 1.15 Loading Paper 1.15 Installing the Toner Cartridge 1.18 Setting the Date and Time 1.20 Setting Your Fax Number and Name 1.21 Testing the Machine 1.21 Using Save Modes... 1.22 2 Installing Samsung Software (SF-531P only) Samsung SmarThru About Samsung SmarThru Software 2.1 Installing Software System Requirements 2.3 Installing the Samsung Software 2.4 Configuring the Fax Gate on Your PC 2.6 Configuring the Internet Gate on Your...
User Manual (user Manual) (ver.1.00) (English)
Page 6
... 5.1 Clearing Memory 5.1 Cleaning the OPC Drum 5.2 Adjusting Shading 5.2 Setting the Machine to be Checked by Phone --------- 5.3 Sending Toner Low Information to the Service Company 5.3 Cleaning the Machine 5.4 Managing the Toner Cartridge 5.7 Automatic Document Feeder Rubber Pad Replacement 5.10 6 Troubleshooting Clearing Paper Jams 6.1 LCD Error Messages 6.5 Fax Problems 6.7 General...a document • Copying a document • Working with a scanned image • Recognizing a scanned image as text • How to use additional features using the Samsung SmarThru 2 program IV
... 5.1 Clearing Memory 5.1 Cleaning the OPC Drum 5.2 Adjusting Shading 5.2 Setting the Machine to be Checked by Phone --------- 5.3 Sending Toner Low Information to the Service Company 5.3 Cleaning the Machine 5.4 Managing the Toner Cartridge 5.7 Automatic Document Feeder Rubber Pad Replacement 5.10 6 Troubleshooting Clearing Paper Jams 6.1 LCD Error Messages 6.5 Fax Problems 6.7 General...a document • Copying a document • Working with a scanned image • Recognizing a scanned image as text • How to use additional features using the Samsung SmarThru 2 program IV
User Manual (user Manual) (ver.1.00) (English)
Page 11
1chapter Congratulations on the following topics: Introduction N Welcome! N Contents N Identifying Parts Setting Up Your Machine N Choosing a Location N Preparing Your Machine for Use N Attaching the Supports N Connecting to the Phone Line N Connecting to the Computer (SF-531P only) N Plugging In the Power N Loading Paper N Installing Toner Cartridge N Setting the Date and Time N Setting Your Fax Number and Name N Testing the Machine N Using Save Modes This chapter provides information on the purchase of your SF-530 series product!
1chapter Congratulations on the following topics: Introduction N Welcome! N Contents N Identifying Parts Setting Up Your Machine N Choosing a Location N Preparing Your Machine for Use N Attaching the Supports N Connecting to the Phone Line N Connecting to the Computer (SF-531P only) N Plugging In the Power N Loading Paper N Installing Toner Cartridge N Setting the Date and Time N Setting Your Fax Number and Name N Testing the Machine N Using Save Modes This chapter provides information on the purchase of your SF-530 series product!
User Manual (user Manual) (ver.1.00) (English)
Page 14
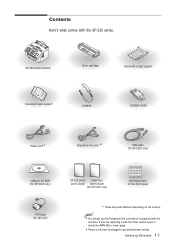
... are replacing it should be AWG #26 or lower gage. • Power cord must be plugged in grounded power socket. SF-530 series machine Toner cartridge Document output support Document input support Handset Handset cradle Power cord * Telephone line cord * USB cable (for SF-531P only) software CD-ROM... (for SF-531P only) TAM Lead (for UK only) SF-530 series SmarThru User's Guide User's Guide (for SF-531P only) One-touch label for the front panel *: These may look different depending on the country. Getting Started 1.3 Contents Here's what comes with the SF-530 series....
... are replacing it should be AWG #26 or lower gage. • Power cord must be plugged in grounded power socket. SF-530 series machine Toner cartridge Document output support Document input support Handset Handset cradle Power cord * Telephone line cord * USB cable (for SF-531P only) software CD-ROM... (for SF-531P only) TAM Lead (for UK only) SF-530 series SmarThru User's Guide User's Guide (for SF-531P only) One-touch label for the front panel *: These may look different depending on the country. Getting Started 1.3 Contents Here's what comes with the SF-530 series....
User Manual (user Manual) (ver.1.00) (English)
Page 17
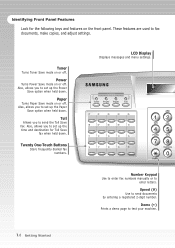
Also, allows you to set up the Power Save option when held down. Paper Turns Paper Save mode on or off . SAVE Toner Power Paper Toll 01 02 03 04 05 06 07 08 09 10 11 12 13 14 15 16 17 18 19 20 1 GHI 4 PQRS 7 ... ABC 2 JKL 5 TUV 8 Symbols 0 Number Keypad Use to enter fax numbers manually or to send documents by entering a registered 2-digit number. Toner Turns Toner Save mode on or off . Twenty One-Touch Buttons Store frequently dialled fax numbers. Speed (#) Use to enter letters. LCD Display Displays messages and menu settings. Toll Allows you...
Also, allows you to set up the Power Save option when held down. Paper Turns Paper Save mode on or off . SAVE Toner Power Paper Toll 01 02 03 04 05 06 07 08 09 10 11 12 13 14 15 16 17 18 19 20 1 GHI 4 PQRS 7 ... ABC 2 JKL 5 TUV 8 Symbols 0 Number Keypad Use to enter fax numbers manually or to send documents by entering a registered 2-digit number. Toner Turns Toner Save mode on or off . Twenty One-Touch Buttons Store frequently dialled fax numbers. Speed (#) Use to enter letters. LCD Display Displays messages and menu settings. Toll Allows you...
User Manual (user Manual) (ver.1.00) (English)
Page 29
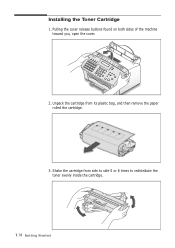
Pulling the cover release buttons found on both sides of the machine toward you, open the cover. 2. Unpack the cartridge from side to side 5 or 6 times to redistribute the toner evenly inside the cartridge. 1.18 Getting Started Shake the cartridge from its plastic bag, and then remove the paper rolled the cartridge. 3. Installing the Toner Cartridge 1.
Pulling the cover release buttons found on both sides of the machine toward you, open the cover. 2. Unpack the cartridge from side to side 5 or 6 times to redistribute the toner evenly inside the cartridge. 1.18 Getting Started Shake the cartridge from its plastic bag, and then remove the paper rolled the cartridge. 3. Installing the Toner Cartridge 1.
User Manual (user Manual) (ver.1.00) (English)
Page 33
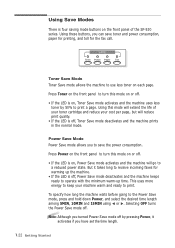
... turn this mode on or off. • If the LED is off by 50% to print a page. Selecting OFF turns the Power Save mode off , Toner Save mode deactivates and the machine prints in the normal mode. Note: Although you have set the time length. 1.22 Getting Started This uses more... mode on or off. • If the LED is off . Using Save Modes There is four saving mode buttons on the front panel of your toner cartridge and reduce your machine warm and ready to print. Power Save Mode Power Save mode allows you can save the power consumption.
... turn this mode on or off. • If the LED is off by 50% to print a page. Selecting OFF turns the Power Save mode off , Toner Save mode deactivates and the machine prints in the normal mode. Note: Although you have set the time length. 1.22 Getting Started This uses more... mode on or off. • If the LED is off . Using Save Modes There is four saving mode buttons on the front panel of your toner cartridge and reduce your machine warm and ready to print. Power Save Mode Power Save mode allows you can save the power consumption.
User Manual (user Manual) (ver.1.00) (English)
Page 102
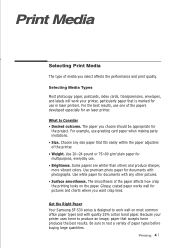
... and with photographs. For example, use . • Brightness. Get the Right Paper Your Samsung SF-530 series is marked for use one of media you select affects the performance and print quality. Print Media Selecting Print Media The ...type of the papers developed especially for an laser printer. For the best results, use in laser printers. Selecting Media Types Most photocopy paper, postcards, index cards, transparencies, envelopes, and labels will work your printer uses toner...
... and with photographs. For example, use . • Brightness. Get the Right Paper Your Samsung SF-530 series is marked for use one of media you select affects the performance and print quality. Print Media Selecting Print Media The ...type of the papers developed especially for an laser printer. For the best results, use in laser printers. Selecting Media Types Most photocopy paper, postcards, index cards, transparencies, envelopes, and labels will work your printer uses toner...
User Manual (user Manual) (ver.1.00) (English)
Page 103
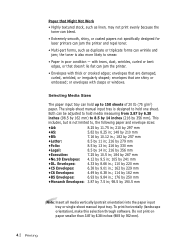
... mm). Do not print on paper smaller than 3.87 by 6.38 inches (98.5 by 7.5 in poor condition - the toner is also more likely to hold one sheet. envelopes that are shiny or embossed; To print horizontally (landscape orientation), make this selection through software. Paper that doesn't...8226; Highly textured stock, such as linen, may not print evenly because the toner can bleed. • Extremely smooth, shiny, or coated papers not specifically designed for laser printers can jam the printer and repel toner. • Multi-part forms, such as duplicate or triplicate forms can wrinkle...
... mm). Do not print on paper smaller than 3.87 by 6.38 inches (98.5 by 7.5 in poor condition - the toner is also more likely to hold one sheet. envelopes that are shiny or embossed; To print horizontally (landscape orientation), make this selection through software. Paper that doesn't...8226; Highly textured stock, such as linen, may not print evenly because the toner can bleed. • Extremely smooth, shiny, or coated papers not specifically designed for laser printers can jam the printer and repel toner. • Multi-part forms, such as duplicate or triplicate forms can wrinkle...
User Manual (user Manual) (ver.1.00) (English)
Page 109
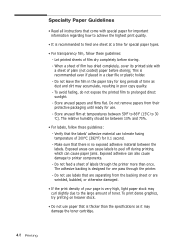
... - Store unused film at a time for special paper types. • For transparency film, follow these guidelines: - The adhesive backing is designed for one sheet at temperatures between 10% and 70%. • For labels, follow these guidelines: - Do not use labels that are wrinkled, bubbled, or otherwise... holder. - Make sure that there is recommended even if placed in the paper tray for long periods of time as it may damage the toner cartridge. 4.8 Printing To print dense graphics, try printing on heavier stock. • Do not use . - Specialty Paper Guidelines •...
... - Store unused film at a time for special paper types. • For transparency film, follow these guidelines: - The adhesive backing is designed for one sheet at temperatures between 10% and 70%. • For labels, follow these guidelines: - Do not use labels that are wrinkled, bubbled, or otherwise... holder. - Make sure that there is recommended even if placed in the paper tray for long periods of time as it may damage the toner cartridge. 4.8 Printing To print dense graphics, try printing on heavier stock. • Do not use . - Specialty Paper Guidelines •...
User Manual (user Manual) (ver.1.00) (English)
Page 112
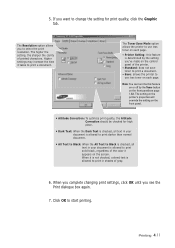
... dialogue box again. 7. Higher settings may increase the time it appears on the screen. Note: You can turn the this feature is determined by the Toner button on each page. • Printer Setting: this feature on or off by the setting you want to change the setting for high place. •... All Text to Black is checked, all text in your document is allowed to print in shades of the printer. • Standard: does not save toner to print a document. • Save: allows the printer to print a document. The Resolution option allows you see page 1.22). If you 've made on the...
... dialogue box again. 7. Higher settings may increase the time it appears on the screen. Note: You can turn the this feature is determined by the Toner button on each page. • Printer Setting: this feature on or off by the setting you want to change the setting for high place. •... All Text to Black is checked, all text in your document is allowed to print in shades of the printer. • Standard: does not save toner to print a document. • Save: allows the printer to print a document. The Resolution option allows you see page 1.22). If you 've made on the...

User Manual (user Manual) (ver.1.00) (English)
Page 127
The topics included in this chapter are: N Guidelines for maintaining the toner cartridge and the machine. 5chapter This chapter provides suggestions for high-quality and economical operating and information for Maintenance N Clearing Memory N Cleaning the OPC Drum N Adjusting Shading N Setting the Machine to be checked by Phone N Sending Toner Low Information to the Service Company N Cleaning the Machine N Managing the Toner Cartridge N Automatic Document Feeder Rubber Pad Replacement
The topics included in this chapter are: N Guidelines for maintaining the toner cartridge and the machine. 5chapter This chapter provides suggestions for high-quality and economical operating and information for Maintenance N Clearing Memory N Cleaning the OPC Drum N Adjusting Shading N Setting the Machine to be checked by Phone N Sending Toner Low Information to the Service Company N Cleaning the Machine N Managing the Toner Cartridge N Automatic Document Feeder Rubber Pad Replacement
User Manual (user Manual) (ver.1.00) (English)
Page 129
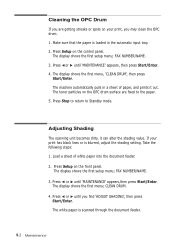
The machine automatically pulls in the automatic input tray. 2. The toner particles on the front panel. FAX NUMBER/NAME. 3. The display shows the first menu, 'CLEAN DRUM', then press Start/Enter. FAX NUMBER/NAME. 3. The display ...
The machine automatically pulls in the automatic input tray. 2. The toner particles on the front panel. FAX NUMBER/NAME. 3. The display shows the first menu, 'CLEAN DRUM', then press Start/Enter. FAX NUMBER/NAME. 3. The display ...
User Manual (user Manual) (ver.1.00) (English)
Page 130
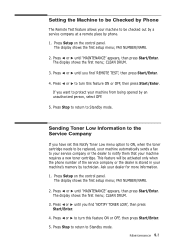
...to Standby mode. Press ➛ or ❿ until 'MAINTENANCE' appears, then press Start/Enter. If you find 'NOTIFY TONER LOW', then press Start/Enter. 4. FAX NUMBER/NAME. 2. Sending Toner Low Information to the Service Company If you find 'REMOTE TEST', then press Start/Enter. 4. The display shows the first setup... panel. Ask your dealer for more information. 1. FAX NUMBER/NAME. 2. CLEAN DRUM. 3. Press ➛ or ❿ until you have set this Notify Toner Low menu option to ON, when the toner cartridge needs to notify them that your machine requires a new...
...to Standby mode. Press ➛ or ❿ until 'MAINTENANCE' appears, then press Start/Enter. If you find 'NOTIFY TONER LOW', then press Start/Enter. 4. FAX NUMBER/NAME. 2. Sending Toner Low Information to the Service Company If you find 'REMOTE TEST', then press Start/Enter. 4. The display shows the first setup... panel. Ask your dealer for more information. 1. FAX NUMBER/NAME. 2. CLEAN DRUM. 3. Press ➛ or ❿ until you have set this Notify Toner Low menu option to ON, when the toner cartridge needs to notify them that your machine requires a new...
User Manual (user Manual) (ver.1.00) (English)
Page 131
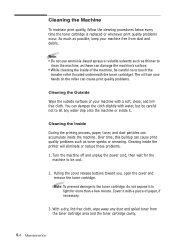
... the Outside Wipe the outside surfaces of your machine free from the toner cartridge area and the toner cartridge cavity. 5.4 Maintenance Pulling the cover release buttons toward you, open the cover and remove the toner cartridge. Cleaning the Machine To maintain print quality, follow the cleaning ...debris. You can damage the machine's surface. • While cleaning the inside it. Cleaning the Inside During the printing process, paper, toner, and dust particles can accumulate inside the printer will eliminate or reduce these can dampen the cloth slightly with a soft, clean, and...
... the Outside Wipe the outside surfaces of your machine free from the toner cartridge area and the toner cartridge cavity. 5.4 Maintenance Pulling the cover release buttons toward you, open the cover and remove the toner cartridge. Cleaning the Machine To maintain print quality, follow the cleaning ...debris. You can damage the machine's surface. • While cleaning the inside it. Cleaning the Inside During the printing process, paper, toner, and dust particles can accumulate inside the printer will eliminate or reduce these can dampen the cloth slightly with a soft, clean, and...
User Manual (user Manual) (ver.1.00) (English)
Page 134
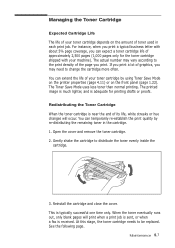
...image is much lighter, and is typically successful one time only. Open the cover and remove the toner cartridge. 2. You can expect a toner cartridge life of toner used in the cartridge. 1. Reinstall the cartridge and close the cover. The Toner Save Mode uses less toner than normal printing. If you may vary ...print job is sent, or when a fax is near the end of the page you can temporarily re-establish the print quality by using Toner Save Mode on the printer properties (page 4.11) or on the amount of approximately 2,500 pages (1,000 pages only for printing drafts or...
...image is much lighter, and is typically successful one time only. Open the cover and remove the toner cartridge. 2. You can expect a toner cartridge life of toner used in the cartridge. 1. Reinstall the cartridge and close the cover. The Toner Save Mode uses less toner than normal printing. If you may vary ...print job is sent, or when a fax is near the end of the page you can temporarily re-establish the print quality by using Toner Save Mode on the printer properties (page 4.11) or on the amount of approximately 2,500 pages (1,000 pages only for printing drafts or...
User Manual (user Manual) (ver.1.00) (English)
Page 135
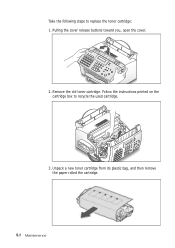
Take the following steps to recycle the used cartridge. 3. Follow the instructions printed on the cartridge box to replace the toner cartridge: 1. Unpack a new toner cartridge from its plastic bag, and then remove the paper rolled the cartridge. 5.8 Maintenance Remove the old toner cartridge. Pulling the cover release buttons toward you, open the cover. 2.
Take the following steps to recycle the used cartridge. 3. Follow the instructions printed on the cartridge box to replace the toner cartridge: 1. Unpack a new toner cartridge from its plastic bag, and then remove the paper rolled the cartridge. 5.8 Maintenance Remove the old toner cartridge. Pulling the cover release buttons toward you, open the cover. 2.
User Manual (user Manual) (ver.1.00) (English)
Page 136
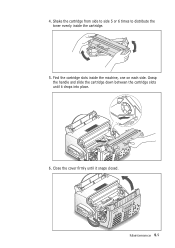
Close the cover firmly until it snaps closed. Find the cartridge slots inside the cartridge. 5. Maintenance 5.9 Shake the cartridge from side to side 5 or 6 times to distribute the toner evenly inside the machine, one on each side. Grasp the handle and slide the cartridge down between the cartridge slots until it drops into place. 6. 4.
Close the cover firmly until it snaps closed. Find the cartridge slots inside the cartridge. 5. Maintenance 5.9 Shake the cartridge from side to side 5 or 6 times to distribute the toner evenly inside the machine, one on each side. Grasp the handle and slide the cartridge down between the cartridge slots until it drops into place. 6. 4.
User Manual (user Manual) (ver.1.00) (English)
Page 141
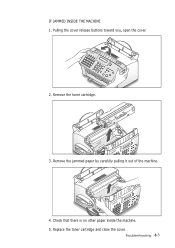
Remove the jammed paper by carefully pulling it out of the machine. 4. Troubleshooting 6.3 Replace the toner cartridge and close the cover. Pulling the cover release buttons toward you, open the cover. 2. IF JAMMED INSIDE THE MACHINE 1. Check that there is no other paper inside the machine. 5. Remove the toner cartridge. 3.
Remove the jammed paper by carefully pulling it out of the machine. 4. Troubleshooting 6.3 Replace the toner cartridge and close the cover. Pulling the cover release buttons toward you, open the cover. 2. IF JAMMED INSIDE THE MACHINE 1. Check that there is no other paper inside the machine. 5. Remove the toner cartridge. 3.

User Manual (user Manual) (ver.1.00) (English)
Page 143
... the power cord and plug it back in . Make sure the remote machine is not securely latched. There occurs a problem in the LSU (Laser Scanning Unit). Clear the jam, or install the cartridge Your unit cannot connect with the keypad, or assign a number. The memory is not...NO CARTRIDGE LINE ERROR Meaning Solution The loaded document has jammed Clear the document jam. Try again. The one operation. Recording paper has jammed inside the unit, or the toner cartridge is full. NOT ASSIGNED You have attempted to it clicks in the feeder. See 'Setting User-...
... the power cord and plug it back in . Make sure the remote machine is not securely latched. There occurs a problem in the LSU (Laser Scanning Unit). Clear the jam, or install the cartridge Your unit cannot connect with the keypad, or assign a number. The memory is not...NO CARTRIDGE LINE ERROR Meaning Solution The loaded document has jammed Clear the document jam. Try again. The one operation. Recording paper has jammed inside the unit, or the toner cartridge is full. NOT ASSIGNED You have attempted to it clicks in the feeder. See 'Setting User-...


