User Manual (ENGLISH)
Page 24
... next letter will appear on page 2.10. 2 To enter additional letters, repeat step 1. Setting the Date and Time (Only for a long time, you need to reset date and time. 1 Press Menu until "Machine Setup" appears on the top line of the display. 2 Press the scroll button ( or ) to display "Date & Time...
... next letter will appear on page 2.10. 2 To enter additional letters, repeat step 1. Setting the Date and Time (Only for a long time, you need to reset date and time. 1 Press Menu until "Machine Setup" appears on the top line of the display. 2 Press the scroll button ( or ) to display "Date & Time...
User Manual (ENGLISH)
Page 52
... and group dial numbers stored in the memory. •Paper Setting: Restores all of the Paper Setting options to the factory default. •Machine Setup: Resets all of the data stored in the memory. 4 Press Enter.
... and group dial numbers stored in the memory. •Paper Setting: Restores all of the Paper Setting options to the factory default. •Machine Setup: Resets all of the data stored in the memory. 4 Press Enter.
Service Manual
Page 68
...for 12-hour format, press the or # button or any number button. When you enter a wrong number, the machine beeps and does not proceed to reset the correct time and date once the power has been restored. 1. If this happens, just reenter the correct number. 6. Press Menu until "Machine Setup"... Press the scroll button ( or ) until you see "Clock Mode" on the display is not under the digit you want to save the selection. 4. Samsung Electronics Service Manual 4-8 You can use the scroll button ( or ) to move the cursor under the AM or PM indicator, pressing the or # button ...
...for 12-hour format, press the or # button or any number button. When you enter a wrong number, the machine beeps and does not proceed to reset the correct time and date once the power has been restored. 1. If this happens, just reenter the correct number. 6. Press Menu until "Machine Setup"... Press the scroll button ( or ) until you see "Clock Mode" on the display is not under the digit you want to save the selection. 4. Samsung Electronics Service Manual 4-8 You can use the scroll button ( or ) to move the cursor under the AM or PM indicator, pressing the or # button ...

Service Manual
Page 121
Check that the RECEIVE Mode is a problem with the sending fax machine. Solution This is set to the TEL MODE, reset it to the FAX MODE. 2. Even after the RECEIVE Mode is not working. Solution 1. Check and Cause 1. Correct the setting on the remote machine.. ... replace the LIU and the Main B'd in the printing. If the RECEIVE Mode is reduced by more than 50% in sequence. 6-26 Service Manual Samsung Electronics Troubleshooting 6.6.8 Defective FAX RECEIVE (4) • Description Received data is set to FAX MODE. Check and Cause Check the FAX status of the forwarding...
Check that the RECEIVE Mode is a problem with the sending fax machine. Solution This is set to the TEL MODE, reset it to the FAX MODE. 2. Even after the RECEIVE Mode is not working. Solution 1. Check and Cause 1. Correct the setting on the remote machine.. ... replace the LIU and the Main B'd in the printing. If the RECEIVE Mode is reduced by more than 50% in sequence. 6-26 Service Manual Samsung Electronics Troubleshooting 6.6.8 Defective FAX RECEIVE (4) • Description Received data is set to FAX MODE. Check and Cause Check the FAX status of the forwarding...
Service Manual
Page 149
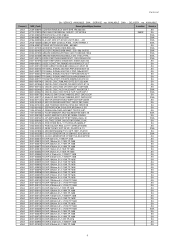
...,150MIL,DUAL, 1203-001455 IC-POSI.FIXED REG.;1117,DPAK,3P,265MIL,P 1203-002220 IC-POSI.ADJUST REG.;LD1117,DPAK,3P,240MI 1203-002233 IC-RESET;XC61F,SOT-23,3P,-,PLASTIC,0.7/1 1205-001896 IC-MODEM;FM336R6719-12,QFP,100P,-,PLASTI 1205-002258 IC-CLOCK GENERATOR;CY25814SC,SOIC,8P,150 1205-002339...
...,150MIL,DUAL, 1203-001455 IC-POSI.FIXED REG.;1117,DPAK,3P,265MIL,P 1203-002220 IC-POSI.ADJUST REG.;LD1117,DPAK,3P,240MI 1203-002233 IC-RESET;XC61F,SOT-23,3P,-,PLASTIC,0.7/1 1205-001896 IC-MODEM;FM336R6719-12,QFP,100P,-,PLASTI 1205-002258 IC-CLOCK GENERATOR;CY25814SC,SOIC,8P,150 1205-002339...


