
Universal Print Driver Guide (ENGLISH)
Page 9
...printers. • Settings: Displays options for buying supplies. • TroubleShooting Guide: Opens the troubleshooting chapter of the user's guide. You need to install the Smart Panel of the selected printer in the list. Changing Samsung Universal Print Driver settings Setting the pop-up : 1. There are ... of recently used printer is at the top of the list. • Search - Search Now: Searches printers that are using to see the troubleshooting guide. • Printer Settings: Opens SyncThur Web Service, which provides options for a printer by USB or network. - Main menus 2 3...
...printers. • Settings: Displays options for buying supplies. • TroubleShooting Guide: Opens the troubleshooting chapter of the user's guide. You need to install the Smart Panel of the selected printer in the list. Changing Samsung Universal Print Driver settings Setting the pop-up : 1. There are ... of recently used printer is at the top of the list. • Search - Search Now: Searches printers that are using to see the troubleshooting guide. • Printer Settings: Opens SyncThur Web Service, which provides options for a printer by USB or network. - Main menus 2 3...

User Manual (ENGLISH)
Page 7
... cartridge ...13.3 Maintenance Parts ...13.9 Managing your machine from the website ...13.9 Checking the machine's serial number ...13.10 System Administrtion Tools ...13.10 14. Troubleshooting Clearing document jams ...14.1 Clearing paper jams ...14.2 Understanding display messages ...14.6 Toner cartridge-related messages ...14.10 Solving other problems ...14.11 15. How...
... cartridge ...13.3 Maintenance Parts ...13.9 Managing your machine from the website ...13.9 Checking the machine's serial number ...13.10 System Administrtion Tools ...13.10 14. Troubleshooting Clearing document jams ...14.1 Clearing paper jams ...14.2 Understanding display messages ...14.6 Toner cartridge-related messages ...14.10 Solving other problems ...14.11 15. How...
User Manual (ENGLISH)
Page 15
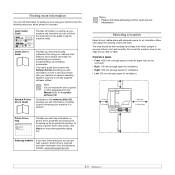
...using your machine's full features, and contains information for maintaining your machine to get help information on setting up your machine from the Samsung website, www.samsungprinter.com. Selecting a location Select a level, stable place with help , support, printer drivers, manuals, and order...operating systems, and how to the edge of heat, cold, and humidity. Samsung website If you have Internet access, you with your machine on setting up and connecting your machine, troubleshooting, and installing accessories. Allow extra space for open source information. Finding more...
...using your machine's full features, and contains information for maintaining your machine to get help information on setting up your machine from the Samsung website, www.samsungprinter.com. Selecting a location Select a level, stable place with help , support, printer drivers, manuals, and order...operating systems, and how to the edge of heat, cold, and humidity. Samsung website If you have Internet access, you with your machine on setting up and connecting your machine, troubleshooting, and installing accessories. Allow extra space for open source information. Finding more...
User Manual (ENGLISH)
Page 22
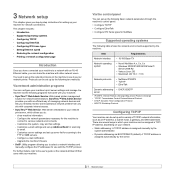
... provides you with the TCP/IP protocol. Customize server settings and set up with a variety of managing network devices and lets you remotely monitor and troubleshoot network printers from any site with corporate intranet access. • SyncThru™ Web Service: Web server embedded to use with an efficient way of TCP...
... provides you with the TCP/IP protocol. Customize server settings and set up with a variety of managing network devices and lets you remotely monitor and troubleshoot network printers from any site with corporate intranet access. • SyncThru™ Web Service: Web server embedded to use with an efficient way of TCP...

User Manual (ENGLISH)
Page 25
...'s Guide in PDF 1. Windows Network utilities CD • SyncThru™ Web Admin Service: Use this webbased program to remotely manage, monitor, and troubleshoot network printers. • Set IP: Use this program to set up your machine and connected it to a network-connected computer. • User... must install the printer software. 4 Software overview This chapter gives you are a Linux OS user, download the software from the Samsung website (www.samsung.com/printer) and install.: OS Windows Contents • Printer driver: Use this driver to take full advantage of the software that...
...'s Guide in PDF 1. Windows Network utilities CD • SyncThru™ Web Admin Service: Use this webbased program to remotely manage, monitor, and troubleshoot network printers. • Set IP: Use this program to set up your machine and connected it to a network-connected computer. • User... must install the printer software. 4 Software overview This chapter gives you are a Linux OS user, download the software from the Samsung website (www.samsung.com/printer) and install.: OS Windows Contents • Printer driver: Use this driver to take full advantage of the software that...

User Manual (ENGLISH)
Page 79
... ADF cover. Exit Misfeed 1 Remove the remaining documents from the ADF. 2 Open the ADF cover. 3 Pull the jammed paper gently out of the DADF. 14 Troubleshooting This chapter gives helpful information for thick, thin, or mixed paper-type originals. This chapter includes: • Clearing document jams • Clearing paper jams •...
... ADF cover. Exit Misfeed 1 Remove the remaining documents from the ADF. 2 Open the ADF cover. 3 Pull the jammed paper gently out of the DADF. 14 Troubleshooting This chapter gives helpful information for thick, thin, or mixed paper-type originals. This chapter includes: • Clearing document jams • Clearing paper jams •...

User Manual (ENGLISH)
Page 80
Follow the instructions in the following sections to release the Tray from the feed area by gently pulling it out completely, lift the front part of jam Go to the right using both hands. After you pull it straight out. Refer to the table below and page 14.3, 14.4 page 14.4 page 14.4 In the duplex unit page 14.6 2 Remove the jammed paper by carefully pulling it to locate and clear the paper jam. Once you pull, stop pulling. Caution To avoid tearing the paper, pull out the jammed paper gently and slowly. Then load the removed pages back into the DADF. 3 Close the document ...
Follow the instructions in the following sections to release the Tray from the feed area by gently pulling it out completely, lift the front part of jam Go to the right using both hands. After you pull it straight out. Refer to the table below and page 14.3, 14.4 page 14.4 page 14.4 In the duplex unit page 14.6 2 Remove the jammed paper by carefully pulling it to locate and clear the paper jam. Once you pull, stop pulling. Caution To avoid tearing the paper, pull out the jammed paper gently and slowly. Then load the removed pages back into the DADF. 3 Close the document ...

User Manual (ENGLISH)
Page 81
In the optional tray 2 1 Pull the optional tray 2 open. 2 Pull the paper Tray to open the side cover. After you do not see the paper in this area, stop and go to step 3. 3 Pull the tray 1 half. 4 Remove the paper in the direction shown. Note Do not touch the shiny drum cartridge surface. Scratches or smudges will result in poor copy quality. 4 Carefully remove the misfed paper in the direction shown. To avoid the paper torn, pull it completely. Lower the rear part of the Tray to align the rear edge with the corresponding slot of the Tray slightly up to release the Tray ...
In the optional tray 2 1 Pull the optional tray 2 open. 2 Pull the paper Tray to open the side cover. After you do not see the paper in this area, stop and go to step 3. 3 Pull the tray 1 half. 4 Remove the paper in the direction shown. Note Do not touch the shiny drum cartridge surface. Scratches or smudges will result in poor copy quality. 4 Carefully remove the misfed paper in the direction shown. To avoid the paper torn, pull it completely. Lower the rear part of the Tray to align the rear edge with the corresponding slot of the Tray slightly up to release the Tray ...

User Manual (ENGLISH)
Page 82
If paper is not seen in smudged copies. 14.4 In the paper exit area 1 Press the release lever to open the side cover. 2 Pull down on the paper. Unfused toner may adhere to the area, resulting in this area, skip to the Exit Area. 4 Push the fuser lever up through the fusing unit. In the multi-purpose tray 1 If the paper is not feeding properly, pull the paper out of the machine. 3 Remove the jammed paper, in the direction shown. 2 Open and close the front cover to resume printing. Note Do not pull paper up , and then close the side cover. 5 Open and close the front cover to...
If paper is not seen in smudged copies. 14.4 In the paper exit area 1 Press the release lever to open the side cover. 2 Pull down on the paper. Unfused toner may adhere to the area, resulting in this area, skip to the Exit Area. 4 Push the fuser lever up through the fusing unit. In the multi-purpose tray 1 If the paper is not feeding properly, pull the paper out of the machine. 3 Remove the jammed paper, in the direction shown. 2 Open and close the front cover to resume printing. Note Do not pull paper up , and then close the side cover. 5 Open and close the front cover to...

User Manual (ENGLISH)
Page 83
This will release pressure on the fuser lever. 2 Open the front cover. 5 Push the fuser lever up. 3 Pull down on the paper. 6 Turn the Jam Remove Lever back to the original position. 4 Turn the Jam Remove Lever in the direction of the arrow to move the paper to the exit area, then gently pull the paper out through the exit area. 7 Close the front cover " and the side cover o. Printing automatically resumes. 14.5
This will release pressure on the fuser lever. 2 Open the front cover. 5 Push the fuser lever up. 3 Pull down on the paper. 6 Turn the Jam Remove Lever back to the original position. 4 Turn the Jam Remove Lever in the direction of the arrow to move the paper to the exit area, then gently pull the paper out through the exit area. 7 Close the front cover " and the side cover o. Printing automatically resumes. 14.5

User Manual (ENGLISH)
Page 84
See page 5.8. • Ensure that the duplex unit is inserted correctly. 1 Press the release lever to open the side cover. 2 Remove the jammed paper. 3 Close the side cover. Understanding display messages Messages appear on the inside wall of its life. Messages and their meanings are positioned correctly. • Do not overload the tray. Yes [COMM. The machine has a communication problem. The protocol you want to tell the service representative the display message. You entered an unavailable item. Ask the sender to accept Yes. Enter the correct item again. 14.6 Note ...
See page 5.8. • Ensure that the duplex unit is inserted correctly. 1 Press the release lever to open the side cover. 2 Remove the jammed paper. 3 Close the side cover. Understanding display messages Messages appear on the inside wall of its life. Messages and their meanings are positioned correctly. • Do not overload the tray. Yes [COMM. The machine has a communication problem. The protocol you want to tell the service representative the display message. You entered an unavailable item. Ask the sender to accept Yes. Enter the correct item again. 14.6 Note ...
User Manual (ENGLISH)
Page 85
... received fax data will be used already. Reconfirm junk fax setup, see page 14.4. Try again after a few minutes. A problem has occurred in the LSU (Laser Scanning Unit). The file names you have entered already exists. For the location of a problem with the phone line. If the problem persists, please call...
... received fax data will be used already. Reconfirm junk fax setup, see page 14.4. Try again after a few minutes. A problem has occurred in the LSU (Laser Scanning Unit). The file names you have entered already exists. For the location of a problem with the phone line. If the problem persists, please call...
User Manual (ENGLISH)
Page 86
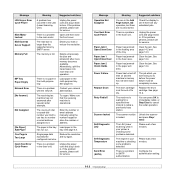
... or Stop/Clear to redial a previously busy station. Please wait a few minutes. The engine in the feeding area of its life. The one operation. Paper has jammed in your printer is checking some problems detected. Replace the drum cartridge. See page 13.6. There is a problem in... page 14.2 and page 14.3. Clear the jam. The job which you tried to it back in the multi-purpose tray. The LSU (Laser Scanning Unit) in the fuser unit. If the problem persists, please call for a specified time interval to cancel the redial operation. There is...
... or Stop/Clear to redial a previously busy station. Please wait a few minutes. The engine in the feeding area of its life. The one operation. Paper has jammed in your printer is checking some problems detected. Replace the drum cartridge. See page 13.6. There is a problem in... page 14.2 and page 14.3. Clear the jam. The job which you tried to it back in the multi-purpose tray. The LSU (Laser Scanning Unit) in the fuser unit. If the problem persists, please call for a specified time interval to cancel the redial operation. There is...
User Manual (ENGLISH)
Page 87
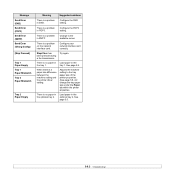
Configure the POP3 setting. Configure your network interface card correctly. There is a problem on the network interface card. There is no paper in Load paper in POP3. Stop/Clear has been pressed during a fax transmission. tray 1. When there is a problem in the optional tray 2. See page 5.5. 14.9 Adjunst the machine setting to the available server. Load paper in DNS. There is a paper size difference between the machine setting and the printer driver setting. Change to the tray paper size of the printer properties. (See page 5.8.) Or change the tray ...
Configure the POP3 setting. Configure your network interface card correctly. There is a problem on the network interface card. There is no paper in Load paper in POP3. Stop/Clear has been pressed during a fax transmission. tray 1. When there is a problem in the optional tray 2. See page 5.5. 14.9 Adjunst the machine setting to the available server. Load paper in DNS. There is a paper size difference between the machine setting and the printer driver setting. Change to the tray paper size of the printer properties. (See page 5.8.) Or change the tray ...
User Manual (ENGLISH)
Page 88
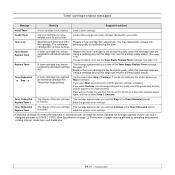
... toner is not for the best print quality when this stage can keep printing but the quality cannot be affected by redistributing the toner. Install a Samsung-genuine toner cartridge, designed for the best print quality when this stage can result in Prepare a new cartridge for replacement. Using a cartridge beyond this message...
... toner is not for the best print quality when this stage can keep printing but the quality cannot be affected by redistributing the toner. Install a Samsung-genuine toner cartridge, designed for the best print quality when this stage can result in Prepare a new cartridge for replacement. Using a cartridge beyond this message...
User Manual (ENGLISH)
Page 89
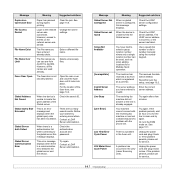
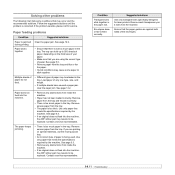
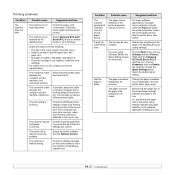
... much paper in the tray. Use only paper that meets the specifications required by the machine. If the problem persists, please call for laser printers. Clear the paper jam. Contact a service representative. Envelopes skew or fail to feed correctly. Remove each transparency as it correctly. ...the machine. Ensure that there is being used. See page 14.2. • Ensure that the paper guides are against both sides of only one type, size, and weight. • If multiple sheets have caused a paper jam, clear the paper jam. Paper feeding problems Condition Suggested...
... much paper in the tray. Use only paper that meets the specifications required by the machine. If the problem persists, please call for laser printers. Clear the paper jam. Contact a service representative. Envelopes skew or fail to feed correctly. Remove each transparency as it correctly. ...the machine. Ensure that there is being used. See page 14.2. • Ensure that the paper guides are against both sides of only one type, size, and weight. • If multiple sheets have caused a paper jam, clear the paper jam. Paper feeding problems Condition Suggested...
User Manual (ENGLISH)
Page 90
... the power switch and the power source. Close the cover. • Paper is extremely slow. Repair the printer software. Right-click the Samsung SCX-6x22 Series PCL 6 machine icon, choose Properties, click the Details tab, and then choose the Spool Settings button. Clear the paper jam....matches the paper in the tray. Possible cause Suggested solutions The machine is incorrect. Select Samsung SCX-6x22 Series PCL 6 as the default printer. If possible, attach the cable to the correct one. If you use. 14.12 The page orientation setting may be incorrect. Check the ...
... the power switch and the power source. Close the cover. • Paper is extremely slow. Repair the printer software. Right-click the Samsung SCX-6x22 Series PCL 6 machine icon, choose Properties, click the Details tab, and then choose the Spool Settings button. Clear the paper jam....matches the paper in the tray. Possible cause Suggested solutions The machine is incorrect. Select Samsung SCX-6x22 Series PCL 6 as the default printer. If possible, attach the cable to the correct one. If you use. 14.12 The page orientation setting may be incorrect. Check the ...
User Manual (ENGLISH)
Page 91
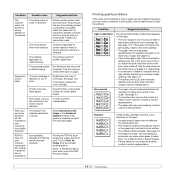
If possible, attach the cable and the machine to temporarily extend the toner cartridge life. Try printing a job from the Acrobat printing options. Turn the machine off . The toner cartridge is bad. Incompatibility between the PDF file and the Acrobat products. Turn on the page: • A single sheet of paper may be dirty. See the help screen of the printer driver and page 2.5, respectively. • A combination of toner. See page 5.3. • The transfer roller may notice a reduction in print quality. Try a print job that you may be defective. If ...
If possible, attach the cable and the machine to temporarily extend the toner cartridge life. Try printing a job from the Acrobat printing options. Turn the machine off . The toner cartridge is bad. Incompatibility between the PDF file and the Acrobat products. Turn on the page: • A single sheet of paper may be dirty. See the help screen of the printer driver and page 2.5, respectively. • A combination of toner. See page 5.3. • The transfer roller may notice a reduction in print quality. Try a print job that you may be defective. If ...
User Manual (ENGLISH)
Page 92
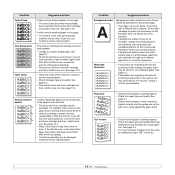
...than 80% RH) conditions can increase the amount of background shading. • Remove the old drum and toner cartridge and then, install a new one . contact a service representative. Printing on seams can cause paper curl. Both high temperature and humidity can cause problems. • If background scatter ... representative. • Check the paper type and quality. See page 5.3. • Remove the drum and toner cartridge and then, install a new one . Do not open packages of paper in the tray. 14.14 Also try rotating the paper 180° in the tray. Remove the drum ...
...than 80% RH) conditions can increase the amount of background shading. • Remove the old drum and toner cartridge and then, install a new one . contact a service representative. Printing on seams can cause paper curl. Both high temperature and humidity can cause problems. • If background scatter ... representative. • Check the paper type and quality. See page 5.3. • Remove the drum and toner cartridge and then, install a new one . Do not open packages of paper in the tray. 14.14 Also try rotating the paper 180° in the tray. Remove the drum ...
User Manual (ENGLISH)
Page 93
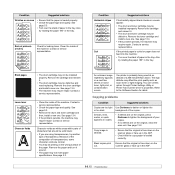
... scan unit. Contact a service representative. Black pages • The drum cartridge may be installed properly. Remove the drum cartridge and install a new one . Contact a service representative. Contact a service representative. • Check the paper type and quality. See page 13.4. • If the problem... 13.2. See page 5.3. • Turn over the stack of paper in the tray. Remove the toner cartridge and install a new one . Also try rotating the paper 180° in the tray. You printer is loaded correctly. Copying problems Condition Suggested solutions Copies are...
... scan unit. Contact a service representative. Black pages • The drum cartridge may be installed properly. Remove the drum cartridge and install a new one . Contact a service representative. Contact a service representative. • Check the paper type and quality. See page 13.4. • If the problem... 13.2. See page 5.3. • Turn over the stack of paper in the tray. Remove the toner cartridge and install a new one . Also try rotating the paper 180° in the tray. You printer is loaded correctly. Copying problems Condition Suggested solutions Copies are...
