User Manual (ENGLISH)
Page 120
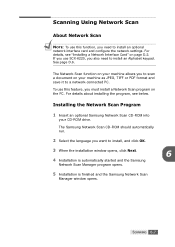
... program on the PC. Installing the Network Scan Program 1 Insert an optional Samsung Network Scan CD-ROM into your machine as JPEG, TIFF or PDF format and save it to a network-connected PC. For details, see below. If you use SCX-6220, you need to install an Alphabet keypad. SCANNING 6.7 Scanning Using Network...
... program on the PC. Installing the Network Scan Program 1 Insert an optional Samsung Network Scan CD-ROM into your machine as JPEG, TIFF or PDF format and save it to a network-connected PC. For details, see below. If you use SCX-6220, you need to install an Alphabet keypad. SCANNING 6.7 Scanning Using Network...
User Manual (ENGLISH)
Page 122
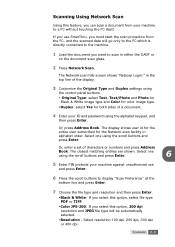
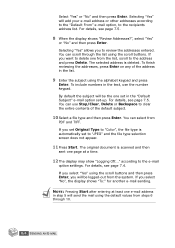
... press Enter. 7 Choose the file type and resolution and then press Enter. •Black & White: If you select this option, select file type PDF or TIFF. •Color JPE-200: If you select this feature, you can scan a document from the PC, and the scanned data will be ... selected. •Resolution - The display shows user id for the entire user subscribed for both sides of characters or numbers and press Address Book. Select one using the scroll buttons and press Enter. SCANNING 6.9 Or, press Address Book. Or, enter a set of a document. 4 Enter your ID and password using...
... press Enter. 7 Choose the file type and resolution and then press Enter. •Black & White: If you select this option, select file type PDF or TIFF. •Color JPE-200: If you select this feature, you can scan a document from the PC, and the scanned data will be ... selected. •Resolution - The display shows user id for the entire user subscribed for both sides of characters or numbers and press Address Book. Select one using the scroll buttons and press Enter. SCANNING 6.9 Or, press Address Book. Or, enter a set of a document. 4 Enter your ID and password using...
User Manual (ENGLISH)
Page 123
The next page is TIFF or PDF, the display asks if you do not send any refresh request or does not perform any job within the stored time, the machine returns to ...
The next page is TIFF or PDF, the display asks if you do not send any refresh request or does not perform any job within the stored time, the machine returns to ...
User Manual (ENGLISH)
Page 306
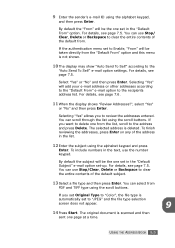
Select "Yes" or "No" and then press Enter. Selecting "Yes" will be the one e-mail address in the list. 9 Enter the subject using the default values from PDF and TIFF. Selecting "Yes" allows you to the e-mail option settings. By default the subject will send the mail using the alphabet keypad ...address and press Delete. If you will add your e-mail address or other addresses according to the "Default From" e-mail option, to delete one page at least one set in the text, use Stop/Clear, Delete or Backspace to "JPEG" and the file type selection screen does not appear. 11 Press...
Select "Yes" or "No" and then press Enter. Selecting "Yes" will be the one e-mail address in the list. 9 Enter the subject using the default values from PDF and TIFF. Selecting "Yes" allows you to the e-mail option settings. By default the subject will send the mail using the alphabet keypad ...address and press Delete. If you will add your e-mail address or other addresses according to the "Default From" e-mail option, to delete one page at least one set in the text, use Stop/Clear, Delete or Backspace to "JPEG" and the file type selection screen does not appear. 11 Press...
User Manual (ENGLISH)
Page 311
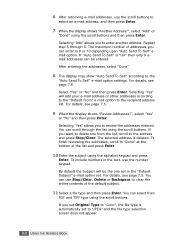
... The original document is not shown. 10 The display may show "Auto Send To Self" according to Enable, "From" will be taken directly from PDF and TIFF type using the alphabet keypad and press Enter. 9 Enter the sender's e-mail ID using the scroll buttons. You can use the number ... see page 7.6. 11 When the display shows "Review Addresses?", select "Yes" or "No" and then press Enter. By default the "From" will be the one page at a time. USING THE ADDRESS BOOK 9.5 Selecting "Yes" allows you set Original Type to clear the entire contents of the address in the "Default...
... The original document is not shown. 10 The display may show "Auto Send To Self" according to Enable, "From" will be taken directly from PDF and TIFF type using the alphabet keypad and press Enter. 9 Enter the sender's e-mail ID using the scroll buttons. You can use the number ... see page 7.6. 11 When the display shows "Review Addresses?", select "Yes" or "No" and then press Enter. By default the "From" will be the one page at a time. USING THE ADDRESS BOOK 9.5 Selecting "Yes" allows you set Original Type to clear the entire contents of the address in the "Default...
User Manual (ENGLISH)
Page 314
..."Auto Send To Self" according to the recipient address list. Selecting "Yes" will be entered. Selecting "Add" allows you want to delete one set in the text, use Stop/Clear, Delete or Backspace to clear the entire contents of addresses you to enter another address. The selected ... e-mail option to the "Auto Send To Self" e-mail option settings. If you to review the addresses entered. You can be the one from PDF and TIFF type using the alphabet keypad and press Enter. To finish reviewing the addresses, scroll to the address and press Stop/Clear. For ...
..."Auto Send To Self" according to the recipient address list. Selecting "Yes" will be entered. Selecting "Add" allows you want to delete one set in the text, use Stop/Clear, Delete or Backspace to clear the entire contents of addresses you to enter another address. The selected ... e-mail option to the "Auto Send To Self" e-mail option settings. If you to review the addresses entered. You can be the one from PDF and TIFF type using the alphabet keypad and press Enter. To finish reviewing the addresses, scroll to the address and press Stop/Clear. For ...
User Manual (ENGLISH)
Page 325
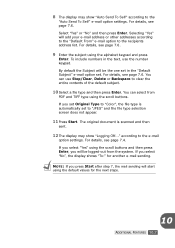
... details, see page 7.6. To include numbers in the "Default Subject" e-mail option set. For details, see page 7.6. If you will be logged-out from PDF and TIFF type using the default values for another e-mail sending. according to "JPEG" and the file type selection screen does not appear. 11 Press ...entire contents of the default subject. 10 Select a file type and then press Enter. For details, see page 7.4. By default the Subject will be the one set to the e-mail option settings. You can use the number keypad. NOTE: If you select "No", the display shows "To:" for the next ...
... details, see page 7.6. To include numbers in the "Default Subject" e-mail option set. For details, see page 7.6. If you will be logged-out from PDF and TIFF type using the default values for another e-mail sending. according to "JPEG" and the file type selection screen does not appear. 11 Press ...entire contents of the default subject. 10 Select a file type and then press Enter. For details, see page 7.4. By default the Subject will be the one set to the e-mail option settings. You can use the number keypad. NOTE: If you select "No", the display shows "To:" for the next ...

User Manual (KOREAN)
Page 330
Netscan Client Black & White PDF 혹은 TIFF Color-JPEG200 200dpi JPEG 100dpi 에서 400dpi 93
Netscan Client Black & White PDF 혹은 TIFF Color-JPEG200 200dpi JPEG 100dpi 에서 400dpi 93
SyncThru 5.0 Job Accounting Plug-in Guide (ENGLISH)
Page 39
... the report generation task by SyncThru™ Admin 5 after a while (more than weeks). Report history details You can see the reports generated previously in PDF or CSV format. 1. In the Report history summary panel, you can: • see the generated report. • see the history of the report...5 generated in detail, click the specific history on page 38.), there will be several reports generated by clicking the button. Then you want to a PDF or CSV file. Report history You can see the date and status for a task. You can : • see the history in detail. If ...
... the report generation task by SyncThru™ Admin 5 after a while (more than weeks). Report history details You can see the reports generated previously in PDF or CSV format. 1. In the Report history summary panel, you can: • see the generated report. • see the history of the report...5 generated in detail, click the specific history on page 38.), there will be several reports generated by clicking the button. Then you want to a PDF or CSV file. Report history You can see the date and status for a task. You can : • see the history in detail. If ...
SyncThru 5.0 Guide (ENGLISH)
Page 66
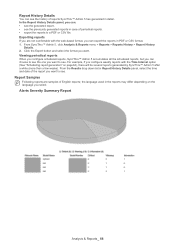
...Samples Following reports are not comfortable with the Time Interval option (See "Scheduling report generation" on the language you can export the reports in PDF or CSV format. 1. Alerts Severity Summary Report Analysis & Reports_ 66 the language used in detail. Report History Details You can see the previously... generated reports in case of periodical reports. • export the reports to a PDF or CSV file. Exporting reports If you want . In the Report History Details panel, you can choose to see the one you want to see . From the Results drop down list in Report History Details...
...Samples Following reports are not comfortable with the Time Interval option (See "Scheduling report generation" on the language you can export the reports in PDF or CSV format. 1. Alerts Severity Summary Report Analysis & Reports_ 66 the language used in detail. Report History Details You can see the previously... generated reports in case of periodical reports. • export the reports to a PDF or CSV file. Exporting reports If you want . In the Report History Details panel, you can choose to see the one you want to see . From the Results drop down list in Report History Details...


