User Manual (ENGLISH)
Page 2
... View 1.5 Control Panel Functions 1.6 SCX-5312F 1.6 SCX-5112 1.9 Making Connections 1.11 Installing Drum and Toner Cartridges 1.14 Turning the Product On 1.17 Loading Paper 1.17 Setting the Paper Size 1.20 Changing the Display Language 1.20 Using Save Mode 1.21 Toner Save 1.21 Paper Save 1.21 Power Save 1.22 Chapter 2: INSTALLING SOFTWARE About Samsung Software 2.2 MFP Driver 2.2 SmarThru...
... View 1.5 Control Panel Functions 1.6 SCX-5312F 1.6 SCX-5112 1.9 Making Connections 1.11 Installing Drum and Toner Cartridges 1.14 Turning the Product On 1.17 Loading Paper 1.17 Setting the Paper Size 1.20 Changing the Display Language 1.20 Using Save Mode 1.21 Toner Save 1.21 Paper Save 1.21 Power Save 1.22 Chapter 2: INSTALLING SOFTWARE About Samsung Software 2.2 MFP Driver 2.2 SmarThru...
User Manual (ENGLISH)
Page 14
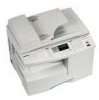
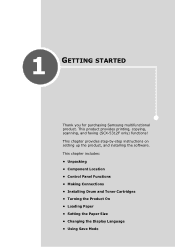
This chapter includes: • Unpacking • Component Location • Control Panel Functions • Making Connections • Installing Drum and Toner Cartridges • Turning the Product On • Loading Paper • Setting the Paper Size • Changing the Display Language • Using Save Mode 1 GETTING STARTED Thank you for purchasing Samsung multifunctional product. This chapter provides step-by-step instructions on setting up the product, and installing the software. This product provides printing, copying, scanning, and faxing (SCX-5312F only) functions!
This chapter includes: • Unpacking • Component Location • Control Panel Functions • Making Connections • Installing Drum and Toner Cartridges • Turning the Product On • Loading Paper • Setting the Paper Size • Changing the Display Language • Using Save Mode 1 GETTING STARTED Thank you for purchasing Samsung multifunctional product. This chapter provides step-by-step instructions on setting up the product, and installing the software. This product provides printing, copying, scanning, and faxing (SCX-5312F only) functions!
User Manual (ENGLISH)
Page 16
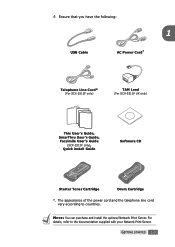
For details, refer to countries. The appearance of the power cord and the telephone line cord vary according to the documentation supplied with your Network Print Server. NOTE: You can purchase and install the optional Network Print Server. GETTING STARTED 1.3 4 Ensure that you have the following: 1 USB Cable AC Power Cord* Telephone Line Cord* (For SCX-5312F only) TAM Lead (For SCX-5312F UK only) This User's Guide, SmarThru User's Guide, Facsimile User's Guide (SCX-5312F only), Quick install Guide Software CD Starter Toner Cartridge Drum Cartridge *.
For details, refer to countries. The appearance of the power cord and the telephone line cord vary according to the documentation supplied with your Network Print Server. NOTE: You can purchase and install the optional Network Print Server. GETTING STARTED 1.3 4 Ensure that you have the following: 1 USB Cable AC Power Cord* Telephone Line Cord* (For SCX-5312F only) TAM Lead (For SCX-5312F UK only) This User's Guide, SmarThru User's Guide, Facsimile User's Guide (SCX-5312F only), Quick install Guide Software CD Starter Toner Cartridge Drum Cartridge *.
User Manual (ENGLISH)
Page 22
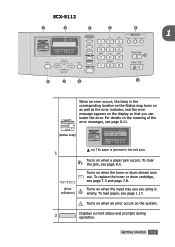
...error. Turns on the meaning of the error messages, see page 7.3 and page 7.8. Turns on when an error occurs on when the toner or drum almost runs out. Turns on the system. 2 Displays current status and prompts during operation. To load paper, see page... 8.4. SCX-5112 1 2 3 4 5 1 10 6 7 8 9 When an error occurs, the lamp in the exit area. Turns on the display so that you are using is empty. GETTING STARTED 1.9 To replace the toner or drum cartridge, see page 8.11. (status map) 1 (Error indicators) ex...
...error. Turns on the meaning of the error messages, see page 7.3 and page 7.8. Turns on when an error occurs on when the toner or drum almost runs out. Turns on the system. 2 Displays current status and prompts during operation. To load paper, see page... 8.4. SCX-5112 1 2 3 4 5 1 10 6 7 8 9 When an error occurs, the lamp in the exit area. Turns on the display so that you are using is empty. GETTING STARTED 1.9 To replace the toner or drum cartridge, see page 8.11. (status map) 1 (Error indicators) ex...
User Manual (ENGLISH)
Page 34
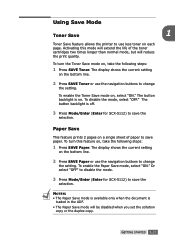
...the Paper Save mode, select "ON." Or select "OFF" to disable the mode. 3 Press Mode/Enter (Enter for SCX-5112) to use less toner on a single sheet of the toner cartridges two times longer than normal mode, but will be disabled when you set the collation copy or the duplex copy. Activating... this feature on , take the following steps: 1 Press SAVE Toner. To enable the Toner Save mode on . Paper Save This ...
...the Paper Save mode, select "ON." Or select "OFF" to disable the mode. 3 Press Mode/Enter (Enter for SCX-5112) to use less toner on a single sheet of the toner cartridges two times longer than normal mode, but will be disabled when you set the collation copy or the duplex copy. Activating... this feature on , take the following steps: 1 Press SAVE Toner. To enable the Toner Save mode on . Paper Save This ...
User Manual (ENGLISH)
Page 90
7 MAINTENANCE This chapter provides information for maintaining the cartridge and your product. This chapter includes: • Cleaning the Scan Unit • Expected Cartridge Life • Replacing the Toner Cartridge • Setting to Notify Toner Low (Available in SCX-5312F only) • Cleaning the Drum • Replacing the Drum Cartridge • Consumables and Replacement Parts
7 MAINTENANCE This chapter provides information for maintaining the cartridge and your product. This chapter includes: • Cleaning the Scan Unit • Expected Cartridge Life • Replacing the Toner Cartridge • Setting to Notify Toner Low (Available in SCX-5312F only) • Cleaning the Drum • Replacing the Drum Cartridge • Consumables and Replacement Parts
User Manual (ENGLISH)
Page 96
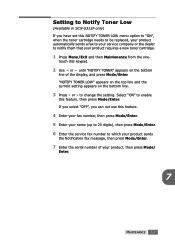
... you have set this NOTIFY TONER LOW menu option to "ON", when the toner cartridge needs to be replaced, your product automatically sends a fax to your service company or the dealer to notify them that your product, then press Mode/ Enter. 7 MAINTENANCE 7.7 "NOTIFY TONER LOW" appears on the top... line and the current setting appears on the bottom line of your product requires a new toner cartridge. 1 Press Menu/Exit and then Maintenance from the one- Setting to Notify Toner Low (Available in SCX-5312F only) If you can not use this feature. 4 Enter your fax number, then press Mode...
... you have set this NOTIFY TONER LOW menu option to "ON", when the toner cartridge needs to be replaced, your product automatically sends a fax to your service company or the dealer to notify them that your product, then press Mode/ Enter. 7 MAINTENANCE 7.7 "NOTIFY TONER LOW" appears on the top... line and the current setting appears on the bottom line of your product requires a new toner cartridge. 1 Press Menu/Exit and then Maintenance from the one- Setting to Notify Toner Low (Available in SCX-5312F only) If you can not use this feature. 4 Enter your fax number, then press Mode...
User Manual (ENGLISH)
Page 97
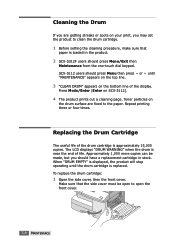
...the bottom line of the display. Toner particles on the drum surface are getting streaks or spots on SCX-5112). 4 The product prints out a cleaning page. Approximately 1,000 more copies can be open to open the front cover. 7.8 MAINTENANCE To replace the drum cartridge: 1 Open the side cover,...drum is near the end of the drum cartridge is approximately 15,000 copies. SCX-5112 users should press Menu/Exit then Maintenance from the one-touch dial keypad. Cleaning the Drum If you should have a replacement cartridge in the product. 2 SCX-5312F users should press Menu then press or until...
...the bottom line of the display. Toner particles on the drum surface are getting streaks or spots on SCX-5112). 4 The product prints out a cleaning page. Approximately 1,000 more copies can be open to open the front cover. 7.8 MAINTENANCE To replace the drum cartridge: 1 Open the side cover,...drum is near the end of the drum cartridge is approximately 15,000 copies. SCX-5112 users should press Menu/Exit then Maintenance from the one-touch dial keypad. Cleaning the Drum If you should have a replacement cartridge in the product. 2 SCX-5312F users should press Menu then press or until...
User Manual (ENGLISH)
Page 99
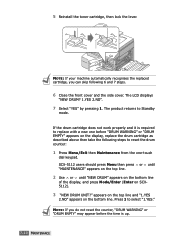
...7.10 MAINTENANCE The product returns to select "1.YES." 5 Reinstall the toner cartridge, then lock the lever. NOTE: If your machine automatically recognises the replaced cartridge, you do not reset the counter, "DRUM WARNING" or "DRUM..." appears on the display, replace the drum cartridge as described above then take the following 6 and 7 steps. 6 Close the front cover and the side cover. SCX-5112 users should press Menu then press or ...you can skip following steps to replace with a new one before the time is required to reset the drum counter: 1 Press Menu/Exit then Maintenance from the...
...7.10 MAINTENANCE The product returns to select "1.YES." 5 Reinstall the toner cartridge, then lock the lever. NOTE: If your machine automatically recognises the replaced cartridge, you do not reset the counter, "DRUM WARNING" or "DRUM..." appears on the display, replace the drum cartridge as described above then take the following 6 and 7 steps. 6 Close the front cover and the side cover. SCX-5112 users should press Menu then press or ...you can skip following steps to replace with a new one before the time is required to reset the drum counter: 1 Press Menu/Exit then Maintenance from the...


