User Manual (ENGLISH)
Page 3
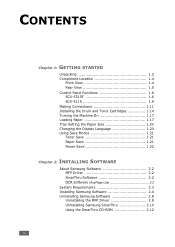
... 1.5 Control Panel Functions 1.6 SCX-5315F 1.6 SCX-5115 1.9 Making Connections 1.11 Installing the Drum and Toner Cartridges 1.14 Turning the Machine On 1.17 Loading Paper 1.17 Tray Setting the Paper Size 1.20 Changing the Display Language 1.20 Using Save Modes 1.21 Toner Save 1.21 Paper Save 1.21 Power Save 1.22 Chapter 2: INSTALLING SOFTWARE About Samsung Software 2.2 MFP Driver...
... 1.5 Control Panel Functions 1.6 SCX-5315F 1.6 SCX-5115 1.9 Making Connections 1.11 Installing the Drum and Toner Cartridges 1.14 Turning the Machine On 1.17 Loading Paper 1.17 Tray Setting the Paper Size 1.20 Changing the Display Language 1.20 Using Save Modes 1.21 Toner Save 1.21 Paper Save 1.21 Power Save 1.22 Chapter 2: INSTALLING SOFTWARE About Samsung Software 2.2 MFP Driver...
User Manual (ENGLISH)
Page 5
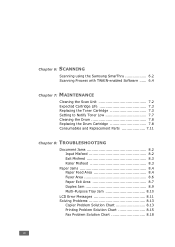
Chapter 6: SCANNING Scanning using the Samsung SmarThru 6.2 Scanning Process with TWAIN-enabled Software ...... 6.4 Chapter 7: MAINTENANCE Cleaning the Scan Unit 7.2 Expected Cartridge Life 7.3 Replacing the Toner Cartridge 7.3 Setting to Notify Toner Low 7.7 Cleaning the Drum 7.8 Replacing the Drum Cartridge 7.8 Consumables and Replacement Parts 7.11 Chapter 8: TROUBLESHOOTING Document Jams 8.2 Input Misfeed 8.2 Exit Misfeed 8.3 Roller Misfeed 8.3 Paper Jams 8.4 Paper Feed...
Chapter 6: SCANNING Scanning using the Samsung SmarThru 6.2 Scanning Process with TWAIN-enabled Software ...... 6.4 Chapter 7: MAINTENANCE Cleaning the Scan Unit 7.2 Expected Cartridge Life 7.3 Replacing the Toner Cartridge 7.3 Setting to Notify Toner Low 7.7 Cleaning the Drum 7.8 Replacing the Drum Cartridge 7.8 Consumables and Replacement Parts 7.11 Chapter 8: TROUBLESHOOTING Document Jams 8.2 Input Misfeed 8.2 Exit Misfeed 8.3 Roller Misfeed 8.3 Paper Jams 8.4 Paper Feed...
User Manual (ENGLISH)
Page 16
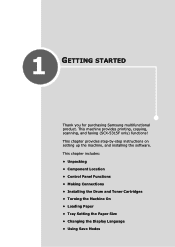
... provides printing, copying, scanning, and faxing (SCX-5315F only) functions! This chapter includes: • Unpacking • Component Location • Control Panel Functions • Making Connections • Installing the Drum and Toner Cartridges • Turning the Machine On • ...Loading Paper • Tray Setting the Paper Size • Changing the Display Language • Using Save Modes 1 GETTING STARTED Thank you for purchasing Samsung multifunctional product.
... provides printing, copying, scanning, and faxing (SCX-5315F only) functions! This chapter includes: • Unpacking • Component Location • Control Panel Functions • Making Connections • Installing the Drum and Toner Cartridges • Turning the Machine On • ...Loading Paper • Tray Setting the Paper Size • Changing the Display Language • Using Save Modes 1 GETTING STARTED Thank you for purchasing Samsung multifunctional product.
User Manual (ENGLISH)
Page 18
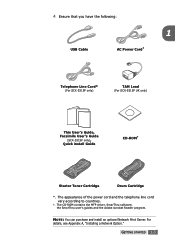
... you have the following: 1 USB Cable AC Power Cord* Telephone Line Cord* (For SCX-5315F only) TAM Lead (For SCX-5315F UK only) This User's Guide, Facsimile User's Guide (SCX-5315F only), Quick install Guide CD-ROM† Starter Toner Cartridge Drum Cartridge *. The CD-ROM contains the MFP driver, SmarThru software, the SmarThru user's guides...
... you have the following: 1 USB Cable AC Power Cord* Telephone Line Cord* (For SCX-5315F only) TAM Lead (For SCX-5315F UK only) This User's Guide, Facsimile User's Guide (SCX-5315F only), Quick install Guide CD-ROM† Starter Toner Cartridge Drum Cartridge *. The CD-ROM contains the MFP driver, SmarThru software, the SmarThru user's guides...
User Manual (ENGLISH)
Page 29
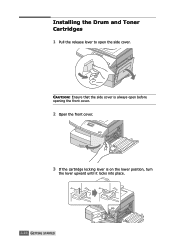
CAUTION: Ensure that the side cover is on the lower position, turn the lever upward until it locks into place. 1.14 GETTING STARTED Installing the Drum and Toner Cartridges 1 Pull the release lever to open before opening the front cover. 2 Open the front cover. 3 If the cartridge locking lever is always open the side cover.
CAUTION: Ensure that the side cover is on the lower position, turn the lever upward until it locks into place. 1.14 GETTING STARTED Installing the Drum and Toner Cartridges 1 Pull the release lever to open before opening the front cover. 2 Open the front cover. 3 If the cartridge locking lever is always open the side cover.
User Manual (ENGLISH)
Page 30
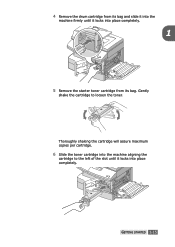
4 Remove the drum cartridge from its bag. Thoroughly shaking the cartridge will assure maximum copies per cartridge. 6 Slide the toner cartridge into the machine aligning the cartridge to loosen the toner. Gently shake the cartridge to the left of the slot until it locks into place completely. 1 5 Remove the starter toner cartridge from its bag and slide it into the machine firmly until it locks into place completely. GETTING STARTED 1.15
4 Remove the drum cartridge from its bag. Thoroughly shaking the cartridge will assure maximum copies per cartridge. 6 Slide the toner cartridge into the machine aligning the cartridge to loosen the toner. Gently shake the cartridge to the left of the slot until it locks into place completely. 1 5 Remove the starter toner cartridge from its bag and slide it into the machine firmly until it locks into place completely. GETTING STARTED 1.15
User Manual (ENGLISH)
Page 31
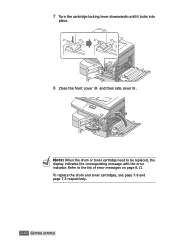
Refer to be replaced, the display indicates the corresponding message with the error indicator. To replace the drum and toner cartridges, see page 7.8 and page 7.3 respectively. 1.16 GETTING STARTED 7 Turn the cartridge locking lever downwards until it locks into place. 8 Close the front cover 1 and then side cover 2 . 2 1 NOTE: When the drum or toner cartridge need to the list of error messages on page 8.11.
Refer to be replaced, the display indicates the corresponding message with the error indicator. To replace the drum and toner cartridges, see page 7.8 and page 7.3 respectively. 1.16 GETTING STARTED 7 Turn the cartridge locking lever downwards until it locks into place. 8 Close the front cover 1 and then side cover 2 . 2 1 NOTE: When the drum or toner cartridge need to the list of error messages on page 8.11.
User Manual (ENGLISH)
Page 36
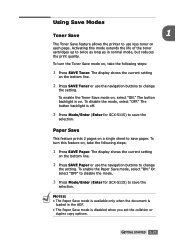
... disable the mode, select "OFF." GETTING STARTED 1.21 To turn this mode extends the life of the toner cartridges up to twice as long as in the ADF. • The Paper Save mode is loaded in normal mode, but reduces the print quality. The ... current setting on a single sheet to change the setting. To enable the Toner Save mode on , take the following steps: 1 Press SAVE Paper. Activating this feature on , select "ON." The button backlight is off. 3 Press Mode/Enter (Enter for SCX-5115) to save the selection. Or select "OFF" to disable the mode. 3 Press...
... disable the mode, select "OFF." GETTING STARTED 1.21 To turn this mode extends the life of the toner cartridges up to twice as long as in the ADF. • The Paper Save mode is loaded in normal mode, but reduces the print quality. The ... current setting on a single sheet to change the setting. To enable the Toner Save mode on , take the following steps: 1 Press SAVE Paper. Activating this feature on , select "ON." The button backlight is off. 3 Press Mode/Enter (Enter for SCX-5115) to save the selection. Or select "OFF" to disable the mode. 3 Press...
User Manual (ENGLISH)
Page 80
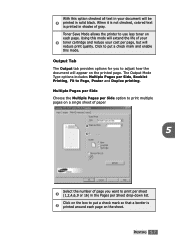
... put a check mark and enable this mode will extend the life of gray. Toner Save Mode allows the printer to use less toner on the box to put a check mark so that a border is printed in shades of your 4 toner cartridge and reduce your document will be 3 printed in solid black. Output Tab The...
... put a check mark and enable this mode will extend the life of gray. Toner Save Mode allows the printer to use less toner on the box to put a check mark so that a border is printed in shades of your 4 toner cartridge and reduce your document will be 3 printed in solid black. Output Tab The...
User Manual (ENGLISH)
Page 92
This chapter includes: • Cleaning the Scan Unit • Expected Cartridge Life • Replacing the Toner Cartridge • Setting to Notify Toner Low (Available in SCX-5315F only) • Cleaning the Drum • Replacing the Drum Cartridge • Consumables and Replacement Parts 7 MAINTENANCE This chapter provides information for maintaining the cartridge and your machine.
This chapter includes: • Cleaning the Scan Unit • Expected Cartridge Life • Replacing the Toner Cartridge • Setting to Notify Toner Low (Available in SCX-5315F only) • Cleaning the Drum • Replacing the Drum Cartridge • Consumables and Replacement Parts 7 MAINTENANCE This chapter provides information for maintaining the cartridge and your machine.
User Manual (ENGLISH)
Page 94
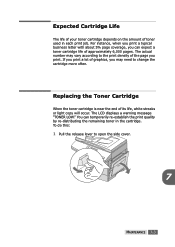
...open the side cover. 7 MAINTENANCE 7.3 You can expect a toner cartridge life of toner used in the cartridge. Replacing the Toner Cartridge When the toner cartridge is near the end of the page you print. Expected Cartridge Life The life of your toner cartridge depends on the amount of approximately 6,000 pages. For instance, ... white streaks or light copy will occur. To do this: 1 Pull the release lever to change the cartridge more often. The LCD displays a warning message "TONER LOW." If you print a lot of graphics, you can temporarily re-establish the print quality by re-...
...open the side cover. 7 MAINTENANCE 7.3 You can expect a toner cartridge life of toner used in the cartridge. Replacing the Toner Cartridge When the toner cartridge is near the end of the page you print. Expected Cartridge Life The life of your toner cartridge depends on the amount of approximately 6,000 pages. For instance, ... white streaks or light copy will occur. To do this: 1 Pull the release lever to change the cartridge more often. The LCD displays a warning message "TONER LOW." If you print a lot of graphics, you can temporarily re-establish the print quality by re-...
User Manual (ENGLISH)
Page 95
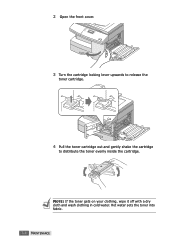
NOTE: If the toner gets on your clothing, wipe it off with a dry cloth and wash clothing in cold water. Hot water sets the toner into fabric. 7.4 MAINTENANCE 2 Open the front cover. 3 Turn the cartridge locking lever upwards to release the toner cartridge. 4 Pull the toner cartridge out and gently shake the cartridge to distribute the toner evenly inside the cartridge.
NOTE: If the toner gets on your clothing, wipe it off with a dry cloth and wash clothing in cold water. Hot water sets the toner into fabric. 7.4 MAINTENANCE 2 Open the front cover. 3 Turn the cartridge locking lever upwards to release the toner cartridge. 4 Pull the toner cartridge out and gently shake the cartridge to distribute the toner evenly inside the cartridge.
User Manual (ENGLISH)
Page 96
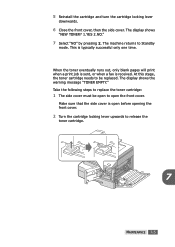
...cover. This is received. When the toner eventually runs out, only blank pages will print when a print job is sent, or when a fax is typically successful only one time. Make sure that the side cover is open to replace the toner cartridge: 1 The side cover must be... replaced. The machine returns to release the toner cartridge. 7 MAINTENANCE 7.5 5 Reinstall the cartridge and turn the cartridge locking lever downwards. 6 Close the front ...
...cover. This is received. When the toner eventually runs out, only blank pages will print when a print job is sent, or when a fax is typically successful only one time. Make sure that the side cover is open to replace the toner cartridge: 1 The side cover must be... replaced. The machine returns to release the toner cartridge. 7 MAINTENANCE 7.5 5 Reinstall the cartridge and turn the cartridge locking lever downwards. 6 Close the front ...
User Manual (ENGLISH)
Page 97
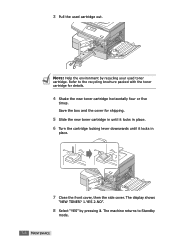
... Standby mode. 7.6 MAINTENANCE 3 Pull the used toner cartridge. Save the box and the cover for details. 4 Shake the new toner cartridge horizontally four or five times. NOTE: Help the environment by pressing 1. The machine returns to the recycling brochure packed with the toner cartridge for shipping. 5 Slide the new toner cartridge in until it locks in place. 6 Turn...
... Standby mode. 7.6 MAINTENANCE 3 Pull the used toner cartridge. Save the box and the cover for details. 4 Shake the new toner cartridge horizontally four or five times. NOTE: Help the environment by pressing 1. The machine returns to the recycling brochure packed with the toner cartridge for shipping. 5 Slide the new toner cartridge in until it locks in place. 6 Turn...
User Manual (ENGLISH)
Page 98
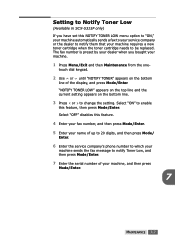
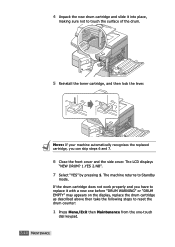
Setting to Notify Toner Low (Available in SCX-5315F only) If you bought your machine. 1 Press Menu/Exit and then Maintenance from the one- Select "OFF" disables this feature. 4 Enter your fax number, and then press Mode/Enter. 5 Enter your name of up to 20 digits, and ...then press Mode/ Enter. 6 Enter the service company's phone number to which your machine requires a new toner cartridge when the toner cartridge needs to be ...
Setting to Notify Toner Low (Available in SCX-5315F only) If you bought your machine. 1 Press Menu/Exit and then Maintenance from the one- Select "OFF" disables this feature. 4 Enter your fax number, and then press Mode/Enter. 5 Enter your name of up to 20 digits, and ...then press Mode/ Enter. 6 Enter the service company's phone number to which your machine requires a new toner cartridge when the toner cartridge needs to be ...
User Manual (ENGLISH)
Page 100
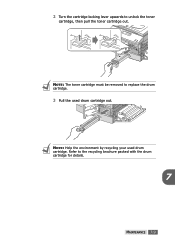
NOTE: Help the environment by recycling your used drum cartridge out. 2 Turn the cartridge locking lever upwards to the recycling brochure packed with the drum cartridge for details. 7 MAINTENANCE 7.9 Refer to unlock the toner cartridge, then pull the toner cartridge out. NOTE: The toner cartridge must be removed to replace the drum cartridge. 3 Pull the used drum cartridge.
NOTE: Help the environment by recycling your used drum cartridge out. 2 Turn the cartridge locking lever upwards to the recycling brochure packed with the drum cartridge for details. 7 MAINTENANCE 7.9 Refer to unlock the toner cartridge, then pull the toner cartridge out. NOTE: The toner cartridge must be removed to replace the drum cartridge. 3 Pull the used drum cartridge.
User Manual (ENGLISH)
Page 101
... If your machine automatically recognises the replaced cartridge, you have to replace it into place, making sure not to touch the surface of the drum. 5 Reinstall the toner cartridge, and then lock the lever. 4 Unpack the new drum cartridge and slide it with a new one before "DRUM WARNING" or "DRUM EMPTY..." may appears on the display, replace the drum cartridge as described above then take the following steps to...
... If your machine automatically recognises the replaced cartridge, you have to replace it into place, making sure not to touch the surface of the drum. 5 Reinstall the toner cartridge, and then lock the lever. 4 Unpack the new drum cartridge and slide it with a new one before "DRUM WARNING" or "DRUM EMPTY..." may appears on the display, replace the drum cartridge as described above then take the following steps to...

User Manual (ENGLISH)
Page 116
... original, clean the document glass and underside of your document 1 hour after you can temporarily re-establish printing operations. Take out the toner cartridge and gently shake it is light, use the Contrast button to darken the background of the copies. Check that the machine is plugged ... detects are too light or too dark. If the original is lower than 10 oC , copy your copies. When it . Display TONER EMPTY TONER LOW Meaning The toner cartridge has run out. The machine stops. By doing this, you turn on the original, press the Contrast Smears, lines, marks, or...
... original, clean the document glass and underside of your document 1 hour after you can temporarily re-establish printing operations. Take out the toner cartridge and gently shake it is light, use the Contrast button to darken the background of the copies. Check that the machine is plugged ... detects are too light or too dark. If the original is lower than 10 oC , copy your copies. When it . Display TONER EMPTY TONER LOW Meaning The toner cartridge has run out. The machine stops. By doing this, you turn on the original, press the Contrast Smears, lines, marks, or...
User Manual (ENGLISH)
Page 117
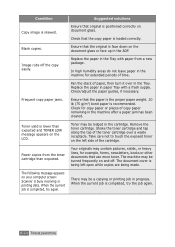
.... Ensure that the copy paper is completed, try again. Fan the stack of paper, then turn it over a waste receptacle. Shake the toner cartridge and tap along the top of time. When the current job is loaded correctly. The document cover is lower than expected. Replace the paper.... Your originals may be turned frequently on the document glass or face up in the Tray. Toner yield is being left side of copy paper remaining in progress. Remove the toner cartridge. When the current job is positioned correctly on the left open while copies are being made. ...
.... Ensure that the copy paper is completed, try again. Fan the stack of paper, then turn it over a waste receptacle. Shake the toner cartridge and tap along the top of time. When the current job is loaded correctly. The document cover is lower than expected. Replace the paper.... Your originals may be turned frequently on the document glass or face up in the Tray. Toner yield is being left side of copy paper remaining in progress. Remove the toner cartridge. When the current job is positioned correctly on the left open while copies are being made. ...

User Manual (ENGLISH)
Page 120
...meets the specifications required by the machine. Missing characters The paper may be too damp. Remove the toner cartridge and shake it gently to evenly distribute the toner. Black staining There is a paper quality problem. Do not open packets of paper. Use only...be dirty. If printing onto envelopes, change your machine. There is a paper quality problem. Then reinstall the toner cartridge. Faded graphics Toner may be low. Toner may be unevenly distributed. Back of paper. Character voids The paper may dirty be too dry. TROUBLESHOOTING 8....
...meets the specifications required by the machine. Missing characters The paper may be too damp. Remove the toner cartridge and shake it gently to evenly distribute the toner. Black staining There is a paper quality problem. Do not open packets of paper. Use only...be dirty. If printing onto envelopes, change your machine. There is a paper quality problem. Then reinstall the toner cartridge. Faded graphics Toner may be low. Toner may be unevenly distributed. Back of paper. Character voids The paper may dirty be too dry. TROUBLESHOOTING 8....


