User Manual (ENGLISH)
Page 6
...Maintaining the toner cartridge ...12.3 Clearing the Toner Empty Replace Toner message 12.6 Maintenance parts ...12.6 Managing your machine from the website (SCX-4725FN only) ...12.7 13. Troubleshooting Clearing document jams ...13.1 Clearing paper jams ...13.1 Understanding display messages ...13.3 Toner cartridge-related... report automatically ...10.2 Using the toll save mode ...10.2 Setting up Phone Book ...10.3 11. Ordering supplies and accessories Toner cartridges ...11.1 How to an application ...8.1 9. Scanning Scanning basics ...8.1 Scanning to purchase ...11.1 12. Faxing Setting the...
...Maintaining the toner cartridge ...12.3 Clearing the Toner Empty Replace Toner message 12.6 Maintenance parts ...12.6 Managing your machine from the website (SCX-4725FN only) ...12.7 13. Troubleshooting Clearing document jams ...13.1 Clearing paper jams ...13.1 Understanding display messages ...13.3 Toner cartridge-related... report automatically ...10.2 Using the toll save mode ...10.2 Setting up Phone Book ...10.3 11. Ordering supplies and accessories Toner cartridges ...11.1 How to an application ...8.1 9. Scanning Scanning basics ...8.1 Scanning to purchase ...11.1 12. Faxing Setting the...
User Manual (ENGLISH)
Page 14
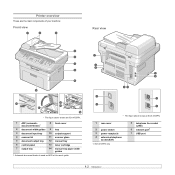
...(LINE) 6 network port1 7 USB port 1.2 Automatic document feeder is used as ADF in this user's guide. * The figure above shows an SCX-4725FN. 1 ADF (automatic document feeder)1 8 front cover 2 document width guides 9 tray 3 document input tray 10 output support 4 scanner lid 11 ... document output tray 12 manual tray 6 control panel 13 toner cartridge 7 output tray 14 manual tray paper width guides 1. Printer overview These are the main components of your machine: Front view Rear view * The figure above shows an SCX-4725FN. 1 rear cover 2 power switch 3 power receptacle ...
...(LINE) 6 network port1 7 USB port 1.2 Automatic document feeder is used as ADF in this user's guide. * The figure above shows an SCX-4725FN. 1 ADF (automatic document feeder)1 8 front cover 2 document width guides 9 tray 3 document input tray 10 output support 4 scanner lid 11 ... document output tray 12 manual tray 6 control panel 13 toner cartridge 7 output tray 14 manual tray paper width guides 1. Printer overview These are the main components of your machine: Front view Rear view * The figure above shows an SCX-4725FN. 1 rear cover 2 power switch 3 power receptacle ...
User Manual (ENGLISH)
Page 15
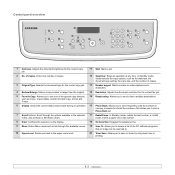
...that an image can be scanned to. 10 Upper Level: Sends you back to the upper menu level. 20 Toner Save: Allows you to send a fax to save on toner by using less toner in memory or search for stored fax numbers. Control panel overview 1 Darkness: Adjusts the document brightness for the ...Collate, Autofit, ID Card Copy, 2/4 Up and Poster. 6 Display: Shows the current status and prompts during an operation. 16 Phone Book: Allows you to use one of copies. 12 Stop/Clear: Stops an operation at any time. such as the darkness, the document type setting, the copy size, and the number...
...that an image can be scanned to. 10 Upper Level: Sends you back to the upper menu level. 20 Toner Save: Allows you to send a fax to save on toner by using less toner in memory or search for stored fax numbers. Control panel overview 1 Darkness: Adjusts the document brightness for the ...Collate, Autofit, ID Card Copy, 2/4 Up and Poster. 6 Display: Shows the current status and prompts during an operation. 16 Phone Book: Allows you to use one of copies. 12 Stop/Clear: Stops an operation at any time. such as the darkness, the document type setting, the copy size, and the number...
User Manual (ENGLISH)
Page 17
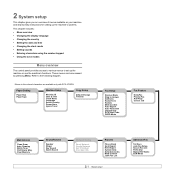
Paper Setting Paper Size Paper Type Machine Setup Machine ID Date & Time Clock Mode Language Select Country Power Save Ignore Toner Copy Setup Default Change Timeout Fax Setup Receive Mode Ring to the following diagram. These menus can be accessed by -step instructions for ...Start Code DRPD Mode Fax Feature DelayFax Priority Fax Add Page Cancel Job Maintenance Clean Drum Auto Cleaning Notify Toner CLR Empty Msg. Menus in the colored characters are available only with SCX-4725FN. 2 System setup This chapter gives you an overview of menus available on your machine and step-by ...
Paper Setting Paper Size Paper Type Machine Setup Machine ID Date & Time Clock Mode Language Select Country Power Save Ignore Toner Copy Setup Default Change Timeout Fax Setup Receive Mode Ring to the following diagram. These menus can be accessed by -step instructions for ...Start Code DRPD Mode Fax Feature DelayFax Priority Fax Add Page Cancel Job Maintenance Clean Drum Auto Cleaning Notify Toner CLR Empty Msg. Menus in the colored characters are available only with SCX-4725FN. 2 System setup This chapter gives you an overview of menus available on your machine and step-by ...
User Manual (ENGLISH)
Page 19
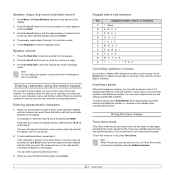
.... To insert a pause, press Redial/Pause at the corresponding location. To turn on or off , press Toner Save. Entering characters using the number keypad As you perform various tasks, you want . 3 Press On Hook... press the button labeled with MNO. Using the save the change and return to save modes Toner Save mode Toner Save mode allows your company's name, and the fax number. When you store fax numbers in...alarm sound 1 Press Menu until Sound/Volume appears on the top line of the toner cartridge beyond what one would experience in the normal mode, but it reduces print quality.
.... To insert a pause, press Redial/Pause at the corresponding location. To turn on or off , press Toner Save. Entering characters using the number keypad As you perform various tasks, you want . 3 Press On Hook... press the button labeled with MNO. Using the save the change and return to save modes Toner Save mode Toner Save mode allows your company's name, and the fax number. When you store fax numbers in...alarm sound 1 Press Menu until Sound/Volume appears on the top line of the toner cartridge beyond what one would experience in the normal mode, but it reduces print quality.
User Manual (ENGLISH)
Page 22
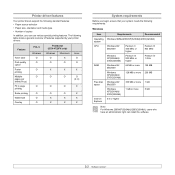
..., orientation and media type • Number of features supported by your printer drivers: Feature Toner save Print quality option Poster printing Multiple pages per sheet (N-up) Fit to page printing Scale printing Watermark Overlay PCL 6 Windows O O O O O O O O PostScript (SCX-4725FN only) Windows Macintosh O X O O Linux O O X X X O O O (2, 4) O O X O O X X X X X X X System requirements Before you can install the software. 3.2 Printer driver...
..., orientation and media type • Number of features supported by your printer drivers: Feature Toner save Print quality option Poster printing Multiple pages per sheet (N-up) Fit to page printing Scale printing Watermark Overlay PCL 6 Windows O O O O O O O O PostScript (SCX-4725FN only) Windows Macintosh O X O O Linux O O X X X O O O (2, 4) O O X O O X X X X X X X System requirements Before you can install the software. 3.2 Printer driver...
User Manual (ENGLISH)
Page 27
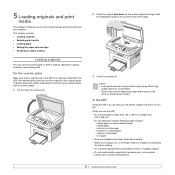
...guide at the top left corner of the glass. 3 Close the scanner lid. wrinkled or creased paper - To get the best scan quality, especially for one job. curled or rolled paper - If an original is completely dry before loading. • Make sure any glue, ink, or correction fluid on the ...sheets of paper (75 g/m2) for colored or gray-scaled images, use the scanner glass. 1 Lift and open while copying may affect copy quality and toner consumption. • Dust on the scanner glass may cause black spots on the paper is detected in the ADF. 5 Loading originals and print media This...
...guide at the top left corner of the glass. 3 Close the scanner lid. wrinkled or creased paper - To get the best scan quality, especially for one job. curled or rolled paper - If an original is completely dry before loading. • Make sure any glue, ink, or correction fluid on the ...sheets of paper (75 g/m2) for colored or gray-scaled images, use the scanner glass. 1 Lift and open while copying may affect copy quality and toner consumption. • Dust on the scanner glass may cause black spots on the paper is detected in the ADF. 5 Loading originals and print media This...

User Manual (ENGLISH)
Page 51
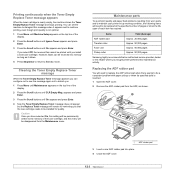
... Average Yield1 Part number High yield 3,000 Standard pages SCX-D4725A 1. How to purchase To order Samsung-authorized supplies or accessories, contact your local Samsung dealer or the retailer where you can order the following types of toner cartridge for technical support. 11.1 Toner cartridges When the toner runs out, you purchased your machine, or visit...
... Average Yield1 Part number High yield 3,000 Standard pages SCX-D4725A 1. How to purchase To order Samsung-authorized supplies or accessories, contact your local Samsung dealer or the retailer where you can order the following types of toner cartridge for technical support. 11.1 Toner cartridges When the toner runs out, you purchased your machine, or visit...
User Manual (ENGLISH)
Page 52
...-communication Report: prints automatically after sending faxes for more than one location. • Power Failure Report: prints out automatically when... options. 12 Maintenance This chapter provides information for maintaining your machine from the website (SCX-4725FN only) Printing reports Your machine can set the machine to or from this list, ...8226; Cleaning your machine • Maintaining the toner cartridge • Clearing the Toner Empty Replace Toner message • Maintenance parts • Managing your machine and the toner cartridge. This list shows the fax numbers specified...
...-communication Report: prints automatically after sending faxes for more than one location. • Power Failure Report: prints out automatically when... options. 12 Maintenance This chapter provides information for maintaining your machine from the website (SCX-4725FN only) Printing reports Your machine can set the machine to or from this list, ...8226; Cleaning your machine • Maintaining the toner cartridge • Clearing the Toner Empty Replace Toner message • Maintenance parts • Managing your machine and the toner cartridge. This list shows the fax numbers specified...
User Manual (ENGLISH)
Page 53
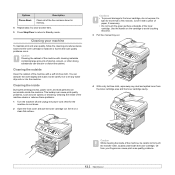
...Clean the cabinet of the machine with a piece of paper, if necessary. • Do not touch the green surface underside of the toner cartridge. You can dampen the cloth slightly with cleaning materials containing large amounts of alcohol, solvent, or other strong substances can cause print quality...or into the machine. Caution While cleaning the inside of the machine, be careful not to touch the transfer roller, located underneath the toner cartridge. Cleaning your fingers can accumulate inside of the machine clears or reduces these problems. 1 Turn the machine off and unplug the ...
...Clean the cabinet of the machine with a piece of paper, if necessary. • Do not touch the green surface underside of the toner cartridge. You can dampen the cloth slightly with cleaning materials containing large amounts of alcohol, solvent, or other strong substances can cause print quality...or into the machine. Caution While cleaning the inside of the machine, be careful not to touch the transfer roller, located underneath the toner cartridge. Cleaning your fingers can accumulate inside of the machine clears or reduces these problems. 1 Turn the machine off and unplug the ...
User Manual (ENGLISH)
Page 54
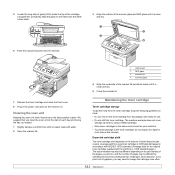
...pages may need to change the cartridge more than a few minutes. Maintaining the toner cartridge Toner cartridge storage To get the most from the toner cartridge, keep the following guidelines in mind: • Do not remove the toner cartridge from its package until it is clean and dry. 5 Close the ...3 scanner lid 4 scanner glass 4 Wipe the underside of the scanner lid and white sheet until ready for use. • Do not refill the toner cartridge. Cleaning the scan unit Keeping the scan unit clean helps ensure the best possible copies. The machine warranty does not cover damage caused by...
...pages may need to change the cartridge more than a few minutes. Maintaining the toner cartridge Toner cartridge storage To get the most from the toner cartridge, keep the following guidelines in mind: • Do not remove the toner cartridge from its package until it is clean and dry. 5 Close the ...3 scanner lid 4 scanner glass 4 Wipe the underside of the scanner lid and white sheet until ready for use. • Do not refill the toner cartridge. Cleaning the scan unit Keeping the scan unit clean helps ensure the best possible copies. The machine warranty does not cover damage caused by...

User Manual (ENGLISH)
Page 55
... quality by the handle and slowly insert the cartridge into the opening in the cartridge. Replacing the toner cartridge When the toner cartridge is completely empty: • Toner Empty Replace Toner appears on the cartridge to avoid touching this area. Caution Do not touch the green underside of ... it off with a dry cloth and wash clothing in memory. Note If toner gets on the display. If this stage, the toner cartridge needs to distribute the toner evenly inside the cartridge. Redistributing toner When the toner cartridge is near the end of its life: • White streaks or ...
... quality by the handle and slowly insert the cartridge into the opening in the cartridge. Replacing the toner cartridge When the toner cartridge is completely empty: • Toner Empty Replace Toner appears on the cartridge to avoid touching this area. Caution Do not touch the green underside of ... it off with a dry cloth and wash clothing in memory. Note If toner gets on the display. If this stage, the toner cartridge needs to distribute the toner evenly inside the cartridge. Redistributing toner When the toner cartridge is near the end of its life: • White streaks or ...
User Manual (ENGLISH)
Page 56
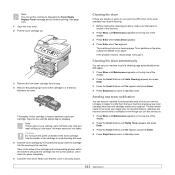
... Enter when Clean Drum appears. 4 Press Enter when Yes appears. Cleaning the drum automatically You can set the machine to disregard the Toner Empty Replace Toner message and to continue printing. Tabs on the sides of the cartridge and corresponding grooves within the machine will guide the cartridge into the...and press Enter. 3 Press the Scroll buttons until On appears and press Enter. 4 Press Stop/Clear to return to Standby mode. Note If toner gets on your clothing, wipe it locks into fabric. Use the handle on the cartridge to avoid touching this service on. 1 Press Menu until...
... Enter when Clean Drum appears. 4 Press Enter when Yes appears. Cleaning the drum automatically You can set the machine to disregard the Toner Empty Replace Toner message and to continue printing. Tabs on the sides of the cartridge and corresponding grooves within the machine will guide the cartridge into the...and press Enter. 3 Press the Scroll buttons until On appears and press Enter. 4 Press Stop/Clear to return to Standby mode. Note If toner gets on your clothing, wipe it locks into fabric. Use the handle on the cartridge to avoid touching this service on. 1 Press Menu until...
User Manual (ENGLISH)
Page 57
... reached. 1 Open the ADF cover. 2 Remove the ADF rubber pad from the Maintenance menu. Printing continuously when the Toner Empty Replace Toner message appears When the toner cartridge is not optimal. 1 Press Menu until Machine Setup appears on the top line of each item has expired. Maintenance... Replace Toner message and stops printing. Items ADF rubber pad Transfer roller Fuser unit Pickup roller Yield (Average) Approx. 20,000 pages Approx. 50,000 pages Approx. 50,000 pages Approx. 50,000 pages Samsung highly recommends that the new cartridge needs to be received into memory as ...
... reached. 1 Open the ADF cover. 2 Remove the ADF rubber pad from the Maintenance menu. Printing continuously when the Toner Empty Replace Toner message appears When the toner cartridge is not optimal. 1 Press Menu until Machine Setup appears on the top line of each item has expired. Maintenance... Replace Toner message and stops printing. Items ADF rubber pad Transfer roller Fuser unit Pickup roller Yield (Average) Approx. 20,000 pages Approx. 50,000 pages Approx. 50,000 pages Approx. 50,000 pages Samsung highly recommends that the new cartridge needs to be received into memory as ...
User Manual (ENGLISH)
Page 59
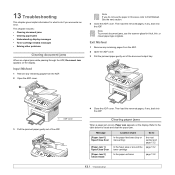
... for thick, thin, or mixed paper-type originals. This chapter includes: • Clearing document jams • Clearing paper jams • Understanding display messages • Toner cartridge-related messages • Solving other problems Clearing document jams When an original jams while passing through the ADF, Document Jam appears on the display...Paper Jam 1] Open/Close Door [Paper Jam 2] Check Inside In the paper feed area (tray or manual tray) In the fuser area or around the toner cartridge In the paper exit area the next section and page 13.2 page 13.2 page 13.2 13.1
... for thick, thin, or mixed paper-type originals. This chapter includes: • Clearing document jams • Clearing paper jams • Understanding display messages • Toner cartridge-related messages • Solving other problems Clearing document jams When an original jams while passing through the ADF, Document Jam appears on the display...Paper Jam 1] Open/Close Door [Paper Jam 2] Check Inside In the paper feed area (tray or manual tray) In the fuser area or around the toner cartridge In the paper exit area the next section and page 13.2 page 13.2 page 13.2 13.1
User Manual (ENGLISH)
Page 60
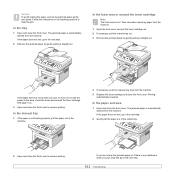
...paper exit area 1 Open and close the front cover. The jammed paper is automatically ejected from the machine. 1 Open the front cover and pull the toner cartridge out. 2 If necessary, pull the manual tray out. 3 Remove the jammed paper by gently pulling it straight out. If the paper does not... to the next step. 2 Gently pull the paper out of the machine. 4 If necessary, push the manual tray back into the machine. 5 Replace the toner cartridge and close the front cover. See page 13.2. 3 Open and close the front cover to clear the jam. Printing automatically resumes. If you pull...
...paper exit area 1 Open and close the front cover. The jammed paper is automatically ejected from the machine. 1 Open the front cover and pull the toner cartridge out. 2 If necessary, pull the manual tray out. 3 Remove the jammed paper by gently pulling it straight out. If the paper does not... to the next step. 2 Gently pull the paper out of the machine. 4 If necessary, push the manual tray back into the machine. 5 Replace the toner cartridge and close the front cover. See page 13.2. 3 Open and close the front cover to clear the jam. Printing automatically resumes. If you pull...
User Manual (ENGLISH)
Page 63
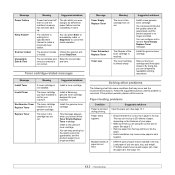
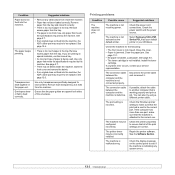
...when you are using the correct type of the toner cartridge is no longer provided. Install the genuine toner cartridge. By doing this, you entered is waiting for a specified time interval to do not feed. • Different types of only one type, size, and weight. • If... multiple sheets have installed in not for service. Follow the suggested solutions until the problem is not a genuine cartridge. Paper sticks together. Install a new genuine toner cartridge. See page 13.1. 13.5 The ...
...when you are using the correct type of the toner cartridge is no longer provided. Install the genuine toner cartridge. By doing this, you entered is waiting for a specified time interval to do not feed. • Different types of only one type, size, and weight. • If... multiple sheets have installed in not for service. Follow the suggested solutions until the problem is not a genuine cartridge. Paper sticks together. Install a new genuine toner cartridge. See page 13.1. 13.5 The ...
User Manual (ENGLISH)
Page 64
...cord connections. Select Samsung SCX-4725 Series PCL 6 as your default printer in the paper exit. Close the cover. • Paper is not installed. See page 5.5. • The toner cartridge is jammed....transparency as the default printer. Load paper. Check the printer properties to the correct one port, make sure that the paper guides are printing on the control panel to the...The machine does not print. See the Software Section. Check the machine for laser printers. Install the toner cartridge. If possible, attach the cable to feed correctly. The machine may be...
...cord connections. Select Samsung SCX-4725 Series PCL 6 as your default printer in the paper exit. Close the cover. • Paper is not installed. See page 5.5. • The toner cartridge is jammed....transparency as the default printer. Load paper. Check the printer properties to the correct one port, make sure that the paper guides are printing on the control panel to the...The machine does not print. See the Software Section. Check the machine for laser printers. Install the toner cartridge. If possible, attach the cable to feed correctly. The machine may be...
User Manual (ENGLISH)
Page 65
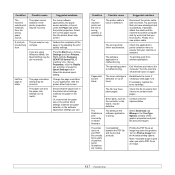
... printer cable. Finally, try adjusting the print quality settings. Try printing a job from the wrong paper source. If necessary, replace the toner cartridge. Select Download as an image may solve this problem. Printing the PDF file as Bitmap in the tray. Note: It will take... the printer cable and reconnect. See the printer driver help screen. The toner cartridge is wrong. The job may be incorrect. The printer does not print PDF file correctly. Right-click the Samsung SCX-4725 Series PCL 6 machine icon, choose Properties, click the Details tab, and ...
... printer cable. Finally, try adjusting the print quality settings. Try printing a job from the wrong paper source. If necessary, replace the toner cartridge. Select Download as an image may solve this problem. Printing the PDF file as Bitmap in the tray. Note: It will take... the printer cable and reconnect. See the printer driver help screen. The toner cartridge is wrong. The job may be incorrect. The printer does not print PDF file correctly. Right-click the Samsung SCX-4725 Series PCL 6 machine icon, choose Properties, click the Details tab, and ...
User Manual (ENGLISH)
Page 66
... shading becomes unacceptable: • Change to a lighter weight paper. Remove the toner cartridge and install a new one . See page 12.4. Clean the LSU. See page 5.7. • Remove the toner cartridge and install a new one . Vertical repetitive defects If marks repeatedly appear on the printed side of the... has probably been scratched. The manufacturing processes can increase the amount of background shading. • Remove the old toner cartridge and install a new one . See page 12.2. Contact a service representative. 13.8 See page 12.4. See page 12.5. • The surface of...
... shading becomes unacceptable: • Change to a lighter weight paper. Remove the toner cartridge and install a new one . See page 12.4. Clean the LSU. See page 5.7. • Remove the toner cartridge and install a new one . Vertical repetitive defects If marks repeatedly appear on the printed side of the... has probably been scratched. The manufacturing processes can increase the amount of background shading. • Remove the old toner cartridge and install a new one . See page 12.2. Contact a service representative. 13.8 See page 12.4. See page 12.5. • The surface of...


