Universal Print Driver Guide (ENGLISH)
Page 4
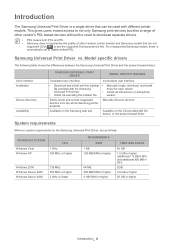
... to usable default PDL. Introduction 1. Universal Print Driver. • Install via CD autorun or Add printer • Install via executing the installer file. Manually discover devices. The Samsung Universal Print Driver is automatically set to see the supported Samsung device list). wizard. Model specific drivers The following table shows the differences between the...
... to usable default PDL. Introduction 1. Universal Print Driver. • Install via CD autorun or Add printer • Install via executing the installer file. Manually discover devices. The Samsung Universal Print Driver is automatically set to see the supported Samsung device list). wizard. Model specific drivers The following table shows the differences between the...

User Manual (ENGLISH)
Page 2
...information purposes only. All information included herein is subject to use of this manual. • SCX-4725F and SCX-4725FN are model names of Samsung Electronics Co., Ltd. • Samsung and Samsung logo are trademarks of Samsung Electronics Co., Ltd. • Centronics is a trademark of Centronics Data Computer... 3 is provided for any direct or indirect damages, arising from or related to change without notice. © 2006 Samsung Electronics Co., Ltd. This manual is a trademark of Adobe System, Inc. • UFST® and MicroType™ are registered trademarks of Monotype Imaging...
...information purposes only. All information included herein is subject to use of this manual. • SCX-4725F and SCX-4725FN are model names of Samsung Electronics Co., Ltd. • Samsung and Samsung logo are trademarks of Samsung Electronics Co., Ltd. • Centronics is a trademark of Centronics Data Computer... 3 is provided for any direct or indirect damages, arising from or related to change without notice. © 2006 Samsung Electronics Co., Ltd. This manual is a trademark of Adobe System, Inc. • UFST® and MicroType™ are registered trademarks of Monotype Imaging...
User Manual (ENGLISH)
Page 6
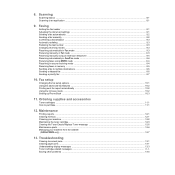
... ...9.1 Adjusting the document settings ...9.1 Sending a fax automatically ...9.2 Sending a fax manually ...9.2 Confirming a transmission ...9.3 Automatic redialing ...9.3 Redialing the last number ...9.3 Changing receiving modes ...9.3 Receiving automatically in Fax mode ...9.3 Receiving manually in Tel mode ...9.3 Receiving manually using an extension telephone 9.4 Receiving automatically in Ans/Fax mode ...9.4 Receiving faxes using... ...12.3 Clearing the Toner Empty Replace Toner message 12.6 Maintenance parts ...12.6 Managing your machine from the website (SCX-4725FN only) ...12.7 13. 8.
... ...9.1 Adjusting the document settings ...9.1 Sending a fax automatically ...9.2 Sending a fax manually ...9.2 Confirming a transmission ...9.3 Automatic redialing ...9.3 Redialing the last number ...9.3 Changing receiving modes ...9.3 Receiving automatically in Fax mode ...9.3 Receiving manually in Tel mode ...9.3 Receiving manually using an extension telephone 9.4 Receiving automatically in Ans/Fax mode ...9.4 Receiving faxes using... ...12.3 Clearing the Toner Empty Replace Toner message 12.6 Maintenance parts ...12.6 Managing your machine from the website (SCX-4725FN only) ...12.7 13. 8.
User Manual (ENGLISH)
Page 13
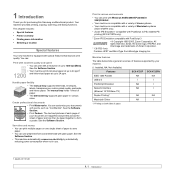
...-sized media, postcards, and heavy paper. The manual tray holds 1 sheet of up to 1200 dpi [Best]. 1 Introduction Thank you for purchasing this Samsung multifunctional product. See the Software Section. • This machine automatically conserves electricity by your machine. (I: Installed, NA: Not Available) Features SCX-4725F SCX-4725FN IEEE 1284 Parallel NA NA USB 2.0 I I PostScript...
...-sized media, postcards, and heavy paper. The manual tray holds 1 sheet of up to 1200 dpi [Best]. 1 Introduction Thank you for purchasing this Samsung multifunctional product. See the Software Section. • This machine automatically conserves electricity by your machine. (I: Installed, NA: Not Available) Features SCX-4725F SCX-4725FN IEEE 1284 Parallel NA NA USB 2.0 I I PostScript...
User Manual (ENGLISH)
Page 14
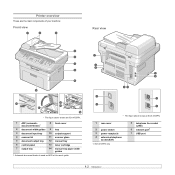
... are the main components of your machine: Front view Rear view * The figure above shows an SCX-4725FN. 1 rear cover 2 power switch 3 power receptacle 4 extension telephone socket (EXT) 1. SCX-4725FN only. 5 telephone line socket (LINE) 6 network port1 7 USB port 1.2 Automatic document feeder is...user's guide. * The figure above shows an SCX-4725FN. 1 ADF (automatic document feeder)1 8 front cover 2 document width guides 9 tray 3 document input tray 10 output support 4 scanner lid 11 scanner glass 5 document output tray 12 manual tray 6 control panel 13 toner cartridge 7 ...
... are the main components of your machine: Front view Rear view * The figure above shows an SCX-4725FN. 1 rear cover 2 power switch 3 power receptacle 4 extension telephone socket (EXT) 1. SCX-4725FN only. 5 telephone line socket (LINE) 6 network port1 7 USB port 1.2 Automatic document feeder is...user's guide. * The figure above shows an SCX-4725FN. 1 ADF (automatic document feeder)1 8 front cover 2 document width guides 9 tray 3 document input tray 10 output support 4 scanner lid 11 scanner glass 5 document output tray 12 manual tray 6 control panel 13 toner cartridge 7 ...

User Manual (ENGLISH)
Page 16
...and humidity. Online User's Guide Printer Driver Help Provides you with information on how to get help, support, printer drivers, manuals, and order information from the Samsung website, www.samsungprinter.com. Allow extra space for ventilation) 1.4 Clearance space • Front: 482.6 mm (enough space so... that the tray and cover can be well-ventilated and away from the Manual folder on printer driver properties and ...
...and humidity. Online User's Guide Printer Driver Help Provides you with information on how to get help, support, printer drivers, manuals, and order information from the Samsung website, www.samsungprinter.com. Allow extra space for ventilation) 1.4 Clearance space • Front: 482.6 mm (enough space so... that the tray and cover can be well-ventilated and away from the Manual folder on printer driver properties and ...
User Manual (ENGLISH)
Page 24
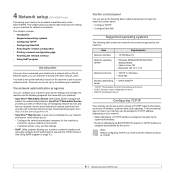
...There are several ways in which allows you need to set up the network protocols on the SCX-4725FN. This chapter gives you to various network environments. - 4 Network setup (SCX-4725FN only) Connecting your machine to a network is assigned automatically by the server. You need ...to set up your machine for use it as an IP address, a subnet mask, and a gateway. Configure the network parameters necessary for the machine to connect to select a network interface and manually...
...There are several ways in which allows you need to set up the network protocols on the SCX-4725FN. This chapter gives you to various network environments. - 4 Network setup (SCX-4725FN only) Connecting your machine to a network is assigned automatically by the server. You need ...to set up your machine for use it as an IP address, a subnet mask, and a gateway. Configure the network parameters necessary for the machine to connect to select a network interface and manually...
User Manual (ENGLISH)
Page 25
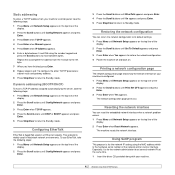
... top line of the display. 2 Press the Scroll buttons until Config Network appears and press Enter. 3 Press Enter when TCP/IP appears. 4 Press Enter when Manual appears. 5 Press Enter when IP Address appears. 6 Enter a byte between bytes. To use EtherTalk, take the following steps: 1 Press Menu until Network Setup appears on...
... top line of the display. 2 Press the Scroll buttons until Config Network appears and press Enter. 3 Press Enter when TCP/IP appears. 4 Press Enter when Manual appears. 5 Press Enter when IP Address appears. 6 Enter a byte between bytes. To use EtherTalk, take the following steps: 1 Press Menu until Network Setup appears on...

User Manual (ENGLISH)
Page 28
... within the paper adjusters of the guidelines in this user's guide. This may be appropriate for the manual tray • Brightness: Some print media are not covered by Samsung's warranty or service agreements. 5.2 Always use any size media that meet the guidelines outlined in this ...into the ADF. When you choose should be the result of improper handling, unacceptable temperature and humidity levels, or other variables over which Samsung has no control. • Before purchasing large quantities of print media, such as weight, composition, grain, and moisture content, are ...
... within the paper adjusters of the guidelines in this user's guide. This may be appropriate for the manual tray • Brightness: Some print media are not covered by Samsung's warranty or service agreements. 5.2 Always use any size media that meet the guidelines outlined in this ...into the ADF. When you choose should be the result of improper handling, unacceptable temperature and humidity levels, or other variables over which Samsung has no control. • Before purchasing large quantities of print media, such as weight, composition, grain, and moisture content, are ...

User Manual (ENGLISH)
Page 29
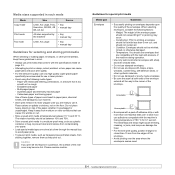
...60 to 165 g/m2 (16 to 43 lb bond) for the manual tray Capacity2 • 250 sheets of 75 g/m2 (20 lb bond) paper for the tray • 1 sheet for the... manual tray Envelope A5 A6 Envelope B5 Envelope Monarch Envelope COM-10 Envelope DL 148.5 x 210 mm (5.85... may differ depending on media weight, thickness, and environmental conditions. 1 sheet for the manual tray 1 sheet for the manual tray 1 sheet for the manual tray 1 sheet for the manual tray Envelope C5 162 x 229 mm (6.38 x 9.02 inches) Transparency Envelope C6...
...60 to 165 g/m2 (16 to 43 lb bond) for the manual tray Capacity2 • 250 sheets of 75 g/m2 (20 lb bond) paper for the tray • 1 sheet for the... manual tray Envelope A5 A6 Envelope B5 Envelope Monarch Envelope COM-10 Envelope DL 148.5 x 210 mm (5.85... may differ depending on media weight, thickness, and environmental conditions. 1 sheet for the manual tray 1 sheet for the manual tray 1 sheet for the manual tray 1 sheet for the manual tray Envelope C5 162 x 229 mm (6.38 x 9.02 inches) Transparency Envelope C6...
User Manual (ENGLISH)
Page 30
...jams and poor print quality. • For the best print quality, use only high quality copier grade paper specifically recommended for use in laser printers. • Avoid using the following factors: - Please exercise caution. Construction: Prior to the corner of the envelope. Place cartons... seal must use damaged or poorly made envelopes. • Be sure the seam at a time through the manual tray to your paper. • Load special media types one flap that is packaged or unpackaged. Condition: Envelopes should be wrinkled, nicked, or otherwise damaged. - Media ...
...jams and poor print quality. • For the best print quality, use only high quality copier grade paper specifically recommended for use in laser printers. • Avoid using the following factors: - Please exercise caution. Construction: Prior to the corner of the envelope. Place cartons... seal must use damaged or poorly made envelopes. • Be sure the seam at a time through the manual tray to your paper. • Load special media types one flap that is packaged or unpackaged. Condition: Envelopes should be wrinkled, nicked, or otherwise damaged. - Media ...

User Manual (ENGLISH)
Page 32
...; Card stock: Print side up and the short edge entering the machine first. • Previously printed paper: Previously printed side down with paper feed, place one sheet at the front. Notes • Do not push the paper width guide far enough to cause the materials to the length of print material..., such as transparency, postcard, note card, and envelope. In the manual tray The manual tray can hold special size and type of the paper. The printed side should be bent, which will result in the...
...; Card stock: Print side up and the short edge entering the machine first. • Previously printed paper: Previously printed side down with paper feed, place one sheet at the front. Notes • Do not push the paper width guide far enough to cause the materials to the length of print material..., such as transparency, postcard, note card, and envelope. In the manual tray The manual tray can hold special size and type of the paper. The printed side should be bent, which will result in the...
User Manual (ENGLISH)
Page 33
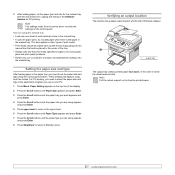
... buttons. This also applies to other types of paper. 1 1 output tray The output tray collects printed paper face down, in the order in the manual tray. Verifying an output location The machine has a paper output location which holds 100 sheets of print media. • Print media should be loaded face... is still paper in which the sheets were printed. Note The settings made from the printer driver override the settings on using the manual tray • Load only one sheet of the tray. • Always load only the print media specified in page 5.2 to select the paper size and type in ...
... buttons. This also applies to other types of paper. 1 1 output tray The output tray collects printed paper face down, in the order in the manual tray. Verifying an output location The machine has a paper output location which holds 100 sheets of print media. • Print media should be loaded face... is still paper in which the sheets were printed. Note The settings made from the printer driver override the settings on using the manual tray • Load only one sheet of the tray. • Always load only the print media specified in page 5.2 to select the paper size and type in ...
User Manual (ENGLISH)
Page 40
...Sending a fax • Setting the fax header • Adjusting the document settings • Sending a fax automatically • Sending a fax manually • Confirming a transmission • Automatic redialing • Redialing the last number Receiving a fax • Changing receiving modes • ...Receiving automatically in Fax mode • Receiving manually in Tel mode • Receiving manually using an extension telephone • Receiving automatically in Ans/Fax mode • Receiving faxes using DRPD mode ...
...Sending a fax • Setting the fax header • Adjusting the document settings • Sending a fax automatically • Sending a fax manually • Confirming a transmission • Automatic redialing • Redialing the last number Receiving a fax • Changing receiving modes • ...Receiving automatically in Fax mode • Receiving manually in Tel mode • Receiving manually using an extension telephone • Receiving automatically in Ans/Fax mode • Receiving faxes using DRPD mode ...
User Manual (ENGLISH)
Page 41
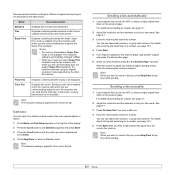
... the highest resolution mode supported by the other fax machine. The resolution setting is enabled only if the machine with which you send the fax manually. Sending a color fax is automatically changed to Fine. • When your originals lighter or darker. 1 Press Menu until the option you have ... 1 Load originals face up into the ADF, or place a single original face down on the top line of gray or photographs. Sending a fax manually 1 Load originals face up into the ADF, or place a single original face down on the scanner glass, load another original and press 1 to ...
... the highest resolution mode supported by the other fax machine. The resolution setting is enabled only if the machine with which you send the fax manually. Sending a color fax is automatically changed to Fine. • When your originals lighter or darker. 1 Press Menu until the option you have ... 1 Load originals face up into the ADF, or place a single original face down on the top line of gray or photographs. Sending a fax manually 1 Load originals face up into the ADF, or place a single original face down on the scanner glass, load another original and press 1 to ...
User Manual (ENGLISH)
Page 42
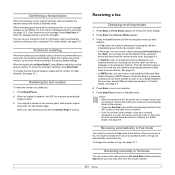
... to save your fax, an error message appears on the line, the machine automatically switches to Fax mode to redial the number without waiting. Receiving manually in Fax mode Your machine is no longer receive any incoming fax.
... to save your fax, an error message appears on the line, the machine automatically switches to Fax mode to redial the number without waiting. Receiving manually in Fax mode Your machine is no longer receive any incoming fax.

User Manual (ENGLISH)
Page 43
...receiving mode to answer several rings to learn the ring pattern you is completed. It is often used by the Receiving in Tel mode (manual reception) when the answering machine is a telephone company service which number someone is calling in Ans/Fax mode To use a single telephone ...on the back of received faxes when the machine is set the menu to that the machine answers with a fax tone. fax machine. Receiving manually using an extension telephone connected to the fax machine. To set up , call , and all incoming faxes go into the EXT socket. When...
...receiving mode to answer several rings to learn the ring pattern you is completed. It is often used by the Receiving in Tel mode (manual reception) when the answering machine is a telephone company service which number someone is calling in Ans/Fax mode To use a single telephone ...on the back of received faxes when the machine is set the menu to that the machine answers with a fax tone. fax machine. Receiving manually using an extension telephone connected to the fax machine. To set up , call , and all incoming faxes go into the EXT socket. When...
User Manual (ENGLISH)
Page 53
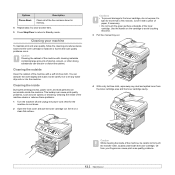
... of the fax numbers stored in memory. 4 Repeat step 3 to clear another item. 5 Press Stop/Clear to return to avoid touching this area. 3 Pull the manual tray out. 4 With a dry lint-free cloth, wipe away any water drip onto or into the machine. This buildup can cause print scan quality problems...
... of the fax numbers stored in memory. 4 Repeat step 3 to clear another item. 5 Press Stop/Clear to return to avoid touching this area. 3 Pull the manual tray out. 4 With a dry lint-free cloth, wipe away any water drip onto or into the machine. This buildup can cause print scan quality problems...
User Manual (ENGLISH)
Page 54
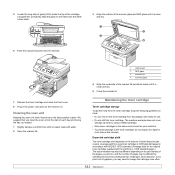
... glass (LSU) inside the top of the cartridge compartment, and gently swab the glass to see if dirt turns the white cotton black. 6 Push the manual tray back into the machine. 3 Wipe the surface of the scanner glass and ADF glass until it is clean and dry. 5 Close the scanner lid...
... glass (LSU) inside the top of the cartridge compartment, and gently swab the glass to see if dirt turns the white cotton black. 6 Push the manual tray back into the machine. 3 Wipe the surface of the scanner glass and ADF glass until it is clean and dry. 5 Close the scanner lid...
User Manual (ENGLISH)
Page 59
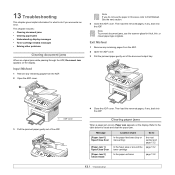
... the table below to [Paper Jam 0] Open/Close Door [Paper Jam 1] Open/Close Door [Paper Jam 2] Check Inside In the paper feed area (tray or manual tray) In the fuser area or around the toner cartridge In the paper exit area the next section and page 13.2 page 13.2 page 13...
... the table below to [Paper Jam 0] Open/Close Door [Paper Jam 1] Open/Close Door [Paper Jam 2] Check Inside In the paper feed area (tray or manual tray) In the fuser area or around the toner cartridge In the paper exit area the next section and page 13.2 page 13.2 page 13...


