

User Manual (ENGLISH)
Page 4
... de sécurité Notices regarding the LENS ✤ Do not let the LENS point toward the sun. Unintended rotation may cause damage to the Camcorder. 1) LCD screen closed . 5) ➔ 90° ➔ 90° 2) Enregistrement standard lors de l'utilisation de l'écran LCD. 3) Enregistrement en regardant l'écran LCD d'en...
... de sécurité Notices regarding the LENS ✤ Do not let the LENS point toward the sun. Unintended rotation may cause damage to the Camcorder. 1) LCD screen closed . 5) ➔ 90° ➔ 90° 2) Enregistrement standard lors de l'utilisation de l'écran LCD. 3) Enregistrement en regardant l'écran LCD d'en...
User Manual (ENGLISH)
Page 9
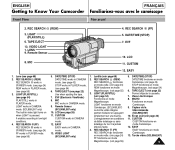
...) 11. EVF 10. LCD 11. It enables recording in PLAYER mode. Remote Sensor (SCL906/L907 only) 10. ENGLISH FRANÇAIS Getting to Know Your Camcorder Familiarisez-vous avec le caméscope Front View Vue avant 2.
...) 11. EVF 10. LCD 11. It enables recording in PLAYER mode. Remote Sensor (SCL906/L907 only) 10. ENGLISH FRANÇAIS Getting to Know Your Camcorder Familiarisez-vous avec le caméscope Front View Vue avant 2.
User Manual (ENGLISH)
Page 11
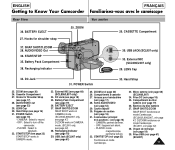
...to record. - CASSETTE Compartment 37. AUDIO/VIDEO Out 32. Hand Strap (see page 19) 36. Battery Pack Compartment (see page 16) 31. USB Jack (SCL907 only) (see page 23) START/STOP works in CAMERA mode. (SCL901 only, see page 18) - START/STOP (voir page 23) Fonctionne en mode Cam... (voir page 16) 31. Compartiment du bloc batterie (voir page 19) 36. Éjection du bloc batterie 37. CAMERA : Select to Know Your Camcorder Familiarisez-vous avec le caméscope Rear View Vue arrière 36. OFF : Select to playback. 32. PLAYER : Select to turn off the...
...to record. - CASSETTE Compartment 37. AUDIO/VIDEO Out 32. Hand Strap (see page 19) 36. Battery Pack Compartment (see page 16) 31. USB Jack (SCL907 only) (see page 23) START/STOP works in CAMERA mode. (SCL901 only, see page 18) - START/STOP (voir page 23) Fonctionne en mode Cam... (voir page 16) 31. Compartiment du bloc batterie (voir page 19) 36. Éjection du bloc batterie 37. CAMERA : Select to Know Your Camcorder Familiarisez-vous avec le caméscope Rear View Vue arrière 36. OFF : Select to playback. 32. PLAYER : Select to turn off the...
User Manual (ENGLISH)
Page 13
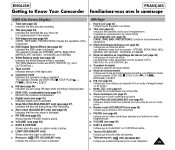
... (SCL906/L907) Indique que la télécommande est en mode "désactivé". 13 ENGLISH FRANÇAIS Getting to Know Your Camcorder Familiarisez-vous avec le caméscope OSD (On Screen Display) j. n. Mode de sélection de l'équilibrage des blancs (voir page... 48) Indique que ce mode est activé. u. Tape counter Indicates amount of the Camcorder. v. p. Il apparaît en surimpression sur scène filmée. v. Torche (SCL906/L907) Indique que la torche vidéo est allum...
... (SCL906/L907) Indique que la télécommande est en mode "désactivé". 13 ENGLISH FRANÇAIS Getting to Know Your Camcorder Familiarisez-vous avec le caméscope OSD (On Screen Display) j. n. Mode de sélection de l'équilibrage des blancs (voir page... 48) Indique que ce mode est activé. u. Tape counter Indicates amount of the Camcorder. v. p. Il apparaît en surimpression sur scène filmée. v. Torche (SCL906/L907) Indique que la torche vidéo est allum...
User Manual (ENGLISH)
Page 14
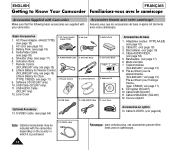
... (voir page 18) 2. CD logiciel (SCL907) 10. ENGLISH FRANÇAIS Getting to Know Your Camcorder Familiarisez-vous avec le caméscope Accessories Supplied with Camcorder Make sure that the following basic accessories are supplied with the camcorder, depending on the country in which it ... l'horloge interne. (type: CR2025, voir page 17) 9. Câble S-VIDEO. (voir page 54) Note: Optional accessories may be included with your camcorder. AC Power Adapter 1. Shoulder Strap 8. Lithium Batteries 3. USB AUDIO Cable 12. Câble DC. (voir page 18) 3. Bloc batterie. (voir ...
... (voir page 18) 2. CD logiciel (SCL907) 10. ENGLISH FRANÇAIS Getting to Know Your Camcorder Familiarisez-vous avec le caméscope Accessories Supplied with Camcorder Make sure that the following basic accessories are supplied with the camcorder, depending on the country in which it ... l'horloge interne. (type: CR2025, voir page 17) 9. Câble S-VIDEO. (voir page 54) Note: Optional accessories may be included with your camcorder. AC Power Adapter 1. Shoulder Strap 8. Lithium Batteries 3. USB AUDIO Cable 12. Câble DC. (voir page 18) 3. Bloc batterie. (voir ...
User Manual (ENGLISH)
Page 16
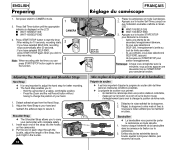
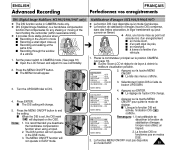
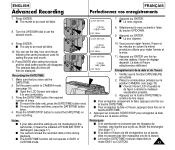
... 1. Placez le caméscope en mode Caméscope. 2. Adjusting the Hand Strap and Shoulder Strap Hand Strap ✤ It is displayed on the camcorder. 2. Appuyez sur la touche Self Timer, jusqu'à ce que l'indication souhaitée s'affiche à l'écran LCD : I WAIT-10S/SELF-30S...232;me fois sur START/STOP pour annuler la fonction. Detach adhesive tape from the Hand Strap. 2. Put the end of each end of your camcorder with the timer, you to : - Shoulder Strap ✤ The Shoulder Strap allows you can press START/STOP button again to CAMERA mode. 1 ...
... 1. Placez le caméscope en mode Caméscope. 2. Adjusting the Hand Strap and Shoulder Strap Hand Strap ✤ It is displayed on the camcorder. 2. Appuyez sur la touche Self Timer, jusqu'à ce que l'indication souhaitée s'affiche à l'écran LCD : I WAIT-10S/SELF-30S...232;me fois sur START/STOP pour annuler la fonction. Detach adhesive tape from the Hand Strap. 2. Put the end of each end of your camcorder with the timer, you to : - Shoulder Strap ✤ The Shoulder Strap allows you can press START/STOP button again to CAMERA mode. 1 ...
User Manual (ENGLISH)
Page 18
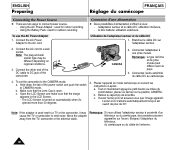
... ou du câble de l'antenne. 18 Branchez le câble DC sur l'adaptateur secteur. 2. Move the adapter away from the TV, camcorder or the antenna cable. Using the Battery Pack: used for outdoor recording. Connect the AC cord to connect power source. - CAMERA 3 Remarque:...s'allume automatiquement lorsqu'il est ouvert de plus de 30°. Note: The plug and wall socket type may cause the TV or camcorder to a TV or the camcorder, it may be different depending on automatically when it's opened more than 30 degrees. 4. c. c. Connectez l'adaptateur à une ...
... ou du câble de l'antenne. 18 Branchez le câble DC sur l'adaptateur secteur. 2. Move the adapter away from the TV, camcorder or the antenna cable. Using the Battery Pack: used for outdoor recording. Connect the AC cord to connect power source. - CAMERA 3 Remarque:...s'allume automatiquement lorsqu'il est ouvert de plus de 30°. Note: The plug and wall socket type may cause the TV or camcorder to a TV or the camcorder, it may be different depending on automatically when it's opened more than 30 degrees. 4. c. c. Connectez l'adaptateur à une ...
User Manual (ENGLISH)
Page 19
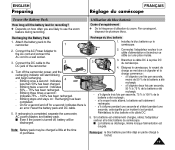
...FRANÇAIS Réglage du caméscope To use the Battery Pack How long will start blinking and begin recharging. - Turn off the camcorder power, and the recharging indicator will the battery last for recording? ✤ Depends on : Recharging has been completed. - On for a second...: Indicates there is completed, separate the camcorder, AC power adapter, and battery pack. Branchez le câble DC à la prise DC du caméscope. 4. Éteignez le cam...
...FRANÇAIS Réglage du caméscope To use the Battery Pack How long will start blinking and begin recharging. - Turn off the camcorder power, and the recharging indicator will the battery last for recording? ✤ Depends on : Recharging has been completed. - On for a second...: Indicates there is completed, separate the camcorder, AC power adapter, and battery pack. Branchez le câble DC à la prise DC du caméscope. 4. Éteignez le cam...
User Manual (ENGLISH)
Page 24
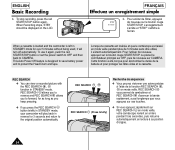
... be displayed on the LCD. REC SEARCH ✤ You can view a recorded picture with the REC SEARCH , function in STANDBY mode, your camcorder will turn off automatically. FRANÇAIS Effectuez un enregistrement simple STBY Y:YY:YY b. To use it will play back in STANDBY mode for ...arrière pendant trois secondes, puis retourne automatiquement en lecture à sa position d'origine. 24 When a cassette is loaded and the camcorder is designed to save battery power and to CAMERA. Pour l'utiliser de nouveau, appuyez sur le bouton rouge START/STOP ou placez le commutateur...
... be displayed on the LCD. REC SEARCH ✤ You can view a recorded picture with the REC SEARCH , function in STANDBY mode, your camcorder will turn off automatically. FRANÇAIS Effectuez un enregistrement simple STBY Y:YY:YY b. To use it will play back in STANDBY mode for ...arrière pendant trois secondes, puis retourne automatiquement en lecture à sa position d'origine. 24 When a cassette is loaded and the camcorder is designed to save battery power and to CAMERA. Pour l'utiliser de nouveau, appuyez sur le bouton rouge START/STOP ou placez le commutateur...
User Manual (ENGLISH)
Page 26
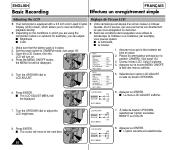
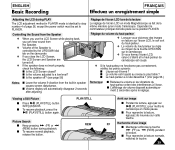
... will turn on the conditions in place. 2. ENGLISH Basic Recording FRANÇAIS Effectuez un enregistrement simple Adjusting the LCD ✤ Your camcorder is in which you are using the camcorder (indoors or outdoors for example), you to view recording or playback directly. ✤ Depending on . 4. Open the LCD Screen, then the...
... will turn on the conditions in place. 2. ENGLISH Basic Recording FRANÇAIS Effectuez un enregistrement simple Adjusting the LCD ✤ Your camcorder is in which you are using the camcorder (indoors or outdoors for example), you to view recording or playback directly. ✤ Depending on . 4. Open the LCD Screen, then the...
User Manual (ENGLISH)
Page 29
... sound from the built-in PLAYER mode is identical to step number 4 of the Speaker is controlled by the UP/DOWN dial tab on the camcorder. ✤ If you close the LCD Screen, the LCD Screen and Speaker are turned off ? (see page 56) Notes: I Is the volume adjusted to PLAYER...
... sound from the built-in PLAYER mode is identical to step number 4 of the Speaker is controlled by the UP/DOWN dial tab on the camcorder. ✤ If you close the LCD Screen, the LCD Screen and Speaker are turned off ? (see page 56) Notes: I Is the volume adjusted to PLAYER...
User Manual (ENGLISH)
Page 35
... and walking at the same time I Recording through the window of the dans des limites raisonables, le léger tremblement qui peut hand holding the camcorder (within reasonable limits). Placez le commutateur principal sur la position CAMERA. (voir page 18) I Ouvrez l'écran LCD et réglez-le de faç...
... and walking at the same time I Recording through the window of the dans des limites raisonables, le léger tremblement qui peut hand holding the camcorder (within reasonable limits). Placez le commutateur principal sur la position CAMERA. (voir page 18) I Ouvrez l'écran LCD et réglez-le de faç...
User Manual (ENGLISH)
Page 43
... mois souhaité à l'aide du bouton UP/DOWN. 9. Press ENTER after setting the minute and the clock setting screen will not operate in the camcorder, it to be reset will then be reset will blink. 10. CLOCK SETTING 12:00 AM FEB. 1, 2005 11. I Pour enregistrer la date et l'heure...
... mois souhaité à l'aide du bouton UP/DOWN. 9. Press ENTER after setting the minute and the clock setting screen will not operate in the camcorder, it to be reset will then be reset will blink. 10. CLOCK SETTING 12:00 AM FEB. 1, 2005 11. I Pour enregistrer la date et l'heure...
User Manual (ENGLISH)
Page 50
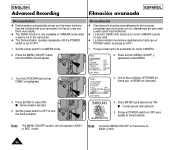
...la touche MENU ON/OFF. Press ENTER to end the Demonstration. Sélectionnez l'option DEMO à l'aide du bouton UP/DOWN. 4. SAMSUNG DEMONSTRATION 4. Placez le commutateur principal sur la position CAMERA. 2. Placez le commutateur principal sur OFF pour mettre fin à la dé...will appear. I Demonstration will start. 5. Turn the UP/DOWN dial so that you the major functions that are included with your camcorder so that DEMO is set to CAMERA mode. 1. Démonstration ✤ La démonstration vous montre automatiquement les fonctions les plus...
...la touche MENU ON/OFF. Press ENTER to end the Demonstration. Sélectionnez l'option DEMO à l'aide du bouton UP/DOWN. 4. SAMSUNG DEMONSTRATION 4. Placez le commutateur principal sur la position CAMERA. 2. Placez le commutateur principal sur OFF pour mettre fin à la dé...will appear. I Demonstration will start. 5. Turn the UP/DOWN dial so that you the major functions that are included with your camcorder so that DEMO is set to CAMERA mode. 1. Démonstration ✤ La démonstration vous montre automatiquement les fonctions les plus...

User Manual (ENGLISH)
Page 53
...érieure), I blanc: audio (gauche). Connecting to a TV which has an Audio and Video input jack ✤ Use the Audio/Video cable supplied with your camcorder. I jaune: vidéo, I à l'écran de votre téléviseur (recommandé pour une utilisation intérieure). Note: To view the cassette on.... ✤ There are two ways to see page 63) Connecting to a TV which has no Audio and Video input jack ✤ You can connect your camcorder to a TV through a VCR.
...érieure), I blanc: audio (gauche). Connecting to a TV which has an Audio and Video input jack ✤ Use the Audio/Video cable supplied with your camcorder. I jaune: vidéo, I à l'écran de votre téléviseur (recommandé pour une utilisation intérieure). Note: To view the cassette on.... ✤ There are two ways to see page 63) Connecting to a TV which has no Audio and Video input jack ✤ You can connect your camcorder to a TV through a VCR.

User Manual (ENGLISH)
Page 59
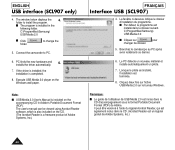
..., double click Install.exe in advance. ✤ This explanation is inserted into CD-ROM. ENGLISH USB interface (SCL907 only) FRANÇAIS Interface USB (SCL907) Installing USB Media 2.0 Program ✤ Do not connect the camcorder to PC before installing the program. ✤ If another camera or scanner is connected, please disconnect it in...
..., double click Install.exe in advance. ✤ This explanation is inserted into CD-ROM. ENGLISH USB interface (SCL907 only) FRANÇAIS Interface USB (SCL907) Installing USB Media 2.0 Program ✤ Do not connect the camcorder to PC before installing the program. ✤ If another camera or scanner is connected, please disconnect it in...
User Manual (ENGLISH)
Page 60
... fois sur l'icône USB Media 2.0 sur le bureau Windows. ENGLISH USB interface (SCL907 only) 4. I USB Media 2.0 User's Manual is installed in Adobe's Portable Document Format ... d'accompagnement sous le format Portable Document Format (PDF) de Adobe. to PC. 6. Connect the camcorder to change the 5. Note: I The program is included on the Windows wall paper. Lorsque le...faut, le programme est installé dans le dossier suivant. folder to install the program. C:\Programfiles\Samsung\ USB Media 2.0 I Cliquez sur pour changer de dossier. 5. Le PC détecte un ...
... fois sur l'icône USB Media 2.0 sur le bureau Windows. ENGLISH USB interface (SCL907 only) 4. I USB Media 2.0 User's Manual is installed in Adobe's Portable Document Format ... d'accompagnement sous le format Portable Document Format (PDF) de Adobe. to PC. 6. Connect the camcorder to change the 5. Note: I The program is included on the Windows wall paper. Lorsque le...faut, le programme est installé dans le dossier suivant. folder to install the program. C:\Programfiles\Samsung\ USB Media 2.0 I Cliquez sur pour changer de dossier. 5. Le PC détecte un ...

User Manual (ENGLISH)
Page 72
...ÇAIS THIS CAMCORDER IS MANUFACTURED BY: CE CAMESCOPE EST DISTRIBUÉ PAR : ELECTRONICS ELECTRONICS *Samsung Electronics' Internet Home Page United States http://www.samsungusa.com United Kingdom http://www.samsungelectronics.co.uk France http://www.samsung.fr Australia http://www.samsung.com.au Germany http://www.samsung.de Sweden http://www.samsung.se Poland http...
...ÇAIS THIS CAMCORDER IS MANUFACTURED BY: CE CAMESCOPE EST DISTRIBUÉ PAR : ELECTRONICS ELECTRONICS *Samsung Electronics' Internet Home Page United States http://www.samsungusa.com United Kingdom http://www.samsungelectronics.co.uk France http://www.samsung.fr Australia http://www.samsung.com.au Germany http://www.samsung.de Sweden http://www.samsung.se Poland http...

User Manual (ENGLISH)
Page 45
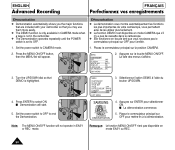
... you want to the left side 10 seconds after you desire. 9. Turn UP/DOWN dial to select the appropriate language. At the same time, the camcorder will disappear. Set power switch to the menu mode. I You may select languages among OFF, AUTO-10S, and CONTINUE. 5. Notes: I El titulo del pais seleccionado...
... you want to the left side 10 seconds after you desire. 9. Turn UP/DOWN dial to select the appropriate language. At the same time, the camcorder will disappear. Set power switch to the menu mode. I You may select languages among OFF, AUTO-10S, and CONTINUE. 5. Notes: I El titulo del pais seleccionado...
User Manual (ENGLISH)
Page 50
...á la lista MENU. 3. Set the power switch to OFF to OFF. Note: The MENU ON/OFF function will not operate in the camcorder. ✤ The Demonstration operates repeatedly until the POWER switch is highlighted. Ponga el interruptor de encendido en modo CAMERA. 2. Demostración ✤...225;s fácilmente. ✤ La función DEMO sólo funciona en modo CAMERA cuando no funcionara en EASY o REC. 50 SAMSUNG DEMONSTRATION 4. Nota: La funcion MENU ON/OFF no hay cinta. ✤ La Demonstration funcionara repetidamente hasta que el POWER switch se ponga en OFF...
...á la lista MENU. 3. Set the power switch to OFF to OFF. Note: The MENU ON/OFF function will not operate in the camcorder. ✤ The Demonstration operates repeatedly until the POWER switch is highlighted. Ponga el interruptor de encendido en modo CAMERA. 2. Demostración ✤...225;s fácilmente. ✤ La función DEMO sólo funciona en modo CAMERA cuando no funcionara en EASY o REC. 50 SAMSUNG DEMONSTRATION 4. Nota: La funcion MENU ON/OFF no hay cinta. ✤ La Demonstration funcionara repetidamente hasta que el POWER switch se ponga en OFF...


