User Manual (ENGLISH)
Page 14
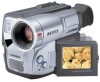
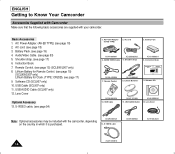
AC Power Adapter 1. AC Power Adapter. (AA-E8 TYPE) (AA-E8 TYPE) (see page 17) 4. Shoulder strap. (see page 18) 2. AUDIO/VIDEO Cable 6. USB Cable (SCL907 only) SSTTOAPRT/ TIMSEERLF DISPLAY STILL ... Control 9. Lens Cover 2. Câble AUDIO/VIDEO. (voir page 53) 5. Bandoulière. (voir page 17) 6. Télécommande. (SCL906/L907, voir page 15) 8. Câble S-VIDEO. (voir page 54) Note: Optional accessories may be included with your camcorder. Software CD (SCL907 only) 10. Basic Accessories 1. Câble USB AUDIO (SCL907) 12.
AC Power Adapter 1. AC Power Adapter. (AA-E8 TYPE) (AA-E8 TYPE) (see page 17) 4. Shoulder strap. (see page 18) 2. AUDIO/VIDEO Cable 6. USB Cable (SCL907 only) SSTTOAPRT/ TIMSEERLF DISPLAY STILL ... Control 9. Lens Cover 2. Câble AUDIO/VIDEO. (voir page 53) 5. Bandoulière. (voir page 17) 6. Télécommande. (SCL906/L907, voir page 15) 8. Câble S-VIDEO. (voir page 54) Note: Optional accessories may be included with your camcorder. Software CD (SCL907 only) 10. Basic Accessories 1. Câble USB AUDIO (SCL907) 12.
User Manual (ENGLISH)
Page 18
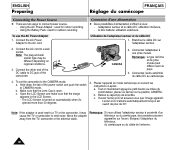
...mode. c. The LCD Screen is open. b. Note: If the adapter is used next to a TV or the camcorder, it may be different depending on automatically when it's opened more than 30 degrees. 4. To use the AC Power Adapter 1. CAMERA 3 Remarque: le type de fiche et de prise ...and wall socket type may cause the TV or camcorder to CAMERA mode. Retirez le capuchon de la lentille. Ouvrez l'écran LCD et assurez-vous que l'image apparaît. - Connectez l'adaptateur à une prise murale. Using the AC Power Adapter : used for indoor recording. - ENGLISH Preparing ...
...mode. c. The LCD Screen is open. b. Note: If the adapter is used next to a TV or the camcorder, it may be different depending on automatically when it's opened more than 30 degrees. 4. To use the AC Power Adapter 1. CAMERA 3 Remarque: le type de fiche et de prise ...and wall socket type may cause the TV or camcorder to CAMERA mode. Retirez le capuchon de la lentille. Ouvrez l'écran LCD et assurez-vous que l'image apparaît. - Connectez l'adaptateur à une prise murale. Using the AC Power Adapter : used for indoor recording. - ENGLISH Preparing ...
User Manual (ENGLISH)
Page 19
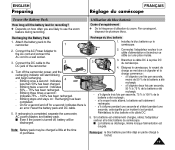
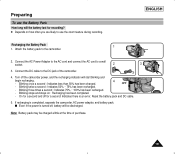
... fois par seconde, 50 % à 75 % de la batterie a été rechargé; - I Even if the power is completed, separate the camcorder, AC power adapter, and battery pack. Utilisation du bloc batterie Durée d'enregistrement ✤ De la fréquence d'utilisation du zoom. Recharging the... Battery Pack 1. Connect the AC Power Adapter to the AC cord and connect the AC cord to the camcorder. 1 2. Blinking once a second : Indicates 4 OFF less than 50% has been charged. - Blinking stops ...
... fois par seconde, 50 % à 75 % de la batterie a été rechargé; - I Even if the power is completed, separate the camcorder, AC power adapter, and battery pack. Utilisation du bloc batterie Durée d'enregistrement ✤ De la fréquence d'utilisation du zoom. Recharging the... Battery Pack 1. Connect the AC Power Adapter to the AC cord and connect the AC cord to the camcorder. 1 2. Blinking once a second : Indicates 4 OFF less than 50% has been charged. - Blinking stops ...
User Manual (ENGLISH)
Page 69
... 42 DATE/TIME 42 DC CABLE 18 DEMO 50 DEW 67 DIGITAL ZOOM 31 DIMENSIONS 68 DIS 35 DISPLAY 12 DSE 40 - HAND STRAP 16 Hi8 54 - MIRROR 40 MOISTURE 67 MOSAIC 40 MULTY PLAYBACK 57 - ND FILTER 52 NEAR 36 NEG 40 NTSC 63 -A- DATE 42 DATE/HEURE 42... DIMENSION 68 DIS 35 DSE 40 - H HAUT-PARLEUR 56 HEURE 42 Hi 8 54 HUMIDITE 67 - ABROAD 63 AC POWER ADAPTER........18 ADJUSTING 26 AF 36 AUDIO 53 AUTO FOCUSING 36 AUTO MODE 38 AUTO POWER OFF 24 - H - N - BANDOULIERE 17 BATTERIE 19 BLC 37 BLOC BATTERIE 19 BOUTON ROUGE DU COMMUTATEUR...........18 - C - CABLE ...
... 42 DATE/TIME 42 DC CABLE 18 DEMO 50 DEW 67 DIGITAL ZOOM 31 DIMENSIONS 68 DIS 35 DISPLAY 12 DSE 40 - HAND STRAP 16 Hi8 54 - MIRROR 40 MOISTURE 67 MOSAIC 40 MULTY PLAYBACK 57 - ND FILTER 52 NEAR 36 NEG 40 NTSC 63 -A- DATE 42 DATE/HEURE 42... DIMENSION 68 DIS 35 DSE 40 - H HAUT-PARLEUR 56 HEURE 42 Hi 8 54 HUMIDITE 67 - ABROAD 63 AC POWER ADAPTER........18 ADJUSTING 26 AF 36 AUDIO 53 AUTO FOCUSING 36 AUTO MODE 38 AUTO POWER OFF 24 - H - N - BANDOULIERE 17 BATTERIE 19 BLC 37 BLOC BATTERIE 19 BOUTON ROUGE DU COMMUTATEUR...........18 - C - CABLE ...
User Manual (ENGLISH)
Page 5
... hazard, do not expose this party responsible for proper grounding and, in particular, specifies that the cable ground shall be use. If this power supply is provided to call the CATV system installer's attention to part 15 FCC rules. Notices and Safety Instructions 22. NOTE TO CATV SYSTEM... INSTALLER: This reminder is used at 240V ac, a suitable plug adapter should be connected to the grounding system of the building as close to the point of the NEC that provides guidelines for compliance to Article...
... hazard, do not expose this party responsible for proper grounding and, in particular, specifies that the cable ground shall be use. If this power supply is provided to call the CATV system installer's attention to part 15 FCC rules. Notices and Safety Instructions 22. NOTE TO CATV SYSTEM... INSTALLER: This reminder is used at 240V ac, a suitable plug adapter should be connected to the grounding system of the building as close to the point of the NEC that provides guidelines for compliance to Article...
User Manual (ENGLISH)
Page 6
ENGLISH Contents Notices and Safety Instructions Getting to Know Your Camcorder Features...8 Descriptions s Front View/Side View/Rear View...9, 10, 11 s OSD (On Screen Display) ...12 Accessories Supplied with the Camcorder...14 Remote Control (SCL906/L907 only) ...15 s Self Timer Recording...15 ...Preparing Adjusting the Hand Strap and Shoulder Strap ...16 Attaching the Lens Cover ...17 Lithium Battery Installation ...17 Connecting the Power Source...18 s To use the AC Power Adapter ...18 s ...
ENGLISH Contents Notices and Safety Instructions Getting to Know Your Camcorder Features...8 Descriptions s Front View/Side View/Rear View...9, 10, 11 s OSD (On Screen Display) ...12 Accessories Supplied with the Camcorder...14 Remote Control (SCL906/L907 only) ...15 s Self Timer Recording...15 ...Preparing Adjusting the Hand Strap and Shoulder Strap ...16 Attaching the Lens Cover ...17 Lithium Battery Installation ...17 Connecting the Power Source...18 s To use the AC Power Adapter ...18 s ...
User Manual (ENGLISH)
Page 10
even if the battery pack or AC power adapter is fitted firmly into place. Notices regarding the battery pack ✤ Make sure that the battery pack is charged before recording outdoors. ✤ To preserve battery power, keep your camcorder turned off to protect against unexpected battery discharge. ✤...it is left in STANDBY for the camcorder lasts about 8~10 months under normal operation from time of installation. ✤ When the lithium battery becomes weak or dead, the date/time indicator flashes about 5 seconds when you set the power switch to be swallowed, consult a ...
even if the battery pack or AC power adapter is fitted firmly into place. Notices regarding the battery pack ✤ Make sure that the battery pack is charged before recording outdoors. ✤ To preserve battery power, keep your camcorder turned off to protect against unexpected battery discharge. ✤...it is left in STANDBY for the camcorder lasts about 8~10 months under normal operation from time of installation. ✤ When the lithium battery becomes weak or dead, the date/time indicator flashes about 5 seconds when you set the power switch to be swallowed, consult a ...
User Manual (ENGLISH)
Page 18
.... (see page 18) 2. Remote Control. (see page 54) 1. S-VIDEO cable. (see page 15) (SCL906/L907 only) 8. ENGLISH Getting to Know Your Camcorder Accessories Supplied with Camcorder Make sure that the following basic accessories are supplied with the camcorder, depending on the country in which it is purchased. 13. AC Power Adapter (AA-E8 TYPE) 2. Basic Accessories 1.
.... (see page 18) 2. Remote Control. (see page 54) 1. S-VIDEO cable. (see page 15) (SCL906/L907 only) 8. ENGLISH Getting to Know Your Camcorder Accessories Supplied with Camcorder Make sure that the following basic accessories are supplied with the camcorder, depending on the country in which it is purchased. 13. AC Power Adapter (AA-E8 TYPE) 2. Basic Accessories 1.
User Manual (ENGLISH)
Page 21
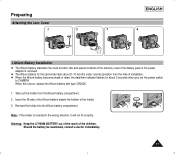
...battery toward the bottom of the children. Note: If the holder is removed. ✤ The lithium battery for about 5 seconds when you set the power switch to CAMERA. Warning: Keep the LITHIUM BATTERY out of the reach of the holder. 3. Preparing ENGLISH Attaching the Lens Cover 1 2 3 ...lithium battery becomes weak or dead, the date/time indicator flashes for the camcorder lasts about 8~10 months under normal operation from the lithium battery compartment. 2. even if the battery pack or AC power adapter is inserted in the wrong direction, it will not fit correctly. Take out...
...battery toward the bottom of the children. Note: If the holder is removed. ✤ The lithium battery for about 5 seconds when you set the power switch to CAMERA. Warning: Keep the LITHIUM BATTERY out of the reach of the holder. 3. Preparing ENGLISH Attaching the Lens Cover 1 2 3 ...lithium battery becomes weak or dead, the date/time indicator flashes for the camcorder lasts about 8~10 months under normal operation from the lithium battery compartment. 2. even if the battery pack or AC power adapter is inserted in the wrong direction, it will not fit correctly. Take out...
User Manual (ENGLISH)
Page 22
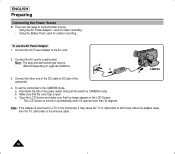
... ✤ There are two ways to the AC cord. 2. Connect the AC Power Adapter to connect power source. - Hold down the tab of the camcorder. 4. c. Move the adapter away from the TV, camcorder or the antenna cable. 18 To use the AC Power Adapter 1. Connect the AC cord to the CAMERA mode. a. b. Note: The plug and wall socket...
... ✤ There are two ways to the AC cord. 2. Connect the AC Power Adapter to connect power source. - Hold down the tab of the camcorder. 4. c. Move the adapter away from the TV, camcorder or the antenna cable. 18 To use the AC Power Adapter 1. Connect the AC cord to the CAMERA mode. a. b. Note: The plug and wall socket...
User Manual (ENGLISH)
Page 23
... and begin recharging. - Blinking once a second : Indicates less than 50% has been charged. 4 OFF - s Even if the power is completed, separate the camcorder, AC power adapter, and battery pack. Preparing To use the zoom feature during recording. Blinking twice a second : Indicates 50% ~ 75% has been ...recharged. - Connect the AC Power Adapter to the AC cord and connect the AC cord to the camcorder. 2. If recharging is turned off, battery will be charged a little at the time of the camcorder. 4. Reset the battery pack and DC cable. 5. Turn off...
... and begin recharging. - Blinking once a second : Indicates less than 50% has been charged. 4 OFF - s Even if the power is completed, separate the camcorder, AC power adapter, and battery pack. Preparing To use the zoom feature during recording. Blinking twice a second : Indicates 50% ~ 75% has been ...recharged. - Connect the AC Power Adapter to the AC cord and connect the AC cord to the camcorder. 2. If recharging is turned off, battery will be charged a little at the time of the camcorder. 4. Reset the battery pack and DC cable. 5. Turn off...
User Manual (ENGLISH)
Page 27
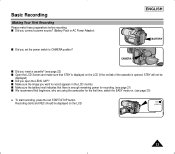
ENGLISH CAMERA BATTERY s Did you open the LENS CAP? s Did you connect a power source? (Battery Pack or AC Power Adapter) s Did you want to CAMERA position? To start recording, press the red START/STOP button. Recording starts and REC should be displayed on the LCD (... of the cassette is displayed on the LCD. s Make sure the battery level indicates that there is enough remaining power for recording. (see page 21) s We recommend that beginners, who are using the camcorder for the first time, switch the EASY mode on. (see page 22) s Open the LCD Screen and make...
ENGLISH CAMERA BATTERY s Did you open the LENS CAP? s Did you connect a power source? (Battery Pack or AC Power Adapter) s Did you want to CAMERA position? To start recording, press the red START/STOP button. Recording starts and REC should be displayed on the LCD (... of the cassette is displayed on the LCD. s Make sure the battery level indicates that there is enough remaining power for recording. (see page 21) s We recommend that beginners, who are using the camcorder for the first time, switch the EASY mode on. (see page 22) s Open the LCD Screen and make...

User Manual (ENGLISH)
Page 48
... ENGLISH [HAVING FUN] FRANÇAIS DEUTSCH ITALIANO ESPAÑOL PYCCK»... Set the power switch to CAMERA mode. (see page 18) s Open the LCD Screen and adjust it to select a preset title stored in the camcorder's memory. ✤ You can change the language. 1. Turn the UP/DOWN dial until TITLE...; Selecting and recording a TITLE is possible in the CAMERA mode only. ✤ The TITLE feature allows you have installed the LITHIUM BATTERY or have the adapter attached. (see page 17) 2.
... ENGLISH [HAVING FUN] FRANÇAIS DEUTSCH ITALIANO ESPAÑOL PYCCK»... Set the power switch to CAMERA mode. (see page 18) s Open the LCD Screen and adjust it to select a preset title stored in the camcorder's memory. ✤ You can change the language. 1. Turn the UP/DOWN dial until TITLE...; Selecting and recording a TITLE is possible in the CAMERA mode only. ✤ The TITLE feature allows you have installed the LITHIUM BATTERY or have the adapter attached. (see page 17) 2.
User Manual (ENGLISH)
Page 58
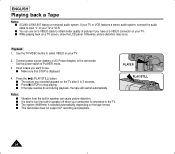
Playback 1. Connect power source (battery or AC Power Adapter) to input "L" of pictures if you have a S-VIDEO connector on your TV. Press the (PLAY/STILL) button. The system (Hi8/8mm) is displayed. 4. If your TV. 2. s While playing back on the tape format. It is best to turn the built-...built-in speaker off when your TV or VCR. Otherwise, picture distortion may occur. s The picture you want to obtain better quality of your camcorder is connected to select VIDEO on the TV after 2 to PLAYER mode. 3. s Make sure that STOP is selected automatically, depending on a ...
Playback 1. Connect power source (battery or AC Power Adapter) to input "L" of pictures if you have a S-VIDEO connector on your TV. Press the (PLAY/STILL) button. The system (Hi8/8mm) is displayed. 4. If your TV. 2. s While playing back on the tape format. It is best to turn the built-...built-in speaker off when your TV or VCR. Otherwise, picture distortion may occur. s The picture you want to obtain better quality of your camcorder is connected to select VIDEO on the TV after 2 to PLAYER mode. 3. s Make sure that STOP is selected automatically, depending on a ...

User Manual (ENGLISH)
Page 67
... viewfinder. s Use a commercially available AC plug adapter, if necessary, depending on a television or to make recordings with your camcorder anywhere in any country or area that uses 100V to view a recording on the power used. However, to 240V, 50/60 Hz. Using Your Camcorder Abroad Using Your Camcorder Abroad ✤ Each country or area has...
... viewfinder. s Use a commercially available AC plug adapter, if necessary, depending on a television or to make recordings with your camcorder anywhere in any country or area that uses 100V to view a recording on the power used. However, to 240V, 50/60 Hz. Using Your Camcorder Abroad Using Your Camcorder Abroad ✤ Each country or area has...
User Manual (ENGLISH)
Page 69
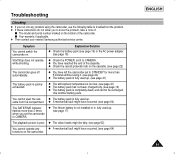
... Check the POWER, set the camcorder to CAMERA. ENGLISH 65 s Your warranty, if applicable. ✤ Then contact your nearest Samsung authorized service center. Symptom You cannot switch the camcorder on. x You have left the camcorder set to STANDBY for more than 5 minutes without using the camcorder, use the ... shooting. x The battery pack is poor. Explanation/Solution x Check the battery pack (see page 19) or the AC power adapter. (see page 22) The camcorder goes off automatically. x You have occurred. (see page 64) The DATE/TIME indicator flashes more than 2 times when you...
... Check the POWER, set the camcorder to CAMERA. ENGLISH 65 s Your warranty, if applicable. ✤ Then contact your nearest Samsung authorized service center. Symptom You cannot switch the camcorder on. x You have left the camcorder set to STANDBY for more than 5 minutes without using the camcorder, use the ... shooting. x The battery pack is poor. Explanation/Solution x Check the battery pack (see page 19) or the AC power adapter. (see page 22) The camcorder goes off automatically. x You have occurred. (see page 64) The DATE/TIME indicator flashes more than 2 times when you...
User Manual (ENGLISH)
Page 73
... 31 DIMENSIONS 68 DIS 35 DISPLAY 12 DSE 40 - HAND STRAP 16 Hi8...54 - EASY 33 EJECT 22 ENTER 26 EXTERNAL MIC 68 - M - BATTERY 19 BATTERY LEVEL 21 BATTERY PACK 19 BLC 37 BRIGHTNESS 26 - C - ABROAD 63 AC POWER ADAPTER 18 ADJUSTING 26 AF ...36 AUDIO 53 AUTO FOCUSING 36 AUTO MODE 38...
... 31 DIMENSIONS 68 DIS 35 DISPLAY 12 DSE 40 - HAND STRAP 16 Hi8...54 - EASY 33 EJECT 22 ENTER 26 EXTERNAL MIC 68 - M - BATTERY 19 BATTERY LEVEL 21 BATTERY PACK 19 BLC 37 BRIGHTNESS 26 - C - ABROAD 63 AC POWER ADAPTER 18 ADJUSTING 26 AF ...36 AUDIO 53 AUTO FOCUSING 36 AUTO MODE 38...


