User Manual (ENGLISH)
Page 14
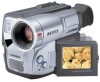
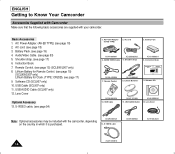
... (SCL907) 12. Câble S-VIDEO. (voir page 54) Note: Optional accessories may be included with your camcorder. USB Cable 11. Pile au lithium pour la télécommande. (SCL906/L907, voir page 15) Pile au lithium pour l'horloge interne. (type: CR2025, voir page 17) 9. USB... Cable (SCL907 only) SSTTOAPRT/ TIMSEERLF DISPLAY STILL RETZUERRNO CROESUENTTER WIDE 11. Instruction Book Video Camcorder 8mm COLOR Caméscope 8mm É...
... (SCL907) 12. Câble S-VIDEO. (voir page 54) Note: Optional accessories may be included with your camcorder. USB Cable 11. Pile au lithium pour la télécommande. (SCL906/L907, voir page 15) Pile au lithium pour l'horloge interne. (type: CR2025, voir page 17) 9. USB... Cable (SCL907 only) SSTTOAPRT/ TIMSEERLF DISPLAY STILL RETZUERRNO CROESUENTTER WIDE 11. Instruction Book Video Camcorder 8mm COLOR Caméscope 8mm É...
User Manual (ENGLISH)
Page 18
... est ouvert de plus de 30°. Utilisation de l'adaptateur secteur et du câble DC 1. Connect the other end of the DC cable to DC jack of the power switch and push the switch to CAMERA mode. CAMERA 3 Remarque: le type de fiche et de prise murale...opened more than 30 degrees. 4. c. Note: If the adapter is turned on 2 regional conditions. 1 3. b. Move the adapter away from the TV, camcorder or the antenna cable. Remarque: Si vous utilisez l'adaptateur secteur à proximité d'un téléviseur ou du caméscope, des parasites peuvent apparaître ...
... est ouvert de plus de 30°. Utilisation de l'adaptateur secteur et du câble DC 1. Connect the other end of the DC cable to DC jack of the power switch and push the switch to CAMERA mode. CAMERA 3 Remarque: le type de fiche et de prise murale...opened more than 30 degrees. 4. c. Note: If the adapter is turned on 2 regional conditions. 1 3. b. Move the adapter away from the TV, camcorder or the antenna cable. Remarque: Si vous utilisez l'adaptateur secteur à proximité d'un téléviseur ou du caméscope, des parasites peuvent apparaître ...
User Manual (ENGLISH)
Page 19
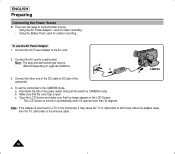
...utilisation du zoom. Blinking once a second : Indicates 4 OFF less than 50% has been charged. - If recharging is completed, separate the camcorder, AC power adapter, and battery pack. Connectez l'adaptateur secteur à un câble d'alimentation et branchez ce câble sur une ... Remarque: le bloc batterie peut être déjà en partie chargé à l'achat. 19 Recharging the Battery Pack 1. Connect the DC cable to a wall socket. 3. Turn off for recording? ✤ Depends on : Recharging has been completed. - Blinking three times a second : Indicates 75...
...utilisation du zoom. Blinking once a second : Indicates 4 OFF less than 50% has been charged. - If recharging is completed, separate the camcorder, AC power adapter, and battery pack. Connectez l'adaptateur secteur à un câble d'alimentation et branchez ce câble sur une ... Remarque: le bloc batterie peut être déjà en partie chargé à l'achat. 19 Recharging the Battery Pack 1. Connect the DC cable to a wall socket. 3. Turn off for recording? ✤ Depends on : Recharging has been completed. - Blinking three times a second : Indicates 75...

User Manual (ENGLISH)
Page 53
...✤ There are two ways to see page 63) Connecting to a TV which has no Audio and Video input jack ✤ You can connect your camcorder. I The yellow plug: Video I à l'écran de votre téléviseur (recommandé pour une utilisation intérieure). Connecting to ...a TV which has an Audio and Video input jack ✤ Use the Audio/Video cable supplied with your camcorder to a TV through a VCR. Note: To view the cassette on the television screen, select the channel reserved for your VCR or ...
...✤ There are two ways to see page 63) Connecting to a TV which has no Audio and Video input jack ✤ You can connect your camcorder. I The yellow plug: Video I à l'écran de votre téléviseur (recommandé pour une utilisation intérieure). Connecting to ...a TV which has an Audio and Video input jack ✤ Use the Audio/Video cable supplied with your camcorder to a TV through a VCR. Note: To view the cassette on the television screen, select the channel reserved for your VCR or ...
User Manual (ENGLISH)
Page 69
CAMERA 18 CASSETTE 22 CASSETTE HOLDER ..........11 CLEANING 62 COLOR 26 CONTENTS 2 COUNTER 55 CUSTOM 34 - F - HAND STRAP 16 Hi8 54 - M - MIRROR 40 MOISTURE 67 MOSAIC 40 MULTY PLAYBACK 57 - N - BANDOULIERE 17 BATTERIE 19 BLC 37 BLOC BATTERIE 19 BOUTON ROUGE DU... FILTER DIAMETER 68 FOCAL LENGTH 68 - H - D - H HAUT-PARLEUR 56 HEURE 42 Hi 8 54 HUMIDITE 67 - ENGLISH Index Index FRANÇAIS -A- CABLE DC 18 CAMERA 18 CASSETTE 22 COMPTEUR 55 COMPTEUR DE BANDE ....13 CONSEILS ET CONSIGNES DE SECURITE 4 CONSOMMATION 68 COULEUR 26 CUSTOM 34 - ABROAD 63...
CAMERA 18 CASSETTE 22 CASSETTE HOLDER ..........11 CLEANING 62 COLOR 26 CONTENTS 2 COUNTER 55 CUSTOM 34 - F - HAND STRAP 16 Hi8 54 - M - MIRROR 40 MOISTURE 67 MOSAIC 40 MULTY PLAYBACK 57 - N - BANDOULIERE 17 BATTERIE 19 BLC 37 BLOC BATTERIE 19 BOUTON ROUGE DU... FILTER DIAMETER 68 FOCAL LENGTH 68 - H - D - H HAUT-PARLEUR 56 HEURE 42 Hi 8 54 HUMIDITE 67 - ENGLISH Index Index FRANÇAIS -A- CABLE DC 18 CAMERA 18 CASSETTE 22 COMPTEUR 55 COMPTEUR DE BANDE ....13 CONSEILS ET CONSIGNES DE SECURITE 4 CONSOMMATION 68 COULEUR 26 CUSTOM 34 - ABROAD 63...
User Manual (ENGLISH)
Page 3
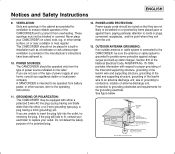
... and the point where they are unable to be blocked or covered. If you are not likely to be sure the antenna or cable system is connected to grounding electrodes and requirements for the grounding electrode. GROUND CLAMP ANTENNA LEAD IN WIRE ELECTRIC SERVICE EQUIPMENT ANTENNA DISCHARGE UNIT... Do not defeat the safety purpose of power source indicated on or near a radiator or heat register. Notices and Safety Instructions ENGLISH 9. This CAMCORDER should be placed in a built-in the cabinet are not sure of the type of the National Electrical Code, ANSI/NFPA No. 70-1984,...
... and the point where they are unable to be blocked or covered. If you are not likely to be sure the antenna or cable system is connected to grounding electrodes and requirements for the grounding electrode. GROUND CLAMP ANTENNA LEAD IN WIRE ELECTRIC SERVICE EQUIPMENT ANTENNA DISCHARGE UNIT... Do not defeat the safety purpose of power source indicated on or near a radiator or heat register. Notices and Safety Instructions ENGLISH 9. This CAMCORDER should be placed in a built-in the cabinet are not sure of the type of the National Electrical Code, ANSI/NFPA No. 70-1984,...
User Manual (ENGLISH)
Page 4
...the service technician has used replacement parts specified by a technician before use. 18. DAMAGE REQUIRING SERVICE: Unplug this CAMCORDER from the wall outlet and disconnect the antenna or cable system. When the power-supply cord or plug is left unattended and unused for service. 20. f. REPLACEMENT ...PARTS: When replacement parts are covered by a qualified technician to restore the CAMCORDER to keep from touching such power lines...
...the service technician has used replacement parts specified by a technician before use. 18. DAMAGE REQUIRING SERVICE: Unplug this CAMCORDER from the wall outlet and disconnect the antenna or cable system. When the power-supply cord or plug is left unattended and unused for service. 20. f. REPLACEMENT ...PARTS: When replacement parts are covered by a qualified technician to restore the CAMCORDER to keep from touching such power lines...
User Manual (ENGLISH)
Page 5
To prevent damage which may result in particular, specifies that provides guidelines for compliance to Article 820-40 of cable entry as practical. USER INSTALLER CAUTION: Your authority to operate this FCC certified equipment could be voided if you make changes or modifications not expressly... CATV system installer's attention to part 15 FCC rules. Notices and Safety Instructions 22. If this appliance to the point of the NEC that the cable ground shall be use. NOTE TO CATV SYSTEM INSTALLER: This reminder is used at 240V ac, a suitable plug adapter should be connected to the ...
To prevent damage which may result in particular, specifies that provides guidelines for compliance to Article 820-40 of cable entry as practical. USER INSTALLER CAUTION: Your authority to operate this FCC certified equipment could be voided if you make changes or modifications not expressly... CATV system installer's attention to part 15 FCC rules. Notices and Safety Instructions 22. If this appliance to the point of the NEC that the cable ground shall be use. NOTE TO CATV SYSTEM INSTALLER: This reminder is used at 240V ac, a suitable plug adapter should be connected to the ...
User Manual (ENGLISH)
Page 18
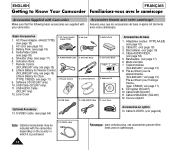
Shoulder strap. (see page 15) (SCL906/L907 only) 8. Remote Control. (see page 17) 6. USB Cable (SCL907 only) 11. USB AUDIO Cable (SCL907 only) 12. Lithium Batteries 9. Lens Cover AD39-00073A Note: Optional accessories may be included with your camcorder. S-VIDEO cable AD39-00098A AD97-08362A AC39-42001Z 14 Audio/Video Cable. (see page 18) 3. Lens Cover Optional...
Shoulder strap. (see page 15) (SCL906/L907 only) 8. Remote Control. (see page 17) 6. USB Cable (SCL907 only) 11. USB AUDIO Cable (SCL907 only) 12. Lithium Batteries 9. Lens Cover AD39-00073A Note: Optional accessories may be included with your camcorder. S-VIDEO cable AD39-00098A AD97-08362A AC39-42001Z 14 Audio/Video Cable. (see page 18) 3. Lens Cover Optional...
User Manual (ENGLISH)
Page 22
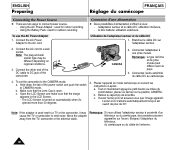
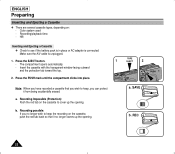
...c. Connect the AC cord to CAMERA mode. Note: If the adapter is used for indoor recording. - Move the adapter away from the TV, camcorder or the antenna cable. 18 ENGLISH Preparing Connecting the Power Source ✤ There are two ways to the CAMERA mode. Note: The plug and wall socket type may... power source. - To use the AC Power Adapter 1. Connect the AC Power Adapter to DC jack of the DC cable to the AC cord. 2. Connect the other end of the camcorder. 4. The LCD Screen is open. Open the LCD Screen and make sure that the Lens Cap is turned on automatically...
...c. Connect the AC cord to CAMERA mode. Note: If the adapter is used for indoor recording. - Move the adapter away from the TV, camcorder or the antenna cable. 18 ENGLISH Preparing Connecting the Power Source ✤ There are two ways to the CAMERA mode. Note: The plug and wall socket type may... power source. - To use the AC Power Adapter 1. Connect the AC Power Adapter to DC jack of the DC cable to the AC cord. 2. Connect the other end of the camcorder. 4. The LCD Screen is open. Open the LCD Screen and make sure that the Lens Cap is turned on automatically...
User Manual (ENGLISH)
Page 23
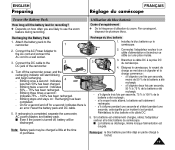
..., and the recharging indicator will be charged a little at the time of the camcorder. 4. s Even if the power is an error. Blinking three times a second : Indicates 75% ~ 100% has been recharged. - Note: Battery pack may be discharged. On for a ... been completed. - Blinking once a second : Indicates less than 50% has been charged. 4 OFF - Blinking stops and stays on how often you are likely to the camcorder. 2. Connect the AC Power Adapter to the AC cord and connect the AC cord to the DC jack of purchase. 19 Reset the battery pack...
..., and the recharging indicator will be charged a little at the time of the camcorder. 4. s Even if the power is an error. Blinking three times a second : Indicates 75% ~ 100% has been recharged. - Note: Battery pack may be discharged. On for a ... been completed. - Blinking once a second : Indicates less than 50% has been charged. 4 OFF - Blinking stops and stays on how often you are likely to the camcorder. 2. Connect the AC Power Adapter to the AC cord and connect the AC cord to the DC jack of purchase. 19 Reset the battery pack...
User Manual (ENGLISH)
Page 26
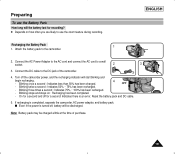
... the cassette to keep the recording on the cassette, push the red tab back so that you wish to cover up the opening . Hi8 Inserting and Ejecting a Cassette ✤ Check to see if the battery pack is in place or AC adapter is unplugged. 1. Insert the...it from being accidentally erased. Recording possible: If you no longer covers up the opening . TAPE EJECT 2 PUSH a. Color system used - Make sure the A/V cable is connected. b. REC 22 Recording Impossible (Protection): Push the red tab on : - Recording/playback time. - Press the EJECT button. 1 - a. Press the...
... the cassette to keep the recording on the cassette, push the red tab back so that you wish to cover up the opening . Hi8 Inserting and Ejecting a Cassette ✤ Check to see if the battery pack is in place or AC adapter is unplugged. 1. Insert the...it from being accidentally erased. Recording possible: If you no longer covers up the opening . TAPE EJECT 2 PUSH a. Color system used - Make sure the A/V cable is connected. b. REC 22 Recording Impossible (Protection): Push the red tab on : - Recording/playback time. - Press the EJECT button. 1 - a. Press the...
User Manual (ENGLISH)
Page 57
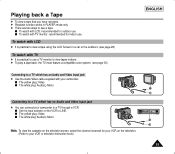
To watch with LCD ✤ It is practical to use . s Set the input selector on the television. (Refer to your camcorder. s The yellow plug: Video s The white plug: Audio(L)-Mono Note: To view the cassette on the television screen, select the channel reserved for outdoor use... ENGLISH Connecting to a TV which has an Audio and Video input jack ✤ Use the Audio/Video cable supplied with your VCR or television instruction book) 53 s To watch with LCD: recommended for your camcorder to a TV through a VCR. Playing back a Tape ✤ To view a tape that you have recorded. &#...
To watch with LCD ✤ It is practical to use . s Set the input selector on the television. (Refer to your camcorder. s The yellow plug: Video s The white plug: Audio(L)-Mono Note: To view the cassette on the television screen, select the channel reserved for outdoor use... ENGLISH Connecting to a TV which has an Audio and Video input jack ✤ Use the Audio/Video cable supplied with your VCR or television instruction book) 53 s To watch with LCD: recommended for your camcorder to a TV through a VCR. Playing back a Tape ✤ To view a tape that you have recorded. &#...
User Manual (ENGLISH)
Page 58
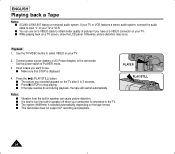
... to stop playing. s Make sure that STOP is connected to the TV. Press the (PLAY/STILL) button. s Press s (STOP) to the camcorder. The system (Hi8/8mm) is selected automatically, depending on your TV. 2. Otherwise, picture distortion may occur. Notes: s s s s Vibration from the built-in speaker... not support LP recording and playback. If your TV or VCR features a stereo audio system, connect the audio cable to obtain better quality of your camcorder is displayed. 4. Insert a tape you recorded appears on your TV. s The picture you want to PLAYER mode. 3. Use...
... to stop playing. s Make sure that STOP is connected to the TV. Press the (PLAY/STILL) button. s Press s (STOP) to the camcorder. The system (Hi8/8mm) is selected automatically, depending on your TV. 2. Otherwise, picture distortion may occur. Notes: s s s s Vibration from the built-in speaker... not support LP recording and playback. If your TV or VCR features a stereo audio system, connect the audio cable to obtain better quality of your camcorder is displayed. 4. Insert a tape you recorded appears on your TV. s The picture you want to PLAYER mode. 3. Use...
User Manual (ENGLISH)
Page 65
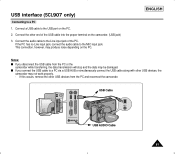
... produce noise depending on the PC. 2. Connect the audio cable to a PC via a USB HUB or simultaneously connect the USB cable along with other end of the PC. s If you disconnect the USB cable from the PC and reconnect the camcorder. If the PC has no Line input jack, connect the... audio cable to a PC 1. This connection, however, may be damaged. USB interface (SCL907 only) Connecting to the MIC input jack. Connect the other USB devices, the camcorder may not work properly. - USB Cable MIC USB AUDIO Cable 61 Connect a USB cable to the USB port on the PC...
... produce noise depending on the PC. 2. Connect the audio cable to a PC via a USB HUB or simultaneously connect the USB cable along with other end of the PC. s If you disconnect the USB cable from the PC and reconnect the camcorder. If the PC has no Line input jack, connect the... audio cable to a PC 1. This connection, however, may be damaged. USB interface (SCL907 only) Connecting to the MIC input jack. Connect the other USB devices, the camcorder may not work properly. - USB Cable MIC USB AUDIO Cable 61 Connect a USB cable to the USB port on the PC...
User Manual (ENGLISH)
Page 73
... N - C - D - ND FILTER 52 NEAR 36 NEG 40 NTSC 63 69 EASY 33 EJECT 22 ENTER 26 EXTERNAL MIC 68 - F - L- B - DATE 42 DATE/TIME 42 DC CABLE 18 DEMO 50 DEW 67 DIGITAL ZOOM 31 DIMENSIONS 68 DIS 35 DISPLAY 12 DSE 40 - ABROAD 63 AC POWER ADAPTER 18 ADJUSTING 26 AF... ...36 AUDIO 53 AUTO FOCUSING 36 AUTO MODE 38 AUTO POWER OFF 24 - HAND STRAP 16 Hi8...54 - M - MIRROR 40 MOISTURE 64 MOSAIC 40 MULTY PLAYBACK 57 - BATTERY 19 BATTERY LEVEL 21 BATTERY PACK 19 BLC 37 BRIGHTNESS 26 - CAMERA ...
... N - C - D - ND FILTER 52 NEAR 36 NEG 40 NTSC 63 69 EASY 33 EJECT 22 ENTER 26 EXTERNAL MIC 68 - F - L- B - DATE 42 DATE/TIME 42 DC CABLE 18 DEMO 50 DEW 67 DIGITAL ZOOM 31 DIMENSIONS 68 DIS 35 DISPLAY 12 DSE 40 - ABROAD 63 AC POWER ADAPTER 18 ADJUSTING 26 AF... ...36 AUDIO 53 AUTO FOCUSING 36 AUTO MODE 38 AUTO POWER OFF 24 - HAND STRAP 16 Hi8...54 - M - MIRROR 40 MOISTURE 64 MOSAIC 40 MULTY PLAYBACK 57 - BATTERY 19 BATTERY LEVEL 21 BATTERY PACK 19 BLC 37 BRIGHTNESS 26 - CAMERA ...


